
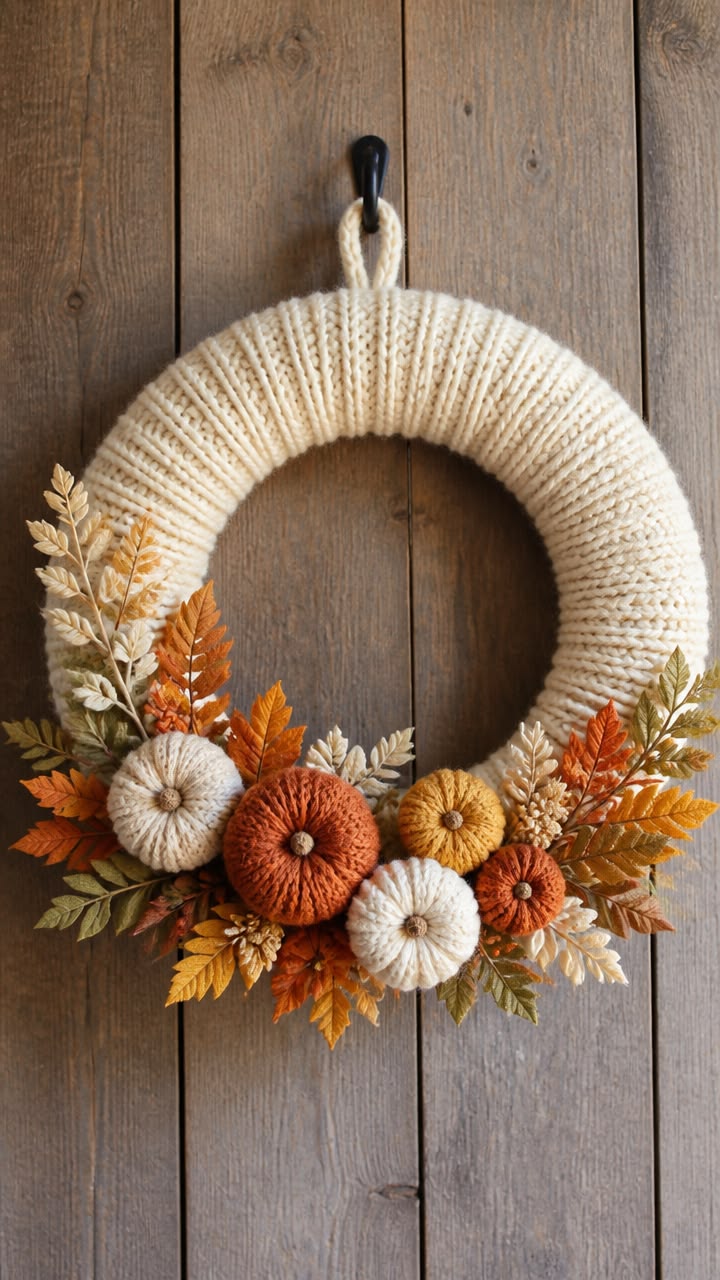
The Crochet Autumn Wreath with Pumpkins, Leaves, and Decorative Foliage Pattern is a beautiful seasonal craft project that combines cozy yarn textures, warm autumn colors, and handmade decorations into one charming piece of fall home decor. Inspired by the natural beauty of changing leaves, rustic pumpkins, and golden foliage, this decorative wreath brings a welcoming atmosphere to any living space. Its soft cream-colored foundation creates an elegant contrast against the orange, mustard yellow, and earthy brown embellishments. Whether displayed on a front door, above a fireplace, or as part of a Thanksgiving arrangement, this handmade crochet autumn wreath adds personality and warmth to seasonal decorating. One of its most appealing features is the combination of simple crochet techniques with creative floral arrangements, making it suitable for adventurous beginners and experienced crocheters alike.
Creating a Crochet Autumn Wreath with Pumpkins, Leaves, and Decorative Foliage Pattern is also an enjoyable way to practice different crochet stitches while producing a decorative accessory that can be reused year after year. The design features a circular wreath foundation wrapped in thick cream yarn, surrounded by miniature crocheted pumpkins, textured autumn leaves, and decorative foliage arranged along the lower half. Each pumpkin contributes a different color and dimension, giving the arrangement a natural, handcrafted appearance. The leaves provide movement and visual balance, while small botanical accents fill the spaces between the larger decorations. Although the finished wreath looks elaborate, its individual components can be made separately using accessible crochet methods. This step-by-step tutorial explains the process using US crochet terminology, clear stitch abbreviations, practical measurements, and assembly instructions.
Another wonderful aspect of this fall crochet wreath pattern is its flexibility. Crafters can personalize the project by choosing different yarn weights, changing pumpkin colors, adjusting the size of the wreath, or experimenting with alternative foliage arrangements. Traditional autumn shades such as burnt orange, ivory, ochre, cinnamon, and olive green create a classic farmhouse appearance, while softer neutral colors produce a modern seasonal decoration. The project also provides opportunities to use leftover yarn from previous crochet projects, making it an appealing option for anyone who enjoys practical and creative crafting. In this guide, you will learn how to prepare the wreath base, crochet dimensional pumpkins, create autumn leaves, add decorative foliage, and assemble everything into a balanced arrangement. The instructions are designed to help readers confidently complete their own crochet pumpkin wreath from beginning to end.
1. Materials, Crochet Abbreviations, and Preparing the Autumn Wreath Foundation
Step 1: Gather your materials. To recreate the appearance of the photographed wreath, begin with a sturdy foam or straw wreath form measuring approximately 30 cm in outer diameter. A foam form is particularly convenient because it is lightweight and provides a smooth foundation for wrapping yarn. Choose cream or ivory bulky-weight yarn for the main covering, along with worsted-weight yarn in burnt orange, mustard yellow, pumpkin orange, cinnamon brown, olive green, and natural white for the decorations. You will also need a 5.5 mm crochet hook for the wreath covering, a 4 mm crochet hook for the pumpkins and leaves, a tapestry needle, stitch markers, polyester fiberfill, scissors, and floral wire or another suitable method for securing the decorations. Optional artificial botanical branches can be included to reproduce the realistic foliage visible in the inspiration image.
DISCOVER MORE FREE PATTERNS HERE!
Step 2: Understand the US crochet abbreviations. The following stitch abbreviations will be used throughout this Crochet Autumn Wreath with Pumpkins, Leaves, and Decorative Foliage Pattern. All instructions follow American crochet terminology.
-
CH (Chain): Yarn over and pull the yarn through the loop on your hook.
-
SL ST (Slip Stitch): Insert the hook into the indicated stitch, yarn over, and pull through the stitch and the loop on the hook.
-
SC (Single Crochet): Insert the hook, yarn over, pull up a loop, yarn over, and pull through both loops.
-
HDC (Half Double Crochet): Yarn over, insert the hook, pull up a loop, yarn over, and pull through all three loops.
-
DC (Double Crochet): Yarn over, insert the hook, pull up a loop, yarn over and pull through two loops twice.
-
TR (Treble Crochet): Yarn over twice, insert the hook, pull up a loop, then yarn over and pull through two loops three times.
-
BLO (Back Loop Only): Work into the back loop of the indicated stitch.
-
INC (Increase): Work two single crochet stitches into the same stitch.
-
DEC (Invisible Decrease): Insert the hook through the front loops of the next two stitches, yarn over, pull through both loops, yarn over, and pull through the remaining loops.
-
FO (Fasten Off): Cut the yarn and pull the tail through the final loop.
Step 3: Crochet the cream foundation covering. A rectangular ribbed crochet strip is an effective way to create the textured covering shown in the image. With cream bulky yarn and a 5.5 mm hook, begin with CH 13. Row 1: SC into the second chain from the hook and into each remaining chain, creating 12 SC. CH 1 and turn. Row 2: SC BLO across all 12 stitches, CH 1, and turn. Repeat Row 2 until the strip is long enough to wrap around the circumference of the wreath form. For a wreath approximately 30 cm in diameter, the strip may require around 80–95 cm of length, depending on the form’s thickness and the yarn’s elasticity. The 12-stitch width should be checked against the circumference of the foam tube before continuing.
Step 4: Fit and secure the crochet covering. Once the ribbed strip is complete, wrap it around the wreath form with the raised crochet ridges running across the width of the ring. The strip should fit snugly without stretching so tightly that the stitches become distorted. Use a tapestry needle and matching yarn to sew the long edges together around the back or inner side of the wreath. Join the two short ends neatly to create a continuous covering. Work slowly to distribute the ribbing evenly around the circle, paying particular attention to the upper section, which remains visible in the finished decoration. This technique creates a soft, knitted-looking appearance using simple crochet stitches.
Step 5: Create the hanging loop. To make a secure hanger, crochet a short strap using the same cream yarn. CH 21, then SC into the second chain from the hook and each remaining chain for a total of 20 SC. CH 1, turn, and work another row of 20 SC to strengthen the strap. FO, leaving a long tail for sewing. Fold the strap into a loop and attach both ends securely to the upper back section of the wreath. Reinforce the attachment with several stitches, especially if you intend to hang the decoration on a door. A fabric ribbon or sturdy braided yarn cord can also be used, provided it supports the weight of the finished wreath.
Step 6: Prepare the decorative layout. Before crocheting the smaller pieces, examine the overall arrangement. The wreath features a cream circular foundation with its decorative elements concentrated along the bottom third and extending slightly upward on both sides. The largest pumpkin is positioned slightly left of center, surrounded by smaller pumpkins in cream, mustard, and burnt orange. Autumn leaves spread outward behind the pumpkins, creating an asymmetrical botanical display. This placement allows the upper section of the crochet wreath base to remain visible while keeping the lower section full and colorful. Planning the arrangement early will help determine how many pumpkins, leaves, and foliage pieces you need to create.
2. How to Crochet Miniature Pumpkins with Realistic Ribbed Texture
Step 1: Choose pumpkin colors and sizes. The miniature pumpkins are the main decorative features of this Crochet Autumn Wreath with Pumpkins, Leaves, and Decorative Foliage Pattern. For a balanced arrangement, make five pumpkins in different sizes: one large burnt-orange pumpkin, two medium cream pumpkins, one medium mustard-yellow pumpkin, and one small cinnamon-orange pumpkin. These colors reflect the traditional autumn palette while complementing the neutral wreath foundation. Using worsted-weight yarn and a 4 mm crochet hook produces firm, defined stitches suitable for small stuffed decorations. The pumpkin instructions below use a flat ribbed rectangle that is sewn into a three-dimensional shape, creating the deep vertical grooves seen in the reference design.
Step 2: Crochet the large pumpkin body. With burnt-orange yarn, CH 21. Row 1: SC in the second chain from the hook and in each remaining chain, making 20 SC. CH 1 and turn. Row 2: SC BLO in each stitch across, CH 1, and turn. Continue repeating Row 2 until you have completed approximately 36 rows, or until the rectangle is wide enough to form a generously rounded pumpkin. The back-loop-only stitches create horizontal ridges across the rectangle. Once the rectangle is formed into a tube, these ridges will become the characteristic vertical pumpkin ribs. FO, leaving a long yarn tail for sewing. A slightly taller rectangle creates a fuller pumpkin, while a shorter one produces a flatter, wider shape.
Step 3: Shape and stuff the pumpkin. Fold the rectangle so that its two short side edges meet, then sew these edges together using a tapestry needle to form a tube. Run a gathering stitch around one open end, pulling the yarn tightly to close the opening. Secure the yarn and turn the piece so the seam is concealed. Add polyester fiberfill gradually, distributing it evenly around the inside without overstuffing. Gather the second opening and close it securely. To create the flattened pumpkin shape, pass a long strand of yarn through the center from top to bottom several times, gently pulling the centers inward. This shaping method accentuates the ribbed texture and gives the pumpkin its familiar rounded, segmented appearance.
Step 4: Make the medium and small pumpkins. For the medium pumpkins, begin with CH 17, creating 16 SC in Row 1. Continue working SC BLO for approximately 28–32 rows, then assemble and stuff each piece using the same method as the large pumpkin. For the small cinnamon pumpkin, begin with CH 13 and work 12 SC across the first row, repeating SC BLO for approximately 22–26 rows. These measurements are adjustable because yarn thickness and personal crochet tension influence the final size. Aim for finished pumpkins measuring approximately 5–7 cm across for medium pieces and 4–5 cm across for the smallest one. Make two cream pumpkins, one mustard-yellow pumpkin, and one cinnamon-orange pumpkin to complete the set.
Step 5: Add miniature pumpkin stems. A small brown stem adds a realistic finishing detail to each crochet pumpkin applique. With brown yarn and a 3.5 mm or 4 mm hook, make a magic ring and work 6 SC into the ring. Do not join unless otherwise indicated. Round 2: SC into each stitch around, working through both loops. Repeat for another one or two rounds to create a short cylindrical stem. FO, leaving a tail for sewing. Add a small amount of stuffing only if necessary, then sew the stem securely to the center of the pumpkin. For an alternative rustic appearance, use a short piece of braided brown yarn or a tightly rolled felt stem. Keep the stems small so they do not overpower the textured pumpkin bodies.
Step 6: Refine the pumpkin arrangement. After completing all five pumpkins, place them along the lower section of the wreath without attaching them permanently. Position the largest burnt-orange pumpkin slightly left of the center, with one cream pumpkin on each side at different heights. Place the mustard-yellow pumpkin toward the right and the smallest cinnamon-orange pumpkin near the outer edge. Adjust the spacing until the shapes overlap naturally without completely hiding one another. The arrangement should feel abundant but not crowded. This stage is especially important because the crochet pumpkin wreath pattern relies on layered textures and varying sizes to achieve its charming farmhouse-inspired appearance.
3. Crochet Autumn Leaves and Decorative Foliage Step by Step
Step 1: Crochet simple pointed autumn leaves. The leaves provide color, movement, and a natural finishing touch to the wreath. Begin with mustard-yellow, burnt-orange, olive-green, or light-brown yarn and a 4 mm hook. CH 13. Starting in the second chain from the hook, work the following stitches along one side of the foundation chain: SC, HDC, DC, DC, TR, TR, TR, DC, DC, HDC, SC, and 3 SC into the final chain. Continue along the opposite side of the foundation chain, working SC, HDC, DC, DC, TR, TR, TR, DC, DC, HDC, and SC into the corresponding available chain loops. Join with SL ST and FO. This creates an elongated leaf shape with a rounded base and a softly pointed tip. For a sharper point, work CH 2 at the tip before continuing down the opposite side.
Step 2: Create more detailed textured leaves. For larger decorative foliage, use a central chain and crochet several pointed lobes along both sides. CH 17 to form the leaf’s center vein. Starting in the second chain from the hook, work SL ST into the first chain, then SC into the next two chains. To form a side lobe, CH 6, SC in the second chain from the hook, HDC in the next chain, DC in the next two chains, and SC in the final chain. SL ST into the next available chain on the central foundation. Repeat the lobe sequence two more times, spacing the attachments along the central chain. Work toward the tip, then crochet corresponding lobes along the opposite side. The resulting leaf resembles a simplified oak or fern-inspired autumn branch.
Step 3: Crochet delicate fern-like branches. Fern-style foliage helps soften the transition between the larger pumpkins and the wreath foundation. Using olive-green or golden-brown yarn, CH 31 to create the main stem. Starting in the second chain from the hook, work SL ST into the first chain. CH 7, SC in the second chain from the hook, SC in the next chain, HDC in the next two chains, SC in the next two chains, then SL ST into the next available chain on the main stem. Repeat the sequence, working small side leaflets along the stem. For a fuller branch, crochet matching leaflets on the opposite side. Vary the length of some branches by using CH 5 or CH 9 for individual leaflets. This variation gives the crochet decorative foliage a more organic appearance.
Step 4: Make smaller filler leaves and botanical accents. The wreath shown in the photograph includes several delicate branches and small decorative elements between the pumpkins. These can be recreated with tiny crochet leaves and clustered stitches. To make a miniature leaf, CH 7, SC in the second chain from the hook, HDC in the next chain, DC in the next two chains, HDC in the next chain, and 3 SC in the final chain. Continue along the opposite side with HDC, DC, DC, HDC, and SC, then FO. For a small botanical cluster, create three or four miniature leaves and sew them to a crocheted chain stem. You can also make textured berry-like accents using a magic ring with 6 SC, followed by one increase round and one decrease round, lightly stuffing each small sphere before closing.
Step 5: Experiment with autumn color combinations. One of the most enjoyable parts of the Crochet Autumn Wreath with Pumpkins, Leaves, and Decorative Foliage Pattern is choosing the foliage colors. A traditional palette combines golden yellow, burnt orange, terracotta, cream, copper, and muted olive green. For a softer farmhouse look, use ivory, beige, dusty orange, and sage green. If you prefer a more dramatic seasonal decoration, add deep burgundy and chocolate brown accents. Try crocheting approximately 12–18 leaves in different shapes and sizes, along with 4–6 fern-like branches. These quantities are a useful starting point for a 30 cm wreath, but you can increase or decrease them depending on the fullness you want to achieve.
Step 6: Shape and prepare the foliage for assembly. After crocheting the leaves, gently shape them with your fingers to emphasize their points and curves. If necessary, lightly block the leaves using a suitable method for the yarn fiber. Cotton and many acrylic yarns respond differently to moisture and heat, so always follow the yarn manufacturer’s care recommendations. For leaves that need additional structure, weave a matching yarn strand along the central vein or use carefully enclosed craft wire, ensuring that no sharp ends remain exposed. Arrange the finished foliage into small groups, combining two or three colors within each cluster. This preparation makes the final assembly easier and helps the handmade autumn wreath achieve a layered, natural appearance.
4. Assembling, Decorating, and Displaying Your Crochet Autumn Wreath
Step 1: Arrange the main decorative elements. Place the covered wreath on a clean, flat work surface with the hanging loop positioned at the top. Begin arranging the five crocheted pumpkins along the lower section of the ring, using the inspiration photograph as a guide. Position the large burnt-orange pumpkin slightly left of center, with the cream pumpkins arranged around it to provide contrast. Place the mustard-yellow pumpkin toward the right and the small cinnamon-orange pumpkin near the outer edge. Avoid attaching the pieces immediately because you may want to adjust their positions after adding the foliage. The goal is to create a balanced, slightly asymmetrical composition that resembles a naturally gathered autumn display.
Step 2: Add the largest leaves behind the pumpkins. Begin layering the largest crocheted leaves behind the pumpkin arrangement. Position several golden and orange leaves toward the left side, allowing their pointed ends to extend beyond the circular foundation. Repeat on the right side with olive-green, mustard, and copper-colored leaves. Place some leaves diagonally to create movement, and vary their angles so the arrangement does not look overly symmetrical. Use a tapestry needle and matching yarn to secure the leaves to the crochet covering. Attach them through multiple stitches rather than relying on a single connection point. This technique provides stability while preserving the soft, dimensional quality of the crochet autumn wreath decoration.
Step 3: Fill the arrangement with fern branches and small foliage. Once the large leaves are attached, insert the smaller fern-like branches between the pumpkins and around the outer edges of the arrangement. Place longer branches near the sides, allowing them to extend upward and outward. Shorter branches can fill spaces directly beneath the pumpkins. Mix the foliage colors throughout the composition to avoid creating large areas of only one shade. Small cream or beige leaves are especially effective because they visually connect the decorations with the ivory wreath foundation. If you choose to include artificial foliage, secure it carefully with floral wire or a suitable craft adhesive, keeping the attachment points hidden behind the crocheted pieces.
Step 4: Secure the pumpkins firmly. After arranging the foliage, attach each pumpkin to the wreath foundation. Thread a tapestry needle with strong yarn matching the pumpkin color and pass it through the back of the pumpkin and several stitches of the wreath covering. Repeat the process at multiple points until the pumpkin is firmly attached. Larger pumpkins may require additional stitches to prevent them from shifting or sagging when the wreath is hung vertically. Keep the sewing stitches hidden behind the decorations whenever possible. For a removable arrangement, sew small fabric loops to the back of the pumpkins and attach them to corresponding ties on the wreath. This approach allows the decorations to be repositioned or replaced in future seasons.
Step 5: Add finishing details and inspect the wreath. Stand the wreath upright or hang it temporarily to examine the arrangement from the front. Look for gaps between the pumpkins, uneven foliage placement, or loose decorative pieces. Add miniature leaves or berry clusters wherever extra texture is needed. Trim visible yarn tails and secure any loose stitches. If the wreath will be displayed near a frequently used doorway, check that all components are firmly attached and do not interfere with the door’s movement. Because yarn and fiberfill can absorb moisture, the finished wreath is best displayed indoors or in a well-protected, dry area. Avoid prolonged direct sunlight, which may gradually fade some yarn colors.
Step 6: Display and care for your finished autumn wreath. Your completed Crochet Autumn Wreath with Pumpkins, Leaves, and Decorative Foliage Pattern can be displayed in several beautiful ways. Hang it on an interior door, above a fireplace mantel, on a decorative wall hook, or as part of a Thanksgiving centerpiece arrangement. Pair it with wooden accents, neutral textiles, or other handmade autumn decorations to create a cohesive seasonal display. To keep the wreath looking fresh, gently remove dust with a soft brush or a vacuum cleaner fitted with a low-suction upholstery attachment. Store it in a breathable container in a dry location after the season ends, avoiding heavy objects that could flatten the pumpkins or foliage. With proper care, this handmade decoration can remain a treasured part of your autumn traditions for years.
Frequently Asked Questions (FAQ)
1. Is the Crochet Autumn Wreath with Pumpkins, Leaves, and Decorative Foliage Pattern suitable for beginners?
Yes. This pattern is suitable for confident beginners who understand basic crochet stitches such as chain, single crochet, half double crochet, and slip stitch. The wreath covering and pumpkin bodies are particularly approachable because they rely on repeated rows of single crochet worked through the back loop. The decorative foliage requires a little more attention, but each piece can be practiced separately before assembly.
2. What is the best yarn for making a crochet autumn wreath?
Acrylic and cotton yarns are both popular choices. Acrylic yarn is lightweight, affordable, and available in a wide range of autumn colors. Cotton yarn offers excellent stitch definition and creates firm, structured leaves. For this design, bulky acrylic yarn works well for the wreath foundation, while worsted-weight cotton or acrylic yarn is suitable for the pumpkins and decorative foliage.
3. How much yarn do I need to complete the wreath?
The amount depends on the wreath diameter, yarn thickness, and number of decorations. For a 30 cm wreath, plan for approximately 150–250 g of bulky cream yarn for the foundation and a combined 150–250 g of worsted-weight yarn for the pumpkins and foliage. These are estimates rather than fixed requirements, so having a little extra yarn is recommended.
4. Can I make the wreath without a foam base?
Yes. A straw wreath form, lightweight wire wreath frame, or padded fabric ring can be used instead of foam. However, the foundation should be sturdy enough to support the pumpkins and decorative foliage without losing its circular shape. If using a wire frame, add padding before attaching the crochet covering.
5. How do I make the crocheted pumpkins look more realistic?
The secret is combining ribbed crochet stitches, moderate stuffing, and careful shaping. Working in the back loops creates raised ridges that resemble natural pumpkin segments. Pulling a yarn strand through the center from top to bottom creates the slightly flattened appearance. Adding a small brown stem completes the realistic look.
6. Can I use different colors for the pumpkins and leaves?
Absolutely. Although traditional fall colors are especially popular, you can personalize the wreath with cream, sage green, dusty rose, burgundy, or even soft blue pumpkins. Neutral palettes work beautifully in modern farmhouse interiors, while brighter colors create a more playful seasonal decoration.
7. How many pumpkins should I crochet for a 30 cm wreath?
Five pumpkins are a good starting point for the design shown in the photograph. One large pumpkin, three medium pumpkins, and one small pumpkin create an appealing arrangement. You can add more or fewer depending on the dimensions of your wreath and the amount of foliage you want to include.
8. Can this crochet autumn wreath be displayed outdoors?
It is best displayed indoors or in a sheltered area protected from rain, humidity, and prolonged direct sunlight. Most standard crochet yarns are not designed for continuous outdoor exposure. If the wreath is placed on a covered porch, check it regularly for moisture and bring it indoors during unfavorable weather.
9. How can I make the leaves hold their shape?
Cotton yarn generally produces firmer leaves than soft acrylic yarn. You can also block the finished leaves according to the yarn’s care instructions. For additional support, carefully incorporate flexible craft wire into the leaf structure, making sure the wire ends are fully enclosed and cannot cause injury.
10. How long does it take to complete this crochet wreath?
The total time varies according to experience and the number of decorative elements. Many crocheters may need approximately 8–15 hours to complete the wreath covering, pumpkins, foliage, and assembly. Beginners may need additional time, particularly when learning how to shape the pumpkins and crochet detailed leaves.
11. Can I wash the finished wreath?
Spot cleaning is generally preferable because the wreath contains a rigid foundation, stuffing, and several attached decorations. Use a slightly damp cloth to clean small areas and allow the wreath to dry completely. Avoid immersing the entire wreath in water unless every component is specifically designed to tolerate washing.
12. Can I make this pattern larger or smaller?
Yes. To create a larger wreath, choose a bigger foundation and extend the crochet covering until it fits comfortably. Increase the number of pumpkins and leaves to maintain a balanced arrangement. For a smaller wreath, use finer yarn, a smaller crochet hook, and fewer decorative pieces.
13. Is this wreath a good handmade gift for Thanksgiving or fall celebrations?
Yes. A handmade crochet fall wreath makes a thoughtful seasonal gift because it combines decorative appeal with personal craftsmanship. You can customize the colors to suit the recipient’s home and include a small care card explaining how to display and store the wreath safely.
14. Can I replace the artificial botanical decorations with crochet pieces?
Certainly. The entire arrangement can be made using crochet leaves, miniature branches, berries, and other botanical motifs. An all-crochet version creates a consistent handmade texture and allows you to customize every detail. It may require additional crafting time, but the result can be equally attractive.
15. What should I do if the crochet covering is too loose around the wreath form?
If the covering is too loose, remove a few rows from the strip before joining the ends. If the strip is too narrow to wrap around the thickness of the wreath form, increase the number of starting chains. Always test the fit before sewing the covering permanently in place.
Conclusion: Create a Beautiful Handmade Autumn Decoration
The Crochet Autumn Wreath with Pumpkins, Leaves, and Decorative Foliage Pattern is a rewarding seasonal project that transforms simple yarn and crochet stitches into a warm, welcoming piece of fall home decor. By combining a textured cream foundation, dimensional ribbed pumpkins, colorful autumn leaves, and delicate decorative foliage, you can create a wreath that celebrates the natural beauty of the season.
Throughout this tutorial, you learned how to prepare the materials, understand essential US crochet abbreviations, crochet a ribbed wreath covering, shape miniature stuffed pumpkins, create several styles of autumn leaves, and assemble the decorative elements into a balanced arrangement. These techniques can also be adapted for other seasonal wreaths, garlands, table decorations, and handmade gifts.
The greatest appeal of this crochet autumn wreath pattern is the freedom to personalize every detail. Whether you prefer classic orange pumpkins, elegant cream decorations, or a colorful mixture of fall foliage, the finished wreath can reflect your individual style and creativity.
EASILY FIND THE FREE PDF FOR THIS PATTERN HERE!
We would love to hear your sincere opinion! 🍂🎃 What did you think of this crochet autumn wreath tutorial? Which pumpkin colors or decorative leaves would you choose for your own design? Leave your honest feedback, creative suggestions, and questions in the comments. Your ideas can inspire other crochet enthusiasts and help make future tutorials even more useful, detailed, and enjoyable. Happy crocheting, and may your handmade autumn decorations bring warmth, creativity, and seasonal charm to your home! 🧶🍁