
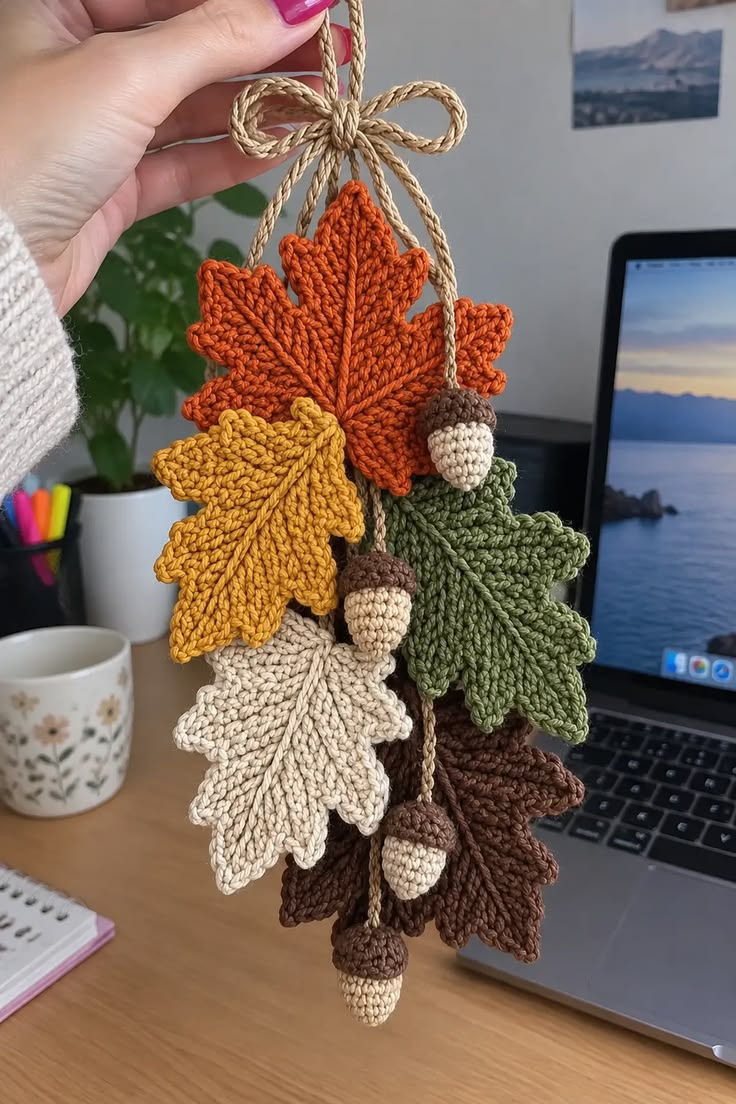
The Crochet Hanging Decoration with Autumn Leaves and Acorns Pattern is a beautiful way to celebrate the warmth, colors, and natural beauty of the fall season. Inspired by the changing leaves and charming woodland details of autumn, this handmade decoration combines textured crochet leaves, miniature acorns, and rustic hanging cords into one delightful seasonal arrangement. Whether you want to decorate your front door, brighten a cozy living room, or create a thoughtful handmade gift, this autumn crochet decoration offers a creative project that feels both welcoming and personal. The combination of burnt orange, golden yellow, olive green, creamy beige, and earthy brown creates a balanced palette that reflects the colors of a peaceful autumn afternoon. Each leaf adds movement and texture, while the small crocheted acorns bring a playful woodland touch. Best of all, the project can be customized with different yarn colors, leaf sizes, and arrangements to match your favorite fall decorating style.
One of the most appealing features of the Crochet Hanging Decoration with Autumn Leaves and Acorns Pattern is its dimensional appearance. Unlike simple flat appliqués, the leaves in this design have raised center veins, gently shaped edges, and pointed lobes that resemble natural oak and maple-inspired autumn foliage. The crocheted acorns feature rounded brown caps and cream-colored bodies, making them especially charming when suspended between the leaves. The finished arrangement is gathered with natural-looking cords and a decorative bow, creating an elegant hanging ornament that can be displayed on a wall hook, cabinet handle, or covered porch away from moisture. This tutorial uses US crochet terminology, making the instructions easy to follow for crocheters in the United States. Beginners who already understand basic stitches can enjoy learning shaping techniques, while experienced crocheters can experiment with texture and creative finishing details.
Creating your own handmade fall crochet hanging ornament is also a wonderful opportunity to practice useful crochet skills on a manageable project. Instead of working on a large blanket or garment, you will make individual leaves and acorns that can be completed separately before being assembled into a decorative cluster. This approach makes the project relaxing and flexible because each component can be worked whenever you have a little free time. You can use cotton yarn for crisp stitch definition, choose a soft cotton blend for a gentler finish, or experiment with lightweight acrylic yarn for a more economical decoration. The pattern below is an original, practical interpretation of the ornament shown in the photograph, rather than an exact stitch-for-stitch reconstruction. It explains how to crochet the leaves, form the acorns, create sturdy hanging cords, and assemble the decoration from beginning to end. With a few basic materials and careful attention to shaping, you can make an attractive crochet autumn wall hanging that celebrates the beauty of handmade seasonal crafts.
1. Materials, Crochet Stitches, and Preparation for the Autumn Hanging Decoration
Before starting your Crochet Hanging Decoration with Autumn Leaves and Acorns Pattern, gather medium-weight cotton yarn in five autumn colors: burnt orange, mustard yellow, olive green, ivory, and chocolate brown. You will also need a small amount of beige or natural-colored yarn for the acorn bodies and hanging cords. A 3.5 mm or 4.0 mm crochet hook works well with many worsted-weight cotton yarns, although the best hook size depends on your yarn and personal tension. Prepare a yarn needle, sharp scissors, stitch markers, and a small amount of polyester fiberfill for stuffing the acorns. For this version, plan to make five large leaves and four miniature acorns, producing a full and balanced decoration.
DISCOVER MORE FREE PATTERNS HERE!
The finished hanging ornament can measure approximately 30–38 cm (12–15 inches) in total length, including the upper bow and hanging cords. Individual leaves can measure around 11–15 cm long, depending on the yarn, hook, and blocking. These dimensions are approximate because decorative crochet does not require the same precise gauge as fitted clothing. However, consistent tension will help all the leaves maintain a similar appearance. If you want a smaller ornament, use DK-weight yarn with a 3.0 mm hook. For a larger statement piece, choose thicker yarn and a compatible hook. Keep in mind that heavier leaves require stronger hanging cords.
Understanding the US crochet abbreviations will make the following instructions easier to complete. The pattern uses ch (chain), sl st (slip stitch), sc (single crochet), hdc (half double crochet), dc (double crochet), and tr (treble crochet). You will also use inc (increase), which means working two single crochet stitches into the same stitch, and dec (invisible single crochet decrease), which joins two stitches into one. The abbreviation st(s) means stitch or stitches, BLO means back loop only, and FO means fasten off. When instructions appear between asterisks, repeat that sequence as directed. Unless stated otherwise, turning chains do not count as stitches.
The leaves use a central foundation chain with crocheted lobes, allowing you to build a recognizable leaf silhouette without complicated colorwork. To create a more pronounced leaf vein, you will work a raised line of slip stitches along the center after completing the main leaf. The lobes are shaped using combinations of sc, hdc, dc, and tr stitches. Shorter stitches create narrow sections, while taller stitches create rounded projections. The final outline is refined with single crochet edging and pointed chain picots. This technique is particularly useful for creating decorative crochet oak leaves with a sculptural appearance.
For the acorns, you will work in continuous spiral rounds using single crochet stitches. A magic ring creates a neat starting point, and evenly spaced increases form the rounded body. The acorn cap is crocheted separately using chocolate brown yarn, then attached over the cream-colored acorn body. Stuffing should be firm enough to maintain the acorn shape but not so tight that the stitches stretch apart. A removable stitch marker helps identify the beginning of each round. The acorn caps can be embellished with surface stitches or worked in the back loops to produce a subtle textured finish.
Before beginning the actual components, organize your colors and decide how the finished decoration will look. A visually balanced arrangement places the orange leaf near the upper center, the yellow leaf slightly to one side, the green leaf opposite it, and the ivory and brown leaves below. The small acorns can hang at different heights to create movement and fill empty spaces. Cut several lengths of natural-colored yarn or soft cotton cord for the hanging structure, leaving extra length for knots and adjustments. This simple preparation helps the final fall crochet home decor look intentional rather than overcrowded.
2. Step-by-Step Crochet Pattern for Textured Autumn Leaves
Begin the crochet autumn leaf pattern with burnt orange yarn. Make a foundation chain of 19 stitches. Starting in the second chain from the hook, work 1 sc, 1 hdc, 2 dc, 3 tr, 3 dc, 3 hdc, 3 sc, and 2 sl st along the chain. You will have worked into all 18 available chains. This creates the first side of the central leaf foundation, with taller stitches forming the broad middle. Chain 2 at the end and rotate the work to crochet along the unused loops on the opposite side of the foundation chain. Work the corresponding sequence in reverse: 2 sl st, 3 sc, 3 hdc, 3 dc, 3 tr, 2 dc, 1 hdc, and 1 sc. Slip stitch into the beginning stitch to complete the central leaf shape.
To create the characteristic pointed leaf lobes, work a second shaping round around the outer edge. Along one side, repeat the following sequence at five approximately evenly spaced positions: sl st, ch 3, sc in the second ch from the hook, hdc in the next ch, sl st into the next available edge stitch. Between these pointed sections, work 2–3 sc stitches along the existing edge, adjusting the spacing to avoid puckering. At the upper tip, make ch 4, sc in the second chain from the hook, hdc in the next chain, dc in the last chain, and slip stitch back into the leaf tip. Repeat the smaller lobes along the opposite edge, keeping the two sides reasonably symmetrical.
For a fuller, more natural leaf, add another round of textured crochet edging. Work single crochet stitches around the perimeter, placing 2 sc into rounded corners and using slip stitches in narrow valleys between the lobes. At the tip of each lobe, make a small picot by chaining 2 and slip stitching into the first chain. This adds a delicate point without making the edges overly stiff. Do not force an identical stitch count into every section because the leaf shape may vary slightly according to tension. Instead, focus on maintaining a smooth, recognizable silhouette. Fasten off and weave in the loose ends securely.
The most distinctive finishing detail is the raised crochet leaf vein. Attach a matching yarn strand near the base of the leaf and work surface slip stitches along the central foundation line toward the tip. Keep the stitches relaxed so the leaf does not curl inward. To form side veins, use a yarn needle to embroider diagonal lines from the center toward several lobes, or add short surface slip-stitch branches where the fabric allows. These raised lines imitate the natural structure of autumn foliage and create the textured appearance visible in the inspiration image. For stronger definition, use the same yarn color rather than a contrasting shade.
Repeat the leaf instructions using mustard yellow, olive green, ivory, and chocolate brown yarn. For a more organic crochet fall leaf garland effect, slightly vary the foundation chain length of individual leaves. A smaller leaf can begin with 15 chains, while a larger one can begin with 21 chains, provided the stitch distribution is adjusted proportionally. You can also make one leaf broader by adding extra dc stitches along the central sides. These small variations help the finished ornament resemble a naturally gathered collection of leaves. For a balanced five-leaf arrangement, keep the orange and green leaves among the largest pieces, with the ivory and brown leaves hanging lower.
Once all five leaves are complete, gently block them to improve their shape. For cotton yarn, lightly dampen each leaf, place it on a blocking mat, and arrange the lobes into attractive points. Use rust-resistant pins to hold the edges in place while drying. Avoid stretching the central vein too much because the raised texture is part of the design. If using acrylic yarn, follow the yarn manufacturer’s care recommendations rather than applying direct heat. After drying, the leaves should lie relatively flat while maintaining a soft dimensional texture. This finishing step makes a noticeable difference in the appearance of your handmade crochet autumn leaves.
3. How to Crochet Miniature Acorns and Decorative Hanging Cords
The miniature acorns give the Crochet Hanging Decoration with Autumn Leaves and Acorns Pattern its woodland personality. Begin with beige or ivory yarn and a 3.5 mm hook. Make a magic ring and work 6 sc into the ring (6 sts). In Round 2, work 2 sc into each stitch around (12 sts). In Round 3, repeat 1 sc, inc six times (18 sts). In Rounds 4–6, work 1 sc in each stitch around (18 sts). These rounds form the rounded upper section of the acorn body. Use a stitch marker to identify the beginning of each round, and keep your tension firm enough to prevent stuffing from showing through the stitches.
Continue shaping the crochet acorn body by decreasing gradually toward the bottom. Round 7: repeat 1 sc, dec six times (12 sts). Add a small amount of polyester fiberfill, distributing it evenly with your fingers. Round 8: work 1 sc in each stitch around (12 sts). Round 9: repeat dec six times (6 sts). Add a little more stuffing if necessary, then fasten off, leaving a long yarn tail. Thread the tail through the front loops of the remaining six stitches and pull gently to close the opening. Secure the yarn inside the acorn. This creates a small tapered body that resembles a natural acorn.
Next, crochet the textured brown acorn cap using chocolate brown yarn. Make a magic ring and work 6 sc into the ring. Round 2: work 2 sc in every stitch (12 sts). Round 3: repeat 1 sc, inc six times (18 sts). Round 4: work 1 sc in the BLO of each stitch (18 sts), creating a visible ridge where the cap begins to turn downward. Round 5: work 1 sc in each stitch around (18 sts). Fasten off, leaving a long tail for sewing. Place the cap over the wider end of the stuffed acorn and secure it with small stitches around the lower cap edge. The cap should overlap the cream-colored body slightly, just like the natural shell of an acorn.
For extra texture, decorate the acorn cap with small embroidered diagonal stitches or a few carefully placed surface slip stitches. You can also work a final round of slip stitches around the cap edge before sewing it in place. Repeat the instructions to make four crochet acorns, or make additional acorns for a fuller arrangement. For the hanging stems, attach brown or natural-colored yarn at the top center of each cap and chain approximately 15–30 stitches, depending on the desired hanging length. Fasten off, leaving enough yarn to secure the stem to the main ornament. Different stem lengths help the acorns appear naturally scattered between the leaves.
To make the rustic crochet hanging cords, use beige cotton yarn or soft braided cotton cord. For a fully crocheted version, make three or four chains approximately 35–45 cm long. For extra strength, work slip stitches back along each chain or use two strands of yarn held together. Gather the cords at the top and tie them into a secure knot, leaving a loop for hanging. A decorative bow can be made separately using a longer cord folded into two loops, then tied around the central knot. The bow should be wide enough to frame the upper part of the ornament without covering the orange leaf. Trim the cord ends evenly for a clean finish.
Before assembling the ornament, check that every acorn cap is firmly attached and that the stems are strong enough to support the small stuffed pieces. Secure all knots and weave in loose ends wherever possible. If the ornament will be displayed near a doorway, avoid making the acorn stems excessively long because they may become tangled. This crochet acorn ornament pattern is intended for decorative use rather than as a toy, particularly because it includes small stuffed elements and hanging cords. Keep the finished decoration out of reach of infants, young children, and pets. With careful construction, the acorns will remain attractive and securely attached throughout the autumn decorating season.
4. Assembling, Styling, and Caring for Your Crochet Autumn Hanging Decoration
Begin assembling your Crochet Hanging Decoration with Autumn Leaves and Acorns Pattern by laying all five leaves on a flat surface. Position the burnt orange leaf near the top center, allowing its pointed tip to extend upward toward the decorative bow. Place the mustard yellow leaf slightly below and to the left, and arrange the olive green leaf on the right side. The ivory leaf can hang beneath the yellow leaf, while the chocolate brown leaf fills the lower right portion of the arrangement. Overlap the leaves slightly to create depth, but leave enough space for the raised veins and pointed edges to remain visible. Take a moment to adjust the composition before attaching anything permanently.
Once you are satisfied with the arrangement, attach each leaf to one of the hanging cords using a yarn needle and matching yarn. Stitch through the upper central portion of the leaf rather than through a narrow pointed lobe, which could stretch under its own weight. For heavier leaves, make two or three small anchoring stitches along the central vein. Allow the leaves to hang at slightly different heights to create the layered appearance of a natural autumn bouquet. Keep the main orange leaf close to the center, as it serves as the visual focal point. The arrangement should feel full but not excessively crowded.
Now attach the miniature crochet acorns between the leaves. One acorn can hang near the upper right side, another between the yellow and ivory leaves, and two more near the lower center and right. Adjust their heights so the cream-colored acorn bodies remain visible against the darker foliage. If an acorn disappears behind a leaf, shorten its stem or move it slightly forward. Secure the stems to the main hanging cords with tight knots and reinforce the attachment points with several small stitches. For a natural woodland appearance, avoid placing every acorn at the same level.
The decorative bow adds the final touch to this autumn crochet wall hanging. Use a natural beige cord that complements the earthy yarn colors. Form two generous loops and tie them securely at the top of the arrangement, allowing the ends to fall behind the leaves. You can make the bow more structured by using a firmer cotton cord, or create a softer appearance with a crocheted chain. Once the bow is attached, lift the ornament by its hanging loop and check the balance. If one side appears too heavy, adjust the cord lengths or reposition a leaf until the decoration hangs comfortably.
This DIY fall crochet decoration can be displayed in many inviting spaces throughout the home. Hang it on an interior door, above a seasonal shelf, beside a framed autumn print, or from a decorative wall hook. It also looks lovely near a window where natural daylight highlights the raised stitches and warm colors. For a coordinated seasonal arrangement, pair the hanging ornament with handmade crochet pumpkins, neutral-colored cushions, or a simple wooden tray. If you want to create several ornaments as gifts, experiment with different color combinations, such as rust and cream, sage and mustard, or burgundy and chocolate brown. Each combination gives the same basic pattern a different personality.
To keep your crochet hanging decoration looking beautiful, gently remove dust with a soft brush or carefully shake the ornament outdoors. If washing becomes necessary, check the yarn care label first and spot-clean the affected areas with cool water and mild detergent. Avoid soaking the entire ornament unnecessarily because the stuffed acorns and hanging cords may take longer to dry. Reshape the leaves while damp and allow them to air-dry completely before storing. At the end of the season, place the ornament flat in a breathable storage bag or box, avoiding heavy objects that could crush the textured leaves. With proper care, your handmade decoration can become a cherished part of your autumn traditions for many years.
Frequently Asked Questions About the Crochet Hanging Decoration with Autumn Leaves and Acorns Pattern
1. Is the Crochet Hanging Decoration with Autumn Leaves and Acorns Pattern suitable for beginners?
Yes, this pattern is suitable for confident beginners who already understand basic US crochet stitches. The leaves require some experience with shaping and working along both sides of a foundation chain, while the acorns use simple single crochet increases and decreases. Beginners may find it helpful to make one practice leaf before starting the complete arrangement. Taking time to understand the shaping techniques will make the remaining components much easier.
2. What type of yarn works best for crochet autumn leaves?
Medium-weight cotton yarn is an excellent choice because it provides clear stitch definition and helps the leaf lobes maintain their shape. Cotton blends can also work beautifully, especially when a slightly softer finish is desired. Acrylic yarn is another option, although the leaves may require more careful blocking. For a natural-looking autumn ornament, choose yarn with a matte finish and warm, earthy colors.
3. How much yarn is needed for the entire hanging decoration?
The amount depends on the size of the leaves, the thickness of the yarn, and the number of acorns. For the five-leaf, four-acorn version described here, approximately 100–160 grams of yarn in total is a reasonable starting estimate. This includes the leaves, acorns, and crocheted hanging cords. Having a little extra yarn is helpful for making adjustments, reinforcing attachments, or replacing a component.
4. Can I make the crochet leaves larger or smaller?
Absolutely. You can adjust the leaf size by changing the foundation chain length, using a different hook size, or selecting thinner or thicker yarn. Larger leaves may require additional shaping stitches to keep the lobes proportionate. Smaller leaves are ideal for mini ornaments, gift decorations, and seasonal garlands. When resizing, make a sample leaf first and adjust the stitch placement until you achieve the desired shape.
5. How do I make the raised veins on the crochet leaves?
Raised veins can be created using surface slip stitches worked along the central foundation line. Insert the hook through the fabric, draw up a loop of matching yarn, and continue making loose slip stitches toward the leaf tip. Smaller side veins can be embroidered with a yarn needle. Avoid pulling the yarn too tightly, as this may cause the leaf to curl or lose its natural shape.
6. Why are my crochet leaves curling instead of lying flat?
Curling usually occurs when the stitch tension is too tight or the edging contains too few stitches. Uneven increases can also affect the shape. Try using a slightly larger hook, relaxing your tension, or adding a few stitches around the outer edges. Gentle blocking can help improve the appearance of cotton leaves. A small amount of natural curling is acceptable because real autumn leaves are rarely perfectly flat.
7. Can I use this pattern to create a crochet autumn garland?
Yes. Instead of gathering the leaves and acorns into one hanging cluster, attach them individually along a longer crocheted chain or cotton cord. Alternate leaf colors and place the acorns between them for visual interest. This creates a decorative garland suitable for a mantel, shelf, or interior wall. Make sure the supporting cord is strong enough to hold all the crocheted components.
8. How can I keep the acorns from losing their shape?
Use firm, even crochet tension and stuff the acorn bodies gradually with small amounts of polyester fiberfill. Avoid overstuffing because it can stretch the stitches and distort the shape. The brown caps should fit snugly over the wider end of each acorn. Secure them with strong, evenly spaced stitches so they remain in position during handling and storage.
9. Can the crochet hanging decoration be displayed outdoors?
The ornament is best suited for indoor use or a well-protected covered area. Cotton and acrylic yarn can absorb moisture, collect dirt, and fade with prolonged exposure to sunlight. Rain and humidity may also affect the stuffed acorns and the shape of the leaves. For the longest lifespan, display the decoration in a dry location away from direct weather exposure.
10. How long does it take to complete this crochet autumn decoration?
The time required depends on your crochet experience and the level of detail you choose. An experienced crocheter may complete the project in approximately 5–8 hours, while a beginner may need several sessions. The leaves generally require the most attention because of their shaping and textured veins. Making the acorns and assembling the finished ornament can be enjoyable tasks for shorter crafting sessions.
11. Can I sell finished decorations made from this pattern?
Finished handmade decorations can generally be sold, subject to applicable laws and any requirements of the selling platform. If you plan to sell your work, focus on secure construction, accurate product descriptions, and clear care instructions. Be especially careful with small decorative components and hanging cords. Your own color combinations and finishing details can help make each handmade ornament distinctive.
12. What colors can I use besides traditional autumn shades?
Although burnt orange, mustard yellow, olive green, cream, and brown are classic autumn choices, many other combinations work beautifully. Burgundy, terracotta, copper, muted rose, forest green, and oatmeal can create a sophisticated seasonal palette. For a modern farmhouse look, try cream, beige, taupe, and soft sage. The same crochet leaf and acorn pattern can be adapted to suit traditional, rustic, minimalist, or contemporary decorating styles.
13. How do I prevent the hanging cords from stretching?
Use sturdy cotton yarn, braided cotton cord, or crocheted chains reinforced with slip stitches. Avoid relying on a single loose chain to support several heavy leaves. When assembling the decoration, distribute the weight across multiple attachment points. If the finished ornament stretches after hanging, shorten the cords and reinforce the upper knot with additional stitches.
14. Is blocking necessary for the finished crochet leaves?
Blocking is not strictly required, but it is highly recommended when you want crisp pointed lobes and a neat finished appearance. Cotton yarn responds particularly well to gentle wet blocking. Arrange the leaves into their desired shapes and allow them to dry completely before assembling the ornament. This extra finishing step helps emphasize the decorative stitchwork and gives the leaves a more polished look.
Conclusion: Create a Beautiful Handmade Autumn Decoration
The Crochet Hanging Decoration with Autumn Leaves and Acorns Pattern brings together the warmth of fall colors, the charm of woodland details, and the satisfaction of creating something beautiful by hand. Throughout this tutorial, you learned how to choose suitable yarn and crochet tools, understand essential US crochet abbreviations, create textured autumn leaves, shape miniature stuffed acorns, make sturdy hanging cords, and assemble the individual components into a balanced seasonal decoration.
The most rewarding part of this project is its versatility. You can follow the suggested arrangement with five colorful leaves and four acorns or customize the design to reflect your own creative style. Changing the yarn colors, adjusting the leaf sizes, and experimenting with different hanging lengths can transform the same basic pattern into an entirely new decoration. Each handmade piece carries its own character, making it a meaningful addition to your fall home decor or a thoughtful seasonal gift.
Whether you are practicing your crochet skills or looking for a relaxing autumn craft, this handmade crochet hanging decoration is a wonderful way to enjoy the season. Take your time with the textured leaf veins, secure the acorns carefully, and enjoy the process of arranging the finished pieces into a beautiful woodland-inspired ornament.
EASILY FIND THE FREE PDF FOR THIS PATTERN HERE!
We would love to hear your sincere opinion! What do you think of this Crochet Hanging Decoration with Autumn Leaves and Acorns Pattern? Which autumn color combination would you choose for your own decoration? Leave an honest comment with your experience, creative suggestions, or ideas for improving the pattern. Your feedback can inspire new projects and help other crochet enthusiasts discover fresh ways to celebrate the beauty of handmade autumn decorations.