
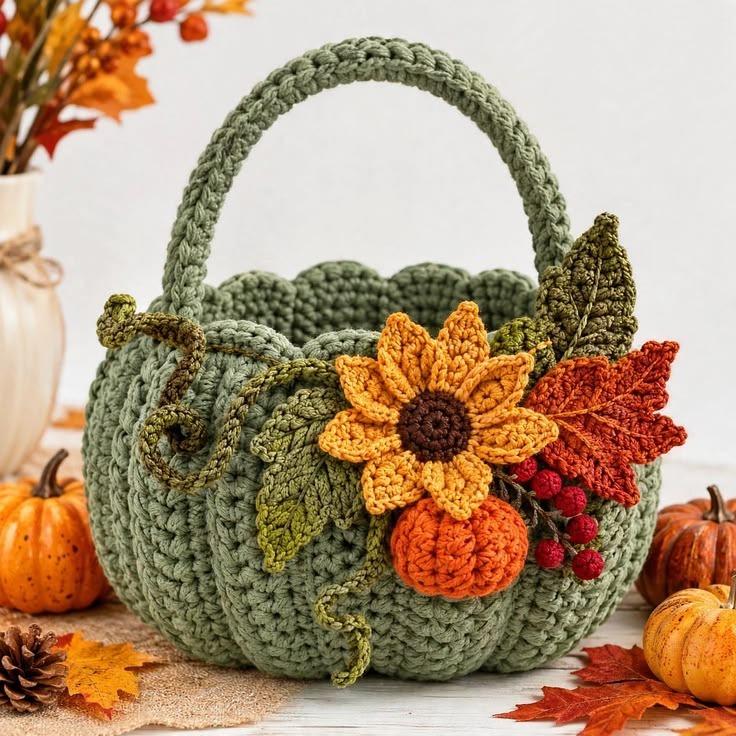
The Crochet Autumn Basket with Sunflower, Pumpkin, Leaves, and Berries Pattern is a beautiful seasonal project that combines the warmth of handmade crochet with the charming colors of fall. Featuring a textured sage-green basket, a sturdy crocheted handle, a bright yellow sunflower, a miniature orange pumpkin, decorative autumn leaves, and clusters of red berries, this design captures the cozy atmosphere of the harvest season. It is an excellent choice for crocheters who enjoy creating decorative pieces that are both practical and visually appealing. Whether displayed on a farmhouse table, placed near a fireplace, or used as part of a Thanksgiving centerpiece, this crochet autumn basket brings a welcoming handmade touch to any room. The combination of dimensional stitches and carefully arranged appliqués creates a sophisticated appearance while allowing plenty of room for personal creativity.
One of the most appealing features of this Crochet Autumn Basket with Sunflower, Pumpkin, Leaves, and Berries Pattern is the way several traditional crochet techniques come together in one project. The rounded basket uses structured stitches to create a firm foundation, while the raised vertical texture resembles the natural grooves of a pumpkin. Its gently scalloped upper edge provides a soft decorative finish, and the curved handle adds height and balance to the finished arrangement. The sunflower introduces layered petals and a textured brown center, while the miniature pumpkin provides a cheerful pop of orange. Meanwhile, the crocheted leaves, curling vines, and small red berries give the arrangement depth and movement. Each decorative element can be made separately, making this project especially enjoyable for crocheters who prefer completing smaller pieces before assembling a larger design.
This detailed fall crochet basket tutorial explains how to recreate the main characteristics of the pictured design using US crochet terminology, including stitch abbreviations, round-by-round instructions, shaping methods, and assembly techniques. The instructions are designed for confident beginners and intermediate crocheters who already understand basic stitches such as single crochet, double crochet, and slip stitch. Because the photograph does not provide exact stitch counts or measurements, the instructions below are an original, photo-inspired pattern rather than a verified reproduction of an existing design. The recommended finished basket measures approximately 24 cm wide, 15 cm tall, and 30 cm tall including the handle, although the final dimensions will depend on yarn thickness, hook size, and individual tension. With patience, consistent stitches, and careful finishing, crocheters can create a beautiful autumn decoration that celebrates the colors and textures of the season.
1. Materials, Crochet Abbreviations, and Preparation for the Autumn Basket
Before beginning the Crochet Autumn Basket with Sunflower, Pumpkin, Leaves, and Berries Pattern, gather all the materials needed for the basket and its decorative appliqués. For a structured result similar to the reference photograph, choose bulky cotton yarn or firm cotton-blend yarn in sage green for the main basket. Cotton is particularly suitable because it offers good stitch definition and helps the basket maintain its rounded shape. You will need approximately 250–350 grams of sage-green yarn, depending on the yarn’s weight and the desired dimensions. For the decorations, prepare smaller amounts of golden yellow, dark brown, pumpkin orange, olive green, rust red, deep red, and forest green. Using coordinated autumn shades creates a harmonious finished project.
DISCOVER MORE FREE PATTERNS HERE!
The recommended tools include a 5.0 mm crochet hook for the basket, a 3.5 mm or 4.0 mm hook for the smaller decorative elements, stitch markers, scissors, a yarn needle, and a measuring tape. A small quantity of polyester fiberfill is needed for the miniature pumpkin and berries. If the yarn feels too flexible, consider using a hook slightly smaller than the manufacturer’s recommendation to produce a denser fabric. An optional removable plastic canvas base can provide additional stability. For a decorative basket that will hold lightweight objects, firm stitches and an adequately reinforced handle are more important than making the fabric excessively thick.
Understanding US crochet stitch abbreviations will make the instructions easier to follow. The principal stitches used throughout this project are ch (chain), sl st (slip stitch), sc (single crochet), hdc (half double crochet), dc (double crochet), tr (treble crochet), and st (stitch). Additional terms include inc (increase), dec (decrease), BLO (back loop only), FLO (front loop only), and rep (repeat). An increase means working two stitches into the same stitch, while a decrease combines stitches to reduce the stitch count. The abbreviation sc2tog means single crochet two stitches together. Instructions placed between asterisks should be repeated as indicated. Unless otherwise stated, the basket rounds are worked continuously without joining.
For the raised texture of the basket, this pattern uses a simple front-post double crochet (FPdc) technique. To make an FPdc, yarn over, insert the hook from front to back and then to front around the post of the indicated stitch, yarn over and pull up a loop, then complete the double crochet normally. This produces a raised vertical ridge that resembles the grooves seen on the photographed basket. Because front-post stitches are easier to establish over taller stitches, the first textured round will create a foundation of double crochet stitches. Subsequent rounds alternate ordinary stitches and raised post stitches to develop the dimensional appearance. Crocheters who prefer a simpler finish can substitute regular single crochet rounds and add embroidered vertical ridges afterward.
The color palette is an essential part of the design. Sage green forms the soft, earthy background, while golden-yellow sunflower petals bring brightness to the front of the basket. Dark brown creates contrast in the sunflower center, and orange yarn emphasizes the rounded shape of the miniature pumpkin. Olive-green and forest-green leaves provide natural variation, while rust-colored leaves and deep-red berries create the unmistakable atmosphere of autumn. For the best visual balance, select yarns with similar textures and compatible thicknesses. The small appliqués can use lighter-weight yarn than the basket, which helps them remain delicate and detailed without becoming overly heavy.
Before starting, crochet a small 10 cm × 10 cm gauge swatch using the yarn and hook selected for the basket. Aim for approximately 13–15 single crochet stitches across 10 cm, although the exact gauge is flexible because this is a decorative project. The fabric should feel firm enough to stand upright when held vertically. If the stitches are loose or the fabric collapses, reduce the hook size. If the fabric feels too stiff to shape comfortably, use a slightly larger hook. Keep a stitch marker at the beginning of each round and count regularly, especially during the base increases. Taking time to prepare the yarn, tools, and gauge will make the following construction steps considerably easier.
2. Step-by-Step Instructions for Crocheting the Textured Basket and Handle
Begin the crochet basket base with sage-green yarn and a 5.0 mm hook. Make a magic ring and work Round 1: 6 sc into the ring (6 sts). Pull the ring closed and place a stitch marker in the first stitch. Continue with Round 2: inc in every stitch (12 sts). For Round 3: 1 sc, inc around (18 sts). For Round 4: 2 sc, inc around (24 sts). Continue increasing in this manner, adding one additional single crochet between increases in every new round. By Round 12, work 10 sc, inc six times to obtain 72 stitches. Keep the base flat and evenly shaped as you crochet. If the base begins to ripple, check that the increases are evenly spaced.
Continue expanding the circular foundation until the basket reaches approximately 20–22 cm in diameter. With the suggested yarn and gauge, the 72-stitch base may be close to the desired measurement, but adjust the number of rounds if necessary. Always maintain six evenly distributed increases in each expansion round. To begin forming the walls, work one round of sc in BLO without increasing. This creates a clear turning line between the base and the sides. Work another round of regular sc in every stitch, maintaining the established stitch count. The basket should now begin to curve upward naturally. For a rounded pumpkin-like profile, avoid pulling the yarn excessively tight at the transition between the base and the sides.
To establish the raised basket texture, work one foundation round of dc in every stitch, beginning with a ch 2 that does not count as a stitch. Join with a sl st to the first dc. For the following textured round, ch 2 and work *FPdc around the next dc, dc in the next dc* repeatedly around the basket. Join with a sl st. Continue working joined textured rounds, placing an FPdc around each FPdc from the preceding round and an ordinary dc into each ordinary dc. This creates continuous vertical ridges. Work approximately five or six textured rounds, or until the walls measure about 12–13 cm above the base. Keep the stitch count consistent and check that the raised columns remain vertically aligned.
To give the basket a softly rounded shape, introduce a small amount of shaping near the upper section. After completing the textured rounds, work one round of sc, decreasing evenly by six stitches if the opening appears too wide. For example, with 72 stitches, work *10 sc, sc2tog* six times to obtain 66 stitches. Work another round of sc without decreasing. The resulting upper edge should curve slightly inward while still leaving enough room to display decorative objects. To create the scalloped rim, work *sl st in the next stitch, skip 1 stitch, 5 dc in the next stitch, skip 1 stitch, sl st in the next stitch* around, adjusting the final repeat as necessary. This decorative border resembles the softly waved opening of the basket in the photograph.
The crochet basket handle should be firm, gently curved, and proportional to the finished body. Begin by chaining approximately 60–70 stitches with the sage-green yarn, creating a strip roughly 38–42 cm long before shaping. Work sc in the second chain from the hook and in each remaining chain. Turn, ch 1, and work another row of sc. Continue for four to six rows, depending on the desired handle thickness. For additional strength, crochet two identical strips and join them around a suitable flexible reinforcement, or work several more rows and fold the strip lengthwise before stitching it closed. If reinforcement is used, ensure that its ends are completely enclosed and cannot protrude through the yarn.
Attach the handle securely to opposite sides of the basket opening using a yarn needle and matching sage-green yarn. Position the ends approximately 2–3 cm below the upper rim, making sure both sides are symmetrical. Sew through multiple rows of the basket wall and several stitches of the handle to distribute the weight. Reinforce the attachment points with repeated passes of yarn, then weave the ends into the inner fabric. The handle should form a smooth arch above the basket, reaching approximately 15 cm above the rim. Because this design is primarily decorative, use it for lightweight items rather than heavy loads. Once the handle is attached, gently reshape the basket and check that the base sits flat on the table.
3. How to Crochet the Sunflower, Mini Pumpkin, Autumn Leaves, Vines, and Berries
The crochet sunflower appliqué is the focal point of the Crochet Autumn Basket with Sunflower, Pumpkin, Leaves, and Berries Pattern. Begin with dark-brown yarn and a 3.5 mm hook. Make a magic ring and work Round 1: 6 sc into the ring (6 sts). For Round 2: inc around (12 sts), and for Round 3: 1 sc, inc around (18 sts). Work Round 4: 2 sc, inc around (24 sts). Join with a sl st and fasten off, leaving a long tail for sewing. For a textured sunflower center, work an optional additional round of small bobble stitches or surface slip stitches in dark brown. The center should measure approximately 4–5 cm across and remain relatively flat so the petals can be attached neatly.
To make the golden sunflower petals, join yellow yarn to any stitch of the brown center. Work *ch 7, sc in the second ch from the hook, hdc in the next ch, dc in each of the next 2 ch, hdc in the next ch, sc in the last ch, sl st in the next 2 stitches of the brown center*. Repeat around to create 12 pointed petals. If you prefer broader petals, replace the central dc stitches with treble crochet stitches or add an additional row around each petal. For a layered appearance, crochet a second set of slightly shorter petals behind the first set, attaching them to the back loops of the brown center. Arrange the petals evenly and gently shape their tips with your fingers. The finished sunflower should measure approximately 12–14 cm across.
The miniature crochet pumpkin is worked separately in orange yarn and lightly stuffed before assembly. Make a magic ring and work Round 1: 6 sc (6 sts). Continue with Round 2: inc around (12 sts), Round 3: 1 sc, inc around (18 sts), and Round 4: 2 sc, inc around (24 sts). Work Rounds 5–8 with one sc in each stitch. For Round 9: 2 sc, sc2tog around (18 sts). Add a small amount of polyester fiberfill. Work Round 10: 1 sc, sc2tog around (12 sts) and Round 11: sc2tog around (6 sts). Close the opening and leave a long yarn tail. Pass the tail around the outside of the pumpkin from top to bottom several times, pulling gently to create five or six raised segments. Add a short brown or olive-green stem made from a chain of four stitches.
The crochet autumn leaves add movement and depth around the sunflower. For a simple pointed green leaf, ch 12 using olive-green yarn. Starting in the second chain from the hook, work sc, hdc, dc, dc, tr, tr, dc, dc, hdc, sc, sl st. Work along the opposite side of the foundation chain using a mirrored sequence, placing extra stitches at the tip if necessary to maintain a pointed shape. Join and fasten off, leaving a sewing tail. For a larger leaf, begin with a longer foundation chain and increase the height of the central stitches. To imitate the rust-colored maple-like leaf in the photograph, create three to five separate pointed lobes and join them at their bases. Surface crochet or embroider veins using a slightly darker yarn to emphasize the natural leaf structure.
Create the crochet vines and berry clusters using olive-green and deep-red yarn. For a curling vine, ch 35–45, then work 2 or 3 sc into each chain along the foundation. The extra stitches cause the strip to twist naturally into a spiral. Make two vines of different lengths for a more organic arrangement. For each berry, use red yarn and a small hook. Make a magic ring with Round 1: 6 sc (6 sts), followed by Round 2: inc around (12 sts). Work one round of sc, insert a tiny amount of fiberfill, and then work sc2tog around (6 sts). Close the berry and leave a sewing tail. Make five to seven berries and attach them to short green stems made from chain stitches.
Arrange the sunflower, pumpkin, leaves, vines, and berries on a flat surface before attaching them to the basket. Position the sunflower slightly off-center on the front, with the orange pumpkin partially tucked beneath its lower petals. Place a large green leaf behind one side of the sunflower and a rust-colored leaf extending outward on the opposite side. Allow the curling vines to flow naturally across the basket’s textured surface, and arrange the berries in small clusters near the leaves. The photograph’s appeal comes from the layered arrangement rather than perfect symmetry. Once satisfied with the composition, pin the pieces temporarily in place and sew them securely using matching yarn. Keep the decorative stitches discreet so the appliqués appear naturally integrated into the basket.
4. Assembly, Finishing Techniques, Decorating Ideas, and Care Instructions
The final assembly stage transforms the separate components into a complete handmade crochet autumn basket. Begin by placing the basket on a stable surface and checking that the handle stands upright. If the walls appear uneven, gently adjust the fabric by hand. The basket should have a rounded body, a slightly narrowed opening, and visible vertical texture. Next, position the sunflower against the front wall and sew around its brown center, leaving the outer petals mostly free for a dimensional appearance. Avoid pulling the sewing yarn too tightly, which could flatten the flower or distort the basket wall. Secure the center with several small stitches before weaving the yarn ends into the interior.
Attach the miniature pumpkin below the sunflower, allowing it to overlap a few of the lower yellow petals. Use the remaining orange yarn tail to sew the pumpkin through several points around its back. This distributes the weight and prevents it from swinging or tilting forward. The pumpkin should remain rounded and visibly segmented after attachment. If desired, add a small green stem or curly tendril near its top. The finished crochet pumpkin decoration should look like a miniature harvest ornament rather than a flat appliqué. Its three-dimensional shape provides an attractive contrast to the flatter sunflower petals and leaves.
Next, attach the larger autumn crochet leaves behind the sunflower and pumpkin. Sew mainly along the center veins and lower portions of the leaves, allowing their tips to lift slightly away from the basket. This technique creates natural-looking depth without making the decorations unstable. Position the olive-green leaves near the handle attachment and allow the rust-colored leaf to extend toward the opposite side. The varied shapes and colors help frame the sunflower while maintaining the warm seasonal palette. If the arrangement feels crowded, remove one or two smaller leaves rather than forcing every element into the same space. A balanced design usually looks more elegant than an overly dense composition.
The berry clusters and vines should be attached last because they fill the smaller spaces between the main decorative elements. Sew the stems close to the basket surface while allowing the berries to project outward slightly. Arrange some berries beneath the rust-colored leaf and others near the sunflower to create visual continuity. For the curling vines, attach only selected sections so the spirals remain visible and lively. Avoid leaving long loose loops that could snag during handling. If the basket will be displayed where children or pets can reach it, secure all small decorations especially carefully, since detachable berries and other small pieces may present a choking hazard.
For a professional finish, carefully weave in all yarn ends using a blunt yarn needle. Pass each end through several neighboring stitches, reverse direction, and trim only after confirming that the yarn is secure. Examine the basket for uneven stitches, loose decorations, or visible knots. If the yarn is suitable for gentle blocking, lightly mist the finished piece with water and shape it by hand, allowing it to dry completely before use. Avoid excessive moisture if the handle contains reinforcement or the basket includes stuffing that may take a long time to dry. A removable rigid base can be placed inside the basket to improve stability, especially when displaying small decorative items.
The completed Crochet Autumn Basket with Sunflower, Pumpkin, Leaves, and Berries Pattern can be styled in many ways throughout the fall season. Place it on an entryway console with small fabric pumpkins, use it as a decorative centerpiece for a Thanksgiving gathering, or display it on a shelf alongside handmade seasonal ornaments. It also makes a thoughtful gift for someone who appreciates crochet and farmhouse-inspired décor. For cleaning, gently spot-clean with a damp cloth and mild detergent, then allow the basket to air-dry completely. Avoid machine washing unless every yarn, stuffing material, and reinforcement component is confirmed to be washable. With proper care, this handmade autumn basket can become a treasured decoration that returns year after year.
Frequently Asked Questions (FAQ)
Is the Crochet Autumn Basket with Sunflower, Pumpkin, Leaves, and Berries Pattern suitable for beginners?
This project is best suited for confident beginners or intermediate crocheters. The basket uses familiar stitches such as single crochet and double crochet, but the raised texture, dimensional decorations, and assembly require additional attention. Beginners can simplify the project by working plain single crochet walls and making a single-layer sunflower. Completing each decorative element separately also makes the project more manageable.
What type of yarn works best for a structured crochet autumn basket?
Firm cotton yarn or a cotton-blend yarn is an excellent choice because it offers clear stitch definition and helps the basket maintain its shape. Bulky yarn works particularly well for the main body, while medium-weight yarn can be used for the smaller appliqués. Very soft acrylic yarn may require tighter stitches or additional reinforcement to produce a similarly structured basket.
How much yarn is needed to complete this fall crochet basket?
For a basket measuring approximately 24 cm wide, plan on using 250–350 grams of sage-green yarn for the main body and handle. You will also need smaller quantities of yellow, brown, orange, green, rust, and red yarn for the decorations. The exact amount depends on yarn weight, hook size, gauge, and the number of appliqués included.
How long does it take to crochet the complete autumn basket?
Most intermediate crocheters can expect to spend approximately 10–16 hours on the project. The basket body and handle generally require the most time, while the sunflower, pumpkin, leaves, and berries can be completed in shorter sessions. Detailed embellishments and careful sewing may add several hours, particularly when creating a heavily layered arrangement.
How can I make the crochet basket stand upright without collapsing?
Use firm yarn, maintain consistent tension, and select a hook that produces dense stitches. A slightly smaller hook can improve the structure, while a removable plastic canvas base helps the basket remain stable. The handle should also be securely reinforced. If the walls are too soft, a washable fabric liner or appropriate basket stiffener may help, provided it is compatible with the yarn and intended use.
Can I change the colors of the sunflower, pumpkin, and leaves?
Absolutely. The pattern can be customized using different seasonal palettes. Cream and mustard yellow create a softer sunflower, while terracotta and burnt orange give the pumpkin a rustic appearance. Burgundy, copper, and deep olive leaves can produce a more sophisticated autumn arrangement. The most important design principle is maintaining enough contrast between the basket body and the decorative elements.
Can this crochet basket be used for storing everyday items?
Yes, it can hold lightweight objects such as yarn balls, small fabric accessories, decorative napkins, or seasonal ornaments. However, it is not intended for heavy objects or for carrying substantial weight by the handle. The basket is primarily a decorative piece, and the attached flowers, berries, and leaves should be protected from excessive pulling.
How do I keep the sunflower petals from curling too much?
Consistent tension and careful shaping help keep the petals attractive. If they curl excessively, check whether the stitches are too tight or whether the petal foundation chains are too short. Gentle blocking can help flatten the petals when the yarn permits it. For additional definition, lightly shape each petal while damp and allow it to dry completely before attaching the sunflower.
Can I make a smaller or larger version of the basket?
Yes. To create a larger basket, continue increasing the circular base before beginning the walls and add additional textured rounds for height. For a smaller basket, stop the base increases earlier and reduce the wall height accordingly. The sunflower, pumpkin, and leaves should also be resized to maintain balanced proportions. Remember to keep the handle length appropriate for the basket’s width.
How should I wash and store my handmade autumn crochet basket?
Spot-cleaning is generally the safest method, particularly when the basket includes stuffing, reinforcement, or delicate appliqués. Use a damp cloth with mild detergent and avoid excessive rubbing. Allow the basket to dry completely before storing it. When the autumn season ends, place it in a clean, dry container where the handle and decorative elements will not be crushed.
Can I sell finished baskets made from this tutorial?
The instructions provide an original, photo-inspired construction method that you can use to make your own handmade projects. If you plan to sell finished pieces, ensure that any branding, photographs, or additional designs you use are your own or appropriately licensed. Accurate product descriptions and clear care instructions are also helpful when presenting handmade items to customers.
What other decorations can I add to personalize the basket?
Small crochet acorns, miniature mushrooms, additional pumpkins, embroidered leaf veins, and decorative fabric bows can all complement the autumn theme. You can also create a matching fabric liner or add a few extra curling vines. Keep the overall arrangement balanced so that the sunflower remains the main focal point.
Conclusion
The Crochet Autumn Basket with Sunflower, Pumpkin, Leaves, and Berries Pattern is a rewarding handmade project that celebrates the beauty of fall through texture, color, and thoughtful design. By following this tutorial, you have learned how to create a rounded crochet basket base, build structured textured walls, shape a decorative scalloped rim, and construct a reinforced handle. You have also explored the techniques needed to make a dimensional sunflower, a miniature stuffed pumpkin, pointed autumn leaves, curling vines, and colorful berry clusters.
Each component contributes something special to the finished piece. The sage-green basket provides a calming background, the golden sunflower adds warmth, and the orange pumpkin creates a cheerful harvest-inspired accent. The layered leaves and berries bring the arrangement together, making the final design suitable for farmhouse decorating, Thanksgiving displays, handmade gifts, and seasonal home styling.
One of the greatest pleasures of this crochet autumn basket pattern is the opportunity to personalize every detail. You can experiment with different yarn colors, adjust the basket dimensions, add more decorative elements, or simplify the design to suit your experience level. The techniques learned in this tutorial can also be adapted to other seasonal baskets and decorative crochet projects.
EASILY FIND THE FREE PDF FOR THIS PATTERN HERE!
If you enjoyed this tutorial, please share your sincere opinion in the comments. Which part of the basket did you enjoy making the most: the textured body, the sunflower, the pumpkin, or the colorful autumn leaves? Your experiences, creative ideas, and suggestions for improving the pattern are always welcome. Sharing your results and feedback can inspire other crochet enthusiasts to create their own beautiful handmade autumn decorations.