
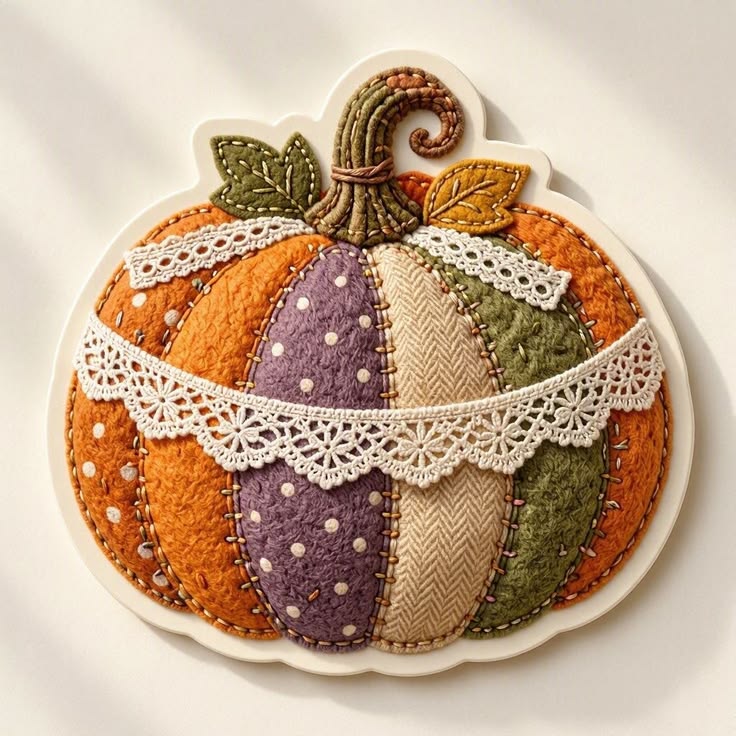
The Stitched Fabric Pumpkin Appliqué Pattern is a warm, decorative sewing project that combines the cozy feeling of autumn with the charm of traditional handmade appliqué. Inspired by the pumpkin shown in the reference image, this design is built from several curved fabric sections joined visually with decorative stitching. Different textures, prints, and earthy colors make each pumpkin segment stand out while still creating one harmonious finished piece. The addition of lace across the pumpkin gives the project a romantic, vintage character that works beautifully for fall and Thanksgiving decorating. Because the construction can be adapted to different sizes, the same idea can become a wall hanging, table decoration, pillow appliqué, seasonal banner, or framed textile artwork.
One of the most attractive features of this fabric pumpkin appliqué is the opportunity to combine scraps that might otherwise remain unused. Orange fabric establishes the classic pumpkin appearance, while purple, cream, olive green, mustard, and patterned fabrics create visual variety. The project in the image also demonstrates how texture can become part of the design: woven fabrics, tiny prints, textured materials, decorative lace, and visible hand-style stitches all contribute something different. Instead of trying to make every section identical, the goal is to create a deliberately handcrafted appearance. This makes the Stitched Fabric Pumpkin Appliqué Pattern especially enjoyable for sewists who like scrap projects, folk-inspired designs, rustic fall décor, and creative appliqué.
Although the finished pumpkin looks detailed, its basic construction is approachable when divided into manageable stages. You will first prepare a pumpkin-shaped foundation and individual curved segments, then arrange the fabric pieces, secure their edges, add the stem and leaves, and finally embellish the surface with decorative stitching and lace. Careful preparation is more important than complicated sewing techniques. Beginners can simplify the embroidery, while experienced makers can add additional quilting, beads, specialty threads, or more elaborate stitches. The instructions below explain the entire process in a practical sequence so that you can create your own Stitched Fabric Pumpkin Appliqué Pattern while preserving the dimensional, colorful appearance of the inspiration.
Materials, Fabric Selection, and Preparing the Pumpkin Pattern
Begin by gathering several coordinating fabrics. For a pumpkin similar to the reference, choose orange fabric, muted purple, cream or beige, olive green, and one or two additional autumn prints. Small-scale dots, subtle florals, herringbone textures, and tone-on-tone fabrics work especially well because they provide interest without overwhelming the pumpkin shape. Cotton is an excellent beginner-friendly choice, although linen blends and lightweight textured fabrics can also be incorporated.
DISCOVER MORE FREE PATTERNS HERE!
You will also need a backing or foundation fabric, lightweight fusible web or your preferred appliqué stabilizer, sewing thread, embroidery floss, fabric scissors, pins or clips, an iron, and basic sewing supplies. A piece of cream or ivory cotton lace trim creates the decorative bands visible across the pumpkin. If you want the project to have more body, add lightweight batting or felt behind the foundation before completing the decorative stitching.
Draw the main pumpkin silhouette on paper before cutting fabric. A practical medium-size decoration can measure approximately 25–30 cm wide and 22–26 cm high, excluding the curled stem. The exact dimensions are flexible. Make the pumpkin slightly wider than it is tall and divide its body into approximately six or seven curved vertical sections. The outer sections should be narrower because they visually curve away from the center.
Create separate paper templates for every pumpkin section. Label them from left to right so they remain in the correct sequence. Adding a small allowance around each template gives you flexibility if you plan to turn the fabric edges under. If you are using raw-edge appliqué, you can cut closer to the finished shape. Consistency matters more than the particular appliqué technique you select.
Before cutting your favorite fabric, arrange the paper sections together and confirm that they recreate a balanced pumpkin silhouette. The central segments should be relatively tall and full, while the outer sections gradually become smaller. This subtle change creates the rounded appearance of a real pumpkin. Adjust the curves now because corrections are much easier on paper than after the fabric has been stitched.
Once you are satisfied with the templates, trace and cut the individual fabric pieces. Alternate the colors instead of placing similar fabrics together. For example, an orange outer section can sit beside another warm orange print, followed by purple, cream, olive, and orange. This variation is central to the Stitched Fabric Pumpkin Appliqué Pattern, giving the finished project its distinctive patchwork personality.
Assembling and Stitching the Fabric Pumpkin Sections
Prepare the foundation by cutting a piece slightly larger than the finished pumpkin. If you are making a freestanding decoration, lightweight batting or felt can be placed beneath it. For a wall quilt or pillow, position the pumpkin directly on the larger background fabric. Mark the vertical and horizontal center lightly with an erasable fabric marker to make symmetrical placement easier.
Start positioning the pumpkin sections from the center and work outward. Place the cream or central panel first, depending on your chosen arrangement, and add the neighboring pieces one at a time. Slight overlaps can help prevent the foundation from showing between pieces. Step away occasionally and examine the overall shape rather than concentrating only on individual seams.
Secure each segment using your chosen fabric appliqué technique. Fusible web is convenient because it prevents the pieces from shifting during stitching. Follow the product instructions carefully and protect delicate or textured materials from excessive heat. If you prefer traditional hand appliqué, baste the pieces temporarily and turn the raw edges underneath before stitching.
The visible seams are an important feature rather than something that needs to disappear. Work a blanket stitch, whipstitch, running stitch, or another decorative hand stitch around the curved sections. Contrasting embroidery thread emphasizes the segmented pumpkin construction. Slightly rustic stitching can actually enhance the handmade appearance, so the stitches do not have to resemble factory-perfect machine work.
Continue stitching around the outside perimeter of the pumpkin. A darker brown, cream, gold, or coordinating autumn thread provides definition without becoming too harsh. Keep the stitch length reasonably consistent and slow down around the deeper curves at the bottom. These rounded valleys are small details, but they contribute greatly to the recognizable pumpkin silhouette.
After the main sections are secure, inspect the piece for loose edges or gaps. Add a few reinforcement stitches wherever necessary. If you want more dimension, work additional running stitches inside selected segments or add subtle quilting lines. These decorative details strengthen the textile pumpkin decoration while creating the layered surface associated with handcrafted seasonal projects.
Creating the Curved Stem, Leaves, and Decorative Lace
The stem gives the Stitched Fabric Pumpkin Appliqué Pattern much of its personality. Draw a tall, slightly curved stem with a whimsical spiral at the upper end. Cut the shape from brown, olive, or textured fabric. For extra dimension, create the stem from two layers or place a thin piece of felt underneath before attaching it to the pumpkin.
Position the stem behind the upper center of the pumpkin so its lower edge appears to emerge naturally from the fabric sections. Secure it with small stitches around the perimeter. Add several long embroidered lines following the direction of the stem. Brown, tan, olive, or gold thread works beautifully here and helps imitate the ridged texture of a dried pumpkin stem.
Next, create two or three fabric appliqué leaves. Simple pointed oval shapes with slightly irregular edges are enough. Olive green and mustard fabrics provide an attractive autumn contrast against the orange pumpkin. Position the leaves around the stem, allowing some to angle outward. Stitch around their edges and embroider a central vein with smaller branching veins for additional detail.
The lace is one of the strongest decorative features of this design. Cut a length of narrow cream lace to stretch across the upper pumpkin and another, wider piece for the central area. Rather than pulling the lace completely straight, allow it to follow the pumpkin’s gentle curve. Pin or baste it before permanently sewing so that you can evaluate the placement.
Attach the decorative lace trim with small stitches using thread that closely matches the lace. Catch enough of the trim to hold it securely without flattening all of its texture. If the lace has scallops, floral motifs, or openwork details, allow those features to remain visible. The contrast between rustic fabric and delicate lace is what gives this pumpkin its appealing cottage-inspired appearance.
At this stage, you can personalize the design further. Small French knots, tiny beads, embroidered dots, miniature buttons, or additional running stitches can be scattered sparingly across selected panels. Avoid covering every available space. A successful autumn appliqué pattern uses embellishment strategically so that the fabric colors, lace, stem, leaves, and stitching remain visually balanced.
Finishing, Displaying, and Personalizing Your Pumpkin Appliqué
Once all decorative elements have been attached, carefully trim the foundation around the pumpkin if you are making a shaped ornament or wall decoration. Leave enough material to finish the edge securely. For a raw-edge folk-art finish, decorative blanket stitching can surround the perimeter. For a cleaner finish, add a backing layer and sew the layers together before turning or binding them.
If using a backing, place it behind the completed pumpkin and check that the front remains smooth. Lightweight batting between the layers gives the project gentle padding and makes the segmented sections more pronounced. Quilt selectively rather than heavily. Stitching along the curved segment boundaries is usually sufficient to emphasize the pumpkin’s dimensional construction.
Pressing should be done carefully because lace, embroidery, and textured fabrics can react differently to heat. When pressing is necessary, work primarily from the back and use a pressing cloth. Avoid flattening the raised stitches or textured fabrics. The slightly dimensional surface is an intentional feature of the Stitched Fabric Pumpkin Appliqué Pattern.
For a wall decoration, add a small hanging loop or sleeve to the back. The pumpkin can also be mounted on a larger quilted panel, incorporated into a fall table runner, attached to a tote bag, or used as the centerpiece of a decorative cushion. Enlarging the templates creates an impressive wall piece, while reducing them produces small ornaments and seasonal gift decorations.
Color changes offer another easy way to personalize the pattern. Traditional orange, cream, green, and brown create an unmistakable fall palette, but muted lavender, dusty rose, burgundy, mustard, sage, and natural linen can create a softer farmhouse interpretation. The most effective approach is to repeat at least one color in different areas so the assorted fabrics still feel connected.
Finally, examine the finished project from a short distance. The pumpkin should have a recognizable rounded silhouette, clear vertical segmentation, a prominent curved stem, decorative leaves, and lace that follows the contours naturally. Make any final adjustments with small stitches. Your completed Stitched Fabric Pumpkin Appliqué Pattern should feel handmade and individual rather than mechanically uniform, which is precisely where much of its charm comes from.
FAQ About the Stitched Fabric Pumpkin Appliqué Pattern
What fabric is best for a Stitched Fabric Pumpkin Appliqué Pattern?
Quilting cotton is one of the easiest options because it cuts cleanly, presses well, and is available in countless colors and prints. You can also combine cotton with linen blends, textured woven fabric, or small pieces of wool-like material. Keeping the fabrics reasonably similar in weight will make assembly easier.
Can beginners make this fabric pumpkin appliqué?
Yes. Beginners can simplify the design by using fusible appliqué and a basic blanket stitch or running stitch. The pumpkin is constructed from relatively simple curved shapes, so there are no extremely complicated pattern pieces. Working slowly and preparing accurate templates will make the process much easier.
Do I need a sewing machine?
No. The project is particularly suitable for hand stitching because visible decorative stitches are part of its character. A sewing machine can speed up the construction and may be used for appliqué or edge finishing, but it is optional.
How large should the pumpkin be?
A finished width of approximately 25–30 cm is convenient for a medium wall or table decoration. However, the pattern can be enlarged for a cushion or wall quilt and reduced for ornaments. When resizing, scale all pumpkin segments, the stem, and leaves proportionally.
Should the raw fabric edges be hidden?
That depends on your preferred style. Turned-edge appliqué provides a traditional polished appearance, while raw-edge appliqué creates a more rustic look. Fusible raw-edge appliqué is often easier for beginners. Decorative stitching around the edges can help secure and visually finish either method.
How do I stop the appliqué pieces from moving while sewing?
Lightweight fusible web, temporary fabric adhesive designed for sewing, pins, or hand basting can hold the sections in place. Always arrange the complete pumpkin before permanently attaching individual pieces so that you can correct spacing and alignment.
What stitches work best around the pumpkin sections?
A blanket stitch is especially attractive because it outlines each fabric piece clearly. Running stitch, whipstitch, backstitch, and decorative embroidery stitches are also suitable. Mixing a few compatible stitches can make the pumpkin look even more handcrafted.
Can I use leftover fabric scraps?
Absolutely. This is an excellent fabric scrap project because most sections require relatively small pieces. Scraps with different prints and textures can actually improve the patchwork appearance. Try arranging your scraps by color before deciding which fabrics will become neighboring pumpkin sections.
How should the lace be attached?
Position the lace after the pumpkin sections have been secured. Baste or pin it temporarily, then sew along stable portions of the lace using small hand stitches and matching thread. Avoid stretching the trim because that can distort both the lace and the pumpkin foundation.
Can this pattern be adapted for Thanksgiving decorations?
Yes. Its pumpkin shape and warm palette make it particularly appropriate for fall décor, harvest displays, and Thanksgiving decorations. It can become a wall hanging, table mat, placemat centerpiece, pillow appliqué, or decorative textile panel.
How can I give the pumpkin more dimension?
Add thin batting or felt underneath the appliqué foundation and quilt around the individual segments. A padded stem can also create dimension. Textured fabrics, raised embroidery, lace, and French knots add visual depth without requiring heavy stuffing.
Can the colors be changed from those shown in the inspiration?
Certainly. The pattern is highly adaptable. Orange establishes a traditional pumpkin appearance, but purple, green, cream, burgundy, gold, dusty pink, blue, or neutral fabrics can produce completely different interpretations. Coordinating the thread and lace with your selected palette helps unify the finished project.
Conclusion
The Stitched Fabric Pumpkin Appliqué Pattern brings together many enjoyable textile techniques in one approachable autumn project. By preparing a rounded pumpkin template, dividing it into curved fabric sections, arranging contrasting scraps, securing the appliqué, and emphasizing the seams with decorative stitching, you can recreate the richly layered appearance that makes this style so appealing.
Throughout the project, the most important lesson is that texture and variation can become design features. The mixture of patchwork fabrics, visible stitches, a dimensional curved stem, appliquéd leaves, and delicate lace transforms a simple pumpkin silhouette into an interesting piece of textile art. Careful fabric placement creates depth even before embroidery and embellishments are added.
You also learned how the basic construction can be adapted to your preferred sewing method. Fusible appliqué offers convenience, hand appliqué provides a traditional approach, and decorative embroidery gives the project its distinctive handmade character. Adding batting, quilting, lace, or small embroidered details allows you to decide how simple or elaborate the finished pumpkin should become.
EASILY FIND THE FREE PDF FOR THIS PATTERN HERE!
Most importantly, use this Stitched Fabric Pumpkin Appliqué Pattern as a creative starting point rather than a rigid formula. Experiment with your favorite autumn fabrics, change the colors, resize the pumpkin, try different lace trims, or create several pumpkins with completely different personalities. Handmade projects become especially meaningful when they reflect the maker’s own choices. If you make your own version, leave your sincere opinion about the project and share any suggestions you have for colors, fabrics, stitches, or embellishments. Your ideas can inspire new variations and help other sewing enthusiasts discover creative ways to turn simple fabric scraps into beautiful seasonal decorations.