
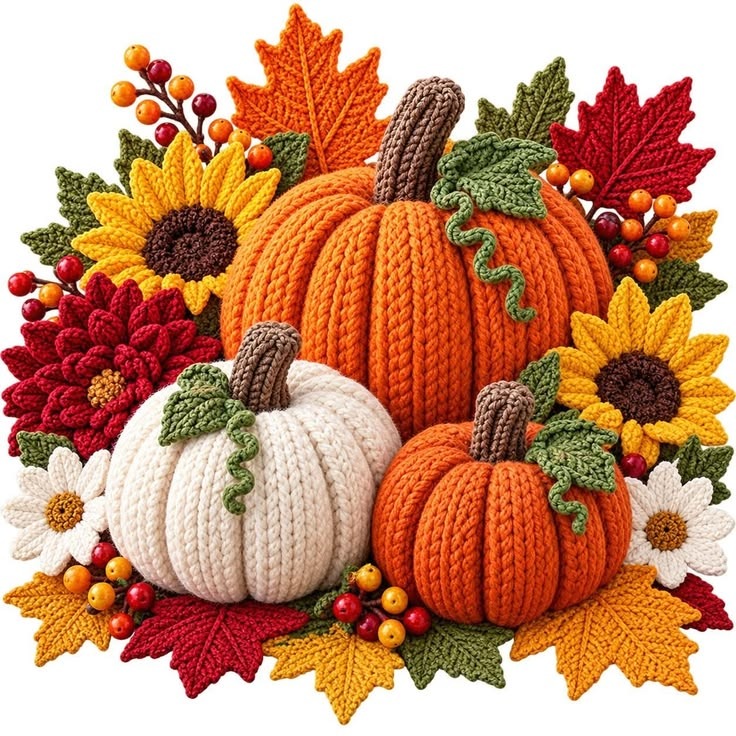
Crochet Autumn Pumpkin Centerpiece Pattern is a warm and inviting seasonal project that combines handmade pumpkins, textured leaves, flowers, curling vines, and rich fall colors into one beautiful decorative arrangement. Inspired by the cozy centerpiece shown in the image, this project is ideal for decorating a dining table, entryway, mantel, coffee table, or Thanksgiving display. The combination of burnt orange, creamy white, sunflower yellow, deep burgundy, olive green, and warm brown creates the unmistakable feeling of autumn while keeping the finished piece soft and welcoming. One of the most attractive features of this crochet pumpkin centerpiece is its dimensional texture. Instead of making flat decorations, you will crochet pieces that can be shaped, stuffed, gathered, layered, and arranged into a full centerpiece. The project also offers plenty of flexibility because you can make one pumpkin or build the complete arrangement with flowers and foliage.
The construction of the Crochet Autumn Pumpkin Centerpiece Pattern is easier to understand when it is divided into individual components. The centerpiece begins with three stuffed pumpkins in different sizes, including a large orange pumpkin, a medium cream pumpkin, and a smaller orange pumpkin. Each pumpkin uses pronounced vertical ribs to imitate the natural sections of a real pumpkin. Crocheted brown stems are attached at the top, followed by green leaves and spiral vines. Around the pumpkins, autumn leaves, sunflower-style blossoms, burgundy flowers, small white flowers, and berry-like accents create additional depth. Beginners who already understand basic crochet stitches can approach the project one element at a time rather than trying to make the entire arrangement at once. This method makes the pattern manageable and gives you opportunities to practice shaping, increases, decreases, surface texture, and simple assembly techniques.
Throughout this tutorial, all crochet terminology follows standard U.S. crochet terms. The most important abbreviations are ch (chain), sl st (slip stitch), sc (single crochet), hdc (half double crochet), dc (double crochet), BLO (back loop only), inc (increase), and dec (decrease). When the instructions say [sc in BLO across], insert your hook only through the back loop of each stitch and work one single crochet. This technique creates the raised ribbing that gives the pumpkins their realistic segmented appearance. Instructions written inside brackets or braces describe a sequence that should be repeated. For example, [sc 4, inc] × 6 means to work four single crochets followed by one increase and repeat that sequence six times. With these crochet keys understood, you can confidently work through the complete autumn centerpiece from beginning to end.
Materials, Crochet Keys, and Preparing the Pumpkin Pieces
For the main Crochet Autumn Pumpkin Centerpiece Pattern, choose medium-weight yarn such as worsted weight yarn (#4) for a sturdy yet soft finished decoration. You will need generous amounts of pumpkin orange and cream, plus smaller quantities of brown, olive green, mustard yellow, burgundy or dark red, dark brown, and white. A crochet hook around 4.0–5.0 mm works well with many worsted-weight yarns, although the yarn label should always be considered. You will also need polyester fiberfill, a yarn needle, scissors, stitch markers, and optional floral wire or pipe cleaners if you want particularly firm stems.
DISCOVER MORE FREE PATTERNS HERE!
Gauge is not critical for decorative pumpkins, but consistent tension is important. A tight fabric prevents the stuffing from showing through the stitches. Make a small test swatch using single crochet and choose a smaller hook if the fabric appears too open. For a dense stuffed pumpkin, the crochet fabric should remain flexible enough to shape while still holding the filling securely. Because every crocheter works at a slightly different tension, finished dimensions can vary naturally without affecting the overall design.
The easiest way to reproduce the strongly ribbed pumpkin texture is to crochet a rectangular panel in rows using BLO single crochet. Begin with a foundation chain equal to the desired height of the pumpkin. For the large pumpkin, try [ch 31], turn, [sc in 2nd ch from hook and sc across]. You should have approximately 30 stitches. Then [ch 1, turn, sc in BLO across] for every following row. Continue until the rectangle is wide enough to wrap into a comfortably rounded pumpkin body.
For the medium cream pumpkin, use the same construction but reduce the starting chain to approximately [ch 25–27]. Crochet every row in BLO sc, maintaining the same stitch count throughout. For the small orange pumpkin, begin around [ch 21–23] and repeat the ribbed rows until the panel has suitable width. These numbers are adjustable rather than strict sizing requirements. A longer starting chain creates a taller pumpkin, while additional rows increase its circumference.
Understanding the crochet keys makes customization much easier. Ch creates the starting foundation, sc produces a compact fabric, hdc gives slightly more height, and dc creates taller stitches that are useful for flower petals and leaves. Sl st joins sections with minimal height. An increase (inc) usually means working two stitches into the same stitch, while a decrease (dec) combines two stitches into one. For the pumpkin panels, however, most shaping happens during assembly rather than through complicated increases and decreases.
Before assembling anything, weave in loose ends that will not be needed for sewing. Leave a long yarn tail on each pumpkin panel because this can be used to close the body. Prepare all three panels first and place them next to each other. The difference in size should be obvious, with the large orange pumpkin acting as the centerpiece, the cream pumpkin creating visual contrast, and the smaller orange pumpkin balancing the arrangement.
Crocheting, Stuffing, and Shaping the Three Pumpkins
Take the large orange rectangle and bring its short edges together with the ribbing running vertically. Using the long yarn tail, seam the first and last rows together. A whip stitch or mattress-style seam works nicely. You now have an open tube. Thread the yarn through stitches around one opening and pull firmly to gather the edge closed. Secure the yarn several times so the bottom cannot open when the pumpkin is stuffed.
Turn the body so the preferred side faces outward and begin adding polyester fiberfill. Add stuffing gradually instead of pushing one large amount inside. Pay special attention to the outer edges because evenly distributed filling creates a smooth pumpkin shape. The pumpkin should feel full and resilient but not so firmly packed that the crochet ribs disappear. A slightly flattened sphere resembles a pumpkin more naturally than a perfectly round ball.
Once the body is filled, weave a strong yarn strand around the upper opening and pull it closed. To create deeper pumpkin sections, pass a long yarn strand from the top center through the bottom center, bring it around the outside along one ribbed groove, and return through the center. Pull gently to deepen that section. Repeat around the pumpkin. The existing BLO crochet ribs help guide the shaping and produce the pronounced vertical sections visible in the autumn design.
Repeat this process with the cream pumpkin. Because light-colored yarn can make gaps more noticeable, make sure the crochet fabric is dense before stuffing. Close the bottom, add fiberfill evenly, gather the top, and use long shaping strands when necessary. The cream pumpkin provides a beautiful visual break between the stronger autumn colors, making the orange pumpkins appear even richer.
Construct the smaller orange pumpkin in exactly the same way. Its compact size makes it perfect for positioning in front of the larger pumpkin. If you want the finished arrangement to resemble the inspiration closely, make the largest pumpkin substantially taller, the cream pumpkin medium-sized and broad, and the smallest orange pumpkin lower and rounder. Variation is important because identical pumpkins would make the arrangement look less natural.
Before adding stems and decorations, place all three pumpkins together temporarily. Position the large orange pumpkin at the back, the cream pumpkin toward the front left, and the small orange pumpkin toward the front right. Rotate each pumpkin until its neatest ribs and seams face forward. This simple arrangement establishes the basic triangular composition of the Crochet Autumn Pumpkin Centerpiece Pattern, leaving plenty of room for foliage and flowers.
Making Crochet Stems, Leaves, Vines, and Autumn Flowers
For each stem, use brown yarn and create a narrow textured tube. One method is to [ch 8–12], depending on the desired stem height, and work rows of sc in BLO until the strip is wide enough to roll. Roll the piece tightly into a cylinder and sew the long edge closed. Alternatively, crochet a small tube in continuous rounds. Lightly stuff the stem or insert a safe flexible support if extra firmness is needed. Sew one stem securely into the gathered center of each pumpkin.
Green pumpkin leaves add another layer of detail. Start with [ch 9]. Working along the chain, try [sl st, sc, hdc, dc, dc, hdc, sc, sl st], adjusting the sequence to fit your chain. Work along the opposite side of the foundation chain to create the second half of the leaf. For a more pointed appearance, place extra stitches near the widest section and finish with a slip stitch at the tip. Leave a yarn tail for attaching the leaf beside the stem.
The curled vines are particularly charming. Using olive green yarn, make a chain of approximately 20–30 chains. Beginning in the second chain from the hook, work [2 or 3 sc in each ch] across. Placing multiple stitches into every chain forces the strip to curl naturally into a spiral. For a tighter vine, use three stitches per chain; for a softer curl, alternate two and three stitches. Attach the vine close to the pumpkin stem and allow it to curl freely over the pumpkin surface.
To crochet the sunflower-style flowers, begin with dark brown yarn. Make a magic ring and work [6 sc into ring]. Increase in the next rounds until you have a flat circular center of the desired size. Change to golden yellow yarn for the petals. A simple petal can be formed with [ch 5, sl st in 2nd ch, sc, hdc, dc, sl st into the next center stitch]. Repeat around the brown center. Longer chains create the elongated pointed petals that give the flower its recognizable autumn sunflower appearance.
For the deep red layered flower, crochet a small central circle and build several rounds of petals around it. The inner petals can be short combinations such as [sc, hdc, sc], while outer petals can use taller stitches such as [hdc, dc, dc, hdc]. Working some petals into front loops and others into back loops creates layers and gives the flower greater dimension. Burgundy, cranberry, brick red, or wine-colored yarn works especially well with the orange pumpkins.
Small white flowers provide contrast around the lower edge. Begin with a golden or brown center, then crochet simple white petals around it. You can use [ch 4, dc, hdc, sl st] for each petal or modify the stitch heights to create pointed shapes. Make several sizes rather than producing identical flowers. This variety, combined with the sunflowers and red blossom, gives the crochet autumn centerpiece a handcrafted botanical look instead of a perfectly symmetrical arrangement.
Crocheting Fall Leaves and Assembling the Complete Centerpiece
The colorful autumn leaves form the visual foundation of the arrangement. Use mustard yellow, burgundy, orange, and olive green yarn. For a simple pointed leaf, begin with a central chain and work stitches of gradually increasing height along one side: [sl st, sc, hdc, dc, tr, dc, hdc, sc]. Crochet around the end and mirror the stitch sequence down the opposite side. This produces an elongated leaf with a defined central spine.
For a maple-inspired leaf, begin from a central base and crochet several pointed lobes. Each lobe can be created with a sequence of chains and graduated stitches, then joined back toward the center with slip stitches. Make the middle lobe longest and the side lobes progressively shorter. Exact stitch counts can be adjusted according to your yarn and desired leaf size. Surface slip stitches or simple embroidery can be added afterward to suggest leaf veins.
Make approximately 8–15 autumn leaves in several colors and sizes. You do not need identical numbers of every shade. A pleasing palette might contain mustard yellow leaves, burgundy leaves, several olive green leaves, and one or two burnt orange accents. Blocking the leaves lightly can help emphasize their pointed edges, although heavily textured leaves may look better with their natural crochet shape.
Assembly is easiest when you work from the largest objects toward the smallest. Position the three pumpkins first on a stable decorative surface. Arrange the large orange pumpkin at the back, then place the cream and small orange pumpkins slightly forward. Add the largest sunflowers around the sides, followed by the burgundy flower and white blossoms. Tuck the crocheted leaves underneath and between these elements so they radiate outward from the pumpkins.
If the centerpiece will remain in one permanent arrangement, stitch the pieces together discreetly with matching yarn. You can also attach them to a crocheted base. For a flexible seasonal display, keep the pumpkins removable and arrange the flowers and leaves around them each year. Avoid unstable attachments if the centerpiece will be moved frequently. The goal is a balanced arrangement in which every element supports the pumpkins without hiding their beautiful ribbed texture.
Finish by adding small crocheted berries if desired. Tiny balls can be made using a magic ring, a few sc increases, one or two even rounds, and decreases until closed. Make them in red, orange, or golden yellow and cluster them near the flowers and leaves. Weave in all remaining ends, reshape the pumpkin sections, straighten the leaves, and adjust the vines. Your finished Crochet Autumn Pumpkin Centerpiece Pattern should now have the layered, abundant character of a handmade autumn harvest display.
Frequently Asked Questions About the Crochet Autumn Pumpkin Centerpiece Pattern
What crochet skill level is recommended for this pattern?
An adventurous beginner or intermediate crocheter should be comfortable with this project. The pumpkins themselves are relatively simple because their texture can be created with back loop only single crochet. The flowers, shaped leaves, vines, and assembly introduce additional techniques, but each component can be practiced separately.
What does BLO mean in this crochet pattern?
BLO means Back Loop Only. Instead of inserting the hook underneath both loops at the top of a stitch, insert it only through the loop farthest from you. Working repeated rows this way creates raised ridges, which are especially useful for producing the segmented texture of crocheted pumpkins.
Can I make the pumpkins larger or smaller?
Yes. The Crochet Autumn Pumpkin Centerpiece Pattern is easy to resize. Increase or decrease the starting chain to change the pumpkin height. Crochet more or fewer rows to change its circumference. You can therefore create miniature pumpkins, medium table decorations, or a larger statement centerpiece using the same basic construction.
What yarn is best for crochet pumpkins?
Worsted weight yarn is an excellent general-purpose choice because it provides good stitch definition and enough structure for stuffing. Cotton creates crisp stitches, while many acrylic yarns are lightweight, accessible, and easy to work with. The most important consideration is choosing yarn that produces a sufficiently dense fabric for stuffed pieces.
How do I keep the stuffing from showing?
Use a crochet hook that produces tight stitches and avoid overstretching the pumpkin body while filling it. Add small amounts of fiberfill gradually. If large openings appear between stitches, consider moving down one hook size while maintaining comfortable tension.
How do I make the pumpkin look more realistic?
Strong vertical ribs are the key. Use BLO crochet, stuff the pumpkin evenly, and pull shaping strands from the top to the bottom to emphasize the natural sections. A slightly flattened shape usually looks more pumpkin-like than a perfectly spherical one.
How is the curly crochet vine made?
Create a foundation chain and then work multiple stitches into every chain. For example, [3 sc in each ch across] naturally forces the crocheted strip to spiral. You can adjust the number of stitches to make the curl tighter or looser.
Can I make only the pumpkins without the flowers?
Absolutely. The three pumpkins can function as a complete autumn decoration by themselves. The leaves, sunflowers, flowers, vines, and berries are decorative additions that transform the pumpkins into a fuller centerpiece.
Can I use different autumn colors?
Yes. Traditional orange, cream, burgundy, mustard, brown, and olive green create a classic harvest palette, but the pattern can easily be adapted. Rust, beige, sage, terracotta, gold, chocolate brown, or muted pumpkin shades can create a softer farmhouse-inspired arrangement.
Is the centerpiece suitable for Thanksgiving decorating?
Yes. Pumpkins, sunflowers, colorful leaves, and warm harvest colors naturally suit fall and Thanksgiving décor. Because the project is made from yarn rather than fresh foliage, it can also be carefully stored and reused for future autumn seasons.
How should I store the finished crochet centerpiece?
Keep the pieces clean and completely dry before storage. Place them in a container where the flowers and leaves will not be heavily compressed. If a pumpkin becomes slightly flattened during storage, gently redistribute the fiberfill and reshape its sections by hand before displaying it again.
Conclusion
The Crochet Autumn Pumpkin Centerpiece Pattern brings several enjoyable crochet techniques together in one colorful seasonal project. You learned how to create ribbed pumpkin panels with BLO single crochet, seam and stuff three differently sized pumpkins, emphasize their sections, make textured brown stems, crochet green leaves and spiral vines, and add sunflower-inspired blossoms, layered flowers, autumn foliage, and optional berries.
More importantly, the project is designed to be customizable. You can use the three-pumpkin arrangement as shown, simplify it to one pumpkin and a few leaves, or expand it into an abundant autumn display filled with flowers and foliage. The crochet keys and repeating stitch combinations make it possible to adjust the dimensions and decorative details according to your preferred yarn, hook, colors, and available display space.
Once everything is assembled, take a moment to reshape the pumpkins and arrange the foliage naturally. Small changes in the angle of a sunflower, the curl of a vine, or the position of a burgundy leaf can dramatically improve the final presentation. Handmade pieces do not need to be perfectly identical; those subtle variations are part of what gives crochet décor its warmth and personality.
EASILY FIND THE FREE PDF FOR THIS PATTERN HERE!
I hope this Crochet Autumn Pumpkin Centerpiece Pattern inspires you to create a cozy handmade decoration for the fall season. If you make your own version, leave your sincere opinion about the pattern and share your suggestions for future crochet projects. Your ideas, color combinations, and creative variations can inspire even more beautiful ways to celebrate autumn with crochet.