
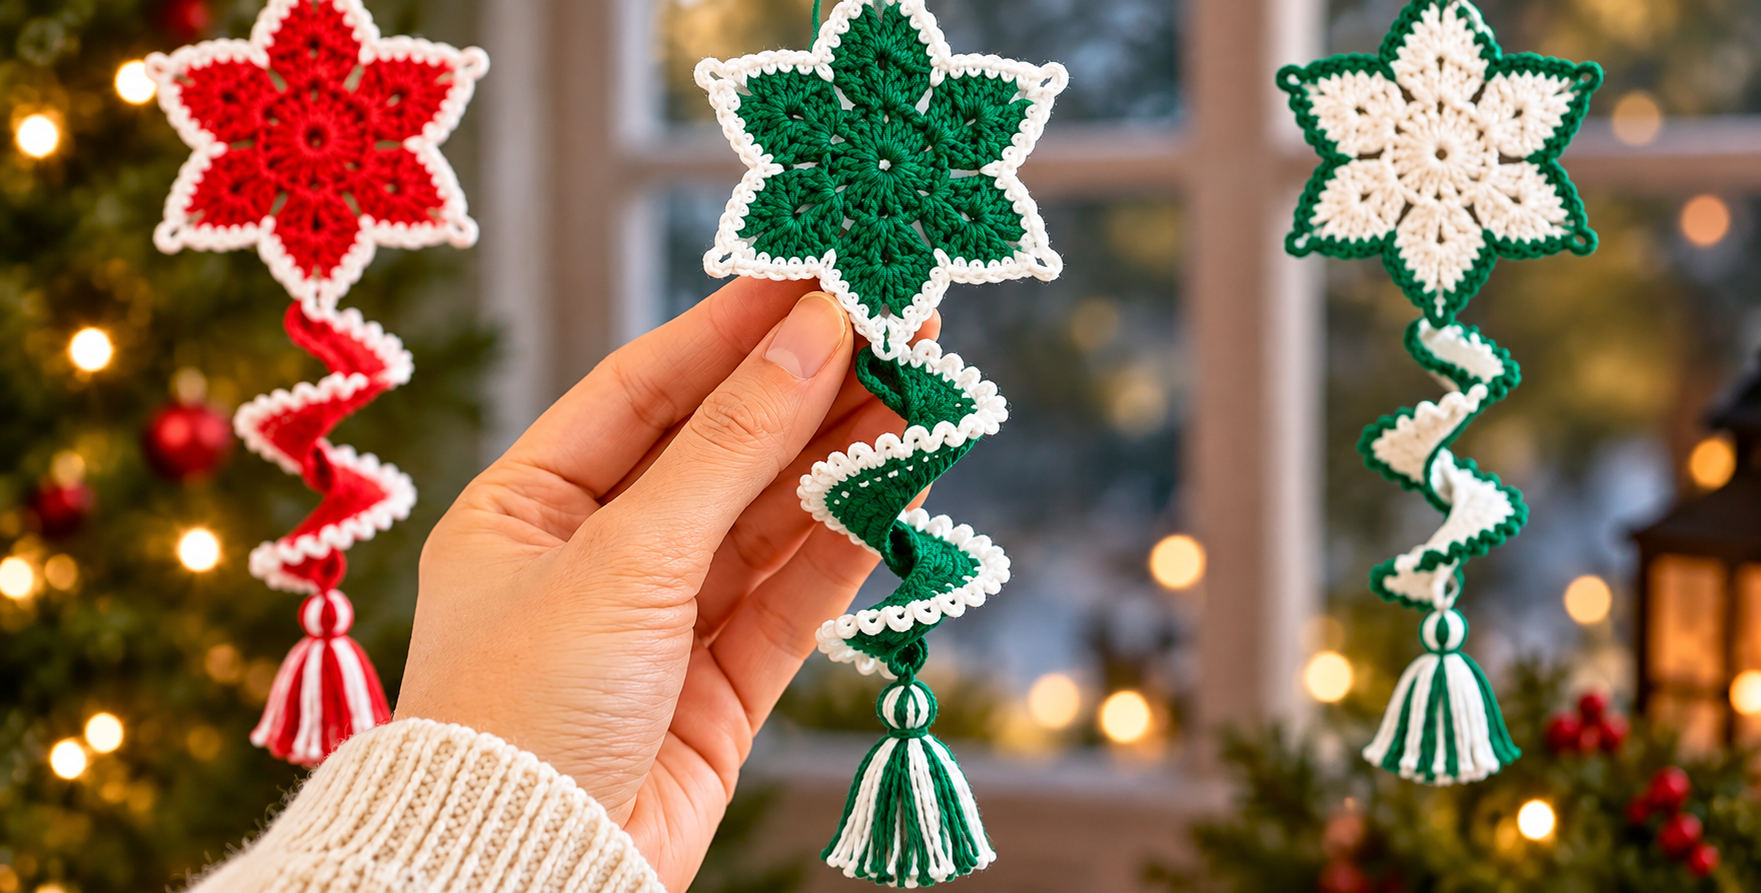
The Crochet Christmas star wind mobile Pattern is a festive crochet project that combines a decorative star, a playful spiral, and a soft tassel into one hanging Christmas ornament. The finished piece can be displayed on a Christmas tree, near a window, from a shelf, or as part of a handmade holiday arrangement. What makes this design especially appealing is the movement created by the crocheted spiral underneath the star. Even a small movement in the surrounding air can make the lower section turn gently, giving the decoration the charming appearance of a miniature Christmas wind mobile.
This project is also an enjoyable way to practice several useful crochet techniques in a relatively small piece. You will work with a magic ring, chains, slip stitches, single crochet, double crochet, increases, decorative edging, and shaping techniques. The star is built around a circular center and gradually develops pointed sections, while the spiral relies on intentionally placing several stitches into the same chains so the fabric naturally curls. The tassel adds the final vertical element and gives the ornament a polished, balanced appearance. Beginners with basic crochet experience can follow the pattern slowly, while experienced crocheters can easily customize it.
For this Crochet Christmas star wind mobile Pattern, traditional Christmas colors such as green, white, and red work beautifully, but there is plenty of room for creativity. Cotton yarn provides excellent stitch definition, while acrylic yarn can create a softer and slightly fuller ornament. A lightweight or sport-weight yarn is particularly suitable when you want a delicate star. Throughout the instructions, the crochet terminology follows U.S. crochet terms, and the pattern uses a simple key so you can quickly recognize each abbreviation while working through the rounds.
Materials, Crochet Key, and Preparation
Before beginning your Crochet Christmas star wind mobile Pattern, gather lightweight cotton or acrylic yarn in two contrasting colors. A classic combination is green and white, although red and white, gold and cream, blue and silver, or other holiday combinations can be equally attractive. You will also need a crochet hook appropriate for your yarn, scissors, a yarn needle, and optional fabric stiffener if you prefer a firmer star.
DISCOVER MORE FREE PATTERNS HERE!
The main crochet key used in this pattern is: MR = Magic Ring, ch = chain, sl st = slip stitch, sc = single crochet, hdc = half double crochet, dc = double crochet, tr = treble crochet, st/sts = stitch/stitches, sp = space, inc = increase, rep = repeat, and FO = fasten off. Understanding these abbreviations before starting will make the instructions much easier to follow.
A magic ring (MR) forms an adjustable starting circle. Instead of beginning with a fixed chain loop, the yarn is wrapped to create an adjustable ring. After completing the first stitches inside it, gently pull the yarn tail to close the center. This technique creates the compact center that works especially well for decorative crochet stars.
The chain stitch (ch) creates both height and spacing. In this design, chains are especially important when forming the star points and the hanging spiral. Keep your chain tension relaxed and consistent. Chains that are extremely tight can make the points difficult to shape, while chains that are excessively loose may produce uneven edges.
The single crochet (sc) is used for firm areas and decorative edging, while double crochet (dc) provides additional height. Combining stitches of different heights allows each star point to rise gradually toward its tip and then descend symmetrically. This progression is one of the easiest ways to achieve clearly defined crochet star points.
Before beginning, make a small tension sample if the finished size is important to you. For an ornament, exact gauge is usually less critical than consistency. Your main objective should be creating stitches that are uniform without being excessively tight. Leave reasonably long yarn tails because they can later be woven securely into the back of the ornament.
Crocheting the Christmas Star Step by Step
Start the center of the Crochet Christmas star wind mobile Pattern with your primary color. Make an MR, then ch 3 to establish the height of the first round. Work 11 dc into the ring and join with a sl st at the top of the beginning chain. Pull the magic-ring tail carefully until the center closes neatly. You should now have a compact circular foundation from which the decorative sections can grow.
For the next round, ch 3 and work another dc into the same stitch. Continue around by placing 2 dc into each stitch from the previous round. This is a standard increase round and expands the center without allowing it to cup dramatically. Join with a sl st when you reach the beginning. Keep the circle relatively flat as you work.
Now begin preparing the sections that will become the star points. Work a combination such as sc, hdc, dc, tr, ch 2, tr, dc, hdc, sc across a designated group of stitches or spaces. The increasing stitch heights create the first side of the point, the chain space defines the tip, and the decreasing heights create the opposite side. Repeat the sequence evenly around the center until the star shape is complete.
When forming each point, pay particular attention to the ch-2 tip. On the following edging round, this small space becomes an excellent location for creating a sharper point. If necessary, place sc, ch 2, sc into the tip space. This adds definition without dramatically increasing the overall size. Adjusting the chain count by one stitch is acceptable when working with a yarn that behaves differently.
Change to your contrasting yarn for the decorative border. Join the new yarn discreetly near the base of one point and work sc stitches around the outer edge. At every star tip, work sc, ch 2, sc into the tip space. Continue down the opposite side using evenly distributed sc stitches. The contrasting border highlights the silhouette and gives the star the crisp handmade appearance associated with Christmas crochet ornaments.
Once the border is finished, join with a sl st and FO, leaving enough yarn to weave in securely. Use your yarn needle to hide all loose ends on the back. Place the star on a flat surface and gently shape all of the points with your fingers. If the yarn permits blocking, lightly dampen the piece, arrange the points symmetrically, and allow it to dry completely before attaching the lower decorations.
Making the Crochet Spiral and Tassel
The curling section is one of the defining features of the Crochet Christmas star wind mobile Pattern. Attach the main color at the bottom center of the star and create a chain approximately 20–30 cm long, depending on how long you want your ornament to hang. Remember that the finished spiral will become considerably shorter once the stitches cause the chain to curl.
Turn and begin working back along the foundation chain. Place 3 dc into each chain stitch. Because several stitches are being forced into every individual chain, the crochet fabric will naturally twist into a spiral. There is no need to manually twist it permanently. Simply continue crocheting and allow the increasing fabric to form its own curls.
For a fuller spiral, you can occasionally use four dc in a chain, while a gentler curl may be produced with two or three stitches. The important principle behind the technique is the same: multiple stitches worked into each foundation chain create the spiral effect. Maintain consistent tension so that the curl looks balanced from the top to the bottom.
A contrasting edging can make the spiral coordinate beautifully with the star. Join your second color along the visible outside edge and work small sc stitches or slip stitches along the curl. Avoid pulling this border too tightly because doing so can distort the spiral. The border should follow the natural curve rather than forcing the crochet into a new shape.
At the bottom, create a small crocheted loop or secure a decorative yarn knot before adding the tassel. To make the tassel, wrap yarn around a piece of cardboard approximately 7–9 cm tall several times. Slide a separate strand underneath the wrapped yarn and tie the top firmly. Remove the bundle from the cardboard and wrap another strand around the upper section to create the tassel head.
Cut through the loops at the bottom and trim the yarn ends until they are relatively even. A combination of the two project colors gives the tassel a cheerful striped appearance. Attach it securely to the bottom of the spiral using the top tying strand. After weaving in the remaining ends, hold the ornament vertically and check whether the star, spiral, and tassel hang naturally in alignment.
Finishing, Customizing, and Displaying the Pattern
To create the hanging loop, attach yarn to the uppermost star point. Chain approximately 10–15 cm, depending on where you plan to display the ornament, and join the chain back to the same point with a sl st. FO securely and weave in the yarn ends. The loop should be strong enough to support the ornament without pulling the upper point out of shape.
If your finished star feels too soft, blocking can improve its appearance significantly. Pin the star carefully onto a suitable blocking surface, making sure that all points are evenly spaced. Lightly dampen the crochet according to the yarn manufacturer’s care requirements and allow it to dry completely. Optional craft stiffener may be used sparingly when a more structured decoration is desired.
Color customization is one of the easiest ways to make this pattern your own. A red star with white edging creates a traditional Christmas appearance, while green and white offer a fresh evergreen-inspired style. Cream and gold can create an elegant ornament, and icy blue with white can suggest a winter snowflake. Scrap yarn can also be used to make several coordinated versions.
You can adjust the finished dimensions simply by changing yarn weight, hook size, or the number of rounds. Thicker yarn will generally create a larger and more substantial ornament, while fine cotton produces a delicate result. When resizing, remember that the spiral and tassel should remain visually proportional to the star so the entire mobile feels balanced.
Another creative option is making several stars and hanging them at different lengths. Repeating the Crochet Christmas star wind mobile Pattern in coordinating colors can create a larger decorative arrangement for a window or covered indoor display area. Keep lightweight handmade crochet decorations away from open flames, heaters, and other high-temperature sources.
The finished ornament also works well as a handmade seasonal gift. Because it is relatively small, it can be prepared in multiple color combinations without requiring the amount of yarn associated with larger crochet projects. Add a simple hanging loop, carefully weave in every yarn end, trim the tassel, and your Christmas star mobile is ready to bring a handmade touch to holiday decorating.
FAQ About the Crochet Christmas Star Wind Mobile Pattern
What skill level is recommended for this crochet pattern?
This project is suitable for an adventurous beginner or intermediate crocheter. If you already know how to make chains, slip stitches, single crochet, double crochet, and a magic ring, you should be able to complete it. The star shaping may require a little patience the first time, but the repeating structure quickly becomes familiar.
What type of yarn works best for a crochet Christmas star?
Cotton yarn is an excellent option because it provides clear stitch definition and holds decorative shapes well. Lightweight acrylic can also work beautifully. Choose yarn that allows the points and spiral stitches to remain visible rather than using an extremely fluffy yarn that hides the crochet structure.
How can I make the star points sharper?
Blocking is extremely helpful. After finishing the star, gently shape each point and pin it into position. You can also emphasize each tip by working sc, ch 2, sc into the tip space during the border round. Consistent tension makes a noticeable difference as well.
Why does the crochet chain turn into a spiral?
The spiral forms because several stitches are worked into every foundation chain. The extra crochet fabric has more width than the original chain can accommodate in a straight line, so it naturally curls. Working approximately 3 dc into each chain produces a pronounced decorative spiral.
Can I make the spiral shorter?
Yes. Simply begin with fewer chain stitches. A shorter foundation chain creates a shorter finished curl. Remember that the completed spiral will be shorter than the original straight chain because curling reduces its vertical length.
Can I use different colors?
Absolutely. The color combination does not affect the basic construction of the Crochet Christmas star wind mobile Pattern. Red and white, green and white, burgundy and cream, blue and white, or metallic-inspired holiday shades can all produce attractive results.
Do I need to stiffen the finished star?
No. Stiffening is optional. Cotton yarn worked at a moderately firm tension may hold the star shape well after blocking. If you want a particularly crisp ornament, however, a suitable fabric stiffening method can provide additional structure.
How do I stop the star from curling at the edges?
First check your tension. Extremely tight edging stitches can pull the star inward. Make sure enough stitches are placed around the points and avoid tightening the contrasting border excessively. Blocking the completed star can correct minor curling and help the piece lie flatter.
How large should the finished ornament be?
There is no mandatory finished measurement because yarn and hook combinations produce different results. A decorative star around 10–15 cm across is convenient for many holiday displays, while the spiral and tassel can extend the complete ornament considerably farther.
Can this pattern be made without the tassel?
Yes. The tassel is decorative rather than structural. You can finish the spiral with a small crochet ball, a simple loop, a yarn knot, or leave the end plain. Removing the tassel creates a simpler and lighter version of the ornament.
Can I make several stars from leftover yarn?
Yes. This type of small Christmas crochet pattern can be useful for using coordinated yarn leftovers. Just make sure you have enough of each selected color to complete matching sections, particularly the outer edging and spiral border.
How should the finished crochet ornament be stored?
Store it clean and completely dry. Place it flat or loosely arranged in a container where the star points will not remain crushed for long periods. If necessary, the star can usually be reshaped and lightly blocked before being displayed again during the next holiday season.
Conclusion
The Crochet Christmas star wind mobile Pattern brings together several enjoyable crochet techniques in one decorative holiday project. You learned how to begin with a magic ring, expand the center, use different stitch heights to form star points, add a contrasting border, and create a naturally curling spiral by working multiple stitches into each foundation chain.
You also learned how to finish the lower section with a handmade tassel, add a practical hanging loop, weave in the yarn ends, and block the star for improved definition. These finishing details are important because they transform a collection of individual crochet sections into one balanced Christmas decoration.
The crochet key makes the pattern easier to follow: MR means magic ring, ch means chain, sl st means slip stitch, sc means single crochet, hdc means half double crochet, dc means double crochet, tr means treble crochet, and FO means fasten off. Once these basic abbreviations become familiar, the construction is straightforward to repeat.
Best of all, this project can be personalized through color, yarn weight, star size, spiral length, edging, and tassel design. You can create a traditional red-and-white version, an evergreen-inspired green-and-white ornament, or develop an entirely different Christmas palette using yarn you already enjoy.
After completing your first star, consider making another version with a different color arrangement or spiral length. Small variations can give every handmade ornament its own personality while keeping the recognizable structure of the original Crochet Christmas star wind mobile Pattern.
If you make this project, leave your sincere opinion about the pattern and share your suggestions for future crochet designs. Your ideas about colors, sizes, edging styles, and other creative variations can inspire even more ways to turn this festive crochet star into a special handmade Christmas decoration.