
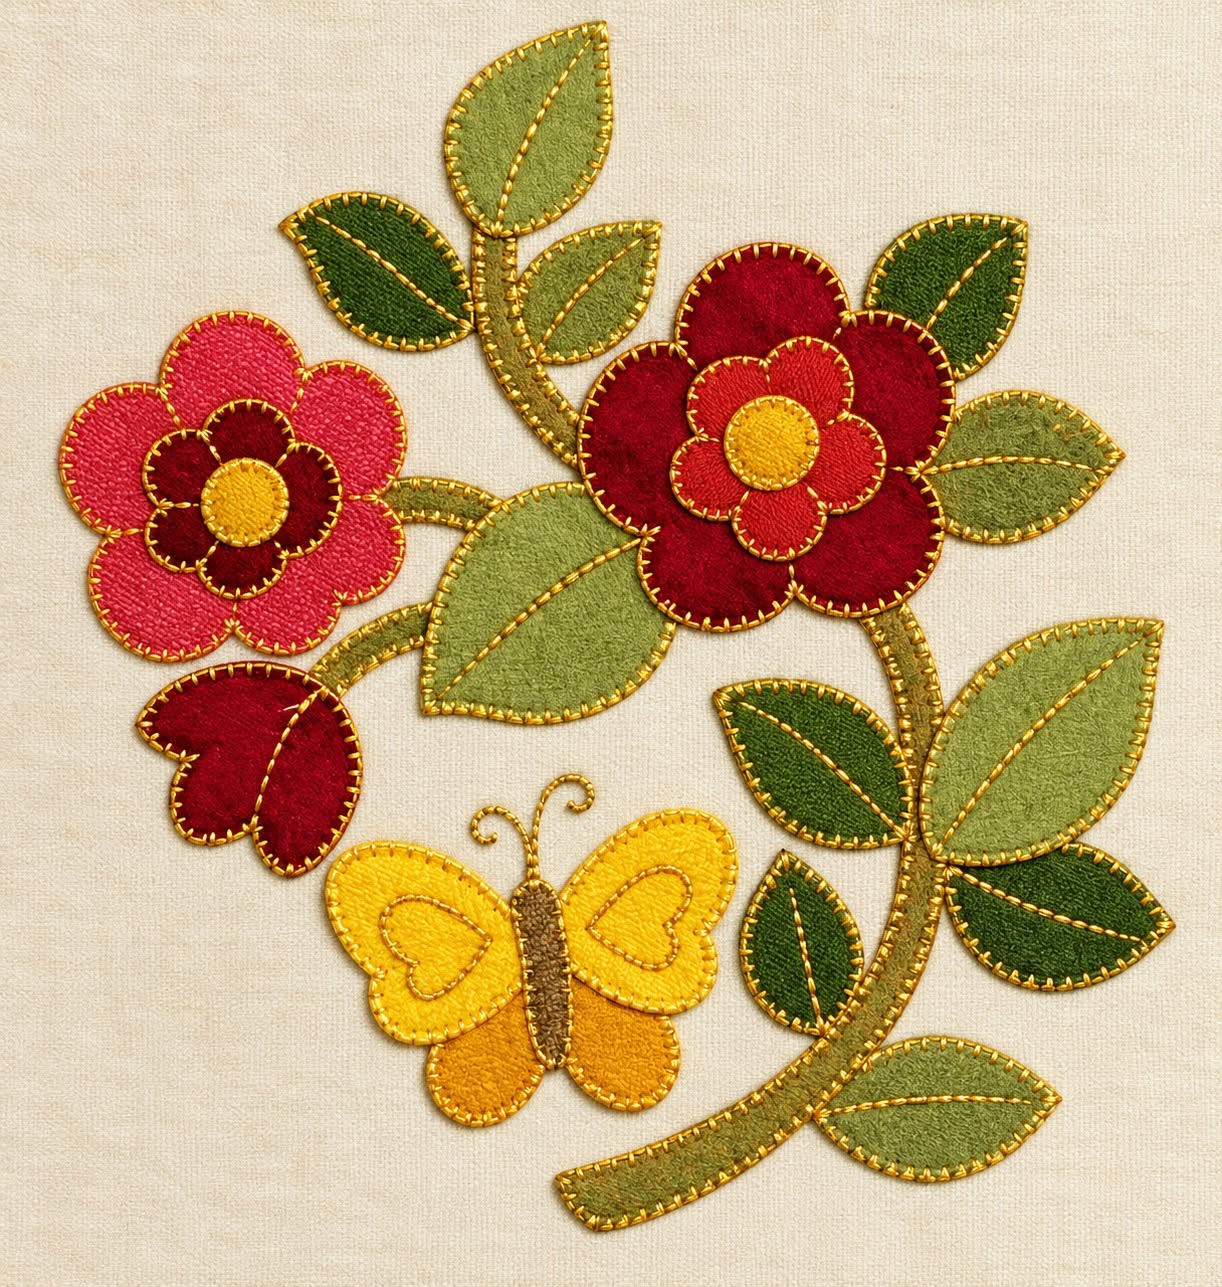
The Fabric Appliqué Flower and Butterfly Template Pattern is a charming sewing project that combines flowers, leaves, curved stems, and a cheerful butterfly into one balanced decorative composition. The design has a warm handmade appearance that works beautifully for quilt blocks, wall hangings, cushion covers, table linens, tote bags, and many other fabric projects. Because the individual shapes are relatively simple, this project can also be a comfortable introduction to fabric appliqué for beginners who want to practice layering shapes and sewing around curved edges. At the same time, experienced sewists can personalize the design with detailed stitching, fabric combinations, embroidery, and quilting.
One of the most attractive features of this Fabric Appliqué Flower and Butterfly Template Pattern is the opportunity to work with different colors and textures. The floral arrangement can be created from scraps left over from previous sewing projects, making it a practical way to use smaller pieces of cotton fabric. Deep reds and pinks can form the flowers, several shades of green can create natural-looking foliage, and warm yellow or golden fabrics can make the butterfly stand out against a neutral background. You do not have to reproduce every color exactly. The pattern is flexible enough to accommodate seasonal palettes, vintage prints, modern solids, or coordinated quilting fabrics.
Creating the finished design is mainly a matter of breaking the picture into manageable components and assembling them in the correct order. You will prepare a stable background, make templates for the stems, leaves, flowers, and butterfly, transfer those templates to fabric, arrange everything carefully, and secure the pieces using your preferred appliqué sewing technique. Paying attention to placement is more important than rushing through the construction. When the stems and larger leaves establish the structure first, the flowers and butterfly can be positioned naturally around them, resulting in a composition that looks balanced rather than crowded.
Materials, Templates, and Fabric Preparation
Begin by choosing the background for your Fabric Appliqué Flower and Butterfly Template Pattern. A light cream, ivory, beige, or soft neutral cotton provides excellent contrast for colorful appliqué pieces. Quilting cotton is especially convenient because it is stable, easy to press, and available in many colors and prints. Prewash your fabrics if you normally prewash quilting materials, particularly when the finished project may eventually be laundered.
DISCOVER MORE FREE PATTERNS HERE!
For the appliqué itself, collect several coordinated fabric scraps. You will need approximately two or three shades for the flowers, three or more greens for the leaves, a muted green or brown for the stems, yellow and orange for the butterfly wings, and a darker neutral for its body. Fabric scraps for appliqué are ideal because most of the pattern pieces are small and require very little material.
You will also need basic sewing supplies such as sharp fabric scissors, small detail scissors, an iron, matching or contrasting thread, pins or fabric-safe positioning tools, and a sewing machine if you are using machine appliqué. Depending on your preferred method, you may also want lightweight fusible web. Fusible web can make this project easier because it temporarily holds the shapes in their intended positions while you stitch around them.
Create the appliqué templates by tracing the individual components separately. The pattern consists of curved stems, oval and pointed leaves, layered flowers, a smaller bud, and a butterfly. When making templates, remember that overlapping pieces should extend slightly underneath the pieces placed above them. This small allowance prevents unwanted gaps from appearing between layers.
Trace each template carefully onto the paper side of fusible web if you are using the raw-edge fusible method. Cut around each traced shape while leaving a small amount of material outside the drawn line. Fuse each section to the wrong side of the corresponding fabric according to the fusible manufacturer’s instructions, and then cut directly along the final outline.
Before removing any protective paper or permanently attaching the pieces, arrange the entire design on the background. This is essentially a dry layout. Use the reference composition as your guide, starting with the main curved stems and then positioning the foliage, flowers, bud, and butterfly. Adjust the pieces until the design feels balanced and there is comfortable space around its outer edges.
Building the Floral Appliqué from the Background Forward
The stems should generally be positioned first because they establish the movement of the entire floral appliqué pattern. Arrange the main stem so that it rises through the design in a gentle curve. Add the smaller branches leading toward the flowers and leaves. Avoid perfectly straight placement; slight natural curves give the finished project a softer botanical appearance.
Next, place the leaves along the stems. Notice that using different greens creates considerably more visual interest than making every leaf identical. Combine olive, moss, dark forest green, and lighter yellow-green fabrics if those colors coordinate with your background. Rotate the leaves slightly in different directions so the arrangement resembles a growing plant rather than a repeated geometric motif.
Once you are satisfied with the stems and leaves, begin constructing the flowers. Each fabric appliqué flower can be made in layers. Start with the largest petal silhouette, place a smaller contrasting floral shape over it, and finish with a round center. This layering technique creates depth without requiring complicated dimensional sewing.
The red flower can become the strongest focal point. A dark red outer flower combined with a brighter red inner section and a golden-yellow center creates a rich contrast. For the second flower, try a pink or coral outer layer with a darker burgundy center and another yellow circle. Repeating the yellow centers visually connects the flowers even though their surrounding fabrics are different.
Add the smaller flower or bud after the main blossoms are positioned. A small burgundy shape tucked into the lower portion of the composition provides another touch of color and helps connect the floral section with the butterfly. Because this piece is intentionally smaller, avoid adding excessive detail that could compete with the larger flowers.
When the entire floral arrangement is correct, secure the pieces according to your chosen fabric appliqué method. With fusible appliqué, carefully follow the pressing instructions for your product. Press rather than aggressively sliding the iron across the pieces, since sliding can shift delicate leaves and narrow stems before the adhesive has bonded.
Creating the Butterfly and Stitching Every Appliqué Piece
The butterfly gives the Fabric Appliqué Flower and Butterfly Template Pattern much of its playful character. Begin with the wing shapes, creating two larger upper wings and two smaller lower wings. Yellow and golden-orange fabrics provide strong contrast against the surrounding greens and reds, although you can easily change these colors to coordinate with another project.
Position a narrow brown or neutral fabric body vertically between the wings. The body should overlap the inner edges slightly so that the individual components visually connect. For additional detail, small decorative shapes can be placed inside the upper wings. These inner motifs can be stitched hearts, curved shapes, or simplified appliqué accents.
The antennae are usually easier to create with embroidery or machine stitching than with extremely thin fabric pieces. Draw their placement lightly with a removable fabric marker, then stitch two delicate curved lines extending from the butterfly’s head. Keep the lines simple and symmetrical enough to look intentional without making them rigid.
After all pieces have been fused or temporarily secured, stitch around their edges. A narrow blanket stitch, zigzag stitch, or satin-style appliqué stitch can work well. Blanket stitching provides a traditional handmade appearance, while a narrow zigzag offers a clean machine-finished result. Straight stitching close to the raw edge is another possibility when a slightly rustic finish is desired.
Take your time around the flowers and leaves. Curves are easier to sew accurately when you slow down and stop periodically with the needle lowered into the fabric. Lift the presser foot, rotate the project slightly, lower the foot again, and continue. This method produces smoother appliqué curves than trying to force the entire shape through the machine in one continuous movement.
Thread selection can subtly change the finished appearance. Matching thread allows the fabrics to remain the primary focus, whereas darker or contrasting thread emphasizes each shape. If you want the stitching itself to become a decorative feature, select a consistent thread color that complements several fabrics throughout the project. Test your stitch settings on scraps before sewing the actual appliqué.
Finishing, Quilting, Care, and Creative Variations
Once every appliqué piece has been stitched, inspect the project carefully for loose edges or missed sections. Trim stray threads and gently press the completed flower and butterfly appliqué from the back whenever possible. Using a pressing cloth can protect both the fabric and any adhesive used during construction.
If you are turning the design into a quilt block or wall panel, add batting and backing fabric after completing the appliqué. Baste the three layers together and quilt around the motifs. Echo quilting around the flowers, butterfly, and foliage can emphasize their outlines while creating a subtle dimensional effect in the background.
For a cushion cover, center the appliqué on the front panel before assembling the pillow. Make sure enough background fabric remains around the design for seam allowances and final trimming. A simple envelope back or zipper closure can transform the finished appliqué panel into a decorative cushion suitable for a living room, bedroom, or sewing space.
This Fabric Appliqué Flower and Butterfly Template Pattern can also be adapted for a table runner. Repeat the arrangement at both ends of a long background panel, or use one larger motif at the center. For a tote bag, reduce the template slightly and position it on the front panel before constructing the bag. Applying the design while the fabric is still flat is much easier than attempting appliqué after the item has been assembled.
Color variations provide another way to make the pattern your own. Spring versions can feature pastel pink, lavender, pale yellow, and fresh green. Autumn projects can combine rust, burgundy, mustard, olive, and brown. A Christmas-inspired interpretation could use deep red flowers, evergreen foliage, and touches of gold. The basic appliqué template pattern remains unchanged while the color palette completely transforms its personality.
Finally, remember that handmade appliqué does not need to look mechanically perfect. Small variations in stitching and placement can contribute to the character of the finished work. Focus on secure construction, balanced placement, smooth pressing, and colors you genuinely enjoy. With those fundamentals in place, the project can become a beautiful example of personalized fabric appliqué sewing.
FAQ About the Fabric Appliqué Flower and Butterfly Template Pattern
Is this Fabric Appliqué Flower and Butterfly Template Pattern suitable for beginners?
Yes. The project is approachable for beginners because most components are simple shapes. The narrow stems and curved flower petals require some patience, but practicing on scrap fabric first can make the final stitching much easier.
What fabric is best for flower and butterfly appliqué?
Quilting cotton is one of the easiest options because it is stable, easy to cut, and available in countless colors. Cotton scraps from previous quilting projects are particularly useful for the smaller leaves, flower centers, and butterfly details.
Do I need fusible web for this project?
Not necessarily. Fusible web makes positioning small shapes easier, especially for beginners, but traditional needle-turn appliqué or other appliqué methods can also be used. Choose the technique that matches your sewing experience and the finish you want.
Which stitch should I use around the appliqué pieces?
A blanket stitch, narrow zigzag, satin stitch, or straight stitch close to the edge can all work. Blanket stitching gives the project a decorative traditional appearance, while narrow zigzag stitching creates a neat and secure edge.
How can I sew smoothly around small curves?
Use a shorter stitch length when appropriate and sew slowly. When you need to change direction, stop with the needle down, raise the presser foot, rotate the fabric slightly, and continue. Several small adjustments usually create smoother curves than one large turn.
Can I make the flowers in different colors?
Absolutely. The template determines the shapes, not the colors. Pink, purple, blue, orange, burgundy, or multicolored flowers can all work. Try selecting fabrics with enough contrast so that the individual layers remain visible.
Can this pattern be enlarged or reduced?
Yes. The templates can be resized as long as all pieces are changed by the same percentage. Enlarging the pattern is useful for wall hangings and cushions, while reducing it can make the design suitable for bags, small quilt blocks, or decorative fabric accessories.
Should I appliqué before or after quilting?
For this style of project, it is generally convenient to complete the main appliqué on the background first. You can then create the quilt sandwich and add quilting around or between the motifs. This provides greater control over the individual appliqué pieces.
How do I prevent the background from puckering?
Avoid stretching the fabric while sewing and make sure your tension is properly adjusted. Stabilizer may help with dense decorative stitching. Pressing the background before beginning and securing the appliqué pieces properly can also improve the final result.
What can I make with the finished appliqué design?
The completed motif can decorate a quilt block, cushion cover, wall hanging, tote bag, table runner, fabric organizer, placemat, or framed textile panel. Because the flowers and butterfly form a self-contained composition, the design adapts easily to projects of different sizes.
Conclusion
The Fabric Appliqué Flower and Butterfly Template Pattern offers a creative way to practice several essential sewing skills within one colorful project. Throughout this tutorial, we covered fabric selection, template preparation, stem and leaf placement, layered flower construction, butterfly assembly, appliqué stitching, pressing, quilting, and several ways to adapt the finished motif for different handmade items.
The key to achieving a polished result is to build the composition gradually. Position the stems first, arrange the leaves around them, construct the layered flowers, add the butterfly, and only then secure and stitch everything permanently. This sequence helps preserve the flowing botanical appearance of the original design while making the construction process easier to manage.
EASILY FIND THE FREE PDF FOR THIS PATTERN HERE!
You can follow the suggested colors closely or use the Fabric Appliqué Flower and Butterfly Template Pattern as a starting point for your own creative version. Different scraps, prints, thread colors, and quilting styles can make every finished piece unique while preserving the recognizable floral-and-butterfly arrangement. If you make this project, leave your sincere opinion about the pattern and share your suggestions. Tell us which colors you would choose, what item you would decorate with the finished appliqué, and which sewing techniques you would like to see explained in a future tutorial.