
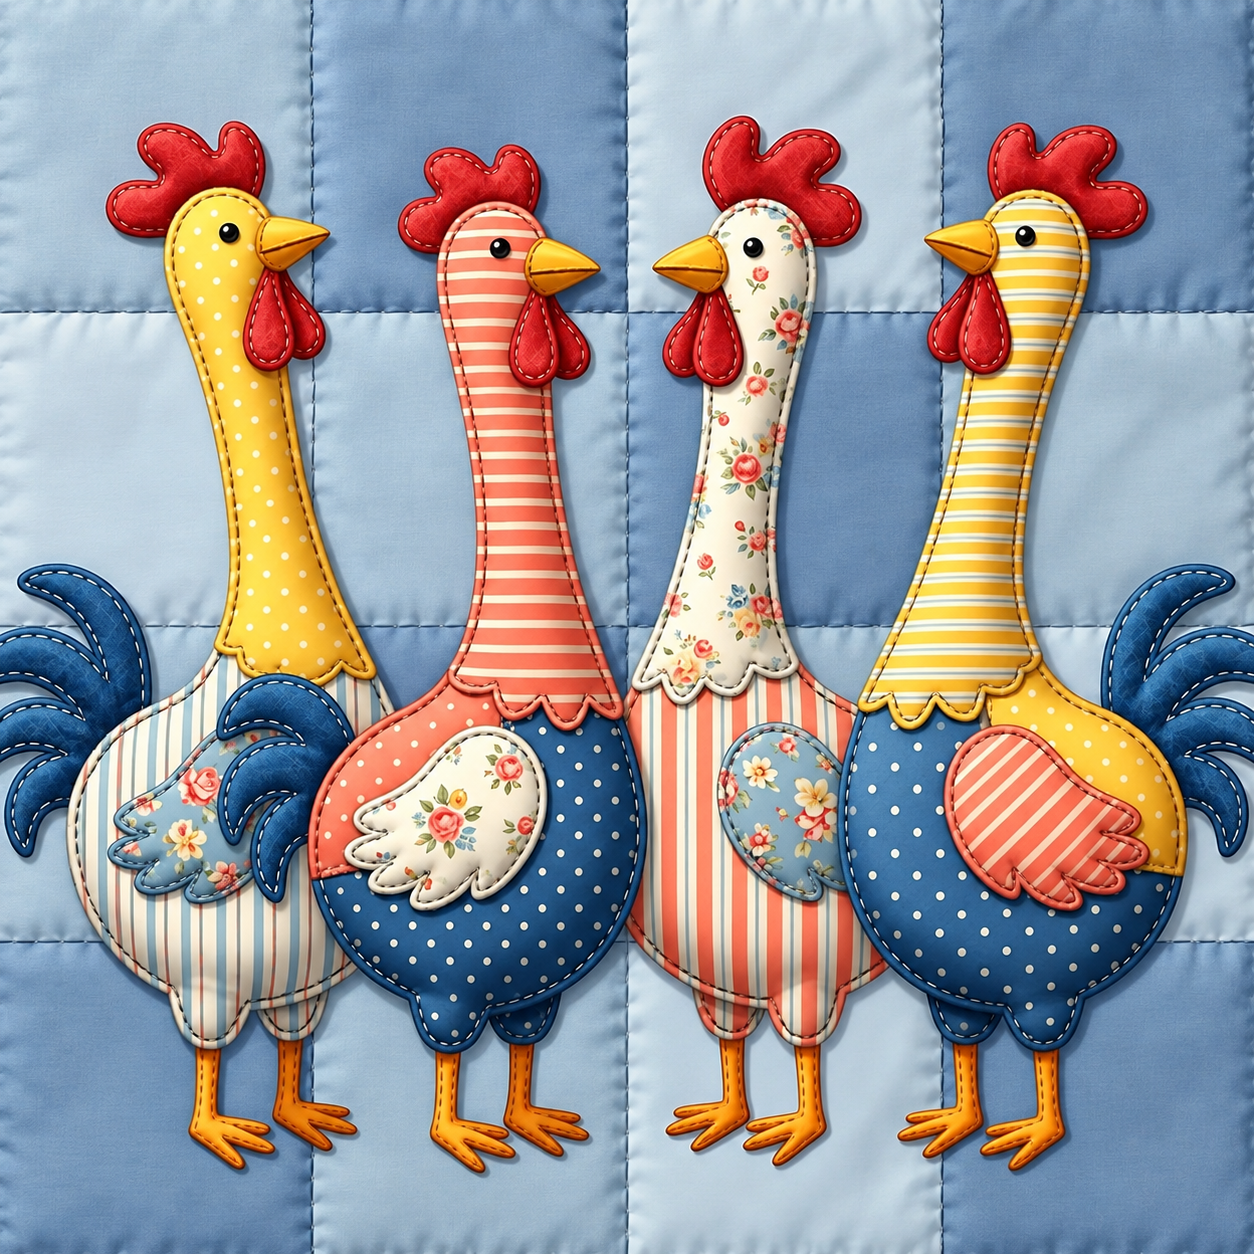
The Patchwork Rooster Applique Panel Pattern is a cheerful sewing project that combines traditional patchwork, layered fabric appliqué, decorative stitching, and playful country-inspired details. The design shown in the reference features a charming group of four tall roosters arranged side by side on a softly quilted blue background. Each bird has its own combination of striped, floral, polka-dot, and solid fabrics, which gives the finished panel a handmade personality without making the composition feel overly busy. Small hearts and button-inspired circles fill some of the open spaces and help connect the individual birds into one unified scene. This type of project is especially enjoyable because it allows you to use favorite cotton prints and smaller fabric pieces that might otherwise remain unused. Although the finished design looks elaborate, it becomes much easier when the rooster is divided into simple components such as the body, neck, wing, comb, beak, tail, wattles, and legs. By assembling those shapes one layer at a time, even an intermediate beginner can create a polished decorative panel.
One of the most appealing qualities of this Patchwork Rooster Applique Panel Pattern is the freedom to personalize every rooster. Instead of requiring four identical birds, the project encourages you to coordinate fabrics while still allowing each character to look different. Yellow polka dots can be combined with narrow stripes, coral fabrics can sit beside dusty blue prints, and delicate floral cotton can soften stronger geometric patterns. The result is a colorful fabric appliqué panel that works beautifully in farmhouse, cottage, country, or vintage-inspired décor. Fabric selection is also an important part of the construction process because contrast helps define the individual appliqué pieces. A light wing, for example, becomes much easier to see against a dark blue body. Similarly, a bright red comb immediately establishes the rooster motif. Careful color placement therefore contributes just as much to the finished appearance as accurate cutting and stitching.
Creating this project from beginning to end requires patience rather than complicated sewing techniques. You will prepare a quilted foundation, make reusable templates, transfer the individual shapes to fabric, stabilize the pieces, arrange the roosters, and secure everything with decorative stitching. The dimensional appearance can be achieved through layered appliqué and optional light padding beneath selected elements. Standard quilting cotton is an excellent choice for most visible pieces because it is easy to cut and press, while fusible web can help hold small shapes securely before stitching. A finished panel can be displayed as wall décor, incorporated into a larger quilt, transformed into a decorative cushion front, or adapted for another textile project. The following guide explains the Patchwork Rooster Applique Panel Pattern step by step so you can understand not only how to reproduce the look, but also why each construction decision matters.
Materials, Fabric Selection, and Preparing the Rooster Templates
Begin by gathering quilting cotton in several coordinated colors and prints. For a look similar to the reference, consider soft blue for the background, coral or red for the combs and wattles, mustard yellow for selected necks and bodies, navy blue for tails, and cream for lighter sections. Add striped, floral, and polka-dot fabrics to create the distinctive patchwork rooster appearance. You will also need batting, backing fabric, fusible web suitable for appliqué, coordinating sewing thread, scissors, pins, an iron, a sewing machine, and basic marking tools.
DISCOVER MORE FREE PATTERNS HERE!
Choose your fabrics as a collection rather than selecting each print independently. The reference design succeeds because coral, yellow, cream, and blue appear repeatedly throughout the composition. Repeating colors creates visual rhythm even though every rooster has a different fabric arrangement. Try placing your fabrics together before cutting anything. If one print dominates all the others, reserve it for a smaller element such as a wing or heart.
Next, create templates for the major rooster components. You will need separate pattern pieces for the main body, long neck or breast section, wing, tail feathers, comb, wattles, beak, legs, feet, and optional decorative accessories. The four birds can share the same basic templates while being slightly altered in orientation or fabric placement. This approach keeps the Patchwork Rooster Applique Panel Pattern consistent while preserving the whimsical appearance of individually designed characters.
Trace each template onto paper or lightweight cardstock and clearly label it. Write the piece name, quantity required, and orientation directly on the template. If you are using fusible appliqué, remember that tracing onto the paper side of fusible web can reverse the final shape. This is especially important for wings, beaks, and tails when you want particular roosters to face in a specific direction.
Prepare a background panel large enough to comfortably accommodate all four birds. Rather than trimming it immediately to the exact finished dimensions, leave several centimeters of extra fabric around every edge. Layer the background with batting and backing, smooth the layers carefully, and baste them together. A softly quilted foundation gives the finished project the cozy padded appearance visible in the reference.
Quilt the background before attaching the appliqué pieces if you want the subtle panel divisions to remain visible behind the birds. Straight vertical and horizontal quilting lines are an easy option and produce a clean grid effect. Keep this background quilting relatively understated because the roosters should remain the focal point. Once the foundation is stable, press it gently and place it on a flat surface for the next stage.
Cutting and Building the Patchwork Rooster Appliqué Pieces
Start cutting the largest body pieces first. These establish the scale and position of each rooster, so preparing them before the tiny details makes assembly easier. For a four-rooster arrangement, vary the body fabrics between stripes, dots, florals, and solid-looking prints. Keeping the silhouettes similar while changing the fabrics creates the characteristic patchwork appliqué style.
Cut the elongated neck pieces next. In the reference, these long shapes extend downward and overlap the upper portion of the bodies. Their narrow profile gives the birds their playful tall appearance. Try alternating light and darker fabrics across the panel. For example, a yellow dotted neck can sit beside coral stripes, followed by a cream floral neck and then yellow stripes.
Prepare the wings using fabrics that contrast with the corresponding bodies. A cream floral wing works especially well against a navy polka-dot body, while coral stripes can stand out against mustard yellow. If desired, place a very thin piece of batting behind each wing before stitching. This produces gentle dimension without making the appliqué excessively bulky.
Now cut the combs, wattles, and beaks. Warm red and coral fabrics work beautifully for the combs and wattles, while golden yellow or orange fabric gives the beaks definition. These relatively small elements are visually important because they immediately identify the birds as roosters. Use sharp scissors and take your time around curved edges.
Tail feathers can be created as one larger silhouette or as several overlapping shapes. The reference uses dark blue curved feathers that contrast strongly with the lighter background. Layering individual feather shapes produces extra depth, while a single grouped tail is faster to sew. Either method can work successfully as long as the tail remains proportionate to the body.
Finally, prepare the legs, feet, hearts, and button-style embellishments. Orange or golden fabric is a natural choice for the legs. Small hearts can repeat colors already used in the roosters, helping distribute coral, blue, cream, and striped fabrics around the composition. These little accessories are optional, but they make the Patchwork Rooster Applique Panel Pattern feel complete and intentionally designed.
Arranging, Fusing, and Stitching the Complete Fabric Panel
Before permanently attaching anything, arrange all four main rooster bodies on the prepared background. Begin near the center and work outward, checking the spacing between birds as you go. Their feet should appear reasonably aligned while their combs can vary slightly in height. Step away from the panel occasionally and look at the entire composition rather than focusing only on individual pieces.
Once you are satisfied with the arrangement, position the necks over the bodies. Add the tails behind or alongside the body sections according to your chosen construction order. Then place the wings, combs, wattles, beaks, legs, and feet. Taking a photograph of the temporary arrangement can be useful because it gives you a reference when you begin removing pieces for fusing and stitching.
Apply fusible web according to the manufacturer’s directions for your chosen product. Avoid excessive heat, particularly when several appliqué layers overlap. Fuse the largest pieces first and add smaller details afterward. Work on one rooster at a time if that feels more manageable. Carefully check alignment before pressing because repositioning a fully fused appliqué can be difficult.
Secure the edges using a narrow blanket stitch, zigzag stitch, satin stitch, or straight decorative stitch. A visible blanket-style stitch complements the handmade character of this rooster appliqué pattern especially well. Keep the stitch width consistent around similar pieces. Reduce your sewing speed when navigating tight curves around the combs, wattles, wings, and feet.
For a slightly raised effect, selected elements can be padded. Wings, combs, and wattles are excellent candidates because their shapes benefit from extra definition. Avoid padding every component heavily; contrasting flat and raised areas usually produces a more attractive result. Gentle dimension also makes the decorative stitching easier to appreciate.
Complete the composition by arranging the small hearts and circular button-inspired appliqués in the open spaces. Do not feel obligated to fill every empty area. Negative space gives the roosters room to stand out. After attaching these final details, inspect the entire panel for loose threads, unsecured edges, puckering, or areas that require additional stitching.
Finishing Tips, Care, and FAQ for the Patchwork Rooster Applique Panel Pattern
After all appliqué stitching is finished, place the panel flat and inspect its shape. Quilting and appliqué can sometimes distort the outer edges slightly, so square the project carefully before adding a border or binding. Measure from the center rather than automatically trimming from one side. This helps keep the four-rooster composition visually centered.
If you want a finished wall hanging, bind the edges using coordinating cotton fabric. Blue, coral, cream, or mustard can all work depending on which color you want to emphasize. A simple binding usually suits this design better than an extremely elaborate border because the numerous patterned fabrics already provide plenty of visual detail.
For a more decorative finish, add a hanging sleeve to the back before completing the binding. The panel can then be displayed using a lightweight rod. Another option is to adapt the Patchwork Rooster Applique Panel Pattern into the center of a larger quilt by surrounding it with patchwork borders or coordinating blocks.
Care for the completed piece according to the fabrics, batting, thread, and fusible products you used. For decorative wall panels, gentle cleaning is often preferable to frequent washing. If you plan to turn the design into a washable household item, prewashing the cotton fabrics before construction can help reduce differences in shrinkage.
The pattern can also be simplified for beginners. Instead of four roosters, make a single large rooster using the same basic components. This allows you to practice curved appliqué, fabric layering, and decorative stitching without preparing dozens of small pieces. Once comfortable with the process, expand the idea into a pair or complete group.
Most importantly, allow small handmade variations to remain part of the project. Slight differences in wings, tail feathers, stitching, and fabric placement give appliqué its character. Accuracy matters where pieces need to align, but the goal does not have to be mechanical perfection. A lively arrangement of prints and textures is part of what makes this fabric rooster panel so appealing.
FAQ: Frequently Asked Questions
What is a Patchwork Rooster Applique Panel Pattern?
A Patchwork Rooster Applique Panel Pattern is a textile design in which rooster-shaped fabric pieces are layered and stitched onto a foundation panel. Patchwork-style fabric combinations provide the color and pattern variation, while appliqué techniques secure the individual shapes. The completed panel may be used as wall décor or incorporated into another sewing project.
What fabric is best for rooster appliqué?
Quilting cotton is one of the easiest options because it is widely available, stable, easy to press, and offered in countless prints. Stripes, florals, dots, checks, and small-scale motifs are particularly useful for this project. Fabrics of similar weight are generally easier to combine than materials with dramatically different thicknesses.
Do I need fusible web for this project?
Fusible web is not absolutely required, but it can make construction considerably easier. It temporarily or permanently stabilizes the appliqué shapes before their edges are stitched. This is especially useful for small parts such as combs, wattles, beaks, hearts, and feet, which may otherwise shift during sewing.
Can a beginner make this rooster appliqué panel?
Yes, particularly if the project is approached in stages. A beginner may want to create one rooster first rather than starting immediately with four. Practice tracing, cutting, fusing, and edge stitching on scrap fabric before working on the final panel. Larger appliqué pieces are usually easier to control than very small or highly detailed shapes.
How can I make the appliqué look dimensional?
Use thin batting behind selected pieces such as wings, combs, or wattles. Layering one fabric shape over another also naturally produces dimension. Decorative edge stitching adds another visual layer by defining the contours. The key is moderation; a few raised elements often create more effective depth than padding every piece.
Can I change the colors shown in the original design?
Absolutely. The color palette is one of the easiest aspects to personalize. You could create rustic roosters using brown, cream, burgundy, and muted green, or make a brighter version with turquoise, yellow, pink, and orange. Maintaining good contrast between adjacent pieces is more important than reproducing a specific color combination.
How do I stop small appliqué pieces from moving while sewing?
Fusible web provides excellent stability, while temporary fabric adhesive or carefully positioned pins may also help depending on your technique. Sew slowly around narrow curves and stop with the needle down whenever you need to rotate the panel. This prevents the appliqué from shifting while you change direction.
Which stitch should I use around the rooster pieces?
A blanket stitch is a popular choice for a handcrafted appearance. A narrow zigzag can provide stronger edge coverage, while a straight stitch close to the raw edge gives a more relaxed raw-edge appliqué finish. The best choice depends on the style you want and how much handling or washing the finished project will receive.
How can I prevent the background from puckering?
Stabilize and baste the background carefully before beginning the appliqué. Avoid pulling the fabric while sewing, and allow the machine to feed the layers naturally. Proper pressing, suitable thread tension, and moderate quilting density can also help maintain a smooth foundation.
Can fabric scraps be used for this project?
Yes. In fact, this is an excellent fabric scrap sewing project because many components require relatively small pieces. Wings, combs, wattles, beaks, hearts, and decorative circles can all be cut from leftover fabric. Coordinating scraps by color is a practical way to achieve an intentional patchwork appearance.
Can the rooster design be used for something other than a wall panel?
The individual motifs can be adapted for cushion covers, quilt blocks, table runners, tote bags, kitchen decorations, or the center section of a larger quilt. When changing the intended use, remember to select suitable batting, backing, stabilization, and finishing methods for the amount of handling the item will receive.
How do I make four different roosters look like part of the same design?
Repeat several colors throughout the entire composition. A coral fabric used on one body might reappear on another wing or heart, while blue can move between bodies, tails, and decorative details. This repetition creates visual unity while still allowing each rooster to have its own combination of prints.
Conclusion
The Patchwork Rooster Applique Panel Pattern brings together several enjoyable sewing techniques in one colorful project. Starting with a quilted fabric foundation, you can build each rooster from individually prepared body, neck, wing, tail, comb, beak, wattle, leg, and foot shapes. Coordinating striped, floral, dotted, and solid-looking fabrics creates the lively patchwork effect, while thoughtful color repetition helps four different birds feel like one cohesive composition.
The construction process also provides plenty of opportunities to develop useful sewing skills. You learn how to prepare appliqué templates, work with fusible web, position layered fabric pieces, sew curved edges, add decorative stitching, introduce subtle padding, quilt a background, and finish a textile panel neatly. Small hearts and button-inspired motifs can then be added to balance the empty spaces and give the project even more personality.
EASILY FIND THE FREE PDF FOR THIS PATTERN HERE!
Most importantly, this pattern is easy to personalize. Change the palette, rearrange the prints, simplify the project to one rooster, or expand the composition into a larger quilt. The techniques remain essentially the same, which means the project can grow alongside your sewing experience. If you make your own Patchwork Rooster Applique Panel Pattern, leave your sincere opinion about the project and share any suggestions you have for different colors, fabrics, stitches, or finishing ideas. Your creative variations can turn this cheerful rooster design into something completely unique.