
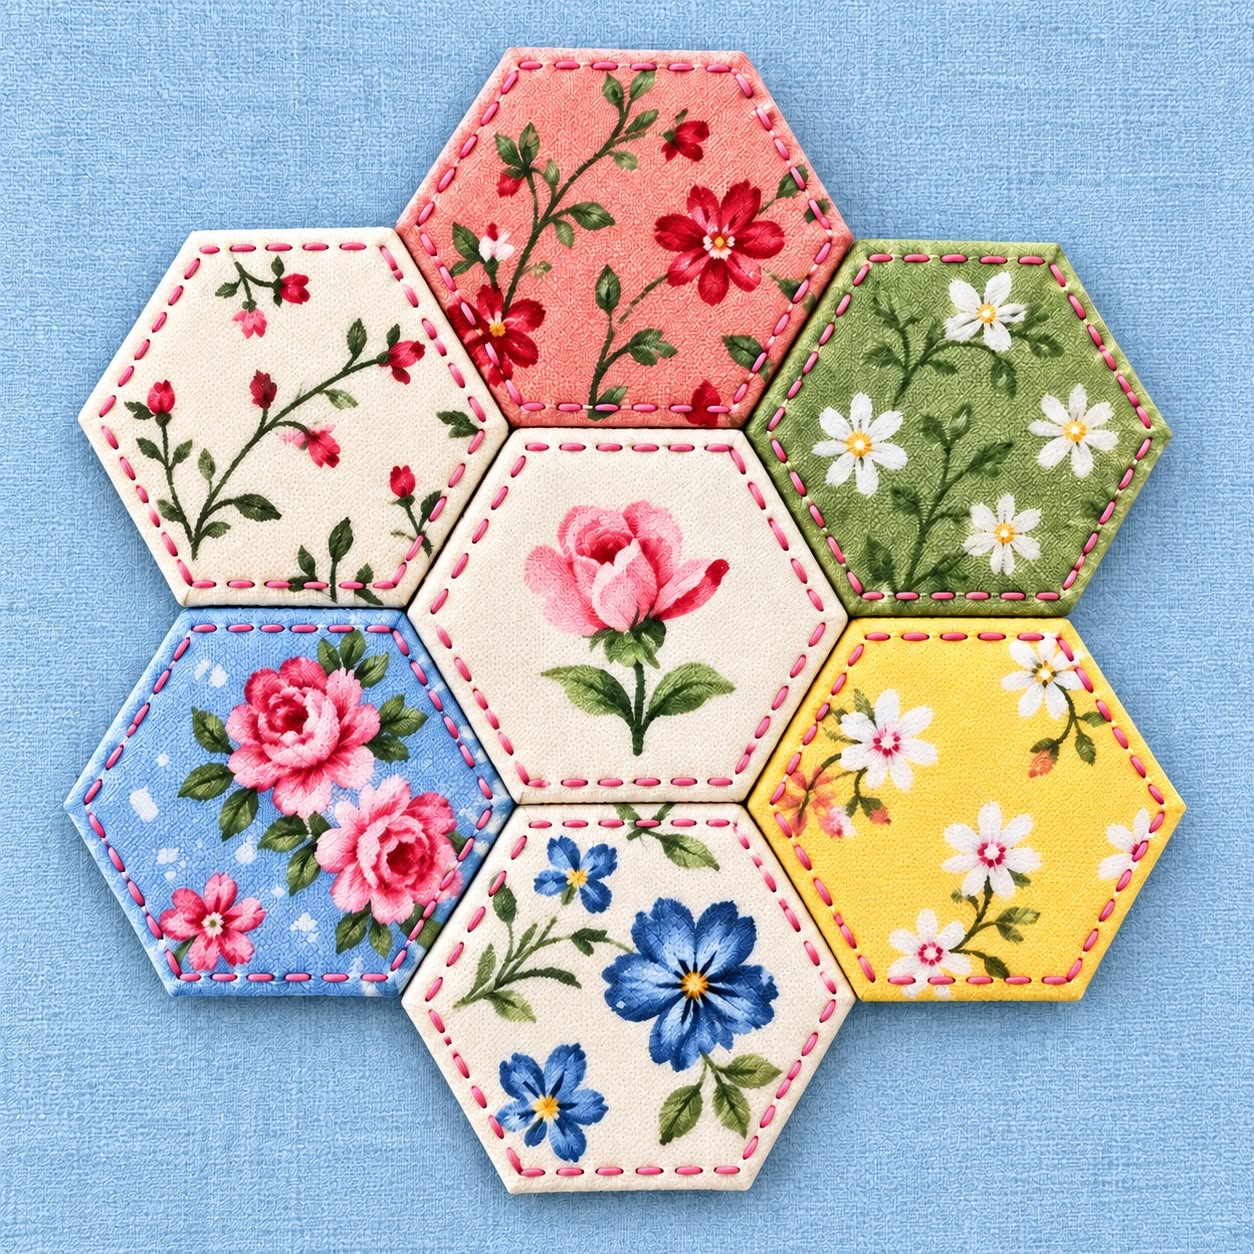
The Hexagon Flower Patchwork Quilt Pattern is a charming way to combine traditional quilting geometry with the soft beauty of floral fabrics. The project shown in the reference image uses individual fabric hexagons arranged together like a blooming flower, with one central hexagon surrounded by coordinating pieces. Each shape becomes a small showcase for roses, daisies, leaves, and other botanical prints, while the visible decorative stitching gives every piece a handmade character. This is an approachable project for anyone who enjoys patchwork quilting, fabric scraps, floral designs, and projects that can be completed gradually rather than requiring a large quilt to be assembled all at once.
One of the most attractive features of this Hexagon Flower Patchwork Quilt Pattern is the opportunity to experiment with color without losing visual harmony. In the pictured design, cream, coral, green, blue, and yellow fabrics work together because they share a common floral theme. A light central hexagon featuring a rose creates a natural focal point, while the surrounding prints add contrast and movement. This type of arrangement is especially useful for leftover quilting cotton because relatively small pieces of fabric can become an important part of the finished composition. Instead of needing several yards of matching material, you can build the project from carefully selected scraps and coordinate them through color, print, and placement.
Although hexagon patchwork can look complicated at first, the construction becomes much easier when the work is divided into simple stages: creating an accurate template, cutting the fabric, stabilizing or layering each hexagon, finishing the edges, adding decorative stitches, and finally joining the units. Accuracy matters because six equal sides must meet neatly, but the process does not require advanced sewing techniques. Beginners can work slowly and practice on spare fabric, while experienced quilters can adapt the same hexagon quilt pattern into table toppers, wall hangings, placemats, cushion panels, or larger quilts. The following tutorial explains how to reproduce the general appearance of the photographed project while leaving room for your own fabric choices and creative details.
Materials, Measurements, and Preparing the Hexagon Quilt Pieces
Begin by deciding how large you want your finished fabric hexagons to be. For a project similar in proportion to the reference image, a practical starting point is a hexagon measuring approximately 12 cm from one flat side to the opposite flat side. You can make the pieces larger or smaller, but every hexagon used in the flower arrangement must be based on exactly the same template. Consistency is much more important than the specific finished measurement.
DISCOVER MORE FREE PATTERNS HERE!
Create one sturdy hexagon template from template plastic, cardboard, or another stable material. Use a ruler to confirm that all six sides are identical and that the opposite edges remain parallel. If your construction method requires a seam allowance, create a second outline approximately 0.7 cm to 1 cm outside the finished hexagon. The inner line represents the finished size, while the outer line becomes your cutting line.
For the fabrics, choose quilting cotton or another lightweight woven fabric that is easy to press and stitch. Floral cotton works particularly well for this design because every hexagon acts almost like a miniature fabric frame. Look for roses, small blossoms, leaves, vines, and complementary botanical motifs. Mixing different prints gives the finished flower more personality than repeating the same material in every section.
The reference design demonstrates a useful color strategy. A cream or neutral piece can occupy the center, while stronger shades such as coral pink, leafy green, sky blue, sunny yellow, and additional cream prints surround it. When selecting fabrics, place them next to each other before cutting. This simple preview helps prevent two visually heavy prints from competing for attention.
You will also need coordinating thread, a hand-sewing needle or sewing machine depending on your preferred method, scissors or a rotary cutter, an iron, pins or fabric clips, and optional batting or interfacing. A thin layer of batting can give the hexagons the softly padded appearance visible in the photograph. Avoid very thick batting because bulky corners are harder to fold and join accurately.
Before cutting everything, make one complete test hexagon. Layer it, finish the edges, add the intended stitching, and check its final measurement. This test piece can reveal problems with seam allowance, bulk, thread tension, or template size before you cut valuable fabric. Once the sample looks balanced, use it as the standard for all remaining pieces of the Hexagon Flower Patchwork Quilt Pattern.
Cutting, Layering, and Sewing Each Floral Hexagon
The first cutting step is fussy cutting, especially when working with large floral motifs. Fussy cutting means deliberately positioning the template over a specific part of the fabric instead of cutting randomly. For example, a large rose can be centered within one hexagon, while another piece might feature a branch of small flowers traveling diagonally across the shape.
Place the transparent or cardboard template over each print and study the composition before tracing. Remember that the seam allowance or folded edge will hide part of the outer fabric. Important flowers should therefore remain safely inside the finished hexagon line. This detail makes a significant difference when you want each patch to resemble the carefully framed floral motifs in the reference project.
Cut seven hexagons if you want to reproduce a classic flower configuration consisting of one center and six surrounding units. The photograph suggests this recognizable arrangement even though the individual pieces are visually emphasized. If you are building a larger quilt, simply continue making additional hexagons. Keeping the same template allows the design to expand almost indefinitely.
For a lightly padded result, cut batting slightly smaller than the outer fabric shape. Depending on your preferred finishing technique, you may also cut backing pieces for every hexagon. Center the batting carefully so that excessive bulk does not collect in the seam allowance. Press the fabric before assembly because wrinkles become harder to remove once the layers are secured.
Turn or finish the edges consistently around all six sides. Work slowly at every corner. Sharp, even corners are one of the defining characteristics of a clean patchwork hexagon. Check each finished piece against your original template rather than relying only on visual judgment. A difference of only a few millimeters can become noticeable when several pieces are placed together.
The decorative running stitch seen around the photographed hexagons can be added after the edges have been stabilized. Use a contrasting thread such as golden yellow embroidery thread and keep the stitches approximately equal in length. A spacing of roughly 0.5 cm to 0.8 cm can create a clearly visible handmade effect. Keep the stitching an even distance from the edge on every side.
Repeat the process for each hexagon, paying attention to consistency rather than speed. When all seven pieces are complete, place them on a flat surface without joining them yet. Rotate each patch until the floral motifs and colors feel balanced. This is the moment to make design changes because rearranging the pieces becomes more difficult after permanent stitching begins.
Arranging and Joining the Hexagon Flower Patchwork Quilt Pattern
Start the layout with your chosen center hexagon. A neutral fabric with one prominent flower is particularly effective because it provides a visual resting point between the more colorful surrounding prints. In the reference image, the central cream piece with a pink rose performs exactly this role, drawing the eye inward before attention moves toward the surrounding colors.
Arrange the other six hexagons around the center. Try alternating stronger and quieter colors instead of placing similar tones together. For example, green can sit away from another dominant green print, while blue and yellow provide contrast on opposite portions of the arrangement. There is no single mandatory color order; the goal is an evenly distributed composition.
Once you are satisfied with the layout, take a quick reference photo or mark the backs discreetly. This prevents accidental rearrangement while sewing. When several floral pieces are removed from the layout, it can be surprisingly difficult to remember exactly which side originally touched the center.
Join the first outer hexagon to one side of the center. Align the corners and edges precisely, then secure them using your preferred hand-sewn patchwork joining stitch. Small, closely spaced stitches are helpful because they keep the connection firm without dominating the decorative surface. Avoid pulling the thread excessively tight, which can distort the straight edges.
Continue attaching the surrounding hexagons one at a time. After each new piece is added, return the work to a flat surface and inspect it. The flower should remain flat rather than beginning to cup or ripple. If distortion appears, check whether the corners are aligned and whether one seam has been pulled tighter than the others.
After all six pieces surround the center, connect the neighboring outer hexagons where their sides meet. The result should form a unified hexagon flower quilt block. From here, the block can remain a small decorative project or become one unit in a much larger composition. Additional hexagons can be joined around the outside to transform the flower into a runner, wall quilt, throw, or full quilt top.
Finishing, Customizing, and Caring for Your Hexagon Patchwork Project
Once the main flower is assembled, inspect every joining seam from both the front and back. Secure any loose thread ends and correct openings before finishing the project. Careful finishing is particularly important with hand-sewn hexagons, because the construction seams will experience gentle tension whenever the piece is handled, washed, or incorporated into a larger quilt.
If you plan to use the flower as a small table decoration, the individual padded hexagons may already provide enough structure. For a wall hanging or larger quilt, you can incorporate the completed flower into additional layers. Always consider how much bulk already exists in the individual patches before adding more batting.
The decorative stitching can also become a major design element. Golden thread produces the warm handcrafted appearance visible in the reference project, but cream thread creates a quieter finish. Green can reinforce a botanical theme, while red or pink can connect the stitching visually to rose prints. The important point is maintaining consistent stitch length and spacing throughout the project.
This pattern is also an excellent fabric scrap project. Small pieces left from previous quilts can be transformed into individual hexagons, allowing sentimental fabrics to become part of a new composition. If scraps vary greatly in color, choose one repeated element—such as similar stitching, neutral backgrounds, or recurring floral prints—to create unity.
For a larger Hexagon Flower Patchwork Quilt Pattern, make several seven-piece flowers and experiment with their placement before connecting them. You can separate the floral clusters with solid-color hexagons or join multiple flowers directly together. Repetition changes the character of the design dramatically, turning one small decorative flower into a traditional geometric quilt surface.
When the project is complete, follow the care requirements of the fabrics and batting you used. Prewashing cotton before construction can help reduce unexpected shrinkage, particularly when combining materials from different manufacturers. For hand-stitched pieces, gentle washing and air drying are usually kinder to the decorative stitches than aggressive handling. Proper care helps preserve the crisp hexagonal geometry and the colorful floral details.
Frequently Asked Questions About the Hexagon Flower Patchwork Quilt Pattern
What is a Hexagon Flower Patchwork Quilt Pattern?
A Hexagon Flower Patchwork Quilt Pattern is a quilting design made from equal six-sided fabric shapes. A common flower block consists of one center hexagon surrounded by six additional hexagons, creating a geometric shape that resembles a flower.
Is this hexagon quilt pattern suitable for beginners?
Yes. Beginners can make this project successfully by concentrating on accurate templates and careful alignment. Creating one test hexagon before preparing the entire set is especially helpful because it provides practice with folding, layering, and stitching.
What fabric works best for floral patchwork hexagons?
Medium-light 100% quilting cotton is an excellent option. It is generally easy to cut, press, fold, and hand sew. Floral prints are ideal for the style shown in the reference image, but solids, gingham, polka dots, vintage-inspired prints, or geometric fabrics can also work.
How many hexagons are required to make one flower?
The traditional arrangement requires seven hexagons: one in the center and six surrounding it. Larger projects require additional pieces depending on the dimensions and layout you choose.
What is fussy cutting in quilting?
Fussy cutting is the practice of intentionally positioning a template over a specific motif before cutting. In this project, it can be used to place a rose, daisy, branch, or other floral feature near the center of a hexagon rather than allowing the print to fall randomly.
Do all hexagons need to use the same fabric?
No. Using different fabrics is actually one of the strengths of this pattern. Coordinated scraps can produce a colorful scrappy quilt design, while repeating a limited palette can create a calmer and more organized appearance.
Can I add batting inside every hexagon?
Yes. Thin batting can create a softly padded appearance similar to the reference image. Keep it away from bulky seam allowances whenever possible so the corners remain neat and the finished hexagons can sit comfortably beside one another.
Should the decorative stitches be added before or after joining the pieces?
For a design like the one pictured, it is often easier to complete the decorative stitching on individual hexagons before assembling the flower. This gives you better access to every edge and makes consistent stitching easier.
Can this pattern be sewn entirely by hand?
Absolutely. Hand quilting and hand piecing are well suited to hexagon projects. Because each piece is relatively small, the project is also portable. A sewing machine can be used for certain construction methods, but it is not essential.
How can I make the hexagon corners meet neatly?
Use one accurate template for every piece, maintain the same seam allowance, and avoid stretching the fabric while sewing. Match the corners first and then align the edges. Checking the project on a flat surface after every few seams can catch alignment problems early.
Can I turn one hexagon flower into a larger quilt?
Yes. You can continue adding hexagons around the first flower or create several separate hexagon flower quilt blocks and join them later. This modular construction makes it easy to determine the size gradually.
What can I make besides a full quilt?
The same technique can be adapted into a table topper, mug rug, placemat, cushion front, tote bag panel, wall decoration, table runner, or decorative centerpiece. Changing the size of the hexagon template makes the pattern suitable for many sewing projects.
Conclusion
The Hexagon Flower Patchwork Quilt Pattern combines simple geometry, floral fabrics, decorative stitching, and traditional patchwork techniques in a project that can be adapted to many skill levels. Throughout this tutorial, we covered how to create an accurate hexagon template, choose coordinating floral fabrics, use fussy cutting to highlight individual motifs, add optional batting, finish the edges, create decorative running stitches, arrange seven pieces into a flower, and join the hexagons carefully without distorting their shape.
The most important lessons are accuracy and consistency. Equal fabric hexagons, carefully matched corners, balanced colors, and evenly spaced stitches help transform individual scraps into a polished design. At the same time, there is plenty of room for creativity. You can replace the floral palette with fabrics from your own collection, change the thread color, enlarge the hexagons, or continue adding pieces until a small flower becomes a complete patchwork quilt.
EASILY FIND THE FREE PDF FOR THIS PATTERN HERE!
This project is also a lovely reminder that quilting does not always require large pieces of fabric or complicated construction. A collection of small floral scraps can become something beautiful when color, shape, and stitching are thoughtfully combined. Whether you make one flower or dozens, the Hexagon Flower Patchwork Quilt Pattern offers many opportunities to develop your sewing skills while creating a project with a distinctly handmade personality. Now that you know the complete process, we would love to hear your sincere opinion about this hexagon patchwork pattern. Which floral colors would you choose for your own version? Would you turn the finished flower into a table decoration, cushion, wall hanging, or a full quilt? Leave your honest opinion and suggestions, and share the creative changes you would make to give this beautiful patchwork idea your own personal touch.