
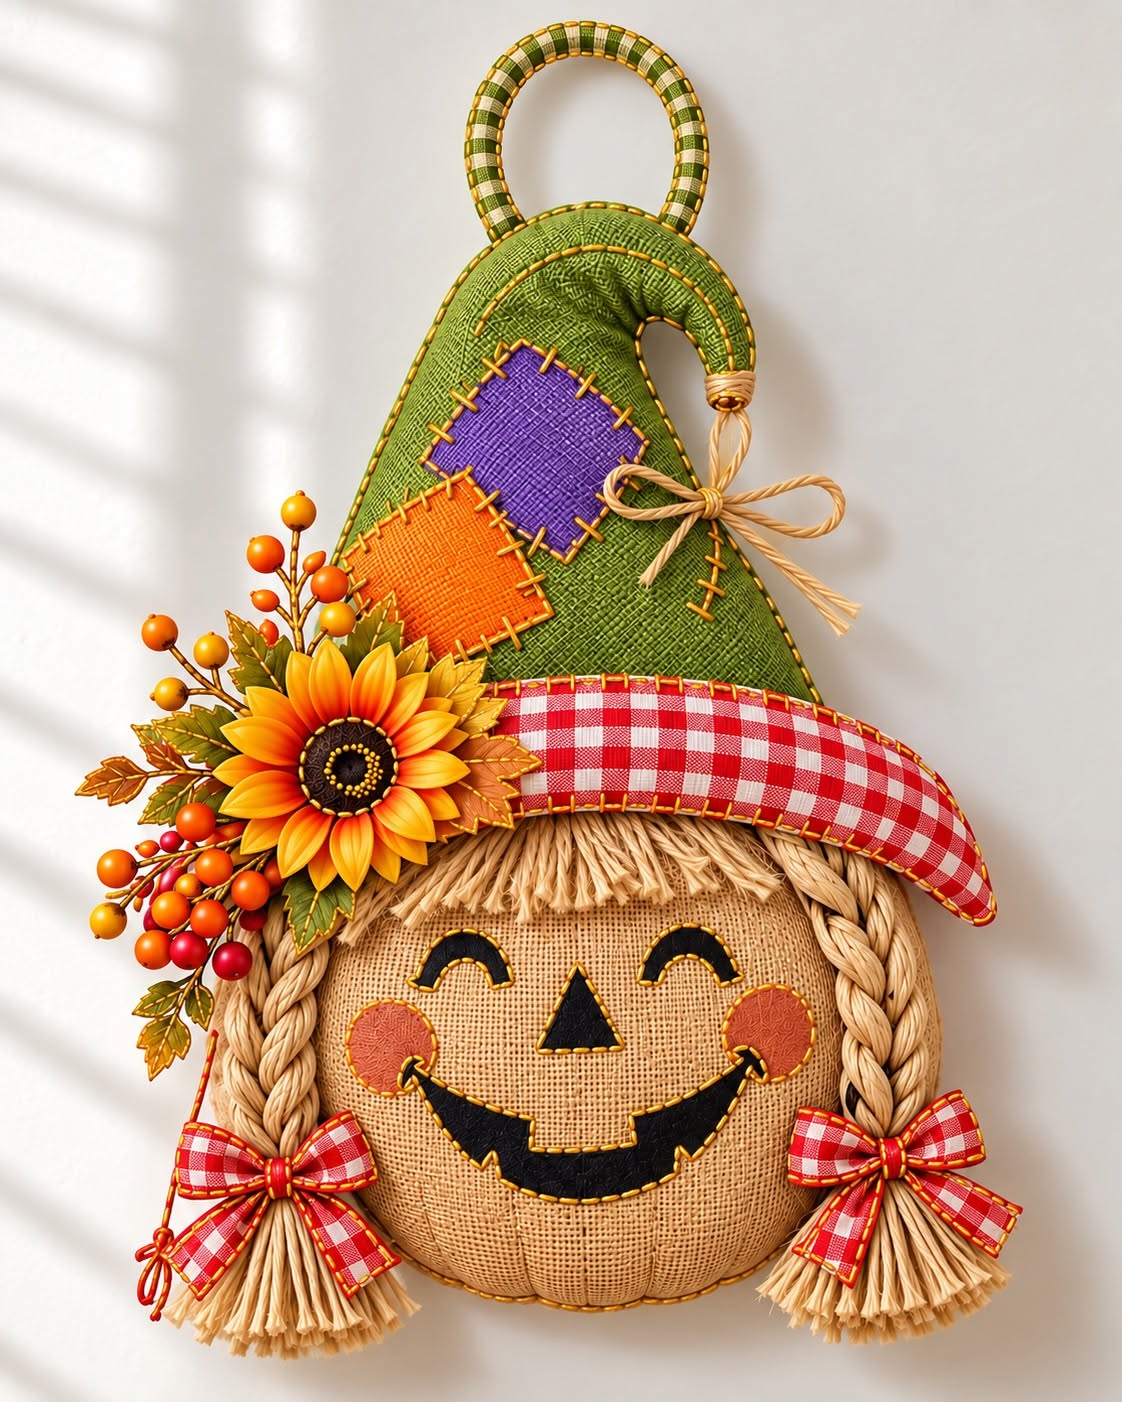
The Scarecrow Fabric Wall Hanging Panel Pattern is a cheerful sewing project that combines rustic autumn style with playful fabric appliqué. Inspired by the wall decoration shown in the reference image, this design features a smiling scarecrow face, braided raffia-style hair, a tall green hat, colorful patchwork details, gingham accents, and a bright sunflower arrangement. The finished piece works beautifully as fall wall décor, a seasonal door decoration, or a handmade accent for a farmhouse-inspired room. Although the project looks detailed, it can be completed by dividing the construction into manageable sections and assembling them one at a time.
One of the most appealing characteristics of this Scarecrow Fabric Wall Hanging Panel Pattern is the mixture of textures. The face can be created from burlap, linen-look fabric, or another woven material, while cotton fabric works well for the hat and decorative appliqués. Braided cord, raffia, felt, ribbon, and fabric flowers add dimension without requiring complicated sewing techniques. Beginners can simplify the design by using fewer decorative elements, while experienced sewists can add quilting, embroidery, decorative stitching, and additional layers. The goal is to preserve the friendly personality of the scarecrow while making the project practical for home sewing.
Before cutting anything, study the proportions of the design and decide how large you want your finished panel to be. A practical finished size is approximately 35–45 cm wide and 50–60 cm tall, including the upper hanging loop. These measurements can be adjusted because this is a decorative project rather than a fitted item. Make a paper template for the face, hat, brim, facial features, patches, and other major pieces before cutting your final fabrics. Taking a little extra time during this preparation stage makes the later assembly of the fabric scarecrow wall hanging much easier and helps keep both sides balanced.
Materials, Templates, and Fabric Preparation
Begin by gathering the materials for your Scarecrow Fabric Wall Hanging Panel Pattern. Useful supplies include medium-weight cotton fabric, burlap or burlap-look fabric, lightweight batting, fusible interfacing, black felt, orange or rust-colored felt, green fabric, red-and-white gingham fabric, purple and orange scraps, coordinating thread, embroidery floss, ribbon, raffia, fabric cord, and a hanging ring or fabric-covered loop. You will also need ordinary sewing tools such as fabric scissors, paper scissors, pins or clips, an iron, marking tools, a ruler, and a sewing machine.
DISCOVER MORE FREE PATTERNS HERE!
The scarecrow face is the visual center of the project, so create its template first. Draw a softly rounded pumpkin-like shape approximately 28–32 cm wide and 25–28 cm high. Instead of making a perfect circle, flatten the upper area slightly and taper the lower edge. Cut one front piece, one backing piece, and one batting or stabilizer piece. If your burlap is loosely woven, apply lightweight interfacing to the wrong side before sewing so the material remains stable.
Next, prepare the hat. The tall curved hat shown in the inspiration image gives the decoration much of its personality. Draft a hat body approximately 25–30 cm wide at the bottom and 30–35 cm tall, allowing the upper portion to curve toward one side. Add your preferred seam allowance around the outer edge. Cut two fabric layers if you want a fully sewn and turned hat, or use one decorative layer with interfacing when creating an appliqué-style version.
The oversized hat brim is another important part of the scarecrow sewing pattern. Use red-and-white gingham cotton to reproduce the warm country appearance. Draft a long curved piece extending slightly beyond both sides of the face. A brim around 32–38 cm long and 8–10 cm deep works well for a medium-sized panel. Cut a front, back, and optional thin batting layer. After stitching and turning, lightly press the brim without flattening all of its dimension.
Prepare the decorative patches from contrasting cotton scraps. The reference design uses an orange patch and a purple patch against the green hat, creating a strong patchwork fall decoration effect. Simple irregular squares or rectangles measuring approximately 7–10 cm are sufficient. Fuse them lightly in position and sew around their edges using a blanket stitch, zigzag stitch, or hand embroidery. Dark thread can imitate the visible rustic stitches seen in traditional handmade scarecrow decorations.
Finally, organize the smaller decorative components before assembly. Cut two curved closed-eye shapes, a triangular nose, a smiling mouth, and two circular cheeks from felt. Prepare ribbon bows, raffia strands, leaves, berries, and a sunflower if you want to reproduce the richly decorated appearance. Arrange everything temporarily on your work surface. This dry layout is useful because it allows you to change proportions and positions before any pieces become permanently attached.
Sewing the Scarecrow Face, Hair, and Facial Details
Start construction with the padded face. Layer the backing fabric, batting, and front fabric according to your preferred sewing method. Stitch around the shape while leaving an opening for turning if you are making a dimensional panel. Clip curved seam allowances carefully, turn the piece right side out, and smooth the edges. Insert a little additional polyester fiberfill if you want a rounded appearance, but avoid overstuffing because the finished fabric wall hanging should still rest comfortably against a wall or door.
To suggest the segmented appearance of a pumpkin, add several gentle vertical stitched lines across the face. Begin near the upper center and curve the lines toward the lower edge. These seams can be ordinary machine stitches or hand quilting stitches. Keep the tension relaxed so the surface does not become puckered. This subtle shaping gives the scarecrow additional dimension while preserving the natural woven texture of the face fabric.
For the hair, cut multiple lengths of natural raffia, yarn, twisted cord, or narrow fabric strips. Divide them into two equal groups and create a braid for each side of the head. Position the braids so they begin underneath the hat brim and extend below the face. Secure the upper ends firmly with stitching before attaching the brim. Leave the lower ends loose and slightly uneven for a rustic handmade scarecrow decoration appearance.
Create the facial expression before permanently attaching every accessory. Position the black curved eyes in the upper half of the face and place the triangular nose centrally between them. Add two warm orange or terracotta circles for the cheeks. The mouth should curve upward into a broad smile. You can construct it from black felt or use dense embroidery. Pin or lightly fuse the components first, then step back and check whether the expression appears balanced.
Once you are satisfied with the arrangement, secure the facial appliqués. A narrow zigzag stitch is practical for felt pieces, while a blanket stitch creates a more traditional handcrafted finish. If you use fusible web, follow its pressing instructions and protect synthetic felt from excessive heat. Black thread around the mouth and nose provides definition, while coordinating thread around the cheeks produces a softer finish.
Finish the lower ends of the braids by trimming the raffia into an even but slightly natural-looking fringe. Add gingham ribbon bows close to the bottom of each braid. Stitch through the center of each bow several times rather than relying only on adhesive. These bows visually connect the hair with the gingham hat brim and help create the cohesive red, green, orange, and natural color palette that makes this autumn scarecrow design distinctive.
Constructing the Hat and Adding Fall Appliqué Decorations
Now assemble the tall green hat. Place the hat pieces right sides together and stitch around the curved outer edges, leaving the lower edge open. Clip or notch the curves where necessary, turn the hat right side out, and press carefully. Add a thin layer of batting if you want the hat to stand away from the wall slightly. For a flatter Scarecrow Fabric Wall Hanging Panel Pattern, interfacing alone will usually provide enough support.
Attach the orange and purple patches before permanently joining the hat to the face. Position them at slightly different angles for an informal patchwork appearance. Use black embroidery floss or heavier decorative thread to make visible stitches around their edges. These stitches do not need to be perfectly identical. Small variations reinforce the handmade quality and complement the rustic character of the scarecrow.
Prepare the gingham brim separately. Sew the front and back brim pieces together along the curved edges, leaving an opening for turning. Turn, press, and topstitch approximately 0.3–0.5 cm from the edge. If the brim contains batting, use a relatively thin layer so it remains flexible. Slightly curving the brim over the face gives the panel more personality and prevents the project from looking completely flat.
Place the hat behind the brim and overlap its lower edge by approximately 2–3 cm. Baste the layers together before attaching them to the head. Position the assembled hat so the brim crosses the upper portion of the face and hides the attachment points for the raffia hair. Stitch securely through the hidden layers. Depending on the thickness of your materials, hand stitching may provide better control than forcing several bulky layers through a domestic sewing machine.
For the floral decoration, build the arrangement gradually. Start with several green and autumn-colored leaves, followed by berry stems and finally the large sunflower. Position the flower toward one side of the hat brim, as shown in the inspiration piece. This asymmetrical placement balances the curved upper hat. A fabric sunflower can be made from layered petal shapes, but a premade fabric flower can also be incorporated if you prefer to concentrate on the sewing portions of the project.
Complete the top of the hat with a hanging loop. A fabric-covered ring, braided cord, or reinforced fabric strap can be used. Make sure it is securely anchored into the upper back of the panel because it will support the entire decoration. If using a decorative circular loop, wrap it with fabric strips or ribbon that coordinates with the green hat. Reinforce the attachment with several passes of strong thread so the fall wall hanging remains dependable throughout repeated seasonal use.
Final Assembly, Finishing, FAQ, and Care
Before completing the back, inspect every section of your Scarecrow Fabric Wall Hanging Panel Pattern. Check the braids, facial appliqués, bows, flower, patches, brim, and hanging loop. Tug gently on dimensional decorations to make sure they are secure. Trim stray threads and remove visible temporary markings. This inspection is especially worthwhile when the panel will be stored and reused from one autumn season to another.
If the back of your project contains visible construction stitches, cover it with a clean backing panel. Trace the overall face shape onto coordinating cotton or felt and trim it slightly smaller than the front. Turn under the raw edge where necessary and hand stitch the backing around the perimeter using small invisible stitches. A finished backing makes the project look neater and also protects the internal stitching and attachment points.
Add the final rustic bow near the curved section of the green hat if you want to closely follow the inspiration design. Natural jute cord or raffia works particularly well. Keep the bow relatively loose and allow the ends to hang naturally. Because the gingham bows and sunflower already provide strong decorative accents, this upper bow should remain simple rather than competing with the other details.
When hanging the finished piece, choose a dry indoor area away from direct moisture. Burlap, raffia, cotton, and dimensional flowers can collect dust, so occasional gentle cleaning is recommended. A soft brush or low-powered handheld vacuum used carefully can remove surface dust. If the project contains cardboard, untreated raffia, or glued decorations, avoid machine washing. Fabric-only versions may be spot cleaned according to the materials used.
The Scarecrow Fabric Wall Hanging Panel Pattern can also be personalized easily. Change the green hat to brown, orange, mustard, burgundy, or navy; replace gingham with plaid; embroider the eyes instead of using felt; or make your own fabric sunflower from scraps. You can even embroider a family name or seasonal message on the hat, provided there is enough open space. Keeping the face simple while changing the accessories is an effective way to create several variations from the same basic template.
Most importantly, enjoy the gradual construction process. This project combines fabric appliqué, basic patchwork, decorative stitching, dimensional sewing, and seasonal embellishment without requiring complicated garment-making techniques. Working section by section keeps the process approachable. Once the face, braids, hat, brim, appliqués, and floral decorations come together, the result is a warm handmade decoration with plenty of texture and autumn character.
FAQ About the Scarecrow Fabric Wall Hanging Panel Pattern
What fabric is best for the scarecrow face?
Burlap-look fabric, tightly woven burlap, linen blends, canvas, and textured cotton are good options. If the fabric frays easily, reinforce the wrong side with lightweight fusible interfacing before cutting and sewing.
Can a beginner make this scarecrow wall hanging?
Yes. A beginner can simplify the project by using felt appliqués, cotton fabrics, and fewer dimensional embellishments. The construction mainly involves basic seams, curved sewing, appliqué, and hand attachment of decorative elements.
How large should the finished scarecrow panel be?
A useful size is approximately 35–45 cm wide and 50–60 cm tall, including the hanging element. However, the pattern can be enlarged or reduced as long as all templates are resized proportionally.
Do I need a sewing machine?
A sewing machine makes the larger fabric sections faster to assemble, but many details can be sewn by hand. A completely hand-sewn version is possible, especially when using felt and fabrics that do not fray excessively.
How much seam allowance should I add?
For pieces that will be stitched right sides together and turned, approximately 0.7–1 cm is practical. Flat appliqué pieces generally do not require a traditional seam allowance unless you plan to turn their edges under.
What can I use instead of raffia for the hair?
Yarn, cotton cord, fabric strips, jute twine, macramé cord, or narrow bias strips can all create attractive scarecrow hair. Choose a material that is flexible enough to braid without becoming excessively bulky.
How can I make the panel more dimensional?
Add thin batting behind the face and hat, lightly stuff the face, use layered felt appliqués, and attach dimensional flowers and leaves. Keep the padding moderate so the decoration can still hang evenly.
Can I change the colors of the original design?
Absolutely. The pattern works well with classic autumn colors such as mustard, burnt orange, burgundy, olive green, brown, cream, and rust. For farmhouse décor, neutral beige, black, cream, and muted green can produce a softer look.
How should I store the scarecrow after fall?
Clean away dust, make sure the project is completely dry, and store it flat or loosely supported in a breathable container. Avoid crushing the sunflower, braids, hat, or other dimensional elements under heavy seasonal decorations.
Can this pattern be adapted into a door hanging?
Yes. For a door decoration, reinforce the backing and hanging loop carefully. Lightweight batting is preferable because an overly heavy panel may pull on the upper attachment point.
How do I keep the hat from collapsing?
Use medium-weight fusible interfacing, thin batting, or a second layer of sturdy cotton. The brim can also be reinforced with interfacing so it maintains its curved silhouette while remaining soft enough to sew.
What sewing techniques are used in this project?
The main methods include appliqué sewing, straight stitching, topstitching, curved seams, hand stitching, decorative blanket stitching, light quilting, fabric layering, and dimensional embellishment. These techniques make the project a useful way to practice several basic sewing skills in one seasonal craft.
Conclusion
The Scarecrow Fabric Wall Hanging Panel Pattern brings together many enjoyable sewing techniques in one colorful autumn project. Beginning with paper templates and carefully selected fabrics, you can build the design progressively through the padded face, cheerful felt expression, braided hair, tall curved hat, gingham brim, contrasting patchwork appliqués, ribbon bows, sunflower, berries, leaves, and reinforced hanging loop. Working in this order makes even the more detailed portions easier to manage.
The key to achieving an attractive result is careful preparation rather than complicated sewing. Stabilizing loosely woven fabric, checking the facial layout before stitching, securing dimensional decorations properly, and reinforcing the hanging point can make a noticeable difference in the finished piece. At the same time, small variations in stitching, fabric texture, and embellishment give the scarecrow the charming handmade character that makes this type of DIY fall fabric decoration so appealing.
EASILY FIND THE FREE PDF FOR THIS PATTERN HERE!
Once completed, the project can become a reusable piece of seasonal décor for a wall, entryway, sewing room, or interior door. You can follow the colors shown in the inspiration image or personalize the Scarecrow Fabric Wall Hanging Panel Pattern with your favorite autumn fabrics and decorative details. What is your sincere opinion of this scarecrow project? Share which colors or fabrics you would choose, and feel free to leave suggestions for details you would add or change in your own version.