
The Round Christmas Tree Wall Panel Pattern is a striking holiday sewing project that combines the warmth of traditional Christmas colors with the artistic beauty of appliqué, patchwork, and decorative quilting. Inspired by the round textile artwork shown in the image, this project features a flowing Christmas tree made from layered sections of red, green, cream, gold, burgundy, and patterned fabrics. Instead of using a conventional rectangular quilt format, the design is presented inside a large circular panel, creating the appearance of a handcrafted textile medallion. The sweeping branches give the tree movement, while the richly quilted cream background adds texture without competing with the colorful centerpiece. A gold star finishes the upper portion of the composition and immediately draws attention toward the center of the wall hanging. With thoughtful fabric selection and careful construction, this project can become a memorable handmade Christmas decoration that can be displayed year after year.
What makes the Round Christmas Tree Wall Panel Pattern especially interesting is the way many familiar sewing techniques are brought together in a single project. The Christmas tree can be created from individual fabric pieces using raw-edge appliqué, turned-edge appliqué, or fusible appliqué, depending on your experience and preferred finish. Decorative stitching can then define the boundaries between the different fabrics, while free-motion quilting fills the surrounding background with spirals and flowing lines. The finished design looks complex because of the number of textures and colors involved, but the actual construction becomes much easier when approached one stage at a time. You begin with the circular foundation, develop a full-size tree template, divide the tree into curved sections, choose coordinating fabrics, assemble the appliqué, quilt the complete sandwich, and finally finish the circular perimeter with bias binding. Each stage builds naturally on the previous one.
Another advantage of this Christmas wall panel pattern is that it offers plenty of room for personalization. You do not need to own exactly the same fabrics shown in the inspiration to create a beautiful result. Scraps from previous quilting projects can work wonderfully, particularly if they stay within a coordinated holiday palette. Traditional Christmas red and evergreen can be mixed with burgundy, ivory, antique gold, dark brown, black, and subtle metallic prints. The project can also be resized according to the wall where it will be displayed. For this tutorial, a finished diameter of approximately 90 cm creates an impressive statement piece, although the same construction method can be adapted to smaller dimensions. The most important goal is maintaining good proportion between the round background, the layered Christmas tree, the star, and the open areas reserved for decorative quilting.
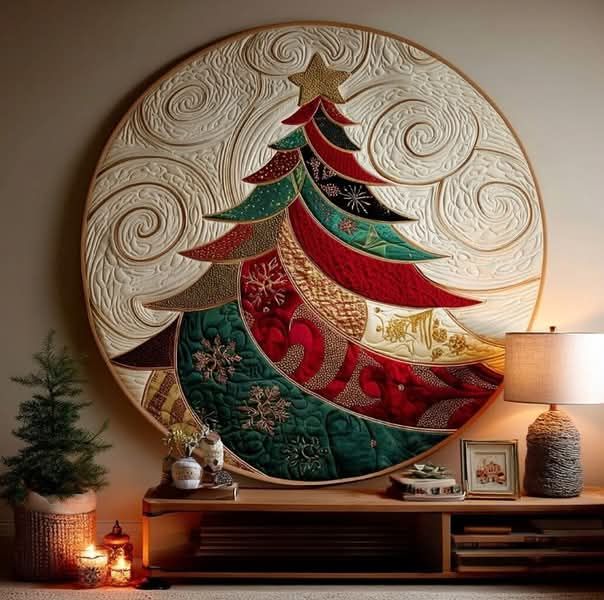
Preparing the Materials and Drafting the Round Christmas Tree Wall Panel Pattern
Begin by gathering the basic materials for your Round Christmas Tree Wall Panel Pattern. For a finished panel approximately 90 cm in diameter, prepare a piece of cream or ivory quilting cotton measuring roughly 100 × 100 cm, a batting piece of the same size, and a backing fabric measuring approximately 105 × 105 cm. Keeping these layers larger than the final circle gives you extra working room during quilting. You will also need assorted Christmas fabrics, matching or contrasting threads, fusible web if desired, paper for templates, fabric scissors, pins or temporary basting supplies, a sewing machine, an appliqué foot, and a free-motion quilting foot if you plan to reproduce the swirling background texture.
DISCOVER MORE FREE PATTERNS HERE!
Your fabric palette is one of the most important parts of this design. Select several red and green quilting fabrics rather than relying on only one shade of each color. Deep forest green can be combined with emerald, muted teal, burgundy, bright Christmas red, cream, gold, and dark accent fabrics. Printed pieces featuring snowflakes, flowers, stars, geometric designs, or subtle holiday motifs can add visual interest. Small metallic details are especially effective because they echo the festive appearance of the gold star. Before cutting, spread all your fabrics together and remove any piece that visually overwhelms the others.
Next, draft the tree on a large sheet of paper. For a 90 cm finished circle, make the tree approximately 72 to 76 cm tall, including the star. Draw a vertical centerline first, then sketch a narrow top that gradually expands toward the bottom. Unlike a standard triangular Christmas tree, this design should have long, sweeping branch tips that curve gently outward. Divide the tree into several horizontal levels, making the lower branches substantially wider than those near the top. These curved silhouettes are essential for achieving the graceful movement visible in the inspiration.
Once the overall silhouette looks balanced, divide each branch level into individual fabric sections. Think of these pieces as sections of a colorful patchwork Christmas tree rather than separate branches. Some sections can be broad and curved, while others can be narrow strips that function almost like ribbons. Number every template piece before cutting the paper apart. Add orientation marks and a center guideline where useful. Careful labeling prevents confusion later, especially when several pieces have similar curved shapes.
Decide which appliqué technique you want to use before cutting fabric. For fusible raw-edge appliqué, trace the reversed templates onto fusible web, fuse them to the wrong side of your fabrics, and cut directly along the finished outline. If you prefer turned-edge appliqué, include approximately 0.7 cm of extra fabric around the template where required. Fusible appliqué is generally faster and makes positioning the numerous curved pieces easier, while turned-edge appliqué can produce a softer traditional finish.
Prepare the star as a separate template. A five-point star measuring approximately 10 to 12 cm across works nicely with a 90 cm panel. Gold-colored fabric, subtle metallic cotton, or a warm ochre print can all provide the desired effect. Before permanently attaching anything, position the paper tree and star over your background. Make sure there is enough cream-colored space around the tree for the decorative spirals. Adjust the templates now if the tree appears too wide, narrow, tall, or small.
Cutting and Assembling the Layered Christmas Tree Appliqué
With your templates prepared, begin transferring each shape to its chosen fabric. Work systematically and keep every cut piece beside its corresponding numbered paper template. If you are using fusible web, remember that directional templates may need to be traced in reverse. This matters particularly with asymmetric branch tips. Carefully cut smooth curves and sharp points because clean cutting will make the finished Christmas tree appliqué look much more polished.
Arrange the cut pieces on the background before activating any adhesive. Start with the large lower branches and gradually work upward. The lower portion should visually anchor the composition with generous areas of dark green, red, burgundy, or other strong colors. As you move toward the top, use smaller sections and slightly lighter visual accents. Do not try to make both sides perfectly symmetrical. The charm of this Round Christmas Tree Wall Panel Pattern comes partly from its flowing, artistic arrangement.
Use color contrast strategically. Place a deep green section beside red, cream beside burgundy, or gold beside dark green. If two neighboring pieces have nearly identical values, introduce a narrow contrasting section between them. The cream and gold pieces can function as visual highlights, while the darkest fabrics create depth. Step away from your work occasionally and look at the entire tree rather than concentrating exclusively on individual pieces.
When you are satisfied with the arrangement, secure the appliqué sections according to your chosen technique. With fusible appliqué, work in stages rather than fusing the entire tree at once. Start near the lower portion and continue upward, checking the alignment after each group of pieces. Where one branch appears to pass over another, overlap the fabrics slightly. This simple technique helps establish the layered appearance that gives the tree its dimensional character.
Stitch around the individual pieces using a blanket stitch, narrow zigzag, satin stitch, or straight raw-edge appliqué stitch. Matching thread creates a subtle transition, while contrasting thread emphasizes the patchwork divisions. Gold-toned thread can look particularly attractive around cream, red, and dark green fabrics. Sew slowly around the long curved branch tips. When changing direction sharply, stop with the needle down, lift the presser foot, pivot the fabric, lower the foot, and continue.
Attach the star after the upper branches are secured. Position it directly above the narrow top of the tree and check its relationship with the circular composition before stitching. You may quilt or embroider inside individual branches at this stage, but avoid adding bulky embellishments until the main quilting is complete. Give the appliqué a careful final press from the appropriate side for your materials, and inspect all edges for loose areas before preparing the quilt sandwich.
Quilting the Background and Finishing the Circular Wall Panel
To begin quilting, place the backing fabric wrong side up on a clean surface, position the batting over it, and add the appliquéd top with the right side facing upward. Smooth all three layers from the center outward. Secure them with your preferred basting method. Keep the quilt sandwich square during this stage rather than trimming it into a circle immediately. Quilting can slightly alter the dimensions, so creating the final circle afterward provides better accuracy.
Start with outline quilting around the Christmas tree. Stitching a few millimeters outside selected branches creates definition between the colorful appliqué and the light background. You can also quilt inside the tree sections. Follow printed fabric motifs, create gentle curves, add snowflake-inspired details, or use simple echo quilting. Different textures in neighboring pieces can make the patchwork construction appear even richer without requiring additional fabric.
The background quilting is a defining feature of the project. Fill the cream areas with large free-motion quilting spirals, sweeping curves, echoed lines, and smaller decorative curls. These motifs suggest winter wind or swirling snow and complement the curved branches beautifully. Beginners should practice several spirals on a scrap quilt sandwich before working on the final piece. Smooth, relaxed curves are more important than creating perfectly identical spirals.
Gradually fill the background rather than attempting to complete one extremely dense area at a time. Distribute the major spirals throughout the panel first and then connect them with flowing lines. Quilting density can be increased in open spaces around the tree. A more densely quilted background becomes flatter, helping the less densely quilted appliqué appear slightly raised. This difference in texture is one reason a finished Round Christmas Tree Wall Panel Pattern can look surprisingly dimensional.
After quilting is complete, locate the exact center of the composition. To create a 90 cm circle, measure a 45 cm radius from the center and mark multiple points around the perimeter. Connect these points into a smooth circle using a flexible ruler, large compass method, or carefully controlled string guide. Inspect the complete outline before cutting. When you are satisfied that the tree is centered appropriately, trim the quilt top, batting, and backing together.
Finish the circular perimeter with bias binding. Bias-cut strips are important because their diagonal grain allows them to bend around the circle without the severe puckering that straight-grain strips may produce. Join enough strips to cover the entire circumference, press the binding, and sew it slowly around the panel without stretching the outer edge. Complete the back by hand or machine, then add a strong hanging sleeve or discreet hanging tabs so the panel can be displayed securely.
FAQ About the Round Christmas Tree Wall Panel Pattern
What is a Round Christmas Tree Wall Panel Pattern? It is a decorative sewing and quilting project featuring a Christmas tree inside a circular textile foundation. This version combines patchwork-style appliqué, layered curved branches, a star, decorative stitching, free-motion quilting, batting, backing, and circular binding. Unlike a traditional rectangular quilt, it is intended primarily as textile wall art and can become a centerpiece for seasonal decorating.
Is the Round Christmas Tree Wall Panel Pattern suitable for beginners? Yes, but beginners may want to simplify some details. Use larger appliqué sections, fusible web, a straightforward blanket or zigzag stitch, and less complicated quilting. Instead of filling the background with dense free-motion spirals, you can begin with larger curves and simple echo lines. The basic construction remains the same, allowing the design to grow in complexity as your sewing skills develop.
What is the best fabric for this Christmas wall panel? Quilting cotton is an excellent primary choice because it is stable, easy to cut, readily available in many prints, and suitable for both appliqué and quilting. Decorative metallic cotton can be introduced in smaller amounts for the star or selected branch sections. When combining fabrics of noticeably different weights, test them together first and consider stabilizing delicate pieces.
Can I make this project using fabric scraps? Absolutely. A scrap fabric Christmas tree is actually ideal for creating the layered appearance of this design. Collect coordinated pieces in red, green, cream, gold, burgundy, and dark neutral shades. Even relatively small scraps can become narrow branch sections. Maintaining a controlled color palette allows numerous different prints to work together without making the tree look visually chaotic.
What finished size should I choose? A diameter of approximately 90 cm creates a large statement decoration, but there is no mandatory finished measurement. A 60 cm or 70 cm panel can be more convenient if you have limited wall space or a smaller sewing machine. Whatever size you choose, scale the Christmas tree proportionally and preserve enough open background around it for visible quilting.
Do I need free-motion quilting experience? No. Free-motion quilting creates beautiful swirls, but it is not essential to the basic structure. A walking foot can be used to create gently curving lines, radiating designs, or echo quilting. If you want the swirling appearance, practice first on scraps. Start with large spirals because larger movements are generally easier to control than very small, densely packed motifs.
Why should I quilt before cutting the final circle? Quilting can cause subtle shrinkage and movement in the layers. If you cut a perfect circle before quilting, the final edge may become slightly uneven. Working with oversized square layers provides extra fabric around the perimeter. Once all quilting is complete, you can measure again and cut a precise circle, resulting in a cleaner finished shape.
How do I make the Christmas tree look dimensional? Use a combination of overlapping appliqué pieces, contrasting fabrics, decorative stitching, and varied quilting density. Dense quilting around the tree visually compresses the background, while softer quilting within the appliqué preserves more loft. Curved overlapping branches also create the illusion of layers. These techniques provide dimension without requiring complicated three-dimensional construction.
What type of binding should be used around a round quilt? Use bias binding whenever possible. Because bias strips are cut diagonally across the fabric grain, they stretch gently and conform more naturally to curved edges. Apply the binding slowly and avoid pulling it excessively while sewing. Careful handling helps maintain the smooth circular silhouette of the finished wall hanging.
Can embroidery be added to the panel? Yes. Embroidered snowflakes, stars, leaves, berries, or decorative lines can add personality to the individual branches. Machine decorative stitches can provide a similar effect. Metallic thread can also highlight selected areas. Complete the structural appliqué and most of the quilting before attaching beads or bulky embellishments that might interfere with your sewing machine.
How can I create a different color version of the pattern? The basic Round Christmas Tree Wall Panel Pattern does not depend on one exact color combination. A contemporary version could use white, silver, blue, and teal, while a rustic interpretation could combine burgundy, forest green, beige, brown, and antique gold. The important principle is contrast: neighboring branch sections should remain visually distinct enough for the layered construction to be clearly visible.
How should a finished round Christmas panel be stored? Make sure the textile is clean and completely dry before storing it. Avoid leaving it tightly folded along the same creases for long periods. If practical, store it flat or gently rolled around a suitable fabric-covered tube. Keep it away from moisture and prolonged direct sunlight so the fabrics, thread, batting, and decorative details remain in good condition between holiday seasons.
Conclusion
The Round Christmas Tree Wall Panel Pattern combines several enjoyable sewing techniques into one distinctive holiday project. Starting with an oversized cream background gives you room to construct the design comfortably, while a carefully drafted tree template establishes the flowing shape of the branches. Dividing those branches into smaller sections allows red, green, burgundy, cream, gold, and patterned fabrics to create the rich patchwork effect that makes the tree so visually interesting.
From there, appliqué stitching secures and defines each fabric section, while the gold star completes the recognizable Christmas silhouette. Creating the quilt sandwich and adding outline quilting gives the appliqué greater definition. The large background spirals then transform the empty cream fabric into an important decorative element, creating movement and texture around the tree instead of leaving the surrounding area visually flat.
EASILY FIND THE FREE PDF FOR THIS PATTERN HERE!
The final stages are just as important. Trimming the circle only after quilting helps produce an accurate shape, and bias binding allows the perimeter to remain smooth and rounded. A secure hanging system on the back completes the project and turns the quilted piece into practical seasonal wall art. Most importantly, you can make this pattern your own. Change the dimensions, rearrange the fabric colors, simplify the quilting, add embroidery, or incorporate treasured scraps from earlier projects. The techniques taught here provide a foundation, while your fabric choices and stitching style give the finished piece its individual character. If you enjoyed this Round Christmas Tree Wall Panel Pattern, leave your sincere opinion about the project and share your suggestions for colors, fabrics, quilting motifs, or creative variations you would like to try.