
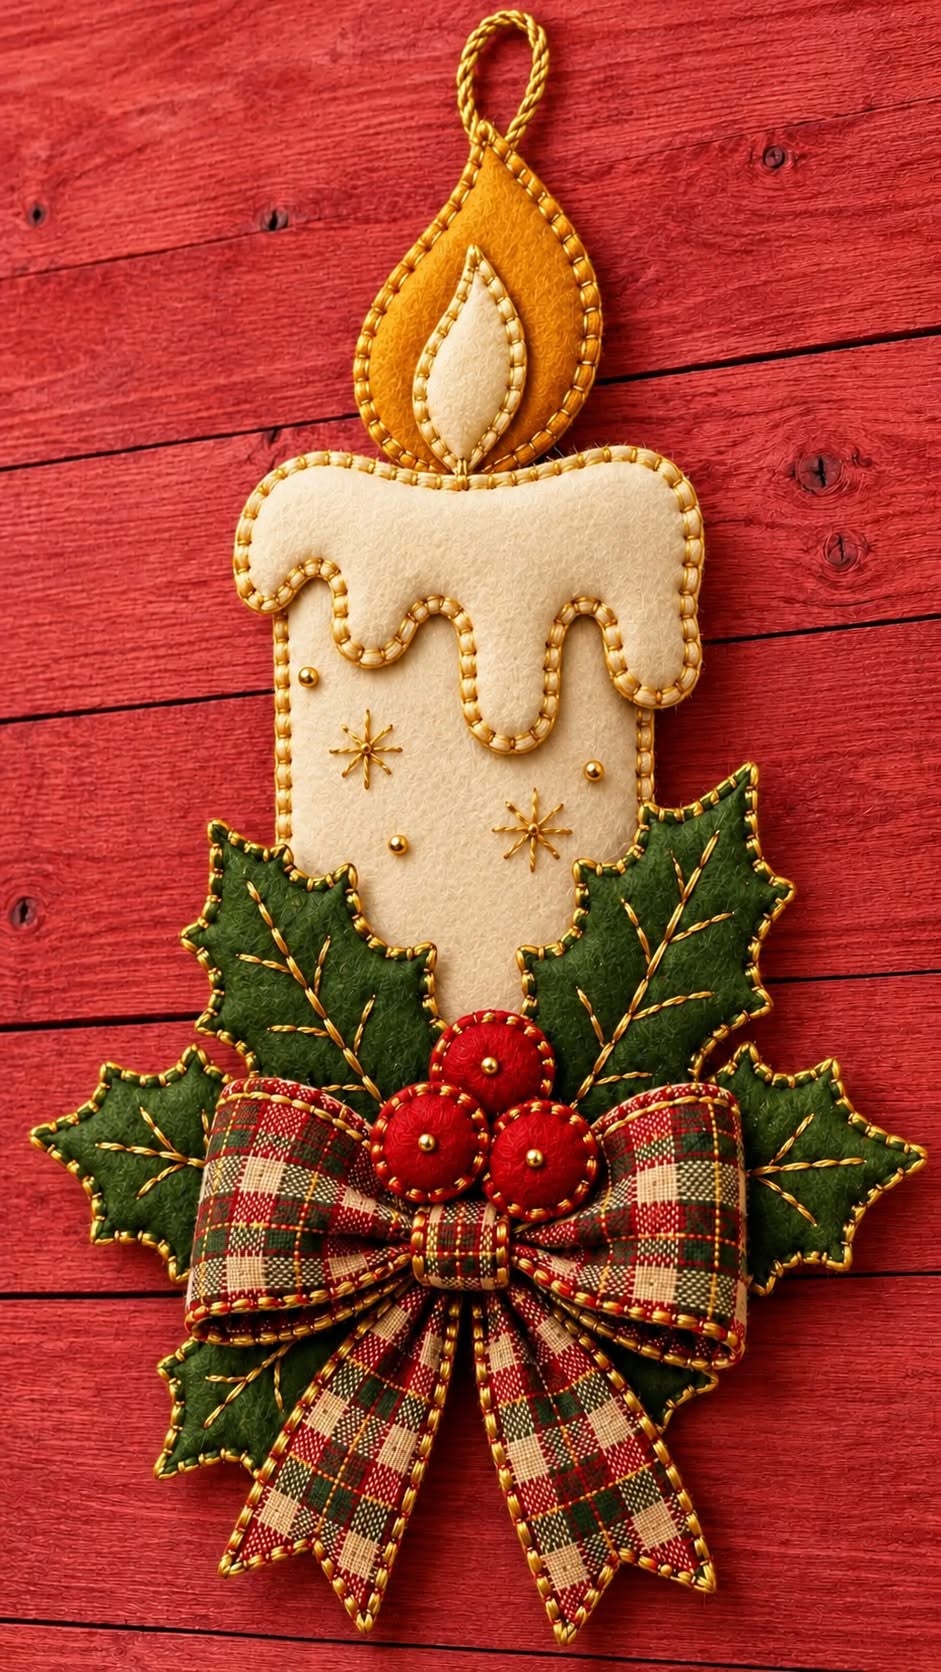
The Felt Christmas Candle Ornament Pattern is a charming handmade project that combines the warmth of traditional Christmas decorations with the simplicity of felt sewing. Inspired by the ornament shown in the reference image, the design features a soft ivory candle, a golden flame, dark green holly leaves, bright red berries, and a generous plaid bow. Small embroidered details give the finished piece a cozy, handcrafted personality that works beautifully on a Christmas tree, wreath, wall hook, door decoration, or holiday gift package. Because the construction relies mainly on basic cutting, layering, and hand stitching, this is also an approachable project for crafters who are still developing their sewing skills.
One of the most attractive qualities of this Felt Christmas Candle Ornament Pattern is the opportunity to customize nearly every detail. Wool-blend felt creates a particularly warm and substantial appearance, while ordinary craft felt can make the project economical and easy to reproduce. The candle can be cream, ivory, or snowy white; the flame can range from mustard yellow to warm gold; and the holly leaves can be made from several shades of green. The plaid bow introduces additional texture and gives the ornament a classic country Christmas character. Rather than requiring complicated machinery, most of the decorative effect comes from careful hand stitching and thoughtful layering.
Before beginning, it is helpful to think of the ornament as several simple components that will eventually be assembled into one dimensional decoration. You will make the felt candle body, melted-wax top, flame, holly leaves, berries, hanging loop, and fabric bow separately before bringing them together. A finished ornament can be approximately 25–30 cm tall, including the flame and bow, although the pattern can easily be scaled smaller for a Christmas tree. Keep your cuts smooth, test the arrangement before stitching permanently, and remember that handmade ornaments do not need to look mechanically perfect. Slight variations in the stitches and shapes are part of what gives a handmade felt Christmas ornament its character.
Materials and Preparing the Felt Christmas Candle Pieces
Start by gathering cream or ivory felt for the candle and melted wax, golden-yellow felt for the flame, dark green felt for the holly leaves, and red felt for the berries. You will also need embroidery floss or strong sewing thread, a hand-sewing needle, fabric scissors, pins or clips, a removable fabric marker, a small amount of polyester stuffing, and cord or twine for the hanging loop. A piece of plaid fabric or ribbon can be used for the large decorative bow. Felt, embroidery thread, and hand stitching are the essential materials for this project.
DISCOVER MORE FREE PATTERNS HERE!
For a medium-size ornament, draw a candle body approximately 10–12 cm wide and 14–16 cm tall. Cut two matching pieces so the candle can be lightly stuffed. The basic silhouette is a rectangle with gently rounded corners. Avoid making the shape perfectly geometric because the softly rounded outline helps reproduce the comfortable folk-art appearance of the reference design.
Next, create the melted-wax overlay. Cut a strip of cream felt roughly the same width as the candle, about 4–5 cm high. Along its lower edge, draw several rounded drips of different lengths. One can be long, another short, and another medium. This irregular arrangement is an important visual feature because it makes the candle appear as though warm wax is naturally flowing down its surface.
Create the flame using two layers. The larger outer flame can measure approximately 6–7 cm tall, with a rounded teardrop shape made from golden or mustard felt. Cut a smaller inner flame from pale cream or light yellow felt, approximately 4–5 cm tall. Layering these two pieces gives the flame greater dimension and immediately makes the Christmas candle ornament more recognizable.
Draw several holly leaves approximately 7–10 cm long. Instead of ordinary oval leaves, create pointed edges or gentle notches along each side to imitate traditional holly. Cut pairs when possible so that two pieces can be stitched together for each leaf. Four to six finished leaves provide enough volume to frame the lower portion of the candle without completely hiding it.
Finally, cut six small red felt circles for three berries. Each circle can be around 3–4 cm in diameter, depending on the overall scale of the ornament. Two circles will create each stuffed berry. Before sewing anything permanently, place the candle, flame, leaves, berries, and bow on your work surface. This dry arrangement helps you adjust proportions and ensures that the completed Felt Christmas Candle Ornament Pattern looks balanced.
Sewing the Candle, Wax Drips, and Decorative Flame
Place the two candle-body pieces together with their edges aligned. Using matching cream embroidery floss, sew around the outside with a blanket stitch or small whip stitches. Blanket stitch is especially effective with felt because it secures the raw edges while simultaneously creating a decorative border. Keep the spacing reasonably consistent, but do not worry about making every stitch identical.
Leave a small opening before completing the candle body. Add a thin layer of polyester stuffing, concentrating on creating gentle dimension rather than making the candle extremely firm. A lightly padded candle retains its soft handmade appearance and remains easy to hang. Once you are satisfied with the shape, close the opening using the same stitch.
Position the melted-wax piece across the upper front of the candle. Sew around its outer perimeter and carefully follow each curved drip. A contrasting beige or light-gold thread can emphasize the shape, while cream thread creates a subtler finish. If you prefer a more dimensional design, place a second matching wax piece behind the first and add a very small amount of stuffing before completing the stitching.
For the flame, place the smaller cream teardrop in the center of the larger golden shape. Secure it with tiny running stitches or blanket stitches. Then place a second golden flame piece behind the front piece and stitch around the perimeter. Add just a pinch of stuffing if you want the flame to stand slightly forward from the candle.
The hanging loop should be attached securely to the top of the flame. Cut approximately 12–15 cm of narrow cord or twine, fold it in half, and insert the cut ends between the two flame layers before closing the top stitches. Reinforce this area with several additional stitches because the loop will carry the weight of the entire ornament.
Attach the finished flame to the top center of the candle. Several hidden stitches along the lower portion of the flame are usually sufficient. The connection will later be visually softened by the wax layer and decorative details, so prioritize strength. Make sure the hanging loop points straight upward before tightening your final stitches.
To reproduce the delicate sparkle seen in the inspiration image, embroider several small starbursts on the candle front using gold-colored embroidery floss. Add tiny French knots, beads, or simple dots between them if desired. These understated details suggest reflected candlelight and make the felt candle decoration look festive without overwhelming its rustic style.
Creating Holly Leaves, Red Berries, and the Plaid Bow
The holly leaves provide the strongest color contrast in this Felt Christmas Candle Ornament Pattern. Pair two matching green felt pieces for each leaf and sew around the pointed edges using green or contrasting thread. You can add a tiny amount of stuffing, but keeping the leaves relatively flat usually makes assembly easier. Slight differences among the leaves create a more natural arrangement.
After completing each leaf, embroider a central vein from the base toward the tip. Gold embroidery floss works especially well because it coordinates with the flame and candle embellishments. Add one or two diagonal veins branching toward the sides. Keep these stitches simple; their purpose is to introduce texture and definition rather than create a botanically precise leaf.
Arrange the leaves around the bottom third of the candle. Place some behind the candle and others slightly toward the front so the foliage appears layered. The pointed tips should extend outward in several directions. Once you like the composition, secure each leaf with strong hidden stitches close to its base. Sewing only the lower area allows the leaf tips to remain dimensional.
To make a berry, place two red felt circles together and stitch around the edge, leaving a small opening. Insert a tiny amount of stuffing and close the seam. Repeat this process until you have three berries. A small gold bead, knot, or stitch in the center of each berry can echo the decorative golden accents used elsewhere in the project.
Cluster the three berries near the center where the holly leaves meet. A triangular arrangement generally looks balanced: one berry at the top and two slightly lower. Stitch them firmly to the foliage and candle base. These felt holly berries provide a bright focal point and help connect the green leaves visually with the red tones in the plaid bow.
For the bow, use plaid fabric or a wide plaid ribbon approximately 5–7 cm wide. Create two generous loops, a central knot, and two tails. If using fabric rather than finished ribbon, fold the raw edges inward and stitch them so they remain neat. Attach the bow directly beneath the berries. The bow should look full but should not completely cover the leaves, since the layered relationship between the holly, berries, and plaid bow is an important part of the design.
Final Assembly, Finishing Details, and Display Ideas
Once all the main components are attached, examine the ornament from a short distance. Check whether the candle appears centered between the leaves and whether the flame aligns naturally with the candle body. Adjust loose elements with additional hidden stitches. This final inspection can make a significant difference because small alignment changes often improve the overall composition.
Check every stitched edge as well. Felt does not fray like woven fabric, but consistent edge stitching gives a handmade ornament a cleaner and more intentional finish. If any stuffing is visible through an opening, gently push it inward with a blunt tool and close the area with a few additional stitches. Trim loose thread ends rather than leaving them exposed.
You can also add additional hand-embroidered details at this stage. Tiny gold stars, French knots, or short radiating stitches work particularly well against cream felt. Avoid filling every empty space. Leaving visible areas of plain felt helps the decorative stitching stand out and maintains the soft, traditional appearance of the Felt Christmas Candle Ornament Pattern.
If you want to personalize the project, consider changing the colors while preserving the basic construction. Burgundy berries and deep forest-green leaves can create a traditional palette, while pastel pink, sage green, and ivory can produce a softer contemporary version. The plaid bow could also be replaced with gingham, velvet ribbon, tartan fabric, or another holiday print.
This handmade candle can be displayed in several ways. A smaller version works beautifully as a Christmas tree ornament, while a larger version can decorate a wreath, cabinet handle, wall hook, or holiday centerpiece. It can also become a reusable gift embellishment. Instead of discarding a decorative bow after opening a present, the recipient can keep the felt candle and hang it every Christmas.
For storage, keep the ornament flat or loosely wrapped in clean tissue paper so the flame and holly points are not crushed. Avoid placing heavy decorations directly on top of it. With careful storage, the hand-sewn felt ornament can be brought out year after year, gradually becoming part of a family’s holiday decorating tradition.
FAQ About the Felt Christmas Candle Ornament Pattern
What is the best felt for a Felt Christmas Candle Ornament Pattern?
Wool or wool-blend felt offers excellent structure, rich texture, and attractive stitched edges. However, good-quality craft felt can also work well, especially for beginners or anyone making several ornaments. The most important consideration is choosing felt that is firm enough to maintain the shapes of the flame and holly leaves.
Do I need a sewing machine for this project?
No. This design is particularly suitable for hand sewing. Blanket stitch, running stitch, whip stitch, and a few basic embroidery stitches are enough to construct and decorate the entire ornament. A sewing machine can be used for certain components, but it is not necessary.
What size should the finished candle ornament be?
A decorative version can measure around 25–30 cm tall from the hanging loop to the bottom of the bow. For a Christmas tree, you may prefer a smaller version around 15–20 cm tall. Simply scale all pattern pieces proportionally so the flame, candle, foliage, berries, and bow remain balanced.
How much seam allowance does felt require?
When pieces are joined using visible blanket stitches around the outside edge, a traditional turned seam allowance is generally unnecessary. You can cut the felt to its finished shape and stitch close to the edge. If you choose a construction method involving turned fabric components, approximately 0.6–1 cm of seam allowance may be appropriate.
Should the candle be heavily stuffed?
No. Light stuffing is usually more effective. The goal is to give the ornament soft dimension while allowing it to remain relatively flat. Too much stuffing can distort the candle outline, make the wax drips difficult to position, and increase the weight of the finished decoration.
How do I make the blanket stitches look even?
Work slowly and try to maintain approximately the same distance between each stitch and the felt edge. Some crafters find it useful to make tiny removable guide marks before stitching. Consistency improves naturally with practice, and minor differences can actually complement the handmade character of the project.
Can I make the ornament without beads?
Absolutely. Beads are optional. Small French knots or embroidered dots can replace them and still provide attractive decorative accents. This is also a useful alternative when creating ornaments for homes where loose embellishments are undesirable.
How can I make the holly leaves more dimensional?
Use two layers of felt for each leaf and add a very thin amount of stuffing between them. Embroidering a central vein can also visually emphasize the leaf structure. Another simple technique is to secure only the base of each leaf to the candle, allowing the pointed edges to lift naturally.
Can this pattern be enlarged for a door decoration?
Yes. The same basic Felt Christmas Candle Ornament Pattern can be enlarged considerably. When creating a larger version, use thicker felt or interfacing to help the candle, flame, and leaves maintain their shapes. You may also need a stronger hanging loop.
What stitches are most useful for this project?
The blanket stitch is excellent for visible felt edges, while the running stitch works for attaching appliqué pieces. Small whip stitches are useful for hidden assembly, and French knots can create decorative dots. Straight stitches arranged in a star shape are an easy way to reproduce the sparkling details on the candle.
Can fabric scraps be incorporated into the design?
Yes. The bow is an ideal place to use a favorite holiday fabric scrap. Small printed cotton pieces can also be incorporated into berries or layered decorative elements. Mixing fabric and felt adds texture while making this project useful for leftover materials from previous Christmas crafts.
Is the Felt Christmas Candle Ornament Pattern suitable for beginners?
Yes. Beginners can simplify the design by using single-layer leaves, flat berries, and basic running stitches. More experienced makers can add stuffing, embroidery, layered felt, decorative beads, and detailed blanket stitching. This makes the same pattern adaptable to several skill levels.
Conclusion
The Felt Christmas Candle Ornament Pattern brings together several classic holiday elements in one warm and inviting handmade decoration. By cutting a simple candle body, adding flowing wax drips, building a layered golden flame, surrounding the base with green holly leaves, and finishing everything with red berries and a plaid bow, you can create a dimensional Christmas ornament using accessible sewing techniques.
Throughout this project, you have learned how to prepare felt pattern pieces, use blanket stitching, lightly stuff dimensional components, layer appliqué elements, embroider decorative accents, construct felt berries, arrange holly foliage, and assemble a balanced finished ornament. These techniques can also be reused in many other felt Christmas crafts and seasonal sewing projects.
EASILY FIND THE FREE PDF FOR THIS PATTERN HERE!
The greatest advantage of handmade decorations is the freedom to make each version personal. Experiment with different felt colors, embroidery threads, bow fabrics, sizes, and embellishments while keeping the recognizable candle-and-holly composition. Whether you make one ornament or an entire collection, each finished piece can have its own personality. If you make your own Felt Christmas Candle Ornament Pattern, leave your sincere opinion about the project and share your suggestions. Which colors, fabrics, stitches, or Christmas details would you add to make your version unique?