
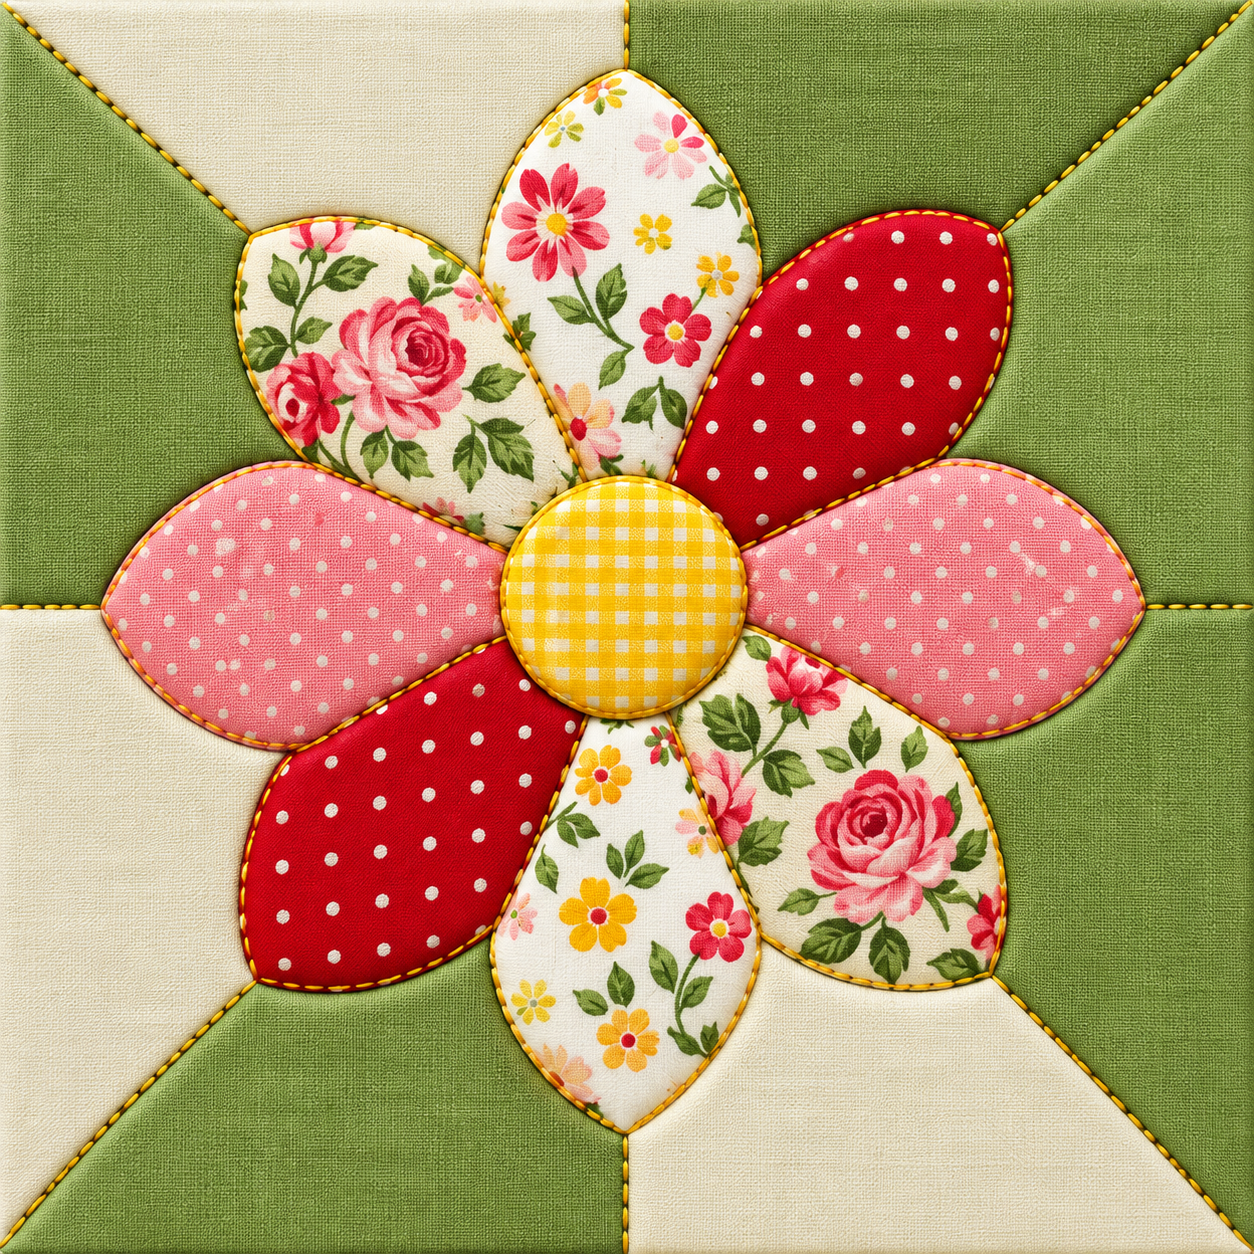
Quilt Block with Fabric Flower Pattern is a colorful sewing project that combines traditional patchwork construction with the charm of floral appliqué. The design shown in the reference image features a large eight-petal flower positioned over a geometric green-and-cream background, creating a block that feels cheerful, balanced, and distinctly handmade. Different prints—including florals, polka dots, and gingham—give every section its own personality while still working together as one coordinated composition. This type of fabric flower quilt block is especially useful for quilters who enjoy working with fabric scraps because the individual petals require relatively small pieces. The project can be adapted for quilts, cushion covers, tote bags, table décor, or decorative wall panels. Most importantly, the construction can be approached one stage at a time, making the pattern accessible even if you are still developing your appliqué and patchwork skills.
The main idea behind the Quilt Block with Fabric Flower Pattern is to create contrast between a structured background and a softer, rounded floral motif. In the photographed design, the background uses alternating green and cream sections that meet toward the center, producing a subtle geometric effect behind the flower. The flower itself contains eight elongated petals in several coordinating fabrics, while a yellow gingham circle covers their inner ends and forms a bright focal point. Decorative golden-yellow stitching outlines the appliqué and emphasizes the shapes. Although the finished block looks detailed, the individual techniques are straightforward: accurate cutting, basic patchwork seams, careful pressing, appliqué placement, and edge stitching. Taking time with these fundamentals is far more important than sewing quickly, particularly when several pieces must meet neatly near the center.
Another appealing feature of this quilt block pattern is its flexibility. You do not have to reproduce every fabric print exactly to achieve a similar effect. A successful version could use vintage florals, modern geometric prints, solids, tiny dots, gingham, or fabrics left over from previous quilting projects. The important principle is maintaining enough contrast for the petals to remain visible against the background. For a block inspired closely by the reference, use cream and medium green for the background, pink and red for several petals, light floral cotton for the remaining petals, and yellow gingham for the center. A practical target is a finished block of approximately 20 cm × 20 cm, with petals around 8 cm high × 5 cm wide and a center circle approximately 5 cm in diameter.
Materials, Measurements, and Preparing the Quilt Block
Start by gathering good-quality 100% cotton quilting fabric, which is an excellent choice because it cuts accurately, presses cleanly, and is easy to sew. For the background, prepare cream and green cotton. For the flower, select at least four coordinating prints so that you can repeat fabrics without making every petal identical. The reference design uses a lively mixture of pink, red, cream, floral, and yellow fabrics. You will also need matching or contrasting thread, lightweight fusible web for appliqué, fabric scissors or a rotary cutter, a cutting mat, quilting ruler, pins or clips, an iron, and a sewing machine.
DISCOVER MORE FREE PATTERNS HERE!
For an approximately 20 cm × 20 cm finished quilt block, prepare background pieces large enough to allow accurate piecing and final trimming. A practical method is to begin with green and cream squares or rectangles and create triangular units that point toward the center. If following the accompanying pattern concept, background squares around 10 cm × 10 cm can be cut diagonally to create the required triangles. Remember that seam allowances affect final dimensions, so it is helpful to begin slightly oversized and square the background after piecing rather than trying to force undersized pieces into position.
The fabric flower appliqué requires eight petals. Each finished petal can be approximately 8 cm tall and 5 cm across its widest area. Create one accurate paper template and use it for all eight petals so the basic flower remains symmetrical. The individual prints may change, but the consistent shape provides visual unity. If you prefer the arrangement seen in the image, cut two petals from each of four coordinating fabrics. This produces repetition around the flower without making neighboring areas look identical.
Prepare one circle approximately 5 cm in diameter for the flower center. Yellow gingham is particularly effective because it contrasts strongly with both the red and pink petals and the green background. The center circle also serves a practical purpose: it covers the narrow inner ends of the eight petals, making the central area look cleaner. If you change the color palette, choose a center fabric with enough contrast to remain visually distinct from every surrounding petal.
Before cutting the appliqué fabrics, press them carefully. Accurate pressing is an essential part of quilting and patchwork because even small wrinkles can affect the dimensions of a small template. Place your fabric on the cutting mat with the grain reasonably straight, position the template, and trace or cut each shape carefully. If you are using fusible web, trace the petal and circle shapes onto its paper side before attaching it to the fabric according to the manufacturer’s instructions.
Accuracy at this stage will simplify everything that follows. Label pieces if necessary, particularly when working with several similar floral prints. Arrange all eight petals on your work surface before sewing anything permanently. This quick preview lets you decide how the colors should circulate around the flower and prevents two visually heavy fabrics from accidentally dominating one side of your Quilt Block with Fabric Flower Pattern.
Piecing the Background and Arranging the Fabric Flower
Begin the background by laying out the green and cream triangular sections. Alternate the colors so they create the pinwheel-like arrangement visible in the reference project. The points should visually lead toward the middle of the block. Before sewing, step away from your work surface and look at the entire arrangement. This simple check often reveals a reversed triangle or misplaced color before it becomes part of a stitched seam.
For traditional American-style quilt piecing, a ¼-inch seam allowance, approximately 0.6 cm, is commonly used. Sew the background sections together with a consistent straight stitch. Avoid pulling the fabric as it moves beneath the presser foot, especially along diagonal or bias edges. Bias edges can stretch easily, and stretching them may cause ripples or prevent the completed background from lying perfectly flat.
Press each seam after sewing. In quilting, pressing is generally preferable to aggressively moving the iron back and forth. Place the iron onto the seam, lift it, and reposition it as needed. You can press seam allowances toward the darker green fabric when practical, which can help prevent darker seam allowances from showing through the cream sections. Around bulky intersections, pressing seams open may sometimes create a flatter result.
Once the background has been assembled, check its shape with a quilting ruler. Square it carefully without removing unnecessary fabric. Locate the exact center by measuring from opposite sides or by lightly folding the block vertically and horizontally. A clearly identified center point makes positioning the eight-petal fabric flower considerably easier.
Now arrange four petals at the top, bottom, left, and right positions, similar to the numbers 12, 6, 9, and 3 on a clock face. Place the other four petals between them. This approach creates much more reliable spacing than attempting to arrange all eight pieces randomly. The narrow ends should point inward while the fuller ends extend toward the outside of the flower.
Place the yellow circle temporarily over the center and inspect the complete design before fusing anything. Look for consistent petal spacing and a centered overall silhouette. Small variations are perfectly natural in a handmade project, but the flower should feel visually balanced. When you are satisfied with the arrangement, remove the center temporarily, secure or fuse the petals, and then position the center circle over their inner ends.
Appliqué Stitching, Quilting, and Finishing Techniques
Fusible-web appliqué is an approachable method for constructing this design. Fusible web is a thin adhesive material that bonds the appliqué fabric to the background when activated with heat. Trace the petal templates onto the paper-backed fusible material, attach it to the wrong side of the chosen fabrics, and cut the final shapes. Always follow the specific temperature and pressing directions supplied with your fusible product, because different adhesives can require different heat settings.
After positioning the petals, fuse them carefully without disturbing their arrangement. Instead of continuously sliding the iron across the block, press individual areas for the recommended amount of time. Once the eight petals are secure, place the center circle over their narrow ends and fuse it as well. Allow the entire block to cool flat before moving it. Cooling gives the adhesive an opportunity to stabilize and helps prevent individual pieces from lifting.
Next comes machine appliqué stitching. A narrow zigzag stitch is an excellent option because it catches both the appliqué edge and background fabric. A blanket-style stitch can provide a more traditional appearance, while straight stitching close to the raw edge creates a casual contemporary finish. The golden-yellow outlining visible in the reference image demonstrates how contrasting thread can become an important decorative element rather than simply disappearing into the fabric.
Sew slowly around curved areas. When you need to change direction, stop with the needle down in the fabric, raise the presser foot, pivot slightly, and continue. Several small pivots will usually create a smoother curve than one dramatic turn. Complete the stitching around all eight petals before sewing around the 5 cm center circle. The center stitching helps secure the area where all the petal ends converge.
If the block will become part of a quilted item, you can now create a quilt sandwich using the finished top, batting, and backing fabric. Baste the layers securely and add quilting stitches. Stitch-in-the-ditch quilting follows the patchwork seam lines and keeps attention on the flower. Echo quilting follows the contours of the petals at a small, consistent distance, emphasizing the appliqué shape. Straight-line quilting is another beginner-friendly option.
After quilting, measure the block again and carefully square its edges. If your goal is a 20 cm × 20 cm block, verify all four sides and both diagonals before trimming. Keep future seam allowances in mind if you plan to join this block to other patchwork units. The completed block can now be incorporated into a larger quilt, transformed into a cushion front, framed as textile art, or used as the decorative centerpiece of a handmade bag.
Creative Variations, Common Mistakes, FAQ, and Final Results
One of the easiest ways to personalize the Quilt Block with Fabric Flower Pattern is through color. A spring version might feature pale pink, lavender, mint, yellow, and cream. An autumn variation could combine rust, mustard, burgundy, olive, and warm beige. For a modern look, try solid fabrics against a low-volume background. The construction process remains essentially the same even when the visual character changes completely.
Scrap selection also influences the finished design. Very large prints may lose recognizable details when cut into small petals, while small- and medium-scale prints usually remain clear. Combining floral prints with dots, gingham, stripes, or subtle geometric designs can produce a balanced scrappy appearance. Lay potential fabrics beside one another before cutting so you can judge contrast under the same lighting conditions.
A common mistake is placing the flower before the background has been properly squared. If the underlying patchwork is distorted, even a perfectly arranged flower may appear crooked later. Another common problem is stretching bias edges while sewing the background. Handle triangular pieces gently, maintain an even seam allowance, and press rather than aggressively iron the fabric.
Appliqué can also become uneven when the sewing machine is operated too quickly. Curved petals require controlled stitching. Slow down near pointed ends and rounded corners, pivot with the needle down, and practice your selected stitch on scraps first. A short test will help you determine suitable stitch length, width, and thread tension without experimenting directly on your finished block.
For a fuller project, make several versions of the same fabric flower quilt block using different color combinations. Repeating the same flower shape creates continuity, while changing the prints makes each block distinctive. Multiple blocks could be arranged with plain sashing between them or alternated with simpler patchwork blocks to prevent the finished quilt from becoming visually crowded.
The greatest advantage of this project is that it teaches several useful quilting skills within one manageable design. You practice accurate cutting, patchwork piecing, ¼-inch seams, pressing, fusible appliqué, curved machine stitching, color placement, and basic quilting. Those skills can then be transferred to many future sewing projects, making this flower block more than a decorative exercise.
FAQ: What is a Quilt Block with Fabric Flower Pattern? A Quilt Block with Fabric Flower Pattern is a patchwork block featuring a flower constructed from individual fabric shapes, typically attached using appliqué. In this design, eight elongated petals surround a contrasting circular center over a pieced geometric background.
FAQ: Is this pattern suitable for beginners? Yes. A beginner who is comfortable with basic straight stitching can approach the project successfully by working slowly. The background introduces simple patchwork construction, while fusible web makes the appliqué pieces easier to position before stitching.
FAQ: What fabric works best for the flower petals? 100% quilting cotton is a practical choice. It is stable, widely used for patchwork, easy to press, and available in countless prints. Small floral prints, polka dots, gingham, and coordinating solids all work particularly well for this design.
FAQ: How many petals are needed? The flower shown here uses eight petals. Each petal is approximately 8 cm high × 5 cm wide. Using one template for all eight shapes helps maintain a consistent flower silhouette.
FAQ: How large should the flower center be? A circle approximately 5 cm in diameter works well with the petal proportions described in this tutorial. You can adjust the circle slightly if your particular petal placement leaves more or less space at the center.
FAQ: Do I need fusible web? It is not absolutely required, but fusible web appliqué makes this project significantly easier, particularly for beginners. It holds the petals in position while you stitch their edges and reduces unwanted movement.
FAQ: What stitch should I use around the petals? A narrow zigzag stitch, blanket stitch, or straight stitch near the raw edge can all work. Zigzag and blanket stitches provide more edge coverage, while straight stitching creates a simpler raw-edge appliqué appearance.
FAQ: What seam allowance should I use for the patchwork background? A ¼-inch seam allowance, approximately 0.6 cm, is standard for many U.S. quilting projects. Consistency matters more than speed, because inaccurate seams can change the final dimensions of the background.
FAQ: Can I hand appliqué the flower instead of using a sewing machine? Yes. The flower can be adapted for hand appliqué if that is your preferred technique. Turned-edge hand appliqué will require slightly different template preparation because enough fabric must remain around each shape to turn the raw edges underneath.
FAQ: What can I make with the completed block? A single block can become a cushion panel, tote-bag feature, mini quilt, wall hanging, table decoration, or framed textile piece. Multiple blocks can be combined to make a larger patchwork quilt.
FAQ: Can leftover fabric scraps be used? Absolutely. This is an excellent scrap quilt pattern because the individual petals are relatively small. Scraps from previous projects can add variety while reducing fabric waste.
FAQ: How can I make the flower look balanced? Position the first four petals at the top, bottom, left, and right of the center. Add the remaining four between them, then place the center circle temporarily over the petal ends. Check the complete arrangement before fusing or stitching anything permanently.
Conclusion
The Quilt Block with Fabric Flower Pattern brings together colorful appliqué and classic patchwork techniques in a project that is both decorative and practical. Starting with an alternating green-and-cream background, you learned how to prepare an eight-petal flower, create a contrasting circular center, arrange the appliqué symmetrically, secure the pieces with fusible web, finish the edges with decorative stitching, and add optional quilting.
EASILY FIND THE FREE PDF FOR THIS PATTERN HERE!
Careful cutting, consistent 0.6 cm (¼-inch) seams, gentle pressing, and patient appliqué work are the main ingredients for achieving a clean result. Once you understand the construction, the same pattern can be recreated in countless fabric combinations and adapted for quilts, cushions, bags, and other sewing projects. If you make your own version, leave your honest opinion about the project and share your suggestions for colors, fabrics, or creative variations you would like to try next.