
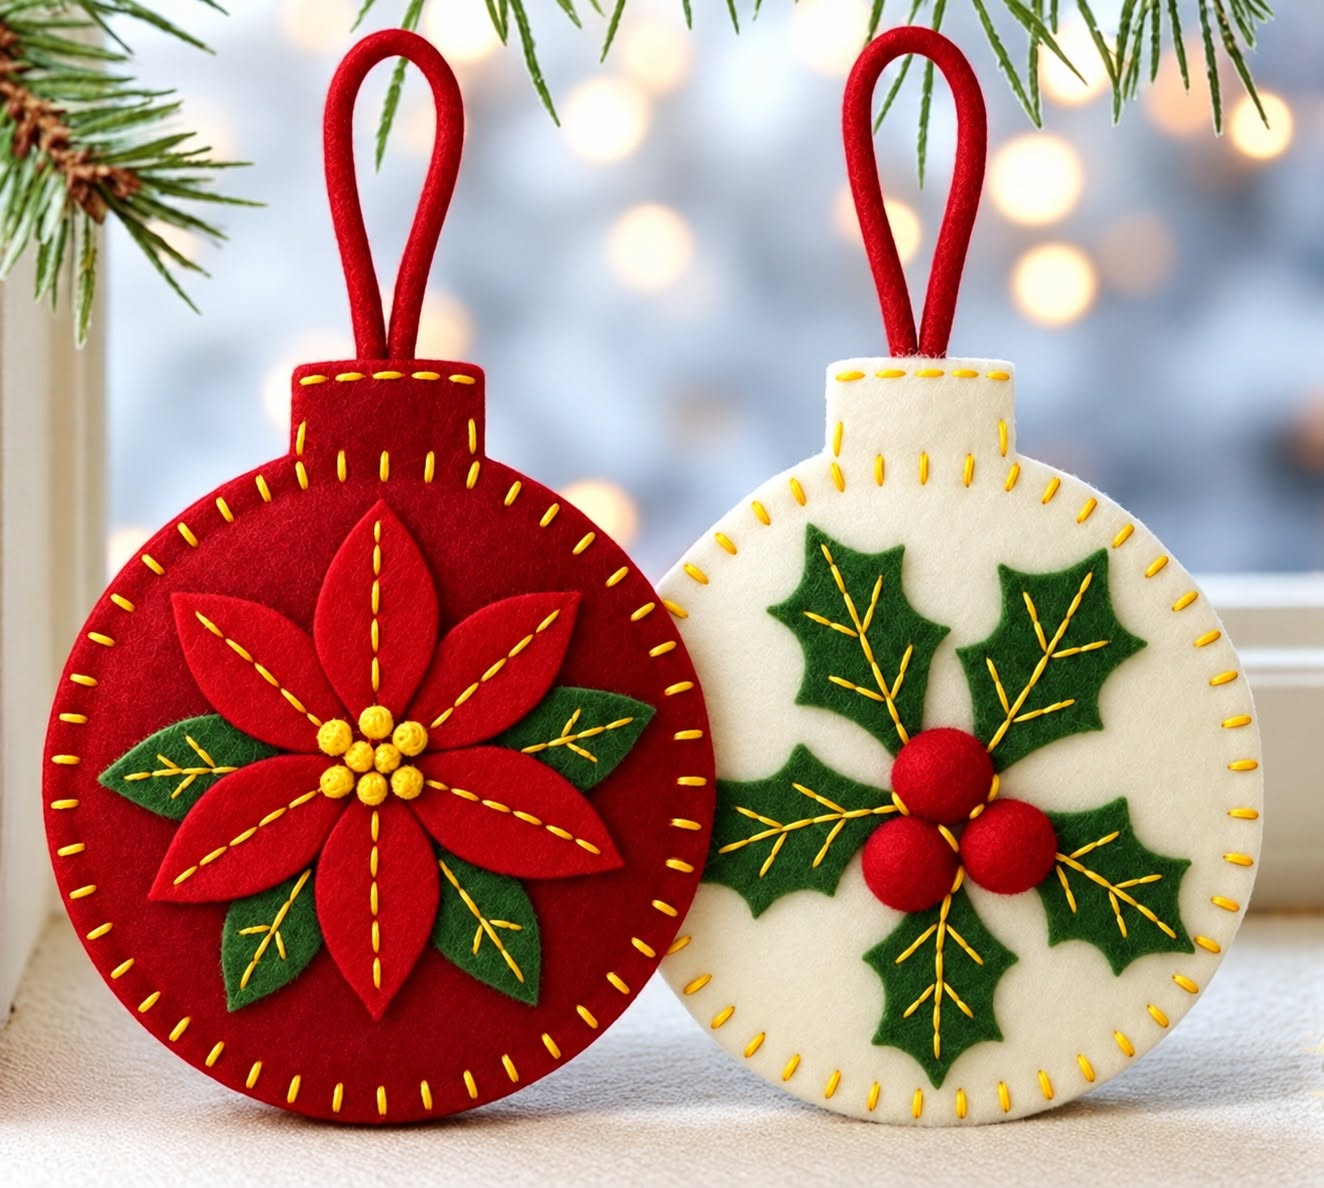
Felt Christmas Ornaments Poinsettia and Holly Designs Pattern is a charming handmade Christmas project that combines traditional holiday colors, simple sewing techniques, and classic botanical motifs. Inspired by the ornaments shown in the reference image, this project features two round felt decorations: a rich red ornament decorated with a layered poinsettia flower, and a soft ivory ornament decorated with holly leaves and red berries. Both designs are finished with visible blanket-style stitches and fabric loops, giving them the warm appearance associated with handmade Christmas decorations.
One of the best features of this felt Christmas ornament pattern is its accessibility. You do not need an advanced sewing machine or complicated quilting equipment to achieve an attractive result. Most of the project can be completed with felt, embroidery thread, a hand-sewing needle, sharp scissors, stuffing, and a few basic templates. Felt is especially convenient because its cut edges normally do not unravel, allowing the flower petals and leaves to remain raw-edged. The visible stitching then becomes part of the decorative design rather than simply a construction method.
The Felt Christmas Ornaments Poinsettia and Holly Designs Pattern can also be customized in many ways while maintaining the recognizable appearance of the original inspiration. You can make the ornaments slightly larger or smaller, use wool-blend or craft felt, change the embroidery colors, add light padding, or personalize the hanging loops. The important idea is to preserve the simple circular silhouette, layered botanical appliqué, and handcrafted stitching. Below, you will learn how to plan the pattern, cut the individual pieces, assemble both designs, and finish the ornaments neatly from beginning to end.
Materials and Pattern Preparation for Felt Christmas Ornaments
Begin by gathering the materials for both ornaments. You will need red felt, ivory or cream felt, dark green felt, yellow felt or small yellow felt pieces, red felt for berries, embroidery floss, a hand-sewing needle, fabric scissors, pins or clips, and lightweight polyester stuffing. A removable fabric marker can also be helpful. For ornaments with additional body, thin batting can be substituted for some of the stuffing.
DISCOVER MORE FREE PATTERNS HERE!
For an ornament similar in proportion to the reference project, create a circular template approximately 13 to 15 cm in diameter. The exact measurement is flexible, but using the same circle for both designs produces a coordinated pair. Cut two circles for each ornament because one will form the decorated front and the second will become the back. Carefully matching the circles makes the final edge stitching much easier.
You will also need a small rectangular cap at the top of each ornament. A practical starting size is approximately 4.5 cm wide by 3.5 cm high, although it should be adjusted according to your ornament diameter. The cap can be integrated visually with the round body or added as a separate felt piece. Its purpose is primarily decorative because the actual hanging loop can be secured between the front and back layers.
For the poinsettia ornament, prepare approximately five elongated red petals. Each petal can measure roughly 5 to 6 cm long and should taper to a point at the outer end. Prepare three or four dark green leaves slightly wider than the petals. These dimensions do not have to be perfectly identical. Slight variations can actually enhance the handcrafted character of the finished ornament.
The holly ornament pattern requires approximately five dark green leaves. Draw each leaf with pointed lobes along both sides to reproduce the recognizable holly shape. A finished leaf around 5 to 6 cm long works well on a 13–15 cm ornament. You will also need three small red circles for the berries. Cutting these pieces carefully is important because the holly design has fewer layers to conceal uneven edges.
Before cutting all your good felt, make a quick paper version of each arrangement. Place the paper petals or leaves over your circle and check the spacing. This simple preparation prevents a common problem: creating appliqué pieces that are attractive individually but too large when arranged together. Once you are satisfied with the proportions, transfer the templates to the felt and cut the final pieces.
How to Make the Red Poinsettia Felt Christmas Ornament
Start the poinsettia felt Christmas ornament with one red felt circle facing upward. Arrange the green leaves first because they form the bottom layer of the flower. Position them so their pointed ends extend beyond the petals but remain comfortably inside the circular edge. Leave enough space around the perimeter for the final decorative stitching.
Temporarily secure each green leaf using a pin, a tiny amount of fabric-safe adhesive, or a few small holding stitches. Using green embroidery floss, stitch each leaf to the red background. A simple running stitch works beautifully. Add a central stitched vein and several smaller diagonal veins if you want the leaves to have the detailed handmade appearance visible in the inspiration.
Place the five red poinsettia petals over the leaves. Arrange them radially so their narrow inner ends meet near the center. Check the composition before sewing because the spacing between petals determines how balanced the finished Christmas poinsettia ornament will appear. Once you are happy with the placement, secure the petals individually.
Sew down each petal with red embroidery floss. A line of running stitches through the center of every petal provides both decoration and attachment. For additional definition, you can use a slightly darker or lighter shade of red thread. Keep the stitches relatively consistent without worrying about absolute perfection. Handmade embroidery often looks more inviting when the stitches retain subtle natural variation.
The center of the poinsettia can be created with several tiny yellow felt circles or small rolled felt knots. Arrange approximately six to nine yellow elements in a compact cluster. Stitch them securely through the center so they cannot easily loosen. If the ornament will be used around small children or pets, stitched felt details are generally a more practical decorative choice than loose beads.
Finally, prepare a narrow red felt strip for the hanging loop. A strip approximately 1 to 1.5 cm wide and 18 to 22 cm long should create a comfortable loop, depending on your preferred hanging length. Fold it in half and place the raw ends between the front and back layers at the top. Secure it with several strong stitches before closing the ornament.
How to Make the Ivory Holly Felt Christmas Ornament
For the second version of the Felt Christmas Ornaments Poinsettia and Holly Designs Pattern, place one ivory felt circle on your work surface. The contrast between the light background, dark green leaves, and red berries creates a classic Christmas palette. Before sewing, arrange all five holly leaves so they radiate outward from a central point.
The holly leaves should overlap slightly near the center while their pointed tips spread toward different areas of the circle. Keep them away from the outer stitching line. Pin or lightly tack each leaf into place. Because the background is pale, check that no dark marking lines remain visible beyond the appliqué pieces.
Using green embroidery floss, attach each holly leaf appliqué with small stitches. You can stitch around the outer edge or use a central line similar to the reference design. Add one main vein running from the base toward the tip, followed by several smaller diagonal veins. These simple embroidery details make flat felt pieces look much more dimensional.
Create three round red berries approximately 1.5 to 2 cm in diameter. For flat berries, simply cut circles and appliqué them directly over the center of the leaves. For the soft dimensional appearance shown in the inspiration, cut slightly larger circles, gather the perimeter with tiny running stitches, add a very small amount of stuffing, and gently tighten the thread.
Arrange the three berries in a triangular cluster where the holly leaves meet. Stitch them firmly to the ornament. If you are making three-dimensional berries, pass the needle through the base several times so each berry remains stable. This central cluster is the visual focal point of the holly Christmas ornament, so symmetrical placement can make the entire design feel more polished.
Prepare the hanging loop using red felt or a sturdy red fabric strip. Fold it in half and position the ends between the ivory front and back pieces. Add the rectangular ivory cap around the loop area if you are following the appearance of the reference image. Stitch through the cap, loop, and ornament layers several times to create a strong attachment point.
Assembling, Stuffing, Stitching, and Finishing the Ornaments
Once the appliqué work is finished, inspect the backs of your decorated circles. Secure any loose thread ends with small knots. Place the corresponding back circle behind each decorated front, aligning the edges carefully. Insert the hanging loop at the top and make certain it points upward rather than becoming trapped sideways between the felt layers.
Thread a needle with embroidery floss that complements the ornament. Red floss creates an attractive contrast around the ivory holly ornament, while a coordinating or slightly darker red works beautifully around the poinsettia design. Begin stitching around the circumference using a blanket stitch or evenly spaced whip-style decorative stitch. Keep approximately the same distance between each stitch.
Do not completely close the circle immediately. Leave an opening of approximately 4 to 5 cm along one side or near the bottom. Through this opening, add small amounts of polyester stuffing. The goal is gentle dimension rather than a heavily stuffed ball. Push the filling evenly toward the edges while keeping the ornament relatively flat.
When you are satisfied with the shape, continue the decorative stitching across the opening. Check the front and back frequently to make sure the edges remain aligned. At the final stitch, make a secure knot and hide the thread tail between the felt layers. This small finishing technique keeps the exterior neat.
Shape the ornament gently with your fingers. Straighten the poinsettia petals, smooth the holly leaves, and check that the berries remain centered. You can also lightly adjust the stuffing if one area appears fuller than another. Avoid aggressive pressing with high heat because many synthetic craft felts can react poorly to excessive temperatures.
Your finished Felt Christmas Ornaments Poinsettia and Holly Designs Pattern can be used on a Christmas tree, attached to a wreath, incorporated into a garland, added to a holiday gift, or displayed on cabinet handles and decorative hooks. You can also make several matching ornaments in different sizes to create a coordinated handmade collection.
Frequently Asked Questions About Felt Christmas Ornaments
What type of felt is best for Christmas ornaments?
Wool-blend felt is an excellent option because it tends to have a dense texture and clean appearance. Good-quality craft felt can also work well, especially for beginner-friendly projects. The most important characteristic is enough firmness to hold the shapes of the poinsettia petals and holly leaves.
What stitch should I use around a felt Christmas ornament?
A blanket stitch is one of the most popular choices because it simultaneously joins the layers and creates a decorative border. Running stitch and whip stitch can also work. The visible stitches in this project are intentionally part of the handmade aesthetic.
Do I need a sewing machine for this pattern?
No. The entire Felt Christmas Ornaments Poinsettia and Holly Designs Pattern can be completed by hand. In fact, hand stitching complements this style especially well because the decorative stitches contribute to the traditional handcrafted appearance.
Should I add seam allowance to felt appliqué pieces?
Usually, no seam allowance is necessary for raw-edge felt appliqué. The poinsettia petals, holly leaves, and similar decorative pieces can be cut at their finished dimensions because their edges are intentionally exposed.
How large should a handmade felt Christmas ornament be?
There is no required size, but a diameter of approximately 13 to 15 cm creates a decorative ornament with enough room for detailed appliqué. For a smaller Christmas tree, you could reduce the pattern to approximately 8–10 cm while scaling the decorative pieces proportionally.
How do I make the berries dimensional?
Cut small felt circles, work tiny running stitches around their edges, place a small amount of stuffing in the center, and pull the thread gradually to gather the edges. Secure the gathered area underneath before stitching each berry onto the holly leaves.
Can I make these ornaments without stuffing?
Yes. Simply stitch the front and back felt layers together without filling them. The result will be a flatter felt Christmas decoration, which can be especially useful for garlands, gift embellishments, or ornaments that need to be stored compactly.
Can beginners make the poinsettia and holly designs?
Absolutely. The construction uses straightforward techniques such as template cutting, felt appliqué, running stitch, blanket stitch, and simple embroidery. Beginners can practice on scraps before stitching the final ornament.
How can I personalize the pattern?
Consider embroidering a year, initials, or a short name on the back before assembling the ornament. You can also experiment with burgundy, forest green, snowy white, gold, or muted vintage Christmas colors while maintaining the same basic poinsettia and holly pattern.
How do I keep the appliqué pieces from moving while sewing?
Small pins, sewing clips, temporary fabric adhesive, or tiny basting stitches can hold the pieces in position. For small felt projects, a few temporary stitches are often enough to keep everything aligned without making the layers stiff.
Conclusion
The Felt Christmas Ornaments Poinsettia and Holly Designs Pattern is a beautiful way to combine basic hand sewing with traditional Christmas imagery. Starting with simple felt circles, you can create two distinctive decorations by layering poinsettia petals, green leaves, holly foliage, dimensional berries, embroidery details, and decorative edge stitches.
Throughout this project, you learned how to prepare the templates, select and cut felt, position raw-edge appliqué, embroider leaf veins, build the poinsettia flower, create holly berries, attach a hanging loop, join the front and back pieces, lightly stuff the ornament, and complete the perimeter with decorative stitching. Each technique is approachable on its own, making the project suitable for both newer crafters and experienced makers looking for a relaxing seasonal project.
EASILY FIND THE FREE PDF FOR THIS PATTERN HERE!
Once you understand the basic construction, the same method can inspire an entire collection of handmade felt Christmas ornaments. Try changing the dimensions, combining different Christmas colors, adding embroidered details, or creating matching sets for family and friends. The handcrafted stitches and soft felt texture give every ornament its own personality while preserving the classic holiday character of the design. What do you think of these poinsettia and holly felt Christmas ornaments? Leave your sincere opinion and suggestions about the project. Sharing which colors, embroidery details, or design variations you would use can also inspire new ideas for future handmade Christmas creations.