
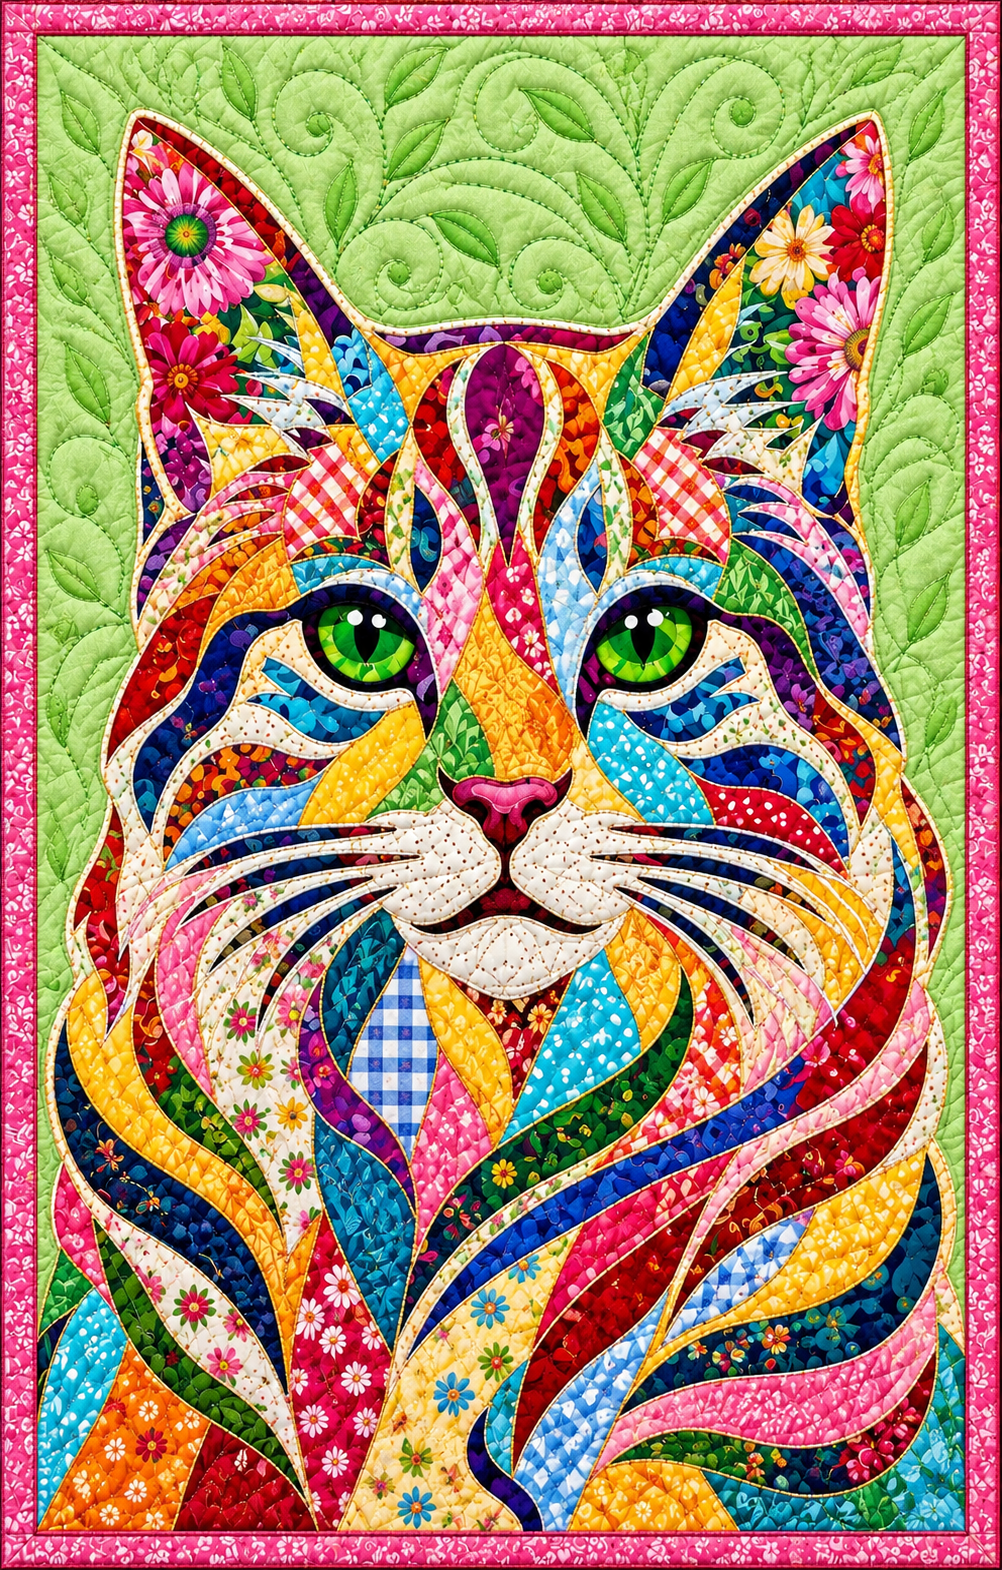
The Patchwork Quilt with Cat Panel Pattern is a striking fabric-art project that combines the warmth of traditional quilting with the expressive beauty of appliqué. Inspired by the colorful cat panel shown in the reference image, this design uses curved fabric sections, floral prints, geometric motifs, layered shapes, and decorative quilting to create a cat portrait full of personality. Although the finished piece looks intricate, the project becomes much more approachable when it is divided into manageable sections. Instead of trying to assemble the entire cat at once, you can construct the ears, forehead, eyes, muzzle, cheeks, and body separately before bringing everything together on the background panel.
One of the most appealing features of the Patchwork Quilt with Cat Panel Pattern is the freedom it gives you to work with color. The reference project mixes floral fabrics, checks, dots, solids, and small-scale prints without requiring every fabric to match perfectly. Warm shades such as yellow, orange, red, and pink are balanced by cooler blue, turquoise, green, and purple pieces. Light cream sections around the muzzle and eyes provide visual breathing room, while the bright green eyes become a strong focal point. This makes the pattern an excellent opportunity to use favorite scraps from previous patchwork and quilting projects while creating something that feels intentionally designed rather than randomly assembled.
Before beginning, remember that a complex cat appliqué quilt does not have to be rushed. Accuracy during preparation is much more valuable than speed. Organize your fabrics, create templates for the individual shapes, label the pieces, and decide where the major colors will appear before sewing. A typical wall-panel version can be adapted to approximately 60 × 90 cm, although the design can easily be enlarged or reduced. You will need cotton quilting fabrics, background fabric, batting, backing fabric, lightweight fusible web if using fusible appliqué, coordinating thread, quilting thread, an iron, fabric scissors, a rotary cutter, a cutting mat, pins or clips, and your preferred sewing machine.
Preparing the Fabrics and Cat Appliqué Pattern
Start the Patchwork Quilt with Cat Panel Pattern by studying the cat as a collection of individual shapes rather than one complicated illustration. Notice the large triangular ears, curved forehead pieces, almond-shaped eyes, narrow nose section, rounded muzzle, whiskers, and flowing sections that form the chest and body. Drawing or tracing these major areas onto paper first gives you a practical master pattern. Number every piece so you can easily reconstruct the design later.
For a panel around 60 × 90 cm, prepare a background slightly larger than the desired finished size. A pale green background works especially well because it contrasts with the multicolored cat without competing with it. Leave approximately 2 to 3 cm of additional fabric around every edge during construction. This extra material provides room for squaring the quilt after the quilting stage.
Next, sort the fabrics into basic color families. Create groups for blue and turquoise fabrics, warm reds and oranges, yellow fabrics, greens, pinks and purples, and light neutral fabrics. You do not need large quantities of any single print because the beauty of this design comes from combining numerous small sections. Scraps measuring approximately 10 × 15 cm can be useful for many of the appliqué pieces. Prepare the templates by tracing each section of the cat onto template paper. If you are using fusible appliqué, remember that the template generally needs to be reversed when transferred to the paper side of the fusible web. Add labels such as “left ear,” “right cheek,” “forehead,” and “muzzle.” Directional fabrics should also be marked so that flowers, checks, or other motifs appear in the intended orientation.
Fuse the prepared shapes to the wrong side of the chosen fabrics according to the instructions for your fusible product, then carefully cut along the traced lines. Keep the cut pieces organized in numbered groups. A small tray or several labeled envelopes can prevent the numerous curved shapes from becoming mixed together. Avoid permanently attaching everything to the background until you have tested the complete arrangement. Finally, place the background fabric on a flat surface and position the cat pieces temporarily. Begin with the largest silhouette areas and work toward the smaller details. Step away from the project occasionally and look at it from a distance. The face should appear balanced, the ears should have similar visual weight, and the eyes should sit at approximately the same level. Make adjustments now because repositioning pieces becomes much more difficult after they have been fused and stitched.
DISCOVER MORE FREE PATTERNS HERE!
Building the Colorful Cat Face Step by Step
Begin assembling the face with the ears because they establish the width and overall position of the cat. Each ear can contain several elongated patchwork appliqué pieces, allowing floral fabrics to sit beside solids, geometric prints, and bright contrasting colors. Arrange darker fabrics near some outer sections and brighter prints toward selected focal areas. A narrow contrasting outline around the ear shapes can help separate them from the background.
Move to the forehead and construct the central shapes symmetrically without making the two sides identical. The Patchwork Quilt with Cat Panel Pattern becomes more interesting when colors are balanced rather than perfectly mirrored. For example, a turquoise piece on one side might be balanced visually by a blue floral section on the opposite side. Continue layering the narrow curved shapes until they naturally lead the eye toward the center of the face.
The eyes deserve special attention because they give the quilt its character. Create almond-shaped outer eye pieces and add bright green irises, dark pupils, and tiny light highlights. The dark areas surrounding the eyes provide essential contrast against the colorful fabrics. Before stitching anything permanently, compare both eyes from several angles and confirm that the pupils point consistently. Even a small change in pupil position can dramatically change the cat’s expression.
Construct the bridge of the nose using elongated pieces that gradually narrow toward the center. Yellow, orange, red, and green fabrics can produce the warm multicolored transition visible in this style of cat quilt panel. Add a pink or rose-colored nose at the bottom of this section. A darker outline beneath the nose helps define its shape and separates it from the pale muzzle.
Build the muzzle from light cream, ivory, or very pale printed cotton. Using quieter fabrics here prevents the center of the face from becoming visually overcrowded. Add curved cheek pieces in blue, turquoise, red, or patterned fabrics around the lighter muzzle. Long narrow strips can then form the whiskers. If extremely narrow appliqué strips feel difficult to sew, decorative stitching can create some of the finest whisker details instead.
Once you are satisfied with the face, secure the appliqué pieces according to your chosen method. Stitch close to each raw edge with a narrow zigzag, blanket stitch, satin-style edge stitch, or a neat straight stitch designed for raw-edge appliqué. Work gradually from the underlying pieces toward the upper layers. The goal is to create crisp separation between colors while preserving the flowing movement of the original Patchwork Quilt with Cat Panel Pattern.
Creating the Patchwork Body, Background, and Quilted Texture
The body can be constructed with larger flowing pieces than those used on the face. Draw long curved sections that travel vertically and diagonally through the chest. These shapes imitate the movement of fur while giving you generous areas for displaying colorful fabrics. Alternate floral cotton, checks, dots, tiny geometric prints, and tonal fabrics to create depth.
When arranging the chest pieces, distribute strong colors throughout the composition. Avoid placing every dark blue section in one corner or every bright yellow piece together. Instead, allow colors to repeat across the body. A pink section near the upper chest might be echoed by another pink piece lower down, while turquoise can appear on both sides. Repetition creates visual rhythm and helps a highly colorful design remain cohesive.
Attach the body sections using the same appliqué method selected for the face. Curved pieces should lie smoothly without puckering. Press carefully after completing small groups of pieces, using an appropriate temperature for your fabrics and fusible materials. When sewing tight curves, slow the machine and pivot frequently with the needle down. Accurate stitching is more important than sewing quickly.
After completing the appliqué, prepare the quilt sandwich. Place the backing fabric wrong side up, position the batting over it, and center the finished quilt top on the batting. Smooth all three layers from the center outward and baste them with your preferred method. Make sure the backing and batting extend several centimeters beyond the quilt top on every side.
Quilting transforms the flat appliqué into a richly textured fabric cat panel. Quilt around the major cat shapes first to stabilize the design. Additional quilting can be added inside larger appliqué sections, following their curves. On the background, flowing vines, leaves, spirals, or gentle free-motion patterns complement the organic shape of the cat. These motifs also fill the open background without distracting from the central portrait.
Take your time with the quilting density. Highly detailed sections of the cat can use relatively simple quilting because the printed fabrics already provide plenty of visual information. The quieter background offers more room for decorative stitching. Maintaining reasonably consistent quilting across the entire panel helps prevent distortion and creates the softly raised texture associated with finished art quilts and appliqué quilts.
Finishing the Border and Refining the Quilt Panel
After quilting is complete, lay the project on a cutting mat and carefully square the edges. Use a long quilting ruler whenever possible. Check the corners before trimming because a slightly uneven panel becomes much more noticeable after the border or binding has been attached. Measure through the center of the quilt rather than relying only on the outer edges when calculating border lengths.
A bright pink border works beautifully with this particular Patchwork Quilt with Cat Panel Pattern because pink already appears throughout the cat. You can use a floral pink fabric, a subtle tonal print, or another small-scale pattern. Depending on the size of your project, a finished border width of approximately 3 to 5 cm can frame the artwork without overpowering it.
Cut the border strips accurately and attach opposite sides first. Press the seams carefully, then add the remaining two borders. If you want a more elaborate frame, insert a narrow contrasting strip between the green background and pink outer border. Yellow, cream, dark pink, or another color already present in the cat can create an attractive transition.
Once the borders are attached, quilt them lightly so that their texture coordinates with the center panel. Straight lines, gentle waves, leaves, or simple loops are good options. Avoid excessively complicated quilting if the border fabric already contains a busy print. The purpose of the border is to visually contain the colorful patchwork cat, not compete with it.
Finish the outer edge with traditional quilt binding. Cut enough strips to travel around the entire perimeter, join them diagonally, press the long strip in half, and attach it carefully around the quilt. Miter the corners for a polished appearance. The binding can match the pink border or use a darker coordinating fabric to create a thin visual outline around the finished piece.
Give the completed quilt a final inspection. Remove loose threads, check the appliqué edges, and make sure no sections have been missed during quilting. If the piece will be displayed as quilted wall art, add a hanging sleeve to the back. A label can also record the pattern name, completion year, and maker’s name. These small finishing touches turn a colorful sewing project into a piece that can be enjoyed for years.
FAQ About the Patchwork Quilt with Cat Panel Pattern
Is the Patchwork Quilt with Cat Panel Pattern suitable for beginners?
A simplified version can be suitable for an adventurous beginner who already understands basic machine sewing. The complete design contains many curved and layered appliqué pieces, so working slowly is important. Beginners can reduce the number of individual fabric sections while keeping the recognizable cat silhouette.
What fabrics work best for this cat quilt?
Quality quilting cotton is an excellent choice because it is easy to cut, press, appliqué, and quilt. Floral prints, checks, dots, small geometric patterns, batiks, and tonal fabrics can all be combined. Using fabrics with different visual scales creates a more interesting patchwork surface.
Can I make the cat panel from fabric scraps?
Yes. This is an especially useful scrap quilt project because many sections require relatively small pieces. Save larger scraps for the ears and body and use smaller pieces for the forehead, cheeks, nose, and decorative details. Coordinating scraps by color before beginning will make the design process easier.
How large should the finished cat quilt be?
There is no required size. A wall hanging around 60 × 90 cm provides enough room for detailed appliqué while remaining manageable. You can scale the templates proportionally to make a smaller panel, cushion front, or larger wall quilt.
Should the appliqué edges be turned under?
They can be, but they do not have to be. Raw-edge fusible appliqué is practical for a design containing numerous narrow curves and pointed sections. Traditional turned-edge appliqué can produce a beautiful result as well, although it generally requires more preparation and sewing time.
How can I prevent the cat face from looking uneven?
Create a full-size placement guide and mark the vertical center line before positioning the facial features. Place the eyes, nose, and muzzle first, then compare their positions before permanently fusing the pieces. Measuring from the center line is usually more reliable than judging alignment entirely by eye.
What is the easiest way to sew around curved appliqué pieces?
Reduce your sewing speed and work in short sections. When you need to change direction, stop with the needle down, raise the presser foot, pivot the fabric slightly, and continue. This technique creates smoother curves and gives you much better control around narrow points.
What quilting design works well on the green background?
Organic free-motion quilting works particularly well. Leaves, vines, curls, spirals, and gentle flowing lines complement the botanical fabrics and curved shapes within the cat. You can also use simpler echo quilting if you prefer a cleaner background.
Can I change the colors shown in the original inspiration?
Absolutely. Color customization is one of the strengths of the Patchwork Quilt with Cat Panel Pattern. You could create a version based primarily on blues and greens, warm autumn shades, pastel fabrics, rainbow scraps, or a more limited three-color palette. Maintaining contrast around the eyes, nose, and muzzle will help preserve the facial definition.
Do all the patchwork pieces need to be symmetrical?
No. The overall face should feel balanced, but the individual prints and colors do not need to mirror each other. Slight asymmetry makes the patchwork more lively and allows you to use a much wider selection of fabric scraps.
How do I make the green eyes stand out?
Surround the irises with darker fabrics and use a very dark pupil. Small light highlights can make the eyes appear brighter. Keeping nearby fabrics somewhat less intense also allows the vivid green irises to become natural focal points.
Can this design be used for something other than a wall hanging?
Yes. A simplified cat appliqué pattern could be adapted for a cushion cover, tote bag panel, lap quilt, fabric organizer, or decorative bed quilt. When reducing the pattern, simplify extremely narrow shapes because tiny appliqué sections can become difficult to stitch accurately.
Conclusion
The Patchwork Quilt with Cat Panel Pattern brings together several enjoyable quilting techniques in one highly expressive project. Beginning with a carefully prepared template, you can construct the design piece by piece, starting with the ears and forehead, continuing through the eyes, nose, muzzle, and whiskers, and finally building the flowing patchwork body. Organizing fabrics by color and preparing all the appliqué shapes before sewing makes even a detailed design much easier to manage.
Throughout the project, the most important ideas are accurate appliqué placement, strong color contrast, careful curved stitching, balanced fabric distribution, and thoughtful quilting. Floral prints and colorful scraps give the cat its playful appearance, while lighter muzzle fabrics and dark eye details keep the face clearly defined. The quilted green background and coordinating pink border then provide a frame that allows the multicolored cat to remain the center of attention.
EASILY FIND THE FREE PDF FOR THIS PATTERN HERE!
This project also demonstrates why patchwork quilting can be so creative. There is no need to reproduce every fabric or color exactly. Your own collection of scraps can make the finished cat completely unique while following the same construction principles. Changing the palette, quilting motifs, border fabric, or arrangement of individual patches gives you countless ways to personalize the pattern. If you make your own Patchwork Quilt with Cat Panel Pattern, take your time and enjoy building the image one section at a time. A detailed quilt like this is as much about the creative process as the final result. Leave your sincere opinion about this colorful cat quilt and share any suggestions, color combinations, or creative variations you would love to try in your own version.