
The Fabric Christmas Wreath Pattern is a charming sewing project that combines traditional Christmas colors, patchwork-inspired fabric placement, dimensional embellishments, and decorative quilting into one festive piece. Inspired by the wreath shown in the reference image, this project uses folded or pieced fabric sections arranged around a large circular opening, creating the appearance of a soft textile wreath rather than a conventional wreath made from greenery. Shades of red, white, pink, and green give the design its unmistakable holiday character, while candy-inspired prints add a playful sweetness. The oversized fabric bow, peppermint decorations, candy canes, and small holly-style accents transform the basic construction into a detailed Christmas decoration that can become a focal point on a door or interior wall.
One of the most appealing things about making a Fabric Christmas Wreath Pattern is the freedom to personalize every section. Instead of searching for one fabric that contains every desired color, you can combine several coordinating cotton fabrics and create your own collection. Small-scale peppermint prints, gingham, polka dots, tiny florals, stars, stripes, and subtle Christmas motifs can all work together when they share a consistent color palette. The project is especially suitable for using quilting cotton, because this fabric is easy to cut, press, layer, stitch, and quilt. A small amount of batting gives the wreath sections the padded appearance visible in the inspiration image and helps decorative stitching stand out.
Although the finished wreath looks elaborate, the construction becomes much easier when it is divided into manageable stages. First, you prepare the foundation and determine the overall dimensions. Next, individual fabric sections are cut, stabilized, quilted, and arranged around the circular form. After the basic fabric wreath is assembled, the dimensional bow and candy decorations can be made separately and attached in layers. Working this way prevents the project from becoming overwhelming and allows you to check the balance of the colors before permanently stitching everything together. The following tutorial explains a practical approach for recreating the visual style of the photograph while leaving enough flexibility to adapt the measurements to your preferred finished size.
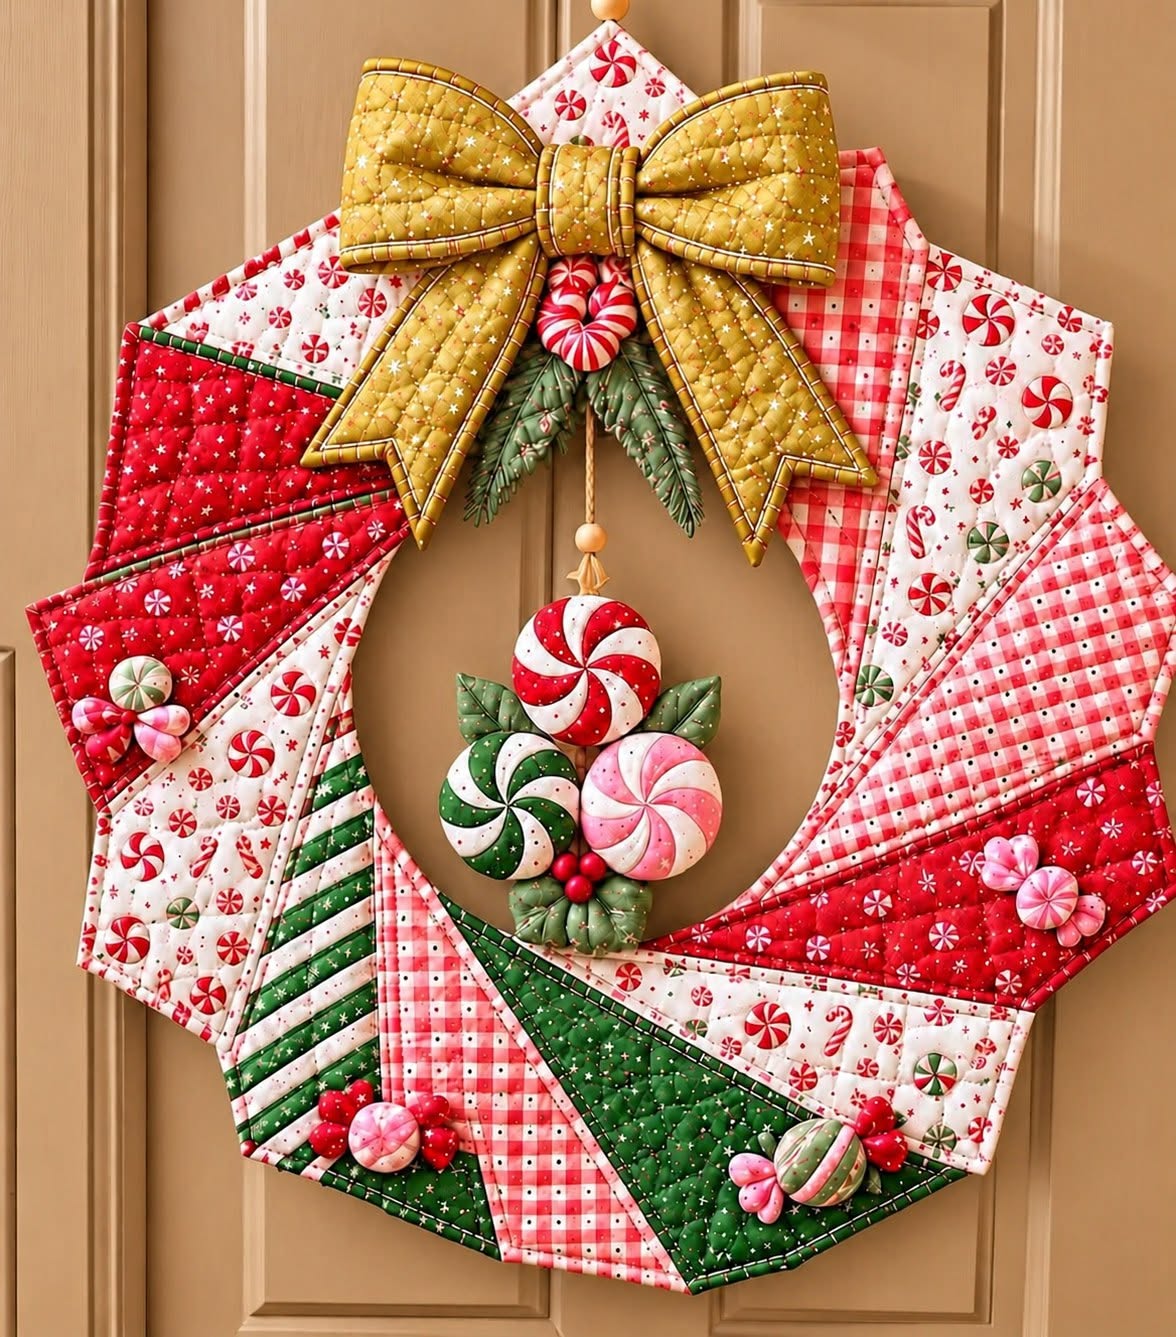
Materials, Measurements, and Preparation for the Fabric Christmas Wreath Pattern
For a medium-to-large Fabric Christmas Wreath Pattern, plan for a finished diameter of approximately 45 to 50 cm. Gather several coordinating quilting cotton fabrics in red, cream or white, soft pink, and muted green. You will also need lightweight or medium-weight batting, coordinating sewing thread, hand-sewing thread, fabric scissors or a rotary cutter, a cutting mat, ruler, pins or clips, an iron, a sewing machine, and a firm foundation material. A fusible stabilizer or heavyweight interfacing can be useful when you want the finished wreath to maintain a crisp circular shape.
DISCOVER MORE FREE PATTERNS HERE!
Before cutting anything, wash and press the cotton fabric if you normally prewash your quilting materials. Pressing is particularly important for this design because the wreath depends on accurate edges and neatly layered sections. Avoid stretching the fabric while ironing it. A flat, accurately pressed piece of Christmas fabric is much easier to measure, cut, quilt, and position than material containing folds or wrinkles.
Create a paper template for the wreath foundation. For example, draw an outer circle measuring approximately 48 cm in diameter and an inner opening measuring around 24 to 27 cm in diameter. These dimensions can be adjusted, but maintaining enough width between the inner and outer edges is important because the fabric sections need sufficient space to display their prints. The wreath in the photograph has a generously proportioned ring, which helps the layered patchwork effect remain visually prominent.
Rather than making the front from one continuous ring of fabric, divide your template into approximately 8 to 12 sections. The sections can resemble broad wedges or slightly irregular patchwork panels. Add approximately 1 cm seam allowance wherever pieces will be sewn together. Label each paper template before cutting the fabric. Marking pieces as top, bottom, left, right, and center sections can save considerable time during assembly.
Cut the fabric pieces using your templates, deliberately alternating colors and prints. Place red beside cream, green beside pink, and patterned fabrics beside quieter prints so that neighboring sections remain visually distinct. For each section, cut a corresponding piece of batting. If you are constructing each wedge as an individually finished padded component, you may also need backing pieces. This fabric selection stage has a major influence on the final appearance, so arrange everything on a table before sewing.
Prepare your sewing machine with a reliable straight stitch and test the tension on fabric scraps containing the same batting you intend to use. Decorative quilting can be done with matching thread, contrasting thread, or metallic-looking thread if appropriate for your machine. The inspiration piece contains highly visible stitched details, so decorative quilting should be considered part of the design rather than merely a construction technique. Once the fabrics, templates, batting, and machine settings are prepared, the actual wreath construction can begin.
Cutting, Quilting, and Assembling the Fabric Wreath
Begin by creating the individual padded sections of the Fabric Christmas Wreath Pattern. Layer each front fabric piece over batting and backing fabric, keeping all layers smooth. Pin or clip the layers securely. If your pieces have seam allowances that will later be hidden, keep decorative quilting away from those edges until you understand exactly where the seams will fall.
Quilt each section individually. Straight parallel lines are one of the easiest choices, while diagonal lines can create a diamond effect similar to traditional quilting. You can also stitch gentle curves, small grids, or echo lines following printed motifs. Keep the quilting relatively consistent across the wreath, even when changing directions from one panel to another. This combination of repetition and variation gives the finished quilted Christmas wreath a handcrafted appearance.
Once the sections have been quilted, trim away excess batting and backing carefully. Arrange all pieces around your paper wreath template before joining them. Move the red, green, white, and pink sections until the composition looks balanced. Try to avoid concentrating all the darkest red pieces on one side. In the reference design, the changing colors lead the eye naturally around the circular shape.
Join neighboring pieces with approximately a 1 cm seam allowance, unless your chosen construction method requires a different allowance. Press seams carefully and avoid crushing the batting excessively. Another option is to overlap individually finished sections rather than joining them conventionally. This creates a more dimensional look and can be useful if you want the wreath to resemble layered folded fabric.
After assembling the circular front, stabilize it with a backing or interfaced foundation. Check that the center opening remains reasonably circular and that the outer edge is symmetrical. Small irregularities can often be corrected during final trimming. Finish the inner and outer raw edges with bias binding, a facing, or a turned construction method. Bias binding is especially useful around curves because it bends much more easily than straight-grain strips.
Add a hanging loop before covering the upper area with the bow. A fabric loop approximately 10 to 15 cm long can be secured firmly to the backing. Reinforce this attachment with several rows of stitching because the completed wreath may become heavier after the stuffed decorations are added. At this stage, temporarily hang the wreath and inspect it from a short distance. This simple check makes it easier to spot uneven sections before adding the decorative components.
Making the Fabric Bow, Peppermints, Candy Canes, and Decorations
The oversized red bow is the visual centerpiece of this Fabric Christmas Wreath Pattern. Cut two large rectangles of red Christmas fabric for the bow loops, plus smaller pieces for the center knot and long tails. The exact size depends on your wreath, but a bow approximately 28 to 34 cm wide works well with a wreath around 48 cm in diameter. Add lightweight batting if you want a soft quilted effect rather than a flat fabric bow.
Sew the bow components right sides together, leaving openings for turning. Trim bulky corners, turn the pieces right side out, and press gently. Add decorative topstitching approximately 0.5 cm from the edges. To form the bow, pinch or pleat the center of the main rectangle and secure it firmly with hand stitches. Wrap a padded fabric strip around the center to create the knot. Attach two pointed tails behind the bow so that they extend downward over the upper portion of the wreath.
The peppermint candies can be created as small stuffed fabric ornaments. Make circles approximately 7 to 10 cm in diameter, depending on their intended position. Red-and-white peppermint fabric provides the quickest effect, but individual curved wedges can also be pieced for a more detailed result. Sew the circles, turn them, add a small amount of polyester filling, and close the openings with hand stitching. Gentle stuffing keeps them soft without making them excessively round.
For the candy canes, draw a simple curved cane template approximately 15 to 20 cm tall. Cut pairs from striped fabric, sew them right sides together, clip the curved seam allowances carefully, and turn them through a small opening. Add light stuffing and close the opening invisibly. Position the fabric candy canes around the wreath rather than placing them symmetrically. Slightly different angles create the playful handcrafted arrangement seen in the inspiration.
Small fabric leaves, berries, peppermint flowers, and folded bows can fill spaces between the larger ornaments. Leaves can be cut from green fabric backed with interfacing and stitched around the edges. Berries may be made from tiny stuffed circles, fabric-covered beads, or tightly gathered fabric shapes. These smaller Christmas fabric decorations help connect the main colors without competing with the large bow.
Arrange every embellishment before attaching anything permanently. Begin with the large bow, followed by the central peppermint cluster and candy canes. Then position the smaller leaves, berries, and candy accents. Take a photograph of the arrangement if necessary so you can remember the placement while sewing. Secure decorations using strong hand stitching wherever possible. The finished composition should feel abundant and festive while leaving enough visible patchwork for the construction of the wreath itself to remain part of the design.
Finishing Details, Display Ideas, FAQ, and Final Tips
After attaching the major embellishments, inspect the entire Fabric Christmas Wreath Pattern for loose threads, exposed raw edges, or sections that need additional reinforcement. Check the back as carefully as the front. Hand-sewing knots should be secure, and any areas supporting heavy stuffed decorations may need several extra stitches. A neat back makes the project easier to store and reduces the possibility of threads catching when the wreath is moved.
You can add a small fabric label near the lower portion of the wreath for an additional handmade detail. A message such as “Sweet Christmas,” “Merry Christmas,” or a family name can be embroidered or printed using an appropriate fabric-printing method. Keep the label proportional to the wreath so that it complements rather than dominates the main design. Frame it with a narrow fabric border for a miniature quilt-block appearance.
If you prefer a simpler version, reduce the number of stuffed ornaments. The Fabric Christmas Wreath Pattern works beautifully with only a bow, several leaves, and two or three peppermint decorations. For a more traditional appearance, replace pink with deeper green or burgundy. For a softer farmhouse interpretation, consider cream, dusty red, sage green, and muted gingham fabrics.
When displaying the wreath, keep in mind that ordinary quilting cotton and batting are primarily intended for indoor decorative use. An interior door, sewing room, living room wall, entryway, or covered location protected from moisture is generally more suitable than an exposed outdoor area. Avoid placing fabric decorations near candles, fireplaces, heaters, or other heat sources. Proper placement helps preserve the colors and shape of your handmade Christmas wreath.
For storage after the holiday season, avoid folding the wreath sharply. Place it flat inside a sufficiently large container or hang it in a protective fabric bag. Lightly stuff tissue paper around the bow loops and dimensional candies if needed to help maintain their shapes. Keep the project away from damp storage areas, because moisture can affect fabric, batting, and interfacing.
Most importantly, treat the photograph as creative inspiration rather than believing that every decorative detail must be reproduced exactly. Handmade sewing projects naturally develop their own character. Different prints, slightly different dimensions, and your preferred quilting stitches can make the finished Fabric Christmas Wreath Pattern unique while preserving the recognizable patchwork wreath concept.
FAQ About the Fabric Christmas Wreath Pattern
What is the best fabric for a Fabric Christmas Wreath Pattern?
Quilting cotton is an excellent option because it is stable, widely available in coordinating prints, easy to press, and suitable for both machine quilting and hand sewing. Medium-weight cotton also holds small decorative details well when combined with batting or interfacing.
How much fabric is needed to make the wreath?
The amount depends on the finished diameter and number of prints. For a wreath around 45 to 50 cm wide, using several fat-quarter-sized pieces or fabric remnants can provide plenty of variety. Because the design is patchwork based, it is also an excellent scrap fabric project.
Does the wreath need batting?
Batting is not absolutely required, but it creates the padded quilted appearance that makes this design distinctive. Thin or medium-loft batting is usually easier to manage than very thick batting, particularly around curved edges and overlapping sections.
Can beginners make this Fabric Christmas Wreath Pattern?
Yes, although beginners may prefer to simplify the embellishments. Basic skills such as straight stitching, cutting templates, turning fabric pieces, simple quilting, and hand sewing are enough for a straightforward version. The project becomes more advanced when complex piecing and highly detailed stuffed decorations are added.
How large should the center opening be?
For an outer diameter of approximately 48 cm, an opening around 24 to 27 cm creates generous fabric sections while maintaining the recognizable wreath shape. These measurements are flexible and can be changed according to the desired proportions.
Can the wreath be made without a rigid frame?
Yes. Firm interfacing, multiple fabric layers, and batting can provide structure. However, adding a lightweight internal foundation may help a larger wreath remain circular, particularly when it carries several dimensional decorations.
How do I make the wreath look professionally finished?
Accurate cutting, consistent seam allowances, careful pressing, neat topstitching, balanced fabric placement, and securely attached embellishments make a significant difference. Take time to trim loose threads and inspect both sides before considering the project finished.
Can I use Christmas fabric scraps for the decorations?
Absolutely. Small scraps are particularly useful for peppermint candies, berries, leaves, bow centers, labels, and other miniature details. Coordinating scraps also help repeat colors around the wreath and visually connect separate sections.
What quilting designs work best for this project?
Straight lines, diamonds, crosshatching, gentle curves, and echo stitching are all suitable. You can use different quilting patterns on neighboring panels while maintaining a similar stitch density throughout the wreath.
How can I personalize the Fabric Christmas Wreath Pattern?
Change the fabric palette, add embroidered names, create a custom message label, use favorite Christmas prints, or alter the arrangement of candies and leaves. You could also make the large bow in green, pink, burgundy, or gold-toned fabric while keeping the remaining construction unchanged.
Conclusion
Creating a Fabric Christmas Wreath Pattern is an enjoyable way to combine sewing, patchwork, quilting, appliqué-style decoration, and dimensional fabric work in one Christmas project. The process begins with choosing coordinating holiday fabrics and creating a circular template, followed by cutting and quilting the individual sections. Once those sections are assembled into a stable wreath, the design comes to life through the oversized fabric bow, stuffed peppermint candies, candy canes, leaves, berries, and other small festive accents.
The key to achieving a polished result is working gradually. Prepare the templates carefully, test fabric combinations before stitching, keep seam allowances consistent, quilt each section neatly, and arrange all embellishments before permanently attaching them. These simple habits make an elaborate-looking project much easier to manage. They also allow the Fabric Christmas Wreath Pattern to be customized for different decorating styles without changing the fundamental construction method.
EASILY FIND THE FREE PDF FOR THIS PATTERN HERE!
Whether you choose classic red and green, the softer red-pink-green palette inspired by the photograph, or an entirely different Christmas color scheme, the finished wreath can become a memorable handmade decoration that returns year after year. Use the tutorial as a foundation, experiment with your favorite fabrics, and add personal details that make the project distinctly yours. If you make your own Fabric Christmas Wreath Pattern, leave your sincere opinion about the project and share your suggestions. Which colors, fabric prints, quilting stitches, or Christmas decorations would you add to your version? Your ideas can inspire even more creative variations of this festive sewing project.