
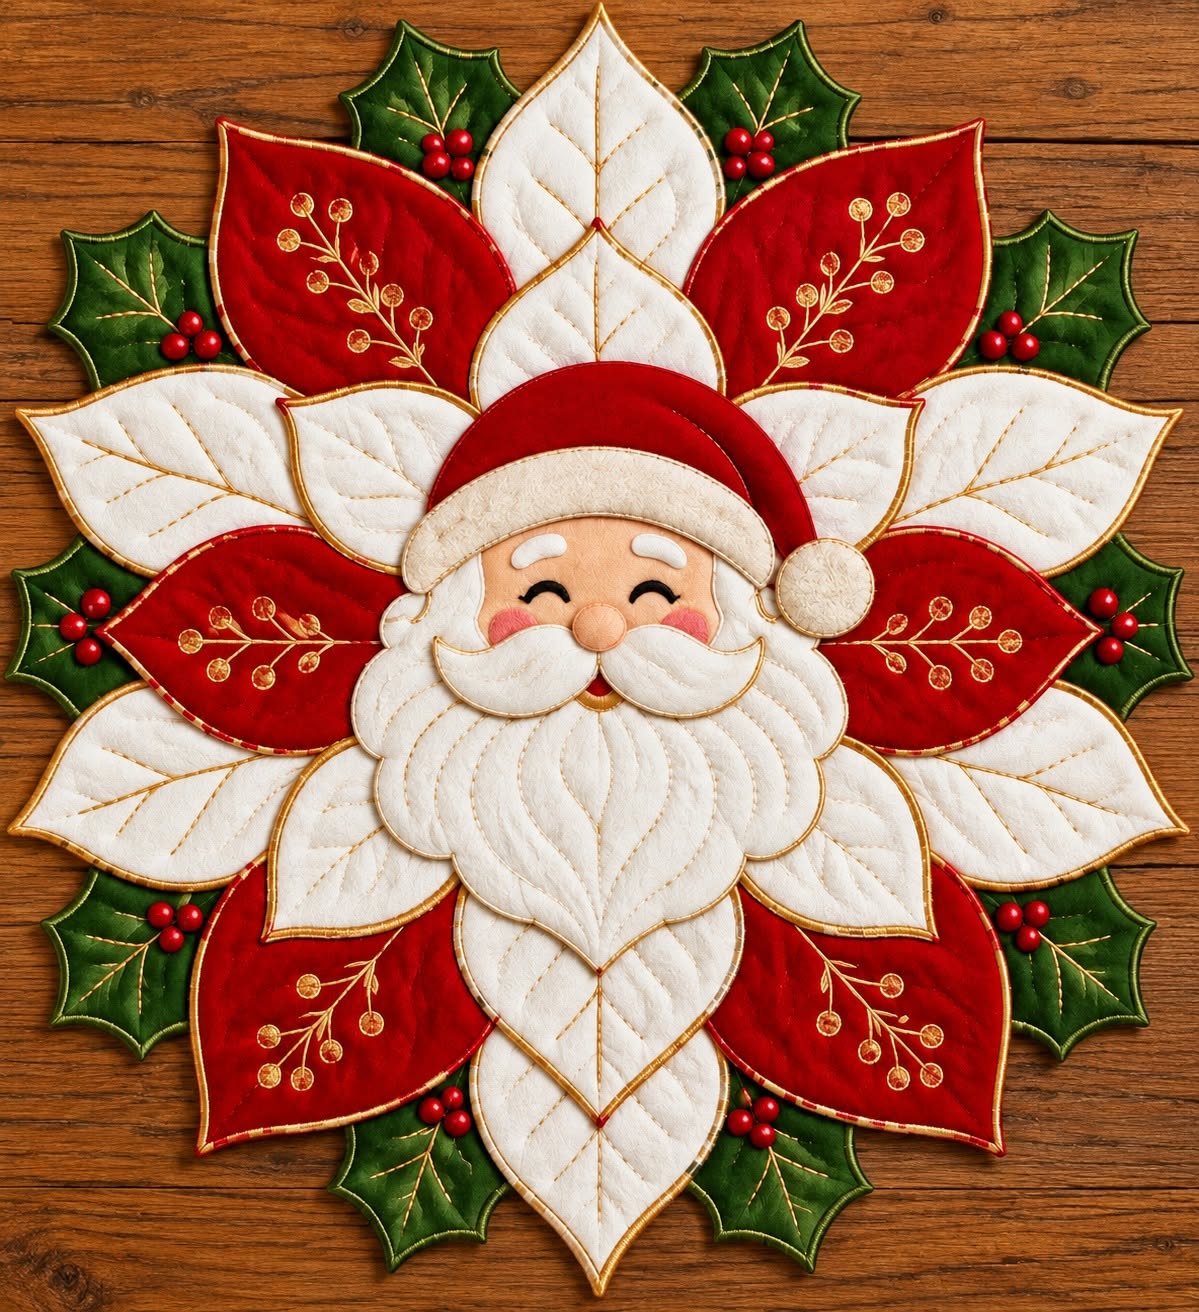
The Christmas rug with Santa Claus and poinsettia Pattern is a beautiful seasonal sewing project that combines the welcoming face of Santa Claus with the layered elegance of a poinsettia-inspired flower. The design shown in the reference image uses overlapping fabric petals in traditional Christmas shades of red, white, and green, with decorative golden stitching adding definition around each shape. At the center, Santa’s face and fluffy white beard become the focal point, while the surrounding petals create a large, symmetrical floral composition. This project works especially well as a Christmas fabric rug, decorative table mat, holiday centerpiece, or quilted seasonal decoration. Although the finished piece looks elaborate, the construction becomes much easier when it is divided into individual templates and assembled layer by layer.
One of the most appealing aspects of this Christmas rug with Santa Claus and poinsettia Pattern is the opportunity to combine several familiar sewing techniques in one project. You can practice fabric appliqué, layered construction, decorative topstitching, light quilting, template cutting, and edge finishing without needing to make an extremely large quilt. Each poinsettia petal can be prepared individually before the final arrangement is assembled, which makes the pattern manageable even for sewists who have never created a dimensional Christmas mat before. The Santa section can also be simplified or embellished depending on your experience. Small details such as rosy cheeks, eyebrows, a soft mustache, and the classic red Santa hat give the project personality without changing the basic construction.
Before cutting any fabric, study the overall arrangement and think of the project as a series of concentric layers rather than one complicated shape. The outermost layer consists mainly of green holly-inspired leaves, followed by large red and white pointed petals. Additional smaller petals move toward the center until they frame the Santa appliqué. Working from the outside toward the center is useful when planning the design, while the actual components can be sewn separately and joined after you have tested the complete layout on a flat surface. Choosing fabrics with enough body is important because the petals need to maintain their recognizable shape. Cotton quilting fabric, lightweight batting, fusible interfacing, and coordinating backing fabric are practical materials for recreating the structured appearance of the photographed project.
Materials and Preparation for the Christmas Poinsettia Rug
Begin by collecting the materials for your Christmas rug with Santa Claus and poinsettia Pattern. A practical selection includes red, white, cream, green, beige, and small amounts of pink and black fabric. You will also need lightweight batting or fusible fleece, backing fabric, matching sewing thread, and gold decorative thread if you want to reproduce the elegant outlined effect visible in the reference design. Fabric scissors or a rotary cutter, pins or clips, an iron, tracing paper, a fabric marker, and a standard sewing machine will make construction easier.
DISCOVER MORE FREE PATTERNS HERE!
For the main poinsettia, create pointed leaf-shaped templates in several sizes. Because the exact dimensions cannot be determined reliably from a photograph alone, it is better to choose the final diameter you want and scale every template proportionally. For example, a finished decorative rug around 70 to 80 cm in diameter provides enough room for the layered petals and central Santa design. Large outer petals might measure approximately 20 to 24 cm long, while medium petals can be around 16 to 20 cm and smaller central petals around 12 to 16 cm. These measurements are flexible and should be adjusted to maintain balanced proportions.
Make a paper template for each petal size before touching your main fabric. Fold the paper vertically and draw half of a pointed leaf so both sides become symmetrical when unfolded. For pieces that will be sewn right sides together and turned, remember to incorporate an appropriate seam allowance, such as approximately 0.7 to 1 cm. Label the templates clearly as large petal, medium petal, small petal, and holly leaf. Keeping these templates will also make it much easier to reproduce the pattern for future Christmas projects.
The photographed project has a lightly padded appearance, so adding thin batting between the front and back layers of each major petal can help achieve a similar result. Avoid very thick batting because too many overlapping padded pieces may make the center bulky. Cut the batting slightly smaller than the fabric shape when necessary, particularly near seam allowances. If your fabric is already relatively firm, lightweight fusible interfacing can be used instead. The objective is structure rather than excessive thickness.
Prepare the colors before sewing so the final composition remains balanced. Place red and white petals alternately around the design and use dark green leaves as an outer accent. The green provides visual separation from the background, while the red petals reinforce the traditional Christmas palette. Cream and white fabrics are especially effective around Santa because they visually connect his beard and hat trim with the surrounding white poinsettia petals. Small gold details can then unite all three major colors.
Prewash cotton fabric if you expect the completed mat to be washed frequently, and press everything before tracing your templates. Smooth fabric produces cleaner curves and more accurate pointed ends. When cutting multiple identical petals, mark each piece carefully rather than relying on rough freehand cutting. Accurate cutting and consistent seam allowances are particularly important for radial designs because even small differences become noticeable once several repeated shapes are arranged around a central point.
Step-by-Step Construction of the Red, White, and Green Petals
Start with the large poinsettia petals that establish the overall shape of the project. For a turned construction, place two matching fabric pieces right sides together, add the stabilizing layer if needed, and stitch around the outline while leaving a small opening. Trim excess bulk near the pointed tip without cutting through the stitching. Turn the petal right side out, gently shape the point, and press it flat. Close the opening neatly with topstitching or a discreet hand stitch.
Repeat this method for all of the white and red petals. Once they are turned and pressed, add a line of stitching around the perimeter. Gold topstitching is especially effective for recreating the festive appearance of the reference piece. Sew slowly around curves and reduce your stitch length slightly when approaching narrow points. A smooth, consistent outline will make even simple cotton fabric look more polished and intentional.
Next, add the internal details that make the petals resemble leaves. On the white petals, a central stitched line can run from the base toward the pointed tip, with a few subtle diagonal veins branching outward. On selected red petals, create small decorative botanical branches using gold thread. You can draw the design first with an erasable fabric marker and then stitch over the lines. Keep these motifs relatively simple so they complement rather than compete with Santa’s face.
Create the green outer pieces using a holly leaf template. Unlike the smooth poinsettia petals, these shapes can have several gentle points along the edges. Make each leaf from two fabric layers with lightweight stabilizer between them. After turning and pressing, topstitch the perimeter and add a central vein with smaller branching lines. Tiny red fabric circles or securely attached soft fabric berries can be added as decorative accents if the finished item will be used only as décor and kept away from small children.
Before permanently joining anything, arrange all completed pieces on a large table or clean floor. Begin with the green leaves, then position the largest red and white petals over them. Add the next layer and continue working inward. Stand back occasionally and check the spacing. The radial symmetry is one of the defining features of this Christmas design, so adjusting the pieces before sewing is much easier than correcting the arrangement after several layers have been secured.
Once you are satisfied with the layout, take a photograph for reference and mark important alignment points with removable fabric markers or small pins. Join the layers gradually, securing only the areas that need to remain attached. Depending on the thickness of your project, you can machine stitch the hidden bases of the petals or use strong hand stitches. Keep the visible outer sections relatively free so the individual petal shapes remain recognizable. This controlled layering creates the rich floral appearance of the Christmas poinsettia rug.
Creating the Santa Claus Appliqué and Assembling the Center
The Santa face is the heart of the Christmas rug with Santa Claus and poinsettia Pattern, so construct it separately before attaching it to the flower. Begin with a simple rounded face template in beige or peach cotton. Add a thin stabilizer behind the fabric to prevent puckering when the facial features are stitched. Santa does not require complicated realism; simple curved eyebrows or closed eyes, a small dimensional nose, and soft pink cheeks are enough to create the cheerful expression seen in the inspiration image.
Create the beard from white or ivory fabric. Instead of using one plain circle, design the lower edge with several rounded scallops to suggest sections of a fluffy beard. Additional overlapping white shapes can be placed near the cheeks to form the mustache and side sections of facial hair. A little batting beneath these pieces produces gentle dimension. Layered fabric appliqué is especially useful here because it creates depth without requiring difficult embroidery or advanced construction.
For the hat, cut a curved red section that fits around the upper portion of Santa’s face. Add a cream or white band across the lower edge and a circular fabric pom-pom at one side. The reference design uses a softly padded appearance, which can be achieved with a thin layer of batting. Stitch around the hat sections with the same decorative thread used on the petals. Repeating this finish helps the Santa appliqué look like an intentional part of the entire poinsettia rather than a separate decoration placed on top.
The facial details should be completed before the Santa section is attached to the rug. Use black thread for the eyes, subtle pink fabric or stitching for the cheeks, and beige or peach fabric for the nose. A tiny red area can suggest the mouth beneath the mustache. Keep the expression friendly and uncluttered. If you are uncomfortable with free-motion stitching, draw the curves first and use a short standard straight stitch, or sew the smallest details carefully by hand.
Position Santa in the exact center of the assembled petals. His beard should overlap part of the innermost floral layer while leaving enough of the red and white petals visible around him. Pin or clip the appliqué temporarily and inspect the piece from several angles. When the position feels balanced, sew around the main outer edges using a matching or decorative thread. Work slowly because the central section may now contain several layers of fabric and batting.
After attaching Santa, inspect the back of the project and decide whether an additional full backing layer is necessary. For a decorative mat, a complete backing can hide construction stitches and produce a cleaner finish. Place the assembled top over backing fabric, trace the overall shape if appropriate, and secure the layers using strategically placed stitches. If you intend to use the piece on a table rather than as a floor rug, a lighter backing is usually sufficient. For floor use, choose a purpose-made nonslip backing appropriate for textiles and follow its manufacturer instructions.
Finishing, Care, FAQ, and Creative Variations
The finishing stage is where the entire Christmas rug with Santa Claus and poinsettia Pattern begins to look cohesive. Inspect every petal and trim loose threads. Check that turned openings are fully closed and that no raw fabric edges are exposed. If some petals have shifted during assembly, small hidden hand stitches can secure them without flattening the layered design. Press only when necessary, using a suitable temperature for your chosen fabrics and protecting decorative threads from excessive heat.
To emphasize the luxurious Christmas appearance, use decorative stitching consistently rather than adding too many unrelated embellishments. Gold stitching, quilted leaf veins, and botanical motifs already provide plenty of detail. A balanced design generally looks more polished when the same finishing technique appears throughout the project. The gold outline shown around many of the photographed shapes is particularly effective because it separates neighboring red, white, and green pieces.
Care will depend on the materials you select. A heavily layered appliqué piece is usually better suited to gentle cleaning than aggressive machine washing. If all materials are washable, test scraps first to ensure that dark red or green fabrics do not bleed onto the white sections. A delicate cycle may be possible for suitable materials, but hand washing and flat drying can reduce distortion. Always follow the care requirements of the fabric, batting, stabilizer, and specialty threads you actually use.
You can personalize the pattern without losing its recognizable character. Replace deep red with burgundy for a traditional look, use soft sage instead of dark green for a farmhouse-inspired palette, or combine cream with muted red for a vintage effect. You could also omit the decorative branches from some petals and add simple quilting lines instead. The basic idea remains the same: a Santa centerpiece surrounded by layered poinsettia petals and seasonal foliage.
The pattern can also be adapted into different projects. A smaller version can become a table centerpiece, while a larger version can serve as a decorative Christmas floor mat when constructed with suitable durable and nonslip materials. Individual poinsettia petals can even inspire coordinating placemats or smaller seasonal decorations. Scaling the templates proportionally is important because changing only one layer can disturb the symmetry of the flower.
Most importantly, take your time during the arrangement stage. There is no advantage in rushing the final assembly after carefully sewing every individual component. Place the pieces, adjust them, photograph the arrangement, and check the spacing again before stitching. This simple habit can prevent many alignment problems. The Christmas rug with Santa Claus and poinsettia Pattern is visually impressive because of repetition and symmetry, so careful positioning contributes just as much to the result as decorative stitching.
FAQ – Frequently Asked Questions
What fabric is best for a Christmas rug with Santa Claus and poinsettia Pattern?
Quality quilting cotton is a practical choice because it is easy to cut, press, layer, and stitch. Cotton also comes in many Christmas colors and prints. If you want a more structured project, combine cotton with lightweight batting, fusible fleece, or interfacing rather than relying on very heavy fabric.
How large should the finished Christmas poinsettia rug be?
There is no mandatory size because the exact measurements cannot be established from the photograph alone. For a substantial decorative piece, approximately 70 to 80 cm across is a useful starting range. Smaller templates can be used for table décor, while a larger version can be created by scaling every component proportionally.
Do I need an advanced sewing machine for this pattern?
No. Most of the construction can be completed with a regular sewing machine capable of straight stitching. Decorative stitches are optional. The most important skills are accurate cutting, controlled topstitching, pressing, and careful layering.
Can beginners make this Christmas sewing project?
Yes, although confident beginners should work slowly. Instead of thinking about the entire project at once, complete one group of components at a time: templates, green leaves, large petals, smaller petals, Santa face, beard, hat, and final assembly. This makes the project much easier to understand.
How do I keep the petals symmetrical?
Use one master template for every group of identical petals. Cut carefully, maintain the same seam allowance, and press every piece before arranging the flower. You can also draw temporary radial guidelines on a large paper surface beneath the project to help position each petal evenly.
Can I use fusible appliqué instead of turned-edge pieces?
Yes. Fusible appliqué can simplify smaller facial details and some decorative elements. However, turned and lightly padded petals create more dimension. Combining both methods can be an effective approach: use structured sewn petals for the flower and fusible appliqué for selected Santa details.
How can I create the gold details shown on the petals?
Use decorative gold sewing or embroidery thread that is compatible with your machine. Draw the branch and vein patterns lightly with a removable fabric marker before stitching. Test the thread, needle, tension, and stitch length on scrap fabric first because metallic threads sometimes require slightly different machine settings.
Does every red petal need the same embroidered branch design?
Not necessarily. Repetition creates visual harmony, but small variations can make the handmade project more interesting. Keep the general scale and style consistent so the decorations still appear coordinated.
Should batting be placed inside every petal?
It depends on the desired thickness. Thin batting gives the petals a soft, quilted appearance, but too many thick layers can make the center difficult to sew. Lightweight batting or fusible fleece is generally more manageable for a heavily layered design.
Can this pattern be used as an actual floor rug?
It can be adapted for decorative floor use, but construction should reflect that purpose. Use durable materials, secure all layered pieces firmly, and add an appropriate nonslip textile backing. Raised appliqué and dimensional decorations may be better suited to low-traffic decorative areas rather than busy walkways.
How can I prevent red fabric from staining the white petals when washing?
Prewash fabrics when appropriate and test dark colors for colorfastness before construction. This is especially important when combining strong reds with bright white fabric. Follow the care instructions for every material used in the finished piece.
Can I make the project without gold thread?
Absolutely. Gold adds a festive finish, but cream, white, red, green, or neutral thread can also work beautifully. The Christmas rug with Santa Claus and poinsettia Pattern depends primarily on its layered floral composition and Santa centerpiece, so decorative thread can be adapted to materials you already have.
Conclusion
The Christmas rug with Santa Claus and poinsettia Pattern brings together several enjoyable sewing techniques in one festive project. You begin by creating reusable templates, cutting and stabilizing the fabric, constructing individual red and white poinsettia petals, preparing green holly-inspired leaves, and adding decorative stitching. The pieces are then arranged in symmetrical layers before the Santa Claus appliqué is constructed and secured at the center.
The key to achieving a polished result is not complicated equipment but careful cutting, consistent stitching, balanced layering, and patient assembly. Gold topstitching can highlight the shapes, while lightweight batting provides the gentle dimension that gives the petals, beard, and Santa hat their soft handcrafted appearance. By changing the colors, size, quilting details, or decorative motifs, you can also make the pattern uniquely your own.
EASILY FIND THE FREE PDF FOR THIS PATTERN HERE!
This project can become a memorable piece of handmade Christmas décor and a wonderful way to practice appliqué, quilting, fabric layering, decorative stitching, and seasonal sewing in a single design. If you make your own version, leave your sincere opinion about the Christmas rug with Santa Claus and poinsettia Pattern and share your suggestions for colors, fabrics, or details you would add. Your ideas may inspire even more creative variations of this festive sewing project.