
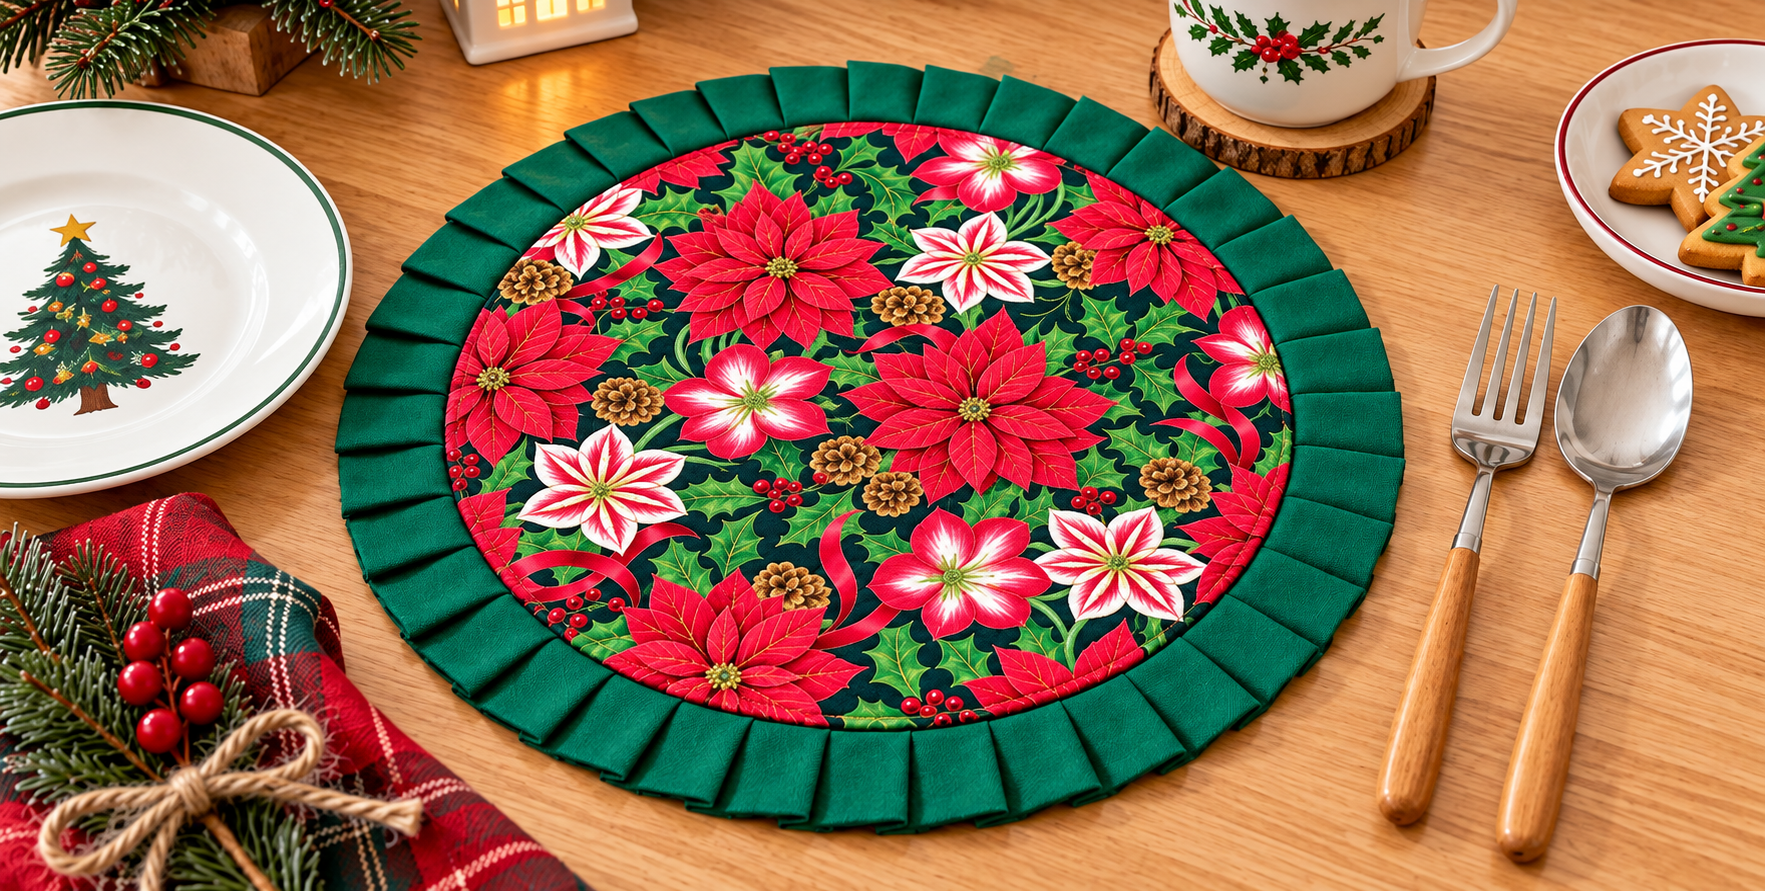
The Christmas themed placemat Pattern is a beautiful sewing project for anyone who wants to bring handmade warmth, traditional holiday colors, and a polished quilted look to the Christmas table. Inspired by the round placemat shown in the photo, this design combines a colorful Christmas-print center with a deep green pleated fabric border. The finished piece can be placed beneath dinner plates, serving dishes, decorative bowls, or holiday centerpieces. Although the design looks elaborate, it can be constructed using familiar quilting and sewing techniques, making it approachable for confident beginners as well as experienced sewists. The secret is to divide the project into manageable stages: choosing fabrics, preparing the circular layers, making the pleated border, assembling the quilt sandwich, and finishing everything with neat stitching. With patience and accurate measurements, the result can look wonderfully professional while still preserving the charm of something made by hand.
A major feature of this Christmas themed placemat Pattern is its combination of prints and solid colors. The center can feature poinsettias, holly leaves, berries, pinecones, ribbons, Christmas flowers, or another festive motif, while the outer border works especially well in forest green, emerald, deep red, burgundy, or even a subtle metallic holiday fabric. For a placemat similar in proportion to the pictured project, a finished diameter of approximately 40 to 44 cm works well for many table settings. You will need Christmas quilting cotton for the center, coordinating solid cotton for the pleated border, batting, backing fabric, matching thread, sewing clips or pins, fabric scissors or a rotary cutter, an iron, and a sewing machine. A circular template is also extremely helpful because accurate circles make the pleats and final assembly considerably easier to control.
What makes this project especially enjoyable is the opportunity to personalize it. You can create one Christmas placemat as a decorative table accent or sew a matching collection for the entire dining table. The same basic construction can also be adapted to different holiday styles. Traditional red and green fabrics create a classic Christmas appearance, while cream, gold, and sage can produce something softer and more contemporary. Before cutting expensive fabric, read through the complete process and consider making a paper template of the finished circle. Prewashing quilting cotton is optional depending on your normal sewing practice, but pressing the fabric before measuring is highly recommended. Flat, wrinkle-free material provides more accurate pieces, and accuracy becomes especially important when multiple pleats must fit evenly around a circular edge.
Materials, Measurements, and Fabric Preparation for the Christmas themed placemat Pattern
Begin by deciding the final size of your Christmas themed placemat Pattern. A practical target is approximately 42 cm in finished diameter, although you can adjust this measurement for your table and dinnerware. The decorative printed center can measure approximately 31 to 33 cm across, leaving enough visual space for the green pleated frame. These dimensions are flexible rather than mandatory, so the important point is maintaining balanced proportions between the printed center and the surrounding border.
DISCOVER MORE FREE PATTERNS HERE!
For the main fabric, select a good-quality quilting cotton with a festive print. Large poinsettias, holly, Christmas foliage, berries, stars, snowflakes, or small ornaments are excellent options. Because the center is circular, place your paper template over different sections of the print before cutting. This technique, often called fussy cutting, allows you to deliberately position the most attractive portion of the fabric in the center rather than accepting a random arrangement of motifs.
Next, prepare the green pleated border. The photograph uses a rich green that creates strong contrast with the red flowers in the central fabric. Cut a collection of equal rectangular pieces for the pleats. Pieces measuring roughly 8 cm wide by 10 cm long are a useful starting point, although their exact size should be adjusted according to the desired border depth and the amount of overlap between pleats. Cut all pieces with the same dimensions so the border remains visually consistent.
You will also need low-loft batting to give the placemat structure and gentle cushioning. Cut the batting slightly larger than your intended finished circle during the early construction stages. Doing so gives you some flexibility when quilting and trimming. Cotton or cotton-blend batting works particularly well for table projects because it produces a soft quilted appearance without creating excessive bulk beneath plates and flatware.
Prepare a piece of backing fabric that is also slightly larger than the final placemat. The backing may be plain green, red, cream, or a coordinating Christmas print. Since the underside can occasionally be visible when the table is being set, choosing a complementary fabric gives the finished project a more intentional appearance. Press the backing thoroughly and make sure it lies completely flat before constructing your quilt sandwich.
Finally, organize your basic sewing supplies before assembly. You will need thread, a sewing machine, an iron, an ironing surface, pins or clips, fabric scissors, and preferably a rotary cutter and cutting mat. A washable fabric marker can help identify alignment points. Divide the circular template into quarters and mark those four positions on your fabric pieces. These reference points will become extremely useful when distributing the pleats evenly around the circumference.
Creating and Attaching the Pleated Christmas Border
The distinctive element of this Christmas themed placemat Pattern is the dimensional outer border. To make each pleat, take one prepared rectangle and fold it neatly so that its sides create an overlapping or accordion-like shape. Press the fold firmly with an iron. Repeat exactly the same folding method for every rectangle. Consistency is more important than speed because small differences become noticeable once dozens of pleats are arranged around a circle.
Lay the prepared pleats side by side before attaching them permanently. Their folded edges should overlap slightly, creating the continuous rhythm visible in the finished placemat. If one section looks wider or narrower, adjust the overlap rather than changing the dimensions of an individual piece. This dry-layout stage is valuable because it lets you estimate how many pleated units are required before anything is sewn permanently.
Once you are satisfied with the arrangement, use a long basting stitch close to the raw edge of each pleat. Basting prevents the folds from opening while you handle the pieces. You can prepare the units individually or connect them progressively into a continuous strip. Press carefully after basting, avoiding excessive stretching. Quilting cotton can distort when repeatedly manipulated, particularly along edges that are not aligned perfectly with the straight grain.
Place the pleated pieces around the edge of your circular foundation and use the quarter marks as guides. Start by positioning pleats at the top, bottom, left, and right reference points. Then fill the spaces between them. This approach distributes the fabric much more evenly than beginning at one point and simply continuing around the entire circumference. Clip or pin each section securely as you work.
Sew around the circle using a consistent seam allowance, generally around 0.7 to 1 cm, depending on how you designed your template. Move slowly and stop occasionally with the needle down to reposition the fabric. A circular seam is easier to control when you sew a short distance, adjust the fabric, and continue. Avoid pulling the pleated border through the machine because stretching can cause waves or an uneven finished shape.
After sewing, inspect the entire border before proceeding. Check that no pleat has flipped backward or become caught incorrectly in the seam. The pleats should radiate outward in a balanced arrangement. If one section looks dramatically different from the others, correcting it now will be easier than trying to fix it after the backing and batting have been permanently incorporated into the round quilted placemat.
Assembling, Quilting, and Finishing the Round Placemat
With the decorative border prepared, you can begin assembling the central portion of the Christmas themed placemat Pattern. Position the Christmas-print circle carefully so the motifs are facing the intended direction. If your fabric contains large flowers such as poinsettias, rotate the piece until the composition feels balanced. The central print is the visual focus, so spending a few extra minutes on placement can noticeably improve the finished result.
Create your quilt sandwich using the decorative top, batting, and backing. Keep each layer smooth and centered. Depending on your chosen construction method, some finishing steps may occur before the pleated edge is fully secured, but the goal remains the same: the batting should sit evenly between the front and back fabrics without wrinkles. Use safety pins, quilting pins, temporary basting, or another preferred quilting method to keep the layers stable.
For quilting, you do not need an elaborate design. Simple quilting stitches can be extremely effective because the Christmas print already contains considerable visual detail. Stitching around major flower shapes, following circular lines, or adding gentle echo quilting can secure the layers without competing with the fabric. If the print contains poinsettias and holly, selective outline quilting can emphasize those motifs beautifully.
Keep the quilting density reasonably consistent across the project. One heavily quilted area beside an almost unquilted section can cause uneven shrinkage or distortion. Work gradually from the center outward whenever practical. Smooth the fabric regularly and check the reverse side for puckers. A walking foot can be helpful when sewing through multiple layers because it encourages the top and bottom fabrics to travel through the machine at a similar rate.
Once quilting is complete, carefully trim the excess batting and backing. Use the circular template as a reference if necessary. Work slowly around the circumference rather than attempting to cut large sections at once. Clean trimming creates a much more professional edge and makes the final finishing process easier. Be especially careful near the pleated border so you do not accidentally cut into any finished folds.
Give the completed placemat a final press according to the requirements of your chosen fabrics and batting. Press rather than aggressively sliding the iron over the pleats. Shape each fold with your fingers if necessary and check that the entire placemat lies evenly on a flat surface. Your finished Christmas themed placemat Pattern should now have a colorful quilted center, an orderly dimensional border, and enough structure to function beautifully as seasonal table décor.
Styling, Care, FAQ, and Final Tips for Your Christmas Placemat
One of the easiest ways to showcase this handmade Christmas placemat is to allow its printed center to remain visible. Pair it with simple white or cream dinnerware so the poinsettias and green border become the main decorative feature. Wooden-handled flatware, natural wood surfaces, tartan napkins, greenery, berries, and small Christmas accents can complement the handmade appearance without making the table feel overcrowded.
If you are making several placemats, use the same measurements and templates for every piece. Cut all center circles together, then all backing circles, batting pieces, and pleated rectangles. This batch sewing method saves time and helps produce a coordinated set. You can still vary the placement of the printed motifs slightly so every placemat has its own handmade character while remaining part of the same collection.
For storage, make sure the placemats are completely clean and dry before putting them away after Christmas. Store them flat whenever possible rather than sharply folding them through the center. If space is limited, loosely rolling them can help reduce permanent creases. Protect them from moisture and direct sunlight so the festive fabric colors remain vibrant for future holiday seasons.
FAQ: Christmas themed placemat Pattern
What is the best fabric for a Christmas themed placemat Pattern?
Medium-weight quilting cotton is one of the easiest choices because it cuts accurately, presses well, and is available in countless Christmas prints. Cotton is especially convenient for pieced and quilted projects because it behaves predictably beneath a domestic sewing machine.
How large should a round Christmas placemat be?
A diameter of approximately 40 to 44 cm is a practical starting range for many tables. However, measure your dinner plates and available table space first. The ideal size should provide a decorative border around the plate without interfering with neighboring place settings.
Do I need batting inside the placemat?
Batting is strongly recommended if you want a soft, structured, quilted finish. Low-loft batting is generally more practical than very thick batting because dinnerware remains stable on the surface.
How do I keep the pleats evenly spaced?
Divide the circle into quarters and mark those positions first. Place pleats at the four reference points and then distribute the remaining pleats evenly between them. Measuring the overlap consistently also helps maintain a professional appearance.
Can a beginner make this Christmas themed placemat Pattern?
Yes, although the pleated circular border requires patience. A beginner who can sew a consistent seam, use an iron, and follow basic quilting construction should be able to complete the project by working slowly through each stage.
Can I make the placemat without the pleated border?
Absolutely. The central circular design can be finished with binding instead. The pleated edge is primarily a decorative feature, so simplifying it does not prevent you from creating a functional Christmas placemat.
How much Christmas fabric will I need?
The amount depends on the fabric width, print direction, placemat diameter, and number of pieces being made. For a complete table set, calculate your layout before purchasing fabric and include extra material for pattern matching, mistakes, and shrinkage if you intend to prewash it.
Should I prewash the fabric?
This depends on your usual quilting practice and the fabric manufacturer’s care recommendations. Prewashing can address potential shrinkage or excess dye before construction, while some quilters prefer working with unwashed quilting cotton because of its crisp finish. Whichever method you choose, use it consistently across the main fabrics.
Can I use metallic Christmas fabric?
Yes. Metallic accents can make a Christmas table setting especially festive. Test the fabric first, however, because some metallic prints respond differently to high iron temperatures. Press from the reverse side or use a pressing cloth when appropriate.
How can I make matching Christmas placemats faster?
Create reusable templates and complete identical operations in batches. Cut every piece first, prepare all pleats together, assemble the borders, and then quilt each placemat. This production-style approach is much more efficient than completing one placemat entirely before starting the next.
What other colors can replace the dark green border?
Deep red, burgundy, cream, gold, sage green, navy, or even a subtle Christmas plaid can work beautifully. Choose a color already present in the center print to create a coordinated holiday sewing project.
How should a handmade Christmas placemat be washed?
Always consider the care requirements of the specific fabric, thread, and batting you used. In general, gentle cleaning and careful drying can help preserve quilting and dimensional details. The pleated border may need light reshaping and pressing after laundering.
The Christmas themed placemat Pattern combines several enjoyable sewing techniques in one practical holiday project. You begin by choosing a festive printed cotton, preparing an accurate circular center, cutting batting and backing, and creating multiple uniform fabric pleats. Those pleats are carefully distributed around the circle to produce the distinctive green frame, while quilting adds structure and helps the central Christmas motifs stand out. Accurate cutting, consistent seam allowances, careful pressing, and patient placement are the main ingredients for achieving a neat finished result.
More importantly, this project can easily become your own. Change the Christmas fabric, adjust the diameter, experiment with border colors, simplify the quilting, or create an entire coordinated set for your holiday table. Once you understand the construction of the Christmas themed placemat Pattern, the same technique can inspire seasonal placemats for many other celebrations and decorating styles. Handmade pieces have a special ability to make a table feel welcoming, and this pattern combines functionality with a cheerful Christmas look that can return year after year. If you make your own version, leave your sincere opinion about the project and share your suggestions for colors, fabrics, border styles, or other details you would love to try.