
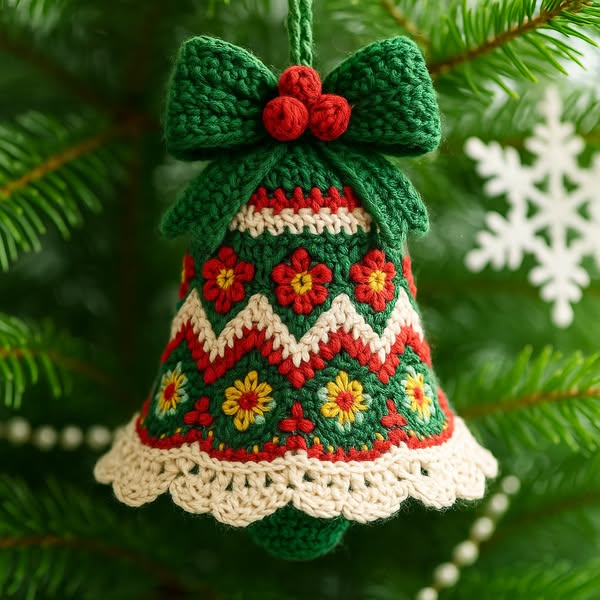
The Crochet Bell Christmas Ornament Pattern is a charming holiday project that combines traditional crochet techniques with the warm, handmade character that makes Christmas decorations feel special. Inspired by classic bell-shaped ornaments, this design can be worked with festive shades of green, red, cream, and gold to create a piece that looks beautiful on a Christmas tree, wreath, garland, door decoration, or handmade gift package. Although the finished ornament appears detailed, the construction becomes much easier when it is divided into manageable crochet sections. The bell begins with a compact top and gradually expands toward the lower edge, creating the recognizable flared silhouette. Decorative color changes, surface flowers, a scalloped border, and a crochet bow can then transform the basic bell into an eye-catching holiday ornament. This tutorial explains the stitches, construction sequence, shaping principles, and finishing methods so that crocheters can adapt the project while keeping the proportions balanced.
One of the advantages of making a crochet Christmas bell is that it does not require a large amount of yarn. Small quantities left from other projects can often be combined effectively, particularly when they belong to the same yarn weight. For a traditional version of the Crochet Bell Christmas Ornament Pattern, prepare green yarn as the dominant color, cream or off-white yarn for contrasting stripes and edging, red yarn for decorative accents, and a small amount of yellow or gold for flower centers. A 2.5 mm to 3.5 mm crochet hook is a practical starting range for lightweight cotton or similar yarn, although the ideal hook depends on the yarn selected and your personal tension. You will also need scissors, a yarn needle, removable stitch markers, and optional fiberfill or fabric stiffener if you want the bell to hold a particularly firm shape. The goal is to produce dense, tidy stitches without making the fabric excessively rigid.
Before beginning the Crochet Bell Christmas Ornament Pattern, it is helpful to understand the crochet abbreviations used throughout the instructions. In US crochet terminology, ch means chain, sl st means slip stitch, sc means single crochet, hdc means half double crochet, dc means double crochet, st means stitch, sts means stitches, inc means increase, and rep means repeat. The notation [ ] indicates that the instructions inside the brackets should be repeated as directed, while ( ) can show the stitch count or a group of stitches worked into one location. A magic ring (MR) is useful when beginning circular crochet because it creates a neat center that can be pulled closed. Beginners should count stitches at the end of every round, because accurate counting is particularly important when shaping the bell and keeping the decorative sections evenly positioned.
Materials, Crochet Stitches, and Preparation for the Bell
Choose a smooth cotton or cotton-blend yarn if you want the individual stitches and decorative details of your Crochet Bell Christmas Ornament Pattern to remain clearly visible. Cotton works especially well for ornaments because it creates defined stitches and generally holds a structured shape. A soft acrylic yarn can also be used and may produce a slightly fuller appearance. Try to use approximately the same yarn weight for every color so that changing colors does not unexpectedly alter the width of the bell. Green can serve as the main shade, while red, cream, and yellow provide the Christmas-inspired contrast.
DISCOVER MORE FREE PATTERNS HERE!
Your hook should create a fabric that is relatively dense but still comfortable to crochet. If the stitches look loose and large gaps appear between them, move down one hook size. If the stitches are difficult to enter or the bell becomes extremely stiff, try a slightly larger hook. Maintaining consistent crochet tension is more important than matching a particular hook number. Because this ornament is decorative rather than wearable, achieving an attractive shape and clean stitch definition should be your primary objective.
Practice the basic stitches before beginning if you are new to crochet. For sc, insert the hook into the designated stitch, yarn over, pull up a loop, yarn over again, and pull through both loops. For hdc, yarn over first, insert the hook, pull up a loop, yarn over, and pull through all three loops. For dc, yarn over, insert the hook, pull up a loop, then complete the stitch by pulling through two loops twice. These three stitches provide different heights that are useful for shaping and decorating the crochet bell ornament.
An increase (inc) means working two stitches into the same stitch. Increases are essential because they gradually make the bell wider as you crochet toward its base. Rather than adding many stitches at once, distribute increases evenly around selected rounds. This creates a gentle outward curve instead of a sudden ruffle. Place a stitch marker at the beginning of each round so you always know where the round starts, especially when working continuous rounds.
Color changes should be neat because the contrasting stripes are highly visible. When changing from green to cream or red, complete the final yarn-over of the previous stitch with the new color. This creates a cleaner transition. Carrying unused yarn for very short sections can sometimes be convenient, but cutting and weaving in the yarn is usually cleaner when there are several rounds between color changes. Secure each yarn tail carefully on the inside of the ornament.
Finally, decide whether you want a flat decorative bell, a lightly stuffed ornament, or a dimensional hollow bell. The same basic shaping principles can accommodate all three versions. A small amount of fiberfill gives the ornament a rounded profile, while leaving it hollow creates a more traditional bell structure. For a tree ornament similar to the festive inspiration, keeping the body dimensional and adding a small crochet ball or clapper underneath creates an especially attractive finish.
Crocheting the Bell Body Step by Step
Begin the Crochet Bell Christmas Ornament Pattern with green yarn. Make an MR, then work 6 sc into the ring and pull it closed. On the next round, work 2 sc in each stitch around, giving you 12 stitches. Continue increasing gradually: a useful progression is [1 sc, inc] around, followed on the next increase round by [2 sc, inc] around. The exact number of expansion rounds can be adjusted according to your yarn and desired ornament size. The important principle is to create a small circular top that begins widening smoothly.
Once the upper section reaches the desired diameter, work several rounds without increases. Crochet 1 sc in each stitch around for approximately three to five rounds. This straight section establishes the upper body of the bell. Hold the work upright occasionally to check the shape. It should begin resembling a small cup rather than a flat circle. If it remains too flat, reduce the frequency of increases; if it becomes too narrow, add another evenly distributed increase round.
Introduce a decorative stripe using cream yarn. Join the cream shade at the beginning of a round and crochet 1 sc in each stitch around. Work one or two cream rounds depending on how bold you want the stripe to appear. Change to red for a narrow accent round, then return to green. These Christmas crochet color changes give the bell a traditional festive appearance without requiring complicated stitch patterns.
Now begin expanding the lower half. Work a green round while distributing approximately six increases evenly around the circumference. Crochet one or two rounds without increases, then repeat another evenly spaced increase round. Alternating straight rounds and increase rounds creates the characteristic bell-shaped crochet silhouette. Avoid placing every increase directly above the increase from the previous round, since slightly offsetting their positions can create a smoother curve.
To form a decorative zigzag effect, alternate short groups of green, cream, and red stitches or embroider the zigzag afterward using a yarn needle. Surface embroidery is often easier for beginners because it avoids managing several colors in a single round. Thread cream yarn through the finished fabric in a repeating V formation, then add a narrower red accent beside it. Keep the embroidery tension relaxed enough that it does not pull or distort the bell.
Finish the main body when the bell has reached the width and height you prefer. For a small tree ornament, a finished body around 10–14 cm tall can work nicely, although there is no required measurement. Complete the final body round with sc and check that the edge lies evenly. If necessary, block the crochet gently before adding the decorative border. Do not over-stretch it, because the slightly rounded three-dimensional shape is part of the charm of the Crochet Bell Christmas Ornament Pattern.
Adding Flowers, Scalloped Edging, Bow, and Hanging Loop
The tiny flowers give this Christmas crochet ornament much of its personality. A simple flower can be made by creating an MR, working [ch 2, 2 dc, ch 2, sl st] into the ring, and repeating the bracketed sequence five times. Pull the center closed and fasten off. Make several flowers in red, yellow, cream, or other festive colors. Small flowers are preferable because they decorate the bell without covering too much of the underlying crochet.
Arrange the flowers around the lower and middle portions before sewing them permanently into place. Alternating red flowers with yellow or gold centers creates a traditional Christmas palette. Use the yarn tails and a tapestry needle to sew each flower securely to the bell. Stitch mainly through the flower center and the bases of the petals so the decorative petals retain some dimension. Space the motifs evenly to keep the composition balanced.
For the cream scalloped crochet edging, attach cream yarn to the bottom edge. Work sc around first to create a stable foundation. For the following round, try [skip 1 st, 5 dc in next st, skip 1 st, sl st in next st] and repeat around. Depending on the total stitch count, you may need to make a small adjustment near the end. The purpose is to create evenly distributed shell-like scallops that flare gently outward.
A large green bow makes an attractive topper. Crochet a small rectangle using rows of sc or hdc, approximately 8–10 cm wide depending on the size of the bell. Fasten off, pinch the center of the rectangle, and wrap green yarn tightly around the middle several times. Secure the yarn at the back. You can create two smaller tapered pieces for the ribbon tails and stitch them behind the bow. Attach the completed bow firmly near the top of the bell.
Small red crochet berries provide another festive detail. Create an MR, work 6 sc into it, then work a short round of increases. Crochet one round evenly, place a tiny amount of fiberfill inside if desired, and decrease until the ball closes. Make three berries and sew them together at the center of the bow. This combination of green crochet bow and red berries immediately reinforces the Christmas theme.
Create the hanging loop last. Chain approximately 20–30 ch, depending on the desired hanging length, and join the chain securely to the top of the ornament. For a stronger hanger, work sl st back along the chain before fastening off. Weave both ends deeply into the upper crochet fabric. If you plan to hang the ornament from a tree branch, test the loop gently before use to ensure that it is firmly attached.
Finishing, Shaping, Customizing, and Caring for Your Ornament
After completing the crochet work, carefully weave in every yarn end. Use a yarn needle to pass each tail through several stitches on the inside before trimming the excess. Avoid cutting the yarn immediately beside a knot because normal handling can loosen short tails. Proper finishing gives the Crochet Bell Christmas Ornament Pattern a cleaner appearance and helps the ornament remain attractive through many holiday seasons.
If the bell needs additional structure, shape it gently by hand. Cotton ornaments can also be lightly blocked according to the care instructions for the yarn you selected. Place the bell over an appropriately sized form while it dries if you want a more defined silhouette. Always make sure the piece is completely dry before storing or decorating with it. A well-shaped lower edge makes the scalloped cream border especially noticeable.
A small crochet clapper can be added underneath. Make a tiny green or red ball using the same technique used for the berries, then attach it to a short crochet chain inside the center of the bell. Position it so that the ball extends just below the scalloped edge. This detail makes the ornament immediately recognizable as a bell while adding movement when it hangs from the Christmas tree.
There are many ways to customize this Crochet Bell Christmas Ornament Pattern. A rustic version could combine cream, deep red, and forest green. A modern version might use white with gold and neutral accents, while a playful design could include pastel Christmas colors. You can also replace the flowers with embroidered stars, snowflakes, dots, hearts, or simple surface-crochet motifs. Keeping the bell construction unchanged makes experimenting with decorative themes straightforward.
The pattern can also be resized. For a smaller bell, use finer yarn, a smaller hook, and fewer body rounds. For a larger bell, use thicker yarn or continue the increase sequence for additional rounds. When enlarging the project, remember to enlarge the bow, flowers, edging, and hanging loop proportionally. Maintaining these relationships helps the final crochet Christmas decoration look intentional rather than oversized in only one area.
Store handmade ornaments carefully after the holiday season. Make sure the crochet is completely clean and dry, then place the bell in a breathable storage container where it will not be crushed by heavier decorations. If the scalloped border becomes flattened, reshape it gently before displaying it again. Thoughtful storage can help preserve the stitches, flowers, bow, and overall bell shape for future Christmas celebrations.
FAQ – Frequently Asked Questions About the Crochet Bell Christmas Ornament Pattern
Is the Crochet Bell Christmas Ornament Pattern suitable for beginners?
Yes. A confident beginner who understands chain, slip stitch, single crochet, double crochet, increases, and working in the round should be able to make this ornament. The decorative flowers and scalloped border can be practiced separately before they are attached.
What does MR mean in this crochet pattern?
MR means magic ring or magic circle. It is an adjustable starting loop commonly used for crochet projects worked in the round. After the first stitches are made into the ring, the yarn tail is pulled to close the center.
What does sc mean in US crochet terminology?
Sc means single crochet. Insert the hook into the stitch, yarn over and pull up a loop, then yarn over again and pull through both loops on the hook.
What does dc mean in the instructions?
Dc means double crochet in US terminology. It is taller than a single crochet stitch and is especially useful for making the decorative scalloped border and flower petals.
How do I make the crochet bell wider at the bottom?
Use evenly spaced increases as you move toward the lower portion of the bell. Instead of increasing every round, alternate increase rounds with plain rounds. This creates a gradual flare and prevents excessive ruffling.
What yarn is best for a crochet Christmas bell?
Cotton and cotton blends are excellent choices because they offer clear stitch definition and good structure. Acrylic yarn can also work successfully. More important than fiber type is using compatible yarn weights throughout the ornament.
How can I make the bell hold its shape?
Use relatively firm tension and a hook that produces dense fabric. Gentle blocking can improve the shape, and optional light stuffing can make the body fuller. If using any commercial stiffening product, always follow its instructions and test it on a yarn sample first.
Can I change the colors in the Crochet Bell Christmas Ornament Pattern?
Absolutely. The traditional green, red, cream, and yellow combination can be replaced with any coordinated palette. White and gold can create an elegant ornament, while red and white produce a classic candy-inspired Christmas appearance.
How can I make a smaller Christmas tree ornament?
Use thinner yarn and a smaller crochet hook, or reduce the number of body rounds. Keep the increase distribution balanced so the bell maintains its shape. The flowers and bow should also be made smaller to match the new proportions.
Why is my crochet bell becoming wavy?
A wavy body usually indicates that too many increases have been added over a short distance. Reduce the number or frequency of increases and work several plain rounds between them. Consistent tension also helps produce a smooth shape.
Do I have to add the flowers and bow?
No. These elements are decorative rather than structural. The basic crochet bell pattern can be finished with only contrasting stripes and scalloped edging, or it can be personalized with flowers, bows, embroidered details, berries, snowflakes, or other holiday motifs.
How do I make a strong hanging loop?
Create a chain of the desired length and work slip stitches back along the chain to reinforce it. Sew both ends securely into several stitches at the top of the bell and weave in the yarn tails thoroughly.
Conclusion
The Crochet Bell Christmas Ornament Pattern combines simple shaping with colorful decorative crochet to create a festive handmade piece that can become part of your holiday decorations year after year. Starting with a magic ring, the project develops through carefully distributed increases, straight rounds, color changes, and a gradually flared lower section. The cream scalloped edging gives the bottom a delicate finish, while the flowers, green bow, red berries, hanging loop, and optional clapper add character and dimension.
EASILY FIND THE FREE PDF FOR THIS PATTERN HERE!
Learning this project also provides useful practice with several fundamental techniques, including working in the round, crochet increases, color changes, surface decoration, scalloped edging, crochet flowers, and finishing. Once you understand the basic construction, you can change the yarn, dimensions, colors, and embellishments to create many variations from the same idea. If you make your own Crochet Bell Christmas Ornament Pattern, leave your sincere opinion about the project and share your suggestions for colors, decorations, or techniques you would like to try in another version.