
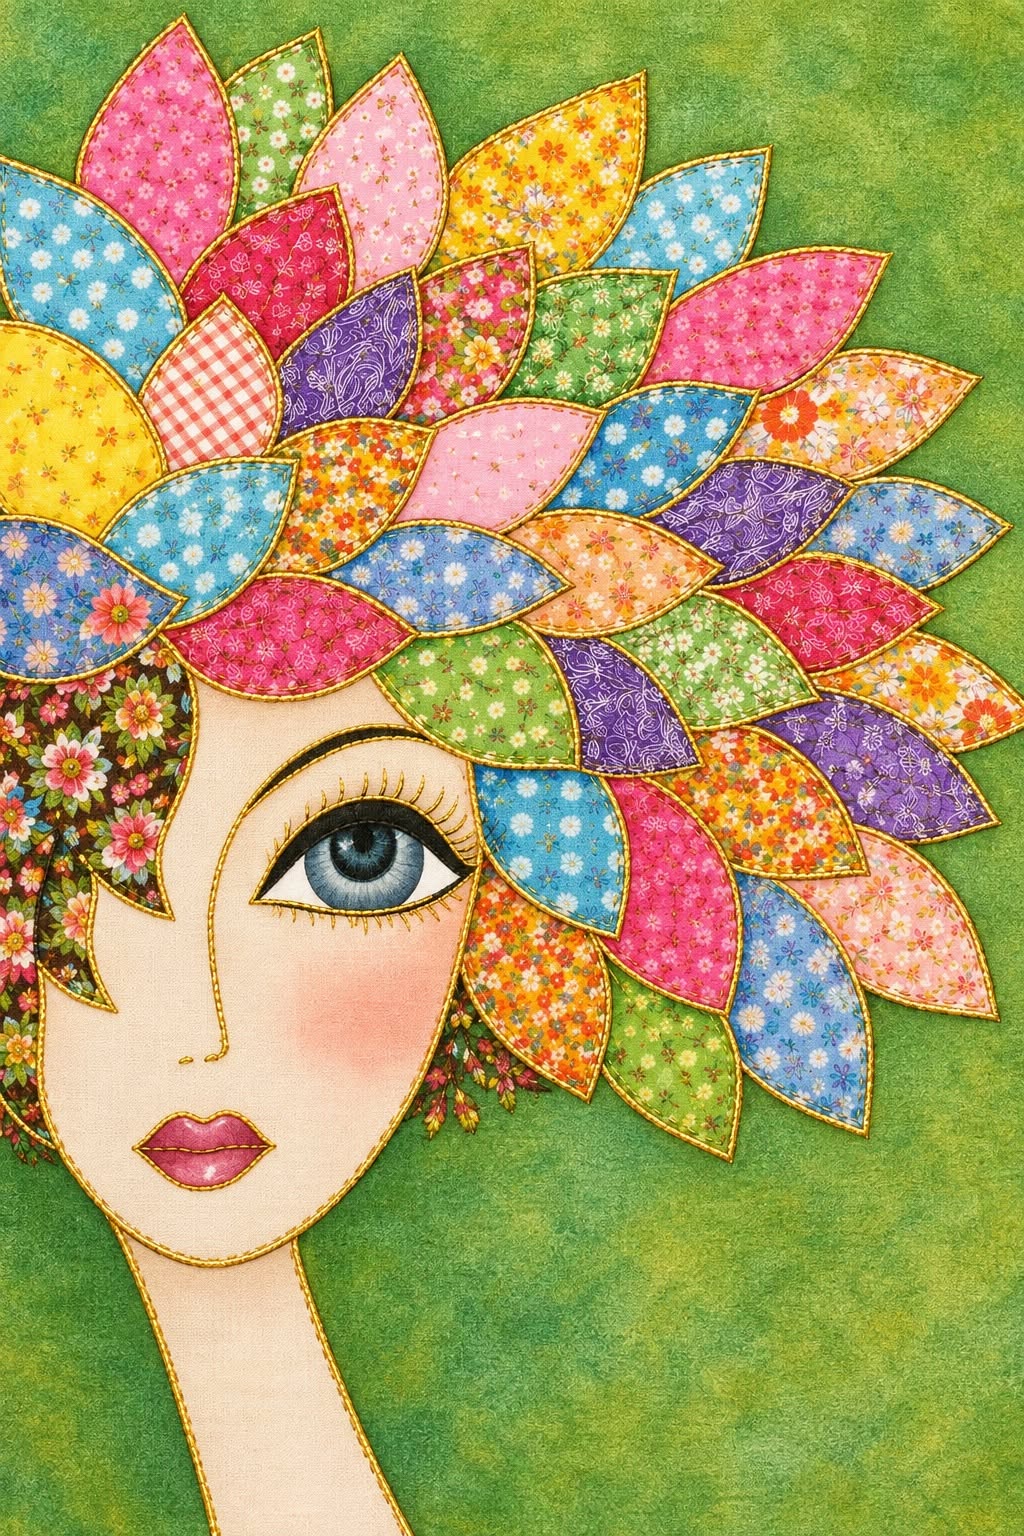
The Quilted Fabric Wall Panel Woman’s Face Pattern is a creative textile-art project that combines quilting, appliqué, fabric collage, and decorative stitching to produce a striking piece of handmade wall décor. Inspired by the reference image, the design features a stylized woman’s face surrounded by colorful petal-shaped fabric pieces that resemble an imaginative floral hairstyle. Instead of relying on complicated traditional quilt blocks, the project is built from recognizable shapes layered carefully to create movement, personality, and visual balance. Floral prints, polka dots, checks, and small-scale patterns can all work beautifully together, making this an excellent project for using treasured fabric scraps. The finished panel can become a distinctive decoration for a sewing room, bedroom, craft studio, hallway, or creative workspace.
One of the most appealing characteristics of the Quilted Fabric Wall Panel Woman’s Face Pattern is the freedom it gives the maker to experiment with color. The reference composition combines pink, blue, yellow, green, purple, orange, and floral fabrics against a textured green background. The woman’s face remains relatively neutral, which allows the surrounding fabric petals to become the strongest visual feature. When recreating this look, you do not need to duplicate every print exactly. The important idea is to maintain a pleasing balance between warm and cool colors, large and small prints, and bright and quiet areas. This approach makes every completed fabric wall panel unique while preserving the artistic character of the original inspiration.
This tutorial explains the complete process from planning the pattern through the final quilting and finishing steps. You will learn how to prepare the background, develop the face template, cut the petal appliqués, arrange the fabrics, secure the pieces, add facial details, assemble the quilt sandwich, and finish the edges professionally. Although the artwork looks elaborate, it becomes much easier when divided into manageable stages. Beginners can simplify the number of petals, while experienced quilters can add free-motion quilting and additional embellishment. Take your time during the arrangement stage because thoughtful placement is what transforms separate pieces of fabric into a cohesive woman’s face quilted wall panel.
Materials, Fabric Selection, and Pattern Preparation
Begin the Quilted Fabric Wall Panel Woman’s Face Pattern by deciding on the finished dimensions. A practical starting size for decorative wall art is approximately 45 x 60 cm, although you can enlarge or reduce the project according to your preferred display space. Cut the background fabric slightly larger than the intended finished dimensions so there is room for trimming after quilting. A mottled green cotton fabric works particularly well for a composition inspired by the reference because it provides contrast without competing excessively with the colorful appliqués.
DISCOVER MORE FREE PATTERNS HERE!
Choose good-quality quilting cotton for most of the appliqué pieces. Collect several prints in pink, turquoise, pale blue, yellow, orange, purple, green, and soft peach. Small floral motifs, dots, checks, and subtle geometric prints provide the lively patchwork appearance visible in the inspiration. Try placing your fabrics beside one another before cutting. If two neighboring fabrics look almost identical from a distance, introduce a lighter, darker, or contrasting print between them to make the individual petals easier to distinguish.
For the face, select a light cream, ivory, beige, or pale peach cotton. The neutral fabric creates an effective visual resting area beneath the highly patterned hairstyle. You will also need small amounts of fabric for the lips and decorative facial elements. Black or dark charcoal thread can be used to define the eye, eyebrow, nose, and other illustrated details, while coordinating quilting thread can be selected for the appliqué edges.
The characteristic petal is the most important reusable template in this fabric appliqué pattern. Draw an elongated leaf or almond shape with pointed ends. Prepare several sizes rather than cutting every piece identically. For example, small petals might measure approximately 6 x 3 cm, medium petals approximately 9 x 4.5 cm, and large petals approximately 12 x 6 cm. These dimensions are flexible because the objective is an organic, layered hairstyle rather than mathematically identical units.
Next, prepare the face pattern. Draw a long stylized oval that narrows toward the chin and continues downward into a slender neck. The face does not need to be anatomically realistic; the elongated proportions are part of the artistic charm. Draw the eye, eyebrow, nose, and lips separately so they can later be transferred or positioned accurately. Keeping these elements on tracing paper makes it easier to test their proportions before stitching anything permanently.
Before cutting the final fabrics, create a full-size paper layout. Place the paper face on a rectangle representing the background and arrange paper petals around the head. Photograph or sketch this arrangement for reference. This preparation prevents unnecessary fabric waste and helps you determine approximately how many petals you need. Depending on panel size and overlap, approximately 30 to 45 assorted pieces can create the abundant layered appearance associated with the Quilted Fabric Wall Panel Woman’s Face Pattern.
Cutting and Building the Woman’s Face Appliqué
Press all fabrics before cutting because wrinkles can distort small appliqué shapes. If you are using fusible appliqué, follow the manufacturer’s instructions for the fusible web and apply it to the wrong side of the selected fabrics before tracing the templates. Remember that directional designs may need to be reversed when traced onto the paper side of fusible web. Allow the fabrics to cool completely before cutting for cleaner edges.
Trace the face shape and carefully cut it from the neutral cotton. Position it slightly toward the lower-left area of the background rather than exactly in the center. This asymmetrical placement leaves plenty of room for the dramatic petal hairstyle to extend upward and across the opposite side of the panel. Keep the neck comfortably inside the lower edge so you still have enough fabric for quilting and finishing.
Arrange the largest petals first. Place several around the upper part of the head and allow them to radiate outward like oversized leaves. The pointed ends should generally face away from the face, although varying their angles prevents the design from looking rigid. Do not fuse anything immediately. Instead, continue building the entire arrangement until you are satisfied with the overall silhouette.
Introduce medium petals between the larger pieces. Overlap their bases so the individual components appear connected rather than scattered across the background. This overlapping technique creates the illusion of depth. Alternate floral fabric, dots, checks, and solid-looking prints instead of grouping all similar patterns together. Bright yellow beside turquoise, pink beside green, or purple beside orange can create particularly lively combinations.
Use smaller petals to fill awkward spaces and soften transitions around the face. Some can partially cover larger pieces, while others can emerge from beneath them. The reference design has a free, abundant quality, so perfect symmetry is unnecessary. The most important consideration is visual rhythm: your eye should move naturally from one colorful shape to another without encountering an excessively heavy concentration of one color.
When the arrangement feels balanced, carefully secure the pieces according to your chosen appliqué method. With fusible web, work gradually and protect your ironing surface. If you prefer traditional appliqué, baste the components temporarily before stitching. Secure the lower layers first and then progress toward the upper layers. This sequence preserves the intended overlaps and makes the woman’s face fabric art appear dimensional even though the finished panel remains relatively flat.
Appliqué Stitching, Facial Details, and Quilting
Once the fabric pieces are secured, stitch around each petal. A narrow zigzag, blanket stitch, straight stitch, or free-motion outline can all be suitable depending on the desired finish. A visible dark outline produces an illustrated appearance similar to the reference image, while coordinating thread creates a softer quilted effect. Test the stitch on scrap fabric first to determine an appropriate stitch length and tension.
Work systematically rather than jumping randomly around the panel. Start with the petals underneath other shapes and gradually move toward the uppermost pieces. Rotate the project smoothly when approaching pointed ends. Slowing the machine near each tip will help you achieve a cleaner result. If necessary, stop with the needle down, lift the presser foot, rotate the fabric slightly, lower the foot, and continue sewing.
The eye becomes the primary focal point of the face. Lightly mark its position with a removable fabric-marking tool. Build the eye from an almond-shaped outline, a colored iris, a dark pupil, and a small highlight. A pale blue or blue-gray iris complements the colorful surrounding fabrics especially well. Add an expressive dark upper lash line and individual eyelashes without making them excessively dense.
Create the eyebrow and nose with simple curved stitched lines. The beauty of this art quilt pattern comes partly from its hand-drawn character, so the features do not need to look mechanically perfect. Keep the nose understated so it does not compete with the eye. For the mouth, use a dusty rose, burgundy, mauve, or deep pink fabric appliqué and add a small highlight if desired.
After completing the appliqué, prepare the quilt sandwich. Place the backing fabric wrong side up, position batting over it, and place the finished appliqué top right side up. Smooth all three layers carefully and baste them using your preferred quilting method. Batting gives the panel body and allows the stitched outlines to develop subtle dimension.
Quilt the background without overwhelming the appliqué. Gentle meandering, echo quilting, flowing lines, or simple contour stitching can all complement the design. You can also quilt around the face and individual petals to make them stand slightly forward. Once quilting is complete, square the panel carefully and add binding around all four edges. If it will hang on a wall, sew a fabric hanging sleeve to the back before completing the final hand stitching.
Finishing, Displaying, and Customizing Your Fabric Wall Panel
After binding, inspect every appliqué edge and trim loose threads. Press the finished panel carefully from the back using appropriate heat for your fabrics and fusible materials. Avoid crushing heavily quilted areas. The goal is a clean, flat presentation while maintaining the gentle dimension created by the batting and stitching.
A hanging sleeve provides a professional way to display the Quilted Fabric Wall Panel Woman’s Face Pattern. Cut a fabric strip approximately 10 to 12 cm wide and slightly shorter than the finished width of the panel. Fold and stitch it into a tube, then attach it horizontally near the upper back edge without allowing the stitches to show through the front. A lightweight rod can then slide through the sleeve.
You can personalize the hairstyle by changing the entire color palette. A spring-inspired version might combine pink, yellow, mint, and sky blue. An autumn version could feature burgundy, mustard, rust, olive, and brown. For a more contemporary quilted wall hanging, try monochromatic petals in several shades of blue or purple. Maintaining contrast between adjacent shapes is more important than following any specific palette.
Scraps from previous quilting projects are particularly suitable for this pattern. Because many petals are relatively small, even modest remnants can become useful design elements. Using scraps also adds personal history to the finished artwork. Fabrics left from a favorite quilt, bag, cushion, or family sewing project can be incorporated into the hairstyle, turning decorative wall art into a meaningful textile keepsake.
Beginners can simplify the pattern by using fewer and larger petals. This reduces cutting and appliqué stitching while retaining the recognizable composition. More experienced makers can experiment with raw-edge appliqué, thread painting, decorative machine stitches, hand embroidery, free-motion quilting, or subtle fabric paint. Additional stitched details around selected petals can increase texture without making the composition visually crowded.
Finally, step several feet away from your finished Quilted Fabric Wall Panel Woman’s Face Pattern and evaluate the overall balance. From a distance, the face should remain clearly recognizable while the colorful petals create a strong frame around it. Small irregularities are completely appropriate in this type of textile art because they reinforce its handmade character. The combination of expressive illustration and traditional fabric techniques is precisely what makes this project so visually distinctive.
FAQ About the Quilted Fabric Wall Panel Woman’s Face Pattern
What is a Quilted Fabric Wall Panel Woman’s Face Pattern?
A Quilted Fabric Wall Panel Woman’s Face Pattern is a decorative textile project featuring a stylized female face created with fabric appliqué and quilting techniques. In this particular design, colorful leaf or petal shapes form an artistic hairstyle around the face, combining portrait-inspired art with patchwork aesthetics.
Is this project suitable for beginners?
Yes. Beginners can complete a simplified version using fusible web and straight or narrow zigzag stitching. The easiest approach is to use fewer, slightly larger petals and avoid complicated free-motion quilting. The project can become more advanced as additional embroidery, decorative stitching, and intricate quilting are introduced.
What is the best fabric for this quilted wall panel?
Good-quality 100% quilting cotton is an excellent choice because it is stable, easy to cut, widely available in small-scale prints, and suitable for appliqué. Cotton fabric is particularly helpful for the petal shapes because crisp pressing and accurate cutting make their pointed ends easier to handle.
How many different fabrics should I use?
There is no strict number, but approximately 10 to 20 coordinating prints can provide plenty of visual variety. Individual fabrics can be repeated throughout the hairstyle. Repetition is actually helpful because it connects distant areas of the composition and prevents the design from appearing completely random.
Do I need fusible web for the appliqué?
No. Fusible web is convenient because it stabilizes the pieces before stitching, but traditional needle-turn appliqué, glue basting, or other suitable appliqué techniques can also be used. Choose a method that matches your experience and the type of finish you want.
How do I keep the colorful petals from looking too busy?
Use the neutral face and relatively calm background as visual resting areas. Distribute strong colors throughout the hairstyle rather than placing them all together. Repeating several colors in different locations also creates harmony. Before sewing, photograph your arrangement and view the photograph from a distance to identify areas that feel unbalanced.
Should every petal be exactly the same shape?
No. Slight differences in width, length, curvature, and angle can make the hairstyle look more organic. Creating three basic sizes gives enough consistency to unify the pattern while allowing plenty of variation.
Can I hand stitch the entire project?
Absolutely. The appliqués can be attached by hand using blanket stitch, whip stitch, needle-turn appliqué, or decorative embroidery. Hand quilting can also replace machine quilting. A hand-stitched version will require more time but can produce a wonderfully tactile handmade finish.
What batting works well for fabric wall art?
A relatively thin, stable batting is generally preferable because wall panels do not require the loft or softness of bed quilts. Cotton or cotton-blend batting can provide enough structure for quilting while allowing the finished artwork to hang neatly.
Can I enlarge the Quilted Fabric Wall Panel Woman’s Face Pattern?
Yes. The design can be scaled to create anything from a small decorative panel to a large statement wall hanging. When enlarging it, increase the face, petals, and overall composition proportionally. Larger pieces may also benefit from additional quilting to keep all three quilt layers stable.
How can I make the facial features look expressive?
Concentrate primarily on the eye, eyebrow, and mouth. Small adjustments to the eyebrow curve, eyelash direction, iris color, or mouth shape can dramatically change the personality of the portrait. Practice these elements on paper before transferring them to fabric.
How should the finished quilt panel be cleaned?
Because this project is intended primarily as wall décor, gentle maintenance is preferable to frequent washing. Keep it away from excessive moisture and prolonged direct sunlight. If washing becomes necessary, consider the requirements of the specific fabrics, threads, batting, fusible products, and embellishments used in your version.
Can leftover quilting scraps be used for the pattern?
Yes, and this is one of the strongest advantages of the design. The numerous small fabric appliqué petals make the project ideal for using colorful scraps. Coordinating remnants from previous sewing projects can give the wall panel even more character and sentimental value.
What makes this pattern different from a traditional quilt block?
Traditional quilt blocks frequently rely on repeated geometric units and precise piecing. This design is closer to a textile art quilt, using appliqué shapes, asymmetrical composition, illustration, and quilting together. That freedom allows each maker to interpret the woman’s face and colorful hairstyle differently.
How long does the project take to complete?
The time varies according to size, experience, number of petals, and stitching technique. Cutting and arranging the appliqués may require as much attention as sewing them. Rather than rushing, treat the arrangement as an important creative stage because it strongly influences the final appearance.
Conclusion
The Quilted Fabric Wall Panel Woman’s Face Pattern brings together several enjoyable textile techniques in one expressive project. Starting with a simple background and stylized face, you can gradually construct an extraordinary hairstyle from colorful fabric petals. Careful fabric selection, balanced placement, secure appliqué stitching, expressive facial details, batting, quilting, and neat binding transform those individual components into finished textile artwork.
The most important lesson is that this pattern does not depend on absolute uniformity. The different floral prints, colors, petal sizes, overlaps, and stitched outlines contribute to its handmade personality. By understanding how fabric appliqué, quilting cotton, quilt sandwiches, decorative stitching, and color balance work together, you can adapt the design confidently instead of simply copying it.
EASILY FIND THE FREE PDF FOR THIS PATTERN HERE!
Whether you create a bright multicolored version inspired by the reference or develop an entirely new palette, this woman’s face quilted wall panel offers plenty of room for personal creativity. It is also an excellent opportunity to transform small fabric scraps into meaningful artwork rather than leaving them unused in the sewing room. If you make your own Quilted Fabric Wall Panel Woman’s Face Pattern, leave your sincere opinion about the project and share your suggestions. Which colors, fabrics, stitching techniques, or creative details would you add to make this artistic quilted portrait uniquely yours?