
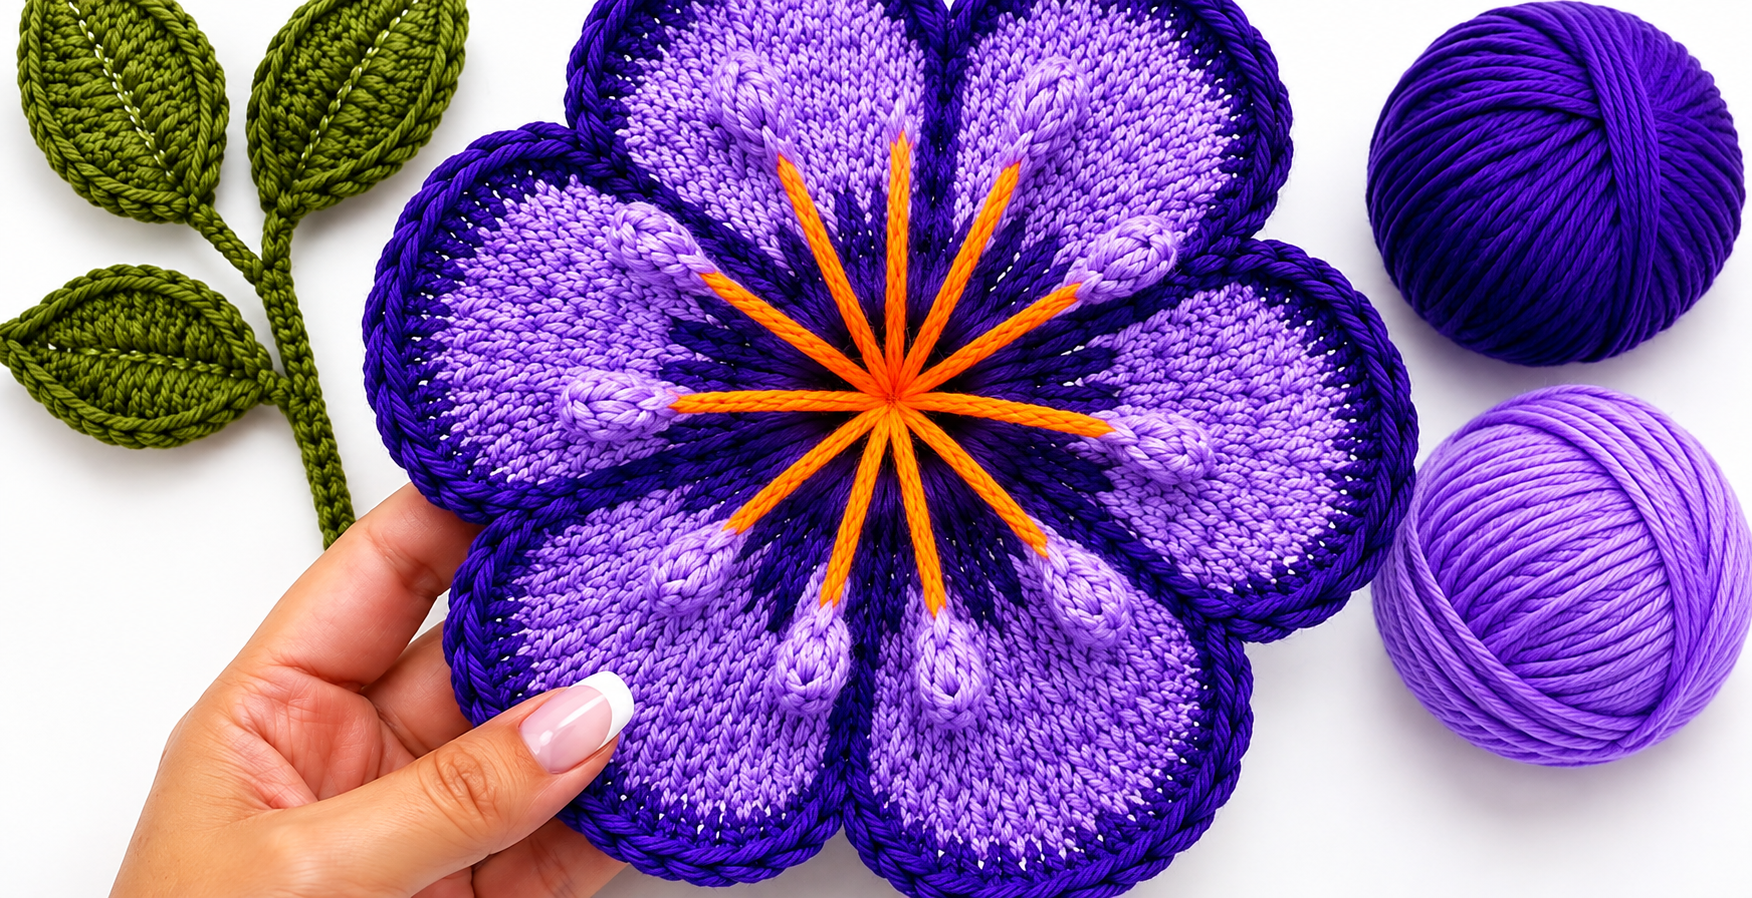
Beautiful crochet flower Pattern is a creative crochet project that combines bold color changes, textured stitches, layered petals, and decorative surface details to create a flower with strong visual impact. The design works especially well as a decorative motif for cushions, bags, wall hangings, blankets, table décor, or handmade gifts. What makes this pattern especially attractive is the contrast between the darker outer edging, the lighter petal sections, and the bright center details. Even though the finished flower looks detailed, the construction becomes much easier when you understand how each round is built and how the main crochet stitches work together.
For this tutorial, the flower is explained using standard U.S. crochet terminology and a practical step-by-step structure. You can recreate the look using purple, lavender, orange, and green yarn, or choose your own palette. A medium-weight cotton or cotton-blend yarn is a good option because it helps define the stitches clearly and keeps the petals structured. You will also need an appropriate crochet hook, scissors, a yarn needle, stitch markers, and optional stuffing or an extra backing layer if you want the finished flower to have additional dimension.
Before starting the Beautiful crochet flower Pattern, it is helpful to understand the basic construction. The flower begins at the center and expands outward in rounds. The petal sections are created by increasing stitches in selected areas, while darker contrast stitches visually separate each petal. Raised details can be produced with puff stitches or clustered stitches, and the bright orange center can be embroidered or crocheted afterward using surface crochet. The design is flexible, so you can make a smaller flower by using fewer rounds or enlarge it by adding additional increases while maintaining the same petal structure.
Materials, Crochet Keys, and Basic Stitches
The first step in making the Beautiful crochet flower Pattern is preparing your materials. For a flower approximately 25 to 30 cm across, prepare about 80 to 100 grams of lavender yarn, 40 to 60 grams of dark purple yarn, and a small quantity of orange yarn. A 4 mm to 5 mm crochet hook usually works well with medium-weight yarn, although the exact size should match your chosen yarn and preferred tension.
DISCOVER MORE FREE PATTERNS HERE!
The most important crochet key is ch, which means chain stitch. To make a chain, create a slip knot on your hook, yarn over, and pull the yarn through the loop already on the hook. Chains are commonly used to begin crochet projects and to create height at the beginning of rounds. In this flower pattern, chains help form the initial center ring and may also be used between petal groups.
Another essential abbreviation is sc, meaning single crochet. Insert the hook into the indicated stitch, yarn over, and pull up a loop. You will now have two loops on the hook. Yarn over again and pull through both loops. Single crochet creates a firm, compact texture and is ideal for the outer edging of the flower because it gives the petals a clean and defined shape.
The abbreviation hdc means half double crochet. Yarn over before inserting the hook into the stitch, pull up a loop, yarn over again, and pull through all three loops on the hook. Half double crochet is slightly taller than single crochet but shorter than double crochet. It is useful for shaping gradual curves in the petals of the Beautiful crochet flower Pattern.
The abbreviation dc means double crochet. Yarn over, insert the hook into the stitch, yarn over, and pull up a loop. Yarn over and pull through two loops, then yarn over again and pull through the remaining two loops. Double crochet stitches provide height quickly, making them excellent for building the rounded middle sections of each flower petal.
You may also use sl st, meaning slip stitch, and st, meaning stitch. A slip stitch is made by inserting the hook into a stitch, yarning over, and pulling the yarn through both the stitch and the loop on the hook in one movement. Slip stitches are important for joining rounds neatly and for moving the working yarn without adding noticeable height.
Creating the Center and Building the Six Petals
Begin the Beautiful crochet flower Pattern with the dark purple yarn. Make a magic ring, or alternatively chain 4 and join the first and last chains with a slip stitch to create a small ring. Chain 1 and work 12 single crochet stitches into the center. Join with a slip stitch. This creates a firm base that will support the six petals.
For the next round, you will begin establishing six equal sections. Chain 2, then work two half double crochet stitches into the first stitch. Continue placing increases evenly around the circle so that you create six distinct groups. A stitch marker can be useful here because maintaining equal spacing is important for producing balanced petals.
Change to the lighter lavender yarn for the main petal sections. Each petal can be worked over several stitches using a combination such as one single crochet, one half double crochet, several double crochet stitches, one half double crochet, and one single crochet. This gradual change in stitch height creates a natural rounded petal shape rather than a sharp point.
Continue expanding each petal by increasing in the central stitches. For example, if one petal contains seven stitches in the previous round, work increases into the two or three central stitches during the next round. This allows the petal to widen gradually. Keep the beginning and ending stitches shorter so the six sections remain clearly separated.
Between each petal, work one or two stitches in the darker purple yarn or use a dark surface crochet line afterward. These contrasting lines are one of the defining features of the Beautiful crochet flower Pattern because they visually separate the petals and create a dramatic layered appearance. Carrying the yarn behind the work may help reduce the number of ends you need to weave in.
Continue working additional rounds until each petal reaches the desired size. A flower similar to the reference style may need approximately six to eight shaping rounds after the center. Check your work regularly on a flat surface. If the flower curls strongly upward, you may need more increases. If it becomes excessively wavy, reduce the number of increases in the next round.
Adding Texture, Raised Details, and the Decorative Border
One of the most beautiful features of this Beautiful crochet flower Pattern is the textured surface of the petals. You can create these raised details using a puff stitch. To make a basic puff stitch, yarn over, insert the hook into the stitch, and pull up a loop. Repeat this action several times in the same stitch, then yarn over and pull through the accumulated loops. Finish with a chain to secure the puff.
Place one or two puff stitches along the center line of each petal. Try to position the raised elements evenly so that the flower maintains a symmetrical appearance. A slightly lighter lavender yarn works beautifully for these details because the raised stitches remain visible without creating an overly sharp contrast.
Another option is using a cluster stitch. A cluster is made by working several partially completed double crochet stitches into the same stitch and then closing them together at the top. Cluster stitches create a teardrop-like shape and can imitate the decorative raised motifs visible on many dimensional crochet flowers.
Once the texture is complete, begin the outer border with dark purple yarn. Attach the yarn near the base of any petal and work single crochet evenly around the entire edge. At the widest section of each petal, you may need to place two single crochet stitches into one stitch so the border follows the curve without pulling.
For an even stronger outline, work a second round using reverse single crochet, sometimes called crab stitch. This stitch is made from left to right instead of right to left and produces a twisted cord-like edge. It gives the Beautiful crochet flower Pattern a professional appearance and helps the petals maintain their shape.
Before fastening off, lay the flower flat and check every petal. Adjust any areas where the border feels too tight or loose. Crochet tension can vary significantly between crocheters, so there is nothing wrong with adding or removing an occasional stitch to achieve a smoother final curve. The goal is a balanced flower that rests naturally without excessive curling.
Finishing the Orange Center, Leaves, and Final Assembly
The bright orange center provides a striking contrast against the purple petals. One simple technique is surface crochet. Insert the hook from the front of the flower into a stitch near the center, pull up the orange yarn from the back, and create a slip stitch. Continue working outward toward the petal using a series of surface slip stitches.
Create several orange lines radiating from the center. You can place one or two lines inside each petal depending on how bold you want the design to appear. Keep the spacing balanced. The orange stitches should look like decorative rays extending from the center rather than covering the lavender and purple sections completely.
Another method is embroidery with a yarn needle. Thread a long strand of orange yarn and make elongated straight stitches from the central ring outward. Because crochet fabric is flexible, avoid pulling these stitches too tightly. Gentle tension keeps the flower flat while still allowing the orange accents to remain clearly visible.
If you want to create the coordinating leaves, begin with green yarn. Chain approximately 12 to 16 stitches depending on the desired leaf size. Starting in the second chain from the hook, work single crochet, half double crochet, double crochet, several taller stitches, and then reverse the sequence as you approach the opposite end. Work around both sides of the foundation chain to form an oval leaf.
For a more realistic leaf, crochet a central ridge using surface slip stitches or embroider a line down the middle. A darker olive green can be used around the edge while a slightly lighter green is used inside. You can also crochet a long chain covered with slip stitches or single crochet to create a stem connecting several leaves.
Finish the Beautiful crochet flower Pattern by weaving in all yarn ends with a yarn needle. If the flower will be attached to another project, leave a few longer yarn tails for sewing. Lightly block the finished piece by shaping it on a flat surface and allowing it to dry in position. Avoid excessive heat, especially when working with acrylic yarn.
Frequently Asked Questions About the Beautiful Crochet Flower Pattern
Is the Beautiful crochet flower Pattern suitable for beginners?
The pattern is suitable for confident beginners who already understand basic chain stitches, single crochet, half double crochet, and double crochet. The most challenging part is keeping six petal sections evenly spaced, but stitch markers make this much easier.
What yarn is best for a crochet flower like this?
Cotton, cotton blend, and smooth acrylic yarn are all good choices. Cotton provides excellent stitch definition, while acrylic can create a softer and more flexible flower. Medium-weight yarn is especially practical for decorative crochet flowers.
What crochet hook size should I use?
A 4 mm to 5 mm crochet hook works well for many medium-weight yarns. Always check the yarn label and adjust the hook size according to your tension. A smaller hook creates firmer fabric, while a larger hook creates softer and more flexible stitches.
How can I make the flower larger?
Add additional shaping rounds to each petal. Increase stitches gradually near the widest part of each petal while keeping the edges separated. You may also use thicker yarn and a larger hook to create a significantly larger flower without changing the basic structure.
How do I keep crochet petals from curling?
Curling usually happens because there are not enough increases or because the tension is too tight. Add a few additional stitches in the curved sections, relax your tension, or use a slightly larger crochet hook.
Can I make the flower using only one color?
Yes. A single-color version can look elegant and modern, especially when textured stitches are included. However, using contrasting colors helps highlight the petal sections, raised stitches, outer border, and decorative center.
What does a puff stitch add to the pattern?
A puff stitch creates three-dimensional texture. It lifts part of the design above the surface and gives the petals more visual depth. Puff stitches are especially effective when worked in a slightly lighter or contrasting yarn.
Can this crochet flower be attached to a blanket?
Yes. The flower can be sewn onto a crochet blanket, quilted textile project, cushion cover, bag, or wall hanging. Use a strong yarn needle and attach the flower around the center and several points along the petals so it remains secure.
How can I make the border more defined?
Use a darker contrasting yarn and work one round of single crochet followed by one round of reverse single crochet. This combination creates a strong outline and helps emphasize the shape of every petal.
Can I wash the finished crochet flower?
Yes, but washing instructions depend on the yarn fiber. Cotton and many acrylic yarns can be gently washed, while specialty fibers may require hand washing. Always follow the care instructions supplied with your yarn.
How can I use the Beautiful crochet flower Pattern in other projects?
The flower can become a centerpiece for a cushion, handbag decoration, table ornament, wall panel, blanket appliqué, handmade gift topper, or decorative element for a larger crochet arrangement. You can also make several flowers in different sizes and combine them into a floral composition.
Why is counting stitches important in this pattern?
Correct stitch counting keeps the six petals balanced. If one petal receives more increases than another, the finished flower can look uneven. Using stitch markers and counting each petal section before moving to the next one helps maintain symmetry.
Conclusion
The Beautiful crochet flower Pattern is an excellent project for practicing color changes, petal shaping, basic crochet stitches, puff stitches, surface crochet, decorative edging, and simple leaf construction. By starting with a strong central ring and dividing the work evenly into six sections, you can gradually build rounded petals that remain balanced and visually consistent.
Throughout this tutorial, you learned the meaning of important crochet keys such as ch, sc, hdc, dc, sl st, and st, along with techniques for creating puff stitches and decorative surface details. Understanding these basic abbreviations makes it much easier to follow this pattern and many other crochet instructions.
The combination of lavender petals, dark purple outlines, bright orange center details, and green leaves creates a colorful handmade design, but the same structure can easily be adapted to different palettes. Try softer pastel colors for a delicate style, warm autumn shades for seasonal décor, or bold contrasting colors for a modern statement piece.
Most importantly, work slowly through the shaping rounds and pay attention to stitch placement. Small adjustments in the number of increases can help your flower stay flat and symmetrical. Once you understand the construction, the Beautiful crochet flower Pattern becomes easy to personalize and repeat in different sizes. I hope this guide helps you create a beautiful crochet flower while also improving your confidence with textured crochet techniques. If you make your own version, leave your sincere opinion about the pattern and share any suggestions you have for colors, stitch combinations, or future crochet projects. Your ideas can inspire new creative variations and help other crochet lovers discover even more ways to enjoy this beautiful handmade pattern.