
The Patchwork Doll with Flowers Pattern is a charming sewing project that combines traditional patchwork, appliqué, decorative lace, floral details, and soft country-inspired colors in a single handmade composition.
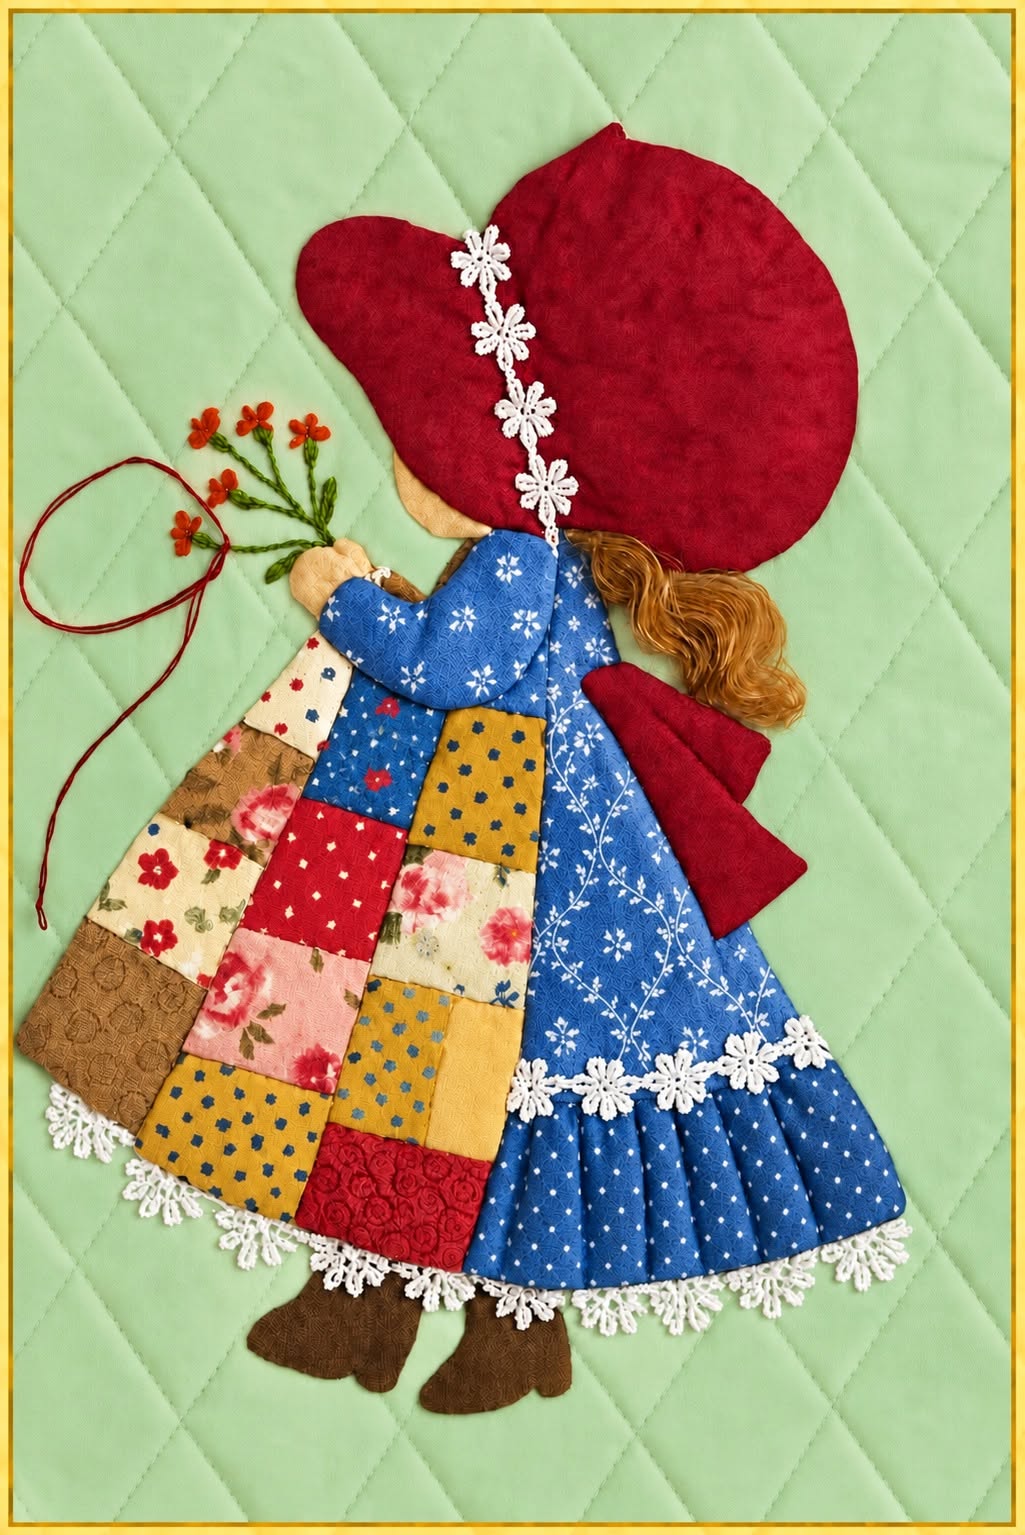
The design shown in the reference image features a sweet doll viewed from the side, wearing a large burgundy bonnet, a patchwork dress, brown shoes, and a delicate floral decoration.
One of the most attractive characteristics of this project is the combination of small fabric scraps in mustard yellow, green, burgundy, beige, brown, and floral prints.
Because several small pieces can be used to build the dress, this is also a creative way to transform leftover fabric into a decorative piece instead of letting useful scraps go to waste.
The finished doll can become part of a quilt, wall hanging, pillow cover, fabric panel, tote bag, table decoration, or another textile project.
Throughout this tutorial, you will learn how to plan, cut, assemble, appliqué, and decorate your own Patchwork Doll with Flowers Pattern from beginning to end.
Before cutting any fabric, take a few minutes to study the proportions of the doll and understand how the different layers overlap.
The bonnet is the largest upper element, while the dress forms a wide triangular silhouette that gives the character its recognizable vintage appearance.
The patchwork section occupies one side of the dress, while a larger green printed fabric creates the other side and continues toward the gathered lower portion.
Small details such as the arm, hand, hair, shoes, lace trim, bonnet flowers, and bouquet help transform a simple fabric silhouette into a more expressive piece.
For beginners, it is helpful to create paper templates for every major part so the arrangement can be tested before the fabrics are permanently attached.
This preparation makes the Patchwork Doll with Flowers Pattern easier to sew and helps maintain good proportions throughout the project.
Another advantage of this project is that the colors do not need to match the reference image exactly.
A burgundy bonnet and earthy patchwork fabrics create a warm country look, but the same pattern can be adapted with blue, pink, purple, pastel, Christmas, spring, or even modern monochromatic fabrics.
What matters most is creating enough contrast between the doll, clothing, accessories, and background so that every shape remains easy to recognize.
Small-scale cotton prints are particularly useful because their motifs remain visible even after the fabric has been cut into small patchwork squares.
The term Patchwork Doll with Flowers Pattern describes not only the doll silhouette but also the technique of assembling different fabrics into one coordinated decorative composition.
With careful cutting, simple stitching, and a few decorative finishing touches, this project can look detailed and sophisticated without requiring complicated construction.
Materials, Fabric Selection, and Preparing the Pattern
For the main materials, choose quilting cotton or another stable woven cotton that is easy to cut and press.
You will need several small fabric scraps for the patchwork dress, a larger green fabric for the second half of the skirt, burgundy fabric for the bonnet and bow, mustard fabric for the sleeve, brown fabric for the shoes, and a light neutral fabric for the face and hand. A small piece of tan or light brown yarn can be used for the hair. You may also use white lace trim, tiny decorative flowers, embroidery thread, fusible web, and a larger neutral fabric as the background.
DISCOVER MORE FREE PATTERNS HERE!
The fabrics do not need to be identical to the reference because personalization is part of the appeal of the Patchwork Doll with Flowers Pattern.
Try to select colors that work together while still creating visible contrast between neighboring pieces.
Begin by preparing a full-size paper pattern for the doll.
The pattern should include separate templates for the bonnet, face, hair area, sleeve, hand, dress, patchwork dress section, lower gathered skirt section, shoes, and bow.
If you are drawing the templates yourself, sketch the complete silhouette first and then divide it into individual appliqué shapes.
Add approximately 0.7 to 1 cm around pieces that will require a turned seam allowance, or cut directly on the finished line if you are using raw-edge fusible appliqué.
Write the name of each piece on the paper template and mark its correct orientation.
This simple organization prevents accidentally cutting mirrored pieces incorrectly.
The dress is one of the most important parts of the design because it creates much of the visual interest.
For the patchwork area, cut small squares or rectangles from coordinating fabrics and arrange them before sewing.
Pieces measuring approximately 3 to 5 cm can work well, although the exact dimensions should be adjusted to the final size of your doll.
Combine floral prints, dots, small geometric motifs, and solid fabrics to reproduce the handmade scrappy appearance of the reference.
Avoid placing two very similar colors directly beside one another unless you want a softer transition.
A balanced combination of light, medium, and dark values will make the Patchwork Doll with Flowers Pattern appear more dimensional.
For the second section of the dress, select one larger printed fabric that contrasts gently with the patchwork squares.
The green botanical fabric in the reference image works particularly well because it visually connects with the flower stems and natural theme.
If you prefer another palette, dusty blue, sage, mustard, burgundy, or soft brown can create equally attractive results.
The larger fabric area gives the eye a place to rest beside the more detailed patchwork section.
Press the fabric before cutting so the template remains accurate and the finished appliqué lies flat.
Always press rather than aggressively stretching the fabric with the iron.
The background should be large enough to comfortably contain the entire doll with extra space around the edges.
A cream or ivory background creates a warm vintage appearance and allows the darker garments to stand out clearly.
You can use plain cotton, linen-look fabric, or lightly textured quilting fabric depending on how the finished project will be displayed.
If the appliqué will become part of a pillow or quilt, leave additional fabric around the design for seam allowances and later construction.
Mark the approximate center of the background with a removable fabric marker or a gentle finger press.
This will help you position the Patchwork Doll with Flowers Pattern without accidentally placing it too close to one edge.
Finally, prepare your sewing tools before beginning assembly.
Useful items include sharp fabric scissors, small embroidery scissors, pins or fabric clips, a ruler, rotary cutter, cutting mat, iron, sewing machine, coordinating thread, hand-sewing needle, and removable fabric marker.
Fusible web is optional but extremely helpful when working with many small appliqué shapes.
It temporarily stabilizes the pieces and keeps them from shifting while stitching.
Test the fusible product on a scrap first and follow the manufacturer’s heat recommendations to avoid damaging the fabric.
Once all materials are organized, you are ready to begin constructing the main dress.
Sewing the Patchwork Dress and Building the Doll
Start the dress by arranging the small patchwork pieces on your work surface.
Experiment with different combinations until the colors appear balanced throughout the panel.
Sew the pieces together in short rows using an approximately 0.7 cm seam allowance, then join the rows to create a larger patchwork unit.
Press the seam allowances carefully, alternating directions when possible so intersections remain less bulky.
Once the panel is complete, place the dress template over it and cut the required shape.
This method creates an organic patchwork arrangement similar to the one seen in the Patchwork Doll with Flowers Pattern.
Next, cut the larger green section of the dress using its corresponding template.
Place it beside the patchwork panel and verify that both sections create the intended skirt silhouette.
Depending on your chosen appliqué technique, the sections can be joined with a regular seam first or positioned separately on the background.
A narrow decorative stitch along the meeting line can add definition while also securing the fabrics.
In the reference design, the contrast between the busy patchwork section and the botanical green panel gives the dress a beautiful handcrafted character.
Press the completed dress section gently before moving to the smaller components.
Create the lower gathered portion by cutting a strip of coordinating green fabric slightly wider than the finished area.
Sew a line of long machine stitches near the upper edge, leaving long thread tails at both ends.
Pull the bobbin threads gently to create small, even gathers until the strip fits the width of the lower skirt area.
Distribute the gathers evenly before attaching or appliquéing the strip into position.
This small amount of volume adds texture and makes the flat appliqué appear more dimensional.
If you prefer a completely flat Patchwork Doll with Flowers Pattern, you can replace the gathered piece with a simple shaped appliqué.
Now prepare the upper body details, including the sleeve and hand.
The sleeve can be cut from mustard or golden-yellow fabric, ideally with a delicate print that coordinates with the dress.
Position the hand so it extends naturally from the sleeve and appears to hold the small flower bouquet.
A light beige, tan, peach, or brown fabric can be used for the skin depending on your preferred representation of the doll.
If using turned-edge appliqué, press the seam allowance under before positioning the pieces.
For raw-edge appliqué, apply fusible web to the reverse side and cut the final shape precisely.
The shoes should be added near the bottom after the main dress position has been established.
Cut two simple shoe shapes from brown fabric and position them slightly apart beneath the hem.
In the reference image, their rounded shape contributes to the soft folk-art appearance of the doll.
Secure them with a small zigzag, blanket stitch, satin stitch, or hand appliqué stitch.
Using a thread that closely matches the brown fabric will create a subtle finish, while contrasting thread will make the outline more decorative.
Make sure part of each shoe remains tucked visually beneath the skirt so the layering looks natural.
Before attaching the bonnet, place all major pieces on the background and evaluate the complete composition.
The dress should be centered comfortably, while the bonnet should overlap the upper body and face area.
Check the angle of the sleeve, hand, shoes, and bow before permanently securing anything.
Take a quick photograph of the arrangement if necessary so you can recreate the placement after removing pieces for pressing or fusing.
Working from the lower layers toward the upper layers will prevent visible overlaps from appearing incorrect.
This layering process is one of the keys to achieving a polished Patchwork Doll with Flowers Pattern.
Creating the Bonnet, Hair, Flowers, and Decorative Details
The large bonnet is the focal point of the upper half of the doll.
Cut it from burgundy, wine red, deep rose, or another rich coordinating fabric.
The bonnet should have a broad rounded crown and a projecting brim that partially covers the face.
Use the reference silhouette as inspiration, but do not worry about making every curve perfectly symmetrical because the handmade appearance is part of its charm.
Position the bonnet so it overlaps the face slightly and sits naturally above the dress.
Secure the edge using your preferred appliqué technique.
Add the hair after determining where it should emerge beneath the bonnet.
A small bundle of light brown, golden, or tan yarn can recreate the soft hair texture seen in the original design.
Cut several equal lengths, align them at one end, and secure them beneath the bonnet edge using hand stitches.
Allow the yarn to fall naturally toward the back of the doll.
You can gently wave or separate the strands with your fingers for a fuller appearance.
Keep the quantity moderate so the hair does not overwhelm the fabric details.
The burgundy bow at the back is another small feature that contributes significantly to the silhouette.
You can create it from two appliqué loops and two tails or sew a tiny three-dimensional fabric bow separately.
Place it beneath the hair near the upper section of the dress so it appears to belong to the bonnet.
If you choose dimensional construction, hand stitch the center securely to prevent the bow from loosening.
A matching burgundy fabric visually connects this detail with the bonnet.
This repeated color helps unify the overall Patchwork Doll with Flowers Pattern.
To decorate the bonnet, add a narrow line of small white flowers following the edge between the brim and crown.
Ready-made floral lace can be used, or individual small lace motifs can be stitched into place one at a time.
Another option is to embroider tiny daisy-like flowers directly onto the fabric using white embroidery floss.
Keep the spacing reasonably consistent but not overly rigid so the decoration retains a handmade character.
Small hand stitches are usually less visible than machine stitches when attaching delicate lace.
Secure the ends carefully on the reverse side of the project.
The bouquet can be made with embroidery, miniature fabric flowers, or a combination of both.
Create several slender green stems extending outward from the doll’s hand and add tiny red, coral, orange, or burgundy blossoms at their tips.
Straight stitches work well for stems, while lazy daisy stitches, French knots, or small fabric petals can form the flowers.
Vary the stem lengths slightly so the bouquet appears natural rather than perfectly symmetrical.
The flowers are especially important because they reinforce the “with Flowers” element of the Patchwork Doll with Flowers Pattern.
They also introduce another delicate point of interest away from the large bonnet and dress.
Finish the skirt with white floral lace along the hem and, if desired, across part of the green fabric panel.
Pin the lace into position first to make sure it follows the skirt curve smoothly.
Hand stitching gives excellent control around gathered areas, although careful machine stitching is also possible.
Use small stitches and white or cream thread so the attachment remains discreet.
The white trim creates contrast against the earthy fabrics and connects visually with the white floral decoration on the bonnet.
At this stage, the doll should already resemble the finished reference closely.
Final Appliqué, Finishing Techniques, and Creative Variations
Once every component has been positioned correctly, secure all remaining appliqué edges.
A narrow blanket stitch is a popular choice because it provides both reinforcement and a decorative handmade outline.
A small zigzag stitch works well for machine appliqué, while an invisible hand stitch creates a softer traditional result.
If your fabrics fray easily, reduce the stitch length or use fusible web beneath the pieces.
Work slowly around curves such as the bonnet, shoes, sleeve, and dress edges.
Consistent stitching will make the finished Patchwork Doll with Flowers Pattern appear clean and professionally assembled.
After stitching, inspect the design for loose threads or unsecured corners.
Trim thread tails carefully rather than pulling them, as pulling can distort small appliqué pieces.
Press the project from the reverse side using a pressing cloth, especially if lace, yarn hair, or dimensional embellishments have already been attached.
Avoid pressing directly over delicate flowers because excessive heat may flatten or damage them.
The final pressing should smooth the background without removing the attractive dimension created by the gathers and decorative trims.
Allow the project to cool flat before moving it.
If you plan to turn the appliqué into a wall hanging, add batting and backing fabric behind the completed top.
Simple quilting around the silhouette can make the doll stand out from the background and add gentle texture.
You can echo the doll shape with quilting lines or use a subtle free-motion pattern in the negative space.
For a pillow cover, trim the completed panel to the desired size and add an envelope or zipper closure.
For a quilt block, square the background carefully before joining it to neighboring blocks.
The Patchwork Doll with Flowers Pattern is flexible enough to work in many types of sewing projects.
Color customization can completely change the personality of the design.
For a spring version, try pastel pink, sage green, cream, and lavender fabrics with tiny floral prints.
For an autumn version, combine burnt orange, mustard, olive, burgundy, and warm brown.
A Christmas-inspired version could use deep red, forest green, cream, and subtle gold accents.
You could even create several dolls using different palettes and arrange them together in a larger quilt.
Maintaining the basic silhouette while changing fabrics allows every version to feel unique.
You can also personalize the decorative details.
Instead of lace flowers around the bonnet, consider embroidery, tiny buttons, fabric yo-yos, or miniature appliqué blossoms.
The bouquet may feature embroidered daisies, lavender stems, tulips, or wildflowers.
Hair can be made from yarn, embroidery floss, narrow fabric strips, or simply represented with a fabric appliqué shape.
If the project will be washed frequently, keep embellishments securely stitched and avoid elements that may not tolerate laundering.
Decorative choices should always support both appearance and practical use.
The best results come from working patiently rather than trying to finish every detail quickly.
Patchwork and appliqué projects reward careful cutting, thoughtful fabric placement, accurate pressing, and consistent stitching.
Small irregularities often add personality, so handmade work does not need to look mechanically perfect.
What matters is that the pieces are securely attached and the overall composition feels balanced.
By combining traditional patchwork with appliqué, lace, embroidery, and dimensional details, the Patchwork Doll with Flowers Pattern becomes much more than a simple fabric silhouette.
It becomes a decorative textile piece that reflects the maker’s own colors, materials, and creative style.
FAQ – Frequently Asked Questions About the Patchwork Doll with Flowers Pattern
What is a Patchwork Doll with Flowers Pattern?
A Patchwork Doll with Flowers Pattern is a sewing and appliqué design in which a decorative doll is created using multiple fabric pieces, often including a patchwork dress, bonnet, shoes, floral details, and additional embellishments. The individual shapes are layered and stitched onto a fabric background to form the finished character.
Is this project suitable for beginners?
Yes. Beginners can successfully make this project by simplifying some of the details. Using fusible web and machine appliqué is particularly helpful for anyone who is still developing hand-appliqué skills. Starting with larger templates and fewer patchwork squares can also make the construction easier.
What fabric is best for making the doll?
Quilting cotton is an excellent choice because it is stable, widely available, easy to press, and available in countless colors and small-scale prints. Cotton fabric scraps are especially suitable for the patchwork dress because only small pieces are required.
How large should the patchwork squares be?
There is no mandatory size because the squares should be proportional to your finished doll. Pieces around 3 to 5 cm can be a practical starting point for a medium-size decorative appliqué. Smaller dolls may require smaller pieces, while larger wall hangings can use larger squares.
Do I need a sewing machine to complete this project?
No. The complete Patchwork Doll with Flowers Pattern can be sewn by hand using traditional appliqué techniques. However, a sewing machine can make the patchwork assembly and edge finishing considerably faster.
Can fusible web be used instead of turned-edge appliqué?
Yes. Fusible web is one of the easiest ways to stabilize small shapes before machine stitching. It is particularly convenient for the bonnet, sleeve, shoes, bow, and individual dress sections. Always test the product on scrap fabric before applying it to your final pieces.
How can I keep small appliqué pieces from fraying?
You can use fusible web, a close zigzag stitch, satin stitch, blanket stitch, or traditional turned-edge appliqué. The best method depends on the final appearance you prefer. For decorative wall pieces that will not be washed frequently, raw-edge appliqué can also develop a charming handmade texture over time.
Can I change the colors shown in the original design?
Absolutely. The pattern can be adapted to virtually any color palette. The most important consideration is contrast. Make sure the bonnet, skin, hair, dress, and background remain visually distinct so the silhouette is easy to understand.
What can I make with the finished doll appliqué?
The finished design can be used for a wall hanging, cushion, quilt block, fabric panel, decorative bag, sewing-room decoration, table runner, or other textile project. Before beginning, decide how you plan to use the appliqué so you can prepare a background large enough for the final construction.
How do I make the flower bouquet look realistic?
Use several stems of slightly different lengths and angles rather than making them identical. Add small blossoms with embroidery stitches or fabric flowers and include a few green leaves. Keeping the bouquet delicate helps it complement rather than overpower the doll.
Should the lace be attached before or after the appliqué?
It depends on the location. Lace that needs to disappear beneath another fabric layer should be positioned before that upper layer is stitched. Decorative lace sitting completely on top of the finished dress or bonnet can usually be attached later. Planning the layering order before sewing prevents unnecessary unpicking.
How can I make my Patchwork Doll with Flowers Pattern look more professional?
Press fabrics before cutting, use accurate templates, test the complete arrangement before stitching, maintain consistent seam allowances, trim loose threads, and take extra care around curves. Small finishing details such as coordinated thread, neat lace placement, and balanced patchwork colors can make a significant difference.
Conclusion
The Patchwork Doll with Flowers Pattern brings together several enjoyable textile techniques in one creative project: patchwork piecing, appliqué, fabric layering, gathering, lace embellishment, embroidery, and decorative finishing. By beginning with accurate templates, choosing coordinating fabrics, constructing the patchwork dress carefully, and building the doll from the lower layers upward, you can create a beautiful design inspired by the charming handmade piece shown in the reference image.
Throughout this tutorial, you learned how to select fabrics, prepare the pattern pieces, assemble small patchwork squares, create the contrasting skirt panel, add a gathered section, construct the bonnet and bow, position the hair and shoes, make a floral bouquet, apply lace, and finish the edges neatly. These same techniques can also be adapted to many other quilt and appliqué projects, making this an excellent design for practicing several useful sewing skills at once.
EASILY FIND THE PDF FOR THIS PATTERN HERE!
The most enjoyable part of making a Patchwork Doll with Flowers Pattern is the freedom to personalize it. Change the fabrics, experiment with seasonal colors, create different flower arrangements, adjust the hair, or add your own embroidery details. Each small creative decision can make your finished doll completely different from another maker’s version while preserving the recognizable character of the original design. If you make your own version of this project, leave your sincere opinion about the pattern and share your suggestions. Which colors would you choose for the bonnet and patchwork dress? Your ideas and creative variations can inspire even more beautiful versions of this timeless patchwork doll.