
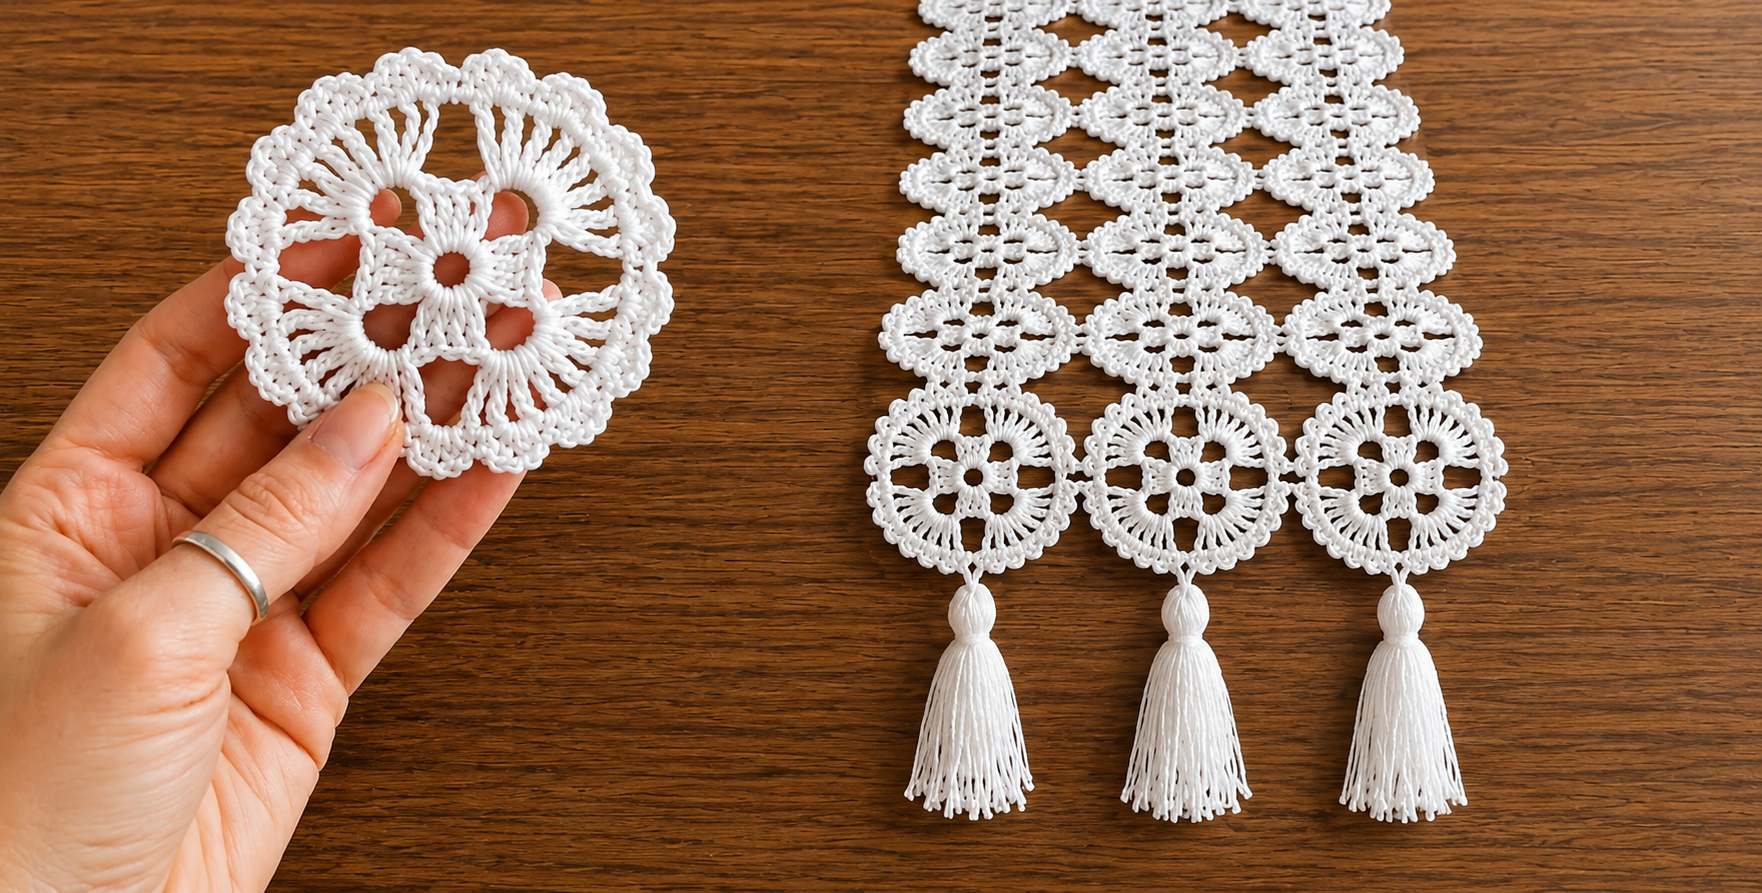
Crochet Tablecloth Pattern is a beautiful way to transform simple crochet stitches into an elegant decorative piece for a dining table, side table, console, or special handmade home décor project. This design is based on repeating circular floral motifs connected together to create a delicate openwork fabric with a traditional lace appearance. One of the most attractive features of this type of crochet tablecloth is that the final dimensions can easily be customized: you simply crochet additional motifs and join them until the piece reaches the width and length you want. The combination of flower centers, chain spaces, tall stitches, decorative arches, and scalloped borders creates a lightweight design that looks detailed without requiring excessively complicated techniques. For crocheters who already understand basic stitches such as chains, single crochet, and double crochet, this project can also be an enjoyable introduction to crochet motif joining and lace construction.
Another important advantage of this Crochet Tablecloth Pattern is its versatility. A narrow arrangement of motifs can become a table runner, while a larger rectangular arrangement can cover an entire dining table. The same floral units may also be adapted for placemats, decorative panels, dresser scarves, or matching coasters. Instead of creating one enormous piece in continuous rows, the project is built gradually from individual motifs, making it easier to carry and work on during short crochet sessions. Each motif can be completed separately, blocked into shape, and joined later, or it can be connected to neighboring motifs during the final round. The open spaces between the stitches give the project its characteristic lace effect while also helping the fabric remain flexible and visually light. Choosing a smooth cotton thread or fine cotton yarn will make the floral details especially visible.
Before beginning the project, take time to understand the crochet stitch key, because consistent stitch tension is especially important in lace-style work. The abbreviations used throughout this tutorial follow common U.S. crochet terminology: ch = chain, sl st = slip stitch, sc = single crochet, hdc = half double crochet, dc = double crochet, tr = treble crochet, sp = space, st = stitch, sk = skip, rep = repeat, and picot = a small decorative loop normally made with chains and a slip stitch. You will also see instructions written inside brackets, such as [dc, ch 2, dc], which means all stitches inside the brackets are worked into the same indicated space unless stated otherwise. Reading the complete round before crocheting it will make the pattern much easier to follow and will reduce the possibility of missing a chain space or repeat.
1. Materials, Crochet Key, Gauge, and Preparation
For a refined Crochet Tablecloth Pattern, mercerized cotton crochet thread or lightweight cotton yarn is an excellent choice because it produces crisp stitches and clearly defined floral details. Depending on the size of the finished project, approximately 800 to 2,500 meters of thread may be required, although a small runner will use significantly less. Choose white or cream for a traditional lace appearance, or use soft neutrals and modern colors for a contemporary interpretation. You will also need an appropriately sized crochet hook, scissors, a yarn needle, measuring tape, rust-resistant blocking pins, and a blocking surface large enough to shape several motifs at once.
DISCOVER MORE FREE PATTERNS HERE!
A practical starting combination is crochet cotton suitable for a 1.75 mm to 2.5 mm hook, although the ideal hook size depends on the thread chosen and your personal tension. The goal is not to make extremely tight stitches. Instead, aim for even stitches that allow the circular motif to lie flat without becoming stiff. Crochet one test motif before committing to the full tablecloth. After blocking, a sample floral motif may measure approximately 9 to 12 cm across, but this dimension can vary. Measure your own motif rather than relying exclusively on the suggested size because even small gauge differences become significant when dozens of motifs are connected.
The essential crochet key for this pattern is straightforward. Ch creates the foundation loops and spaces throughout the lace. Sl st joins rounds and closes decorative picots. Sc creates firm connecting points. Dc forms most of the flower petals and surrounding fans. Tr may be used when additional height is needed in decorative sections. When the pattern says repeat from *, return to the previous asterisk and crochet the same sequence around the motif. These abbreviations make written crochet instructions much shorter while preserving the exact order of stitches.
To estimate the finished dimensions, first measure your table. For a decorative runner, allowing approximately 15 to 25 cm of uncovered tabletop on each side usually creates a balanced look. For a tablecloth with an overhang, decide how far you want the lace to extend beyond the table edge and add that measurement twice to both the table width and length. Next, divide these measurements by the blocked width of one motif. This calculation provides an approximate number of motifs needed in each direction.
Thread preparation can also affect the appearance of the finished crochet lace. If your cotton arrives tightly wound, allow it to relax before beginning. Avoid combining different dye lots when using colored yarn because small variations may become obvious across a large tablecloth. If you plan to wash the finished piece regularly, select washable cotton and follow the yarn manufacturer’s care instructions. A durable, washable fiber is particularly useful for handmade table linens, which may occasionally be exposed to food, drinks, or repeated laundering.
Finally, make a small project plan before crocheting dozens of motifs. Draw a simple grid showing the number of motifs planned across the width and length. For example, a small runner might use three motifs across and twelve motifs long, while a larger tablecloth could require substantially more. Mark each completed unit on the grid as you work. This simple method keeps a large crochet lace tablecloth project organized and makes it easier to determine whether additional motifs are necessary.
2. Step-by-Step Floral Motif Crochet Pattern
Begin the center of the floral motif with a magic ring, or make ch 6 and join with a sl st in the first chain to create a ring. For Round 1, ch 3 to count as the first dc, work 15 dc into the center ring, and join with a sl st into the top of the beginning ch 3. You should have 16 stitch positions around the center. Keep the ring neat but do not pull it so tightly that the stitches become crowded. This circular foundation forms the small central flower around which the decorative lace will grow.
For Round 2, ch 1 and work 1 sc in the same stitch. Then ch 4, sk 1 dc, sc in the next dc. Repeat from * around the circle and finish with a sl st in the first sc. You should have eight chain loops. These loops establish evenly spaced sections for the first petals. If the motif begins to cup upward at this point, check that you have created all eight spaces and that your chains are not too tight.
For Round 3, slip stitch into the first ch-4 space. Into that same space work [sc, hdc, 5 dc, hdc, sc] to form one rounded petal. Repeat the same sequence in each ch-4 space around. Join with a sl st in the first sc. The motif should now resemble a small eight-petal flower. The group of taller double crochet stitches produces the curved top of each petal, while the shorter stitches on both sides create a smooth transition back toward the center.
For Round 4, work behind or between the completed petals to establish larger decorative loops. Ch 1, sc at the base between two petals, ch 7, sc between the next two petals. Repeat around and join with a sl st. Eight larger chain spaces should surround the flower. These open loops are important because they create the airy structure that distinguishes lace crochet patterns from more compact crochet fabric. Try to keep every chain loop approximately equal in size.
For Round 5, slip stitch into the first ch-7 space and work [sc, ch 3, 4 dc, ch 3, 4 dc, ch 3, sc] into the same space. Repeat this decorative fan in every ch-7 space around. The groups of double crochet stitches create broad lace sections, while the chain spaces provide room for the next round. Depending on your tension and preferred appearance, you may adjust a chain-3 section to chain 2 or chain 4 after testing the first motif, but make the same adjustment consistently throughout the entire project.
For Round 6, create the scalloped outer edge that will also provide joining points. Work sl sts until you reach the first chain space, then make [sc, ch 3, sl st in the first ch to form a picot, sc] in the chain space, ch 4, sc in the next available chain space or between fan sections. Continue evenly around the motif. The goal is to establish repeated arches and small picots around the circumference. Fasten off and weave in the yarn ends if this is a standalone motif. If you plan to use a join-as-you-go crochet technique, do not fasten off the motifs that need to connect during this final round.
3. Joining the Motifs and Building the Tablecloth
Once several floral units have been completed, place them on a flat surface and arrange them according to the grid planned earlier. All motifs should face the same direction, even when the pattern appears symmetrical, because consistent orientation usually produces cleaner joining lines. For a highly professional Crochet Tablecloth Pattern, block the individual motifs lightly before joining. Blocking makes the joining points easier to identify and prevents one slightly smaller motif from pulling neighboring motifs out of shape.
One straightforward joining method uses a yarn needle. Position two motifs with the wrong sides facing each other or side by side, depending on the seam appearance you prefer. Using matching cotton thread, sew through corresponding outer loops with a small whip stitch. Connect only the designated picots or chain spaces rather than sewing entire edges together. This preserves the lace openings and keeps the finished fabric flexible. Secure the thread carefully and weave the end through several nearby stitches.
A second method is the slip stitch join. Place two motifs next to each other, insert the hook through a picot or chain space on both motifs, yarn over, and pull the thread through all loops to form a slip stitch. Move to the next corresponding joining point with chains or slip stitches as required. This method creates a slightly more visible connection than sewing, but it is strong and convenient. Maintain relaxed tension so the seam does not become shorter than the outer edges of the motifs.
The join-as-you-go method is especially useful once you become comfortable with the motif structure. Crochet the first motif completely. When making the final round of the second motif, replace selected chain stitches with joining slip stitches into the matching picots of the first motif. For example, instead of making a complete ch-4 arch, crochet ch 2, sl st into the corresponding arch of the neighboring motif, then ch 2 before continuing. This integrates the motifs naturally without requiring a separate sewing stage.
When four motifs meet at one corner, avoid joining every possible loop into one bulky knot. Select one central joining point and connect the motifs symmetrically. You may work ch 1, sl st into the shared joining space, ch 1 as part of a small chain arch. The exact number of chains can be adjusted according to your tension, but all four-way intersections should be created consistently. Lay the work flat after completing each new row of motifs to confirm that the fabric is not puckering.
Continue adding motifs row by row until the tablecloth reaches the planned dimensions. After every two or three rows, place the crochet fabric on a table or large flat surface and inspect its alignment. This is much easier than discovering an incorrect join after an entire tablecloth has been assembled. If the project begins to lean or twist, identify whether one motif has been connected at the wrong joining point. Correcting a small section immediately will help maintain the straight rectangular shape of your crochet tablecloth.
4. Crochet Border, Tassels, Blocking, and Finishing
After all motifs are connected, a unified border helps transform the individual pieces into one finished textile. Attach the thread to any outer chain space with a slip stitch. For Border Round 1, ch 1 and work sc stitches evenly around the entire edge, placing approximately 2 to 4 sc stitches into larger chain spaces as necessary. At corners, work [sc, ch 2, sc] into the same corner space. The objective is to create a stable foundation without stretching or gathering the lace.
For Border Round 2, ch 3 to count as a dc, then create repeating open arches such as ch 3, sk an appropriate distance, sc in the next stitch or space, ch 3, sk, dc in the following joining point. Continue this rhythm around the tablecloth while maintaining symmetry. Because motif-based tablecloths can vary in size and stitch count, visually aligning the arches with the floral units is more important than forcing an arbitrary total stitch count.
For Border Round 3, add a decorative scallop by working [sc, 5 dc, sc] into alternating chain spaces. If you prefer a more delicate finish, use [sc, 3 dc, picot, 3 dc, sc] for each larger scallop. A picot can be made with ch 3, sl st into the first chain. Continue around the entire project, checking periodically that the border remains flat. If it begins to ripple, reduce the number of stitches. If it pulls inward, increase the chain spaces slightly.
Decorative tassels can be added to a narrow runner or selected ends of the tablecloth. Cut multiple strands of cotton approximately 18 to 22 cm long, depending on the desired finished tassel length. Fold the strands in half and secure them around a small central tie. Wrap another strand several times around the bundle approximately 1 to 2 cm below the folded top, tie securely, and trim the bottom evenly. Attach each tassel through a sturdy border chain space. Three evenly spaced tassels can provide an elegant finish to a narrow runner.
Blocking is one of the most important stages of a Crochet Tablecloth Pattern because it reveals the full lace structure. Follow the care recommendations for your chosen fiber. For washable cotton, gently wet the completed crochet piece and remove excess water without twisting it. Arrange the tablecloth on a blocking surface and gradually stretch it to the intended dimensions. Pin the corners first, followed by the sides, motif intersections, and decorative scallops. Allow the piece to dry completely before removing the pins.
For long-term care, fold or roll the tablecloth gently instead of keeping it under tension. Wash according to the requirements of the thread used and avoid harsh treatments that might weaken fine cotton fibers. If the lace needs reshaping after washing, repeat the blocking process. Proper care helps the openwork flowers, picots, scallops, and joined motifs maintain their definition, allowing your handmade crochet lace tablecloth to remain beautiful for many years.
Frequently Asked Questions About the Crochet Tablecloth Pattern
What yarn is best for a Crochet Tablecloth Pattern?
Mercerized cotton crochet thread is one of the most popular choices because it has good stitch definition, strength, and a slightly polished appearance. Fine cotton yarn can also be used when you want a larger and softer result. The most important factor is choosing a fiber that creates clearly defined stitches and can withstand appropriate washing.
How many motifs are needed for a crochet tablecloth?
The number depends on the dimensions of your table and the blocked size of each motif. Crochet and block one complete motif first. Measure its width, then divide the desired tablecloth width and length by that measurement. Remember that joining may slightly change the final dimensions, so creating one small joined sample can improve your estimate.
Can beginners make this crochet tablecloth?
A confident beginner who understands chain stitches, slip stitches, single crochet, double crochet, and working in the round can attempt the project. Creating one motif repeatedly is often less intimidating than working a large tablecloth in continuous rows. Practice the motif several times before starting the final assembly.
What does an asterisk mean in a crochet pattern?
An asterisk indicates a section of instructions that should be repeated. For example, ch 4, sk 1, sc in next st means you repeat everything following the asterisk for the number of times required by that round. Brackets usually group stitches that belong together, often in the same stitch or space.
What does [dc, ch 2, dc] mean?
The brackets show a grouped sequence. Unless the pattern specifies otherwise, work one double crochet, chain two, and another double crochet into the same indicated stitch or chain space. This type of combination is commonly used to form V-shaped lace elements and corners.
How do I keep crochet motifs flat?
Use consistent tension, count every repeat carefully, and avoid making chain stitches excessively tight. A motif that consistently cups may need slightly longer chain spaces, while a motif that ripples may contain too many stitches or overly loose chains. Blocking can correct small variations, but major distortion usually indicates a stitch-count or tension problem.
Should I block motifs before or after joining?
Both approaches are useful. Lightly blocking motifs before joining helps standardize their size and makes assembly easier. A complete final blocking after the tablecloth is assembled is still recommended because it aligns the joins, straightens the border, and opens the lace pattern evenly.
Can the motif be used for projects other than a tablecloth?
Yes. The same crochet floral motif can become a table runner, placemat, curtain panel, decorative scarf, pillow insert, wall hanging, or coaster arrangement. Simply adjust the number of joined motifs according to the dimensions of the desired project.
How can I make the tablecloth larger?
Add more motifs before completing the final border. This is one of the greatest advantages of a modular Crochet Tablecloth Pattern. Because the project is built from individual units, increasing its dimensions usually means adding another row or column of motifs rather than redesigning the entire pattern.
Why does my crochet tablecloth ripple after joining?
Rippling can occur when the motifs have inconsistent dimensions, when joining chains are too loose, or when too many stitches are added to the border. Compare several motifs before assembly and keep all joining points identical. During the border rounds, periodically spread the project on a flat surface and make adjustments before continuing.
Can I use different colors for the motifs?
Absolutely. A monochromatic white or cream tablecloth creates a classic lace appearance, while several coordinated colors can create a modern decorative effect. You could also make the flower centers one color and the outer lace another. When using multiple colors, weaving the ends securely becomes especially important.
How long does a crochet tablecloth take to make?
The time varies greatly according to the finished dimensions, thread thickness, complexity of the motifs, and crocheter’s experience. A runner might be completed relatively quickly, while a full dining-table-sized piece can become a long-term project. Completing the motifs in small batches often makes the work feel more manageable and enjoyable.
Conclusion
The Crochet Tablecloth Pattern presented here demonstrates how a relatively small floral motif can become a sophisticated piece of handmade home décor. By beginning with a circular center, creating petals with double crochet stitches, expanding the design with chain spaces, adding decorative picots and scallops, and finally joining multiple motifs, you can build a tablecloth in almost any size. Understanding the crochet key—especially ch, sl st, sc, hdc, dc, tr, sp, sk, rep, and picot—also makes the pattern easier to follow and gives you skills that can be applied to many other lace crochet projects.
The most important lessons are to crochet a test motif first, measure it after blocking, plan the number of motifs required, keep your tension consistent, and inspect the project frequently during assembly. Whether you create a small floral runner decorated with tassels or expand the same Crochet Tablecloth Pattern into an elegant full-size table covering, the modular construction makes the design flexible and customizable. Take your time with the finishing and blocking stages because these final details can dramatically improve the appearance of handmade lace. If you decide to make this pattern, leave your sincere opinion about the design and share any suggestions you would make to personalize it. It is always interesting to hear which colors, borders, motif arrangements, or finishing details other crochet lovers would choose for their own version of this Crochet Tablecloth Pattern.