
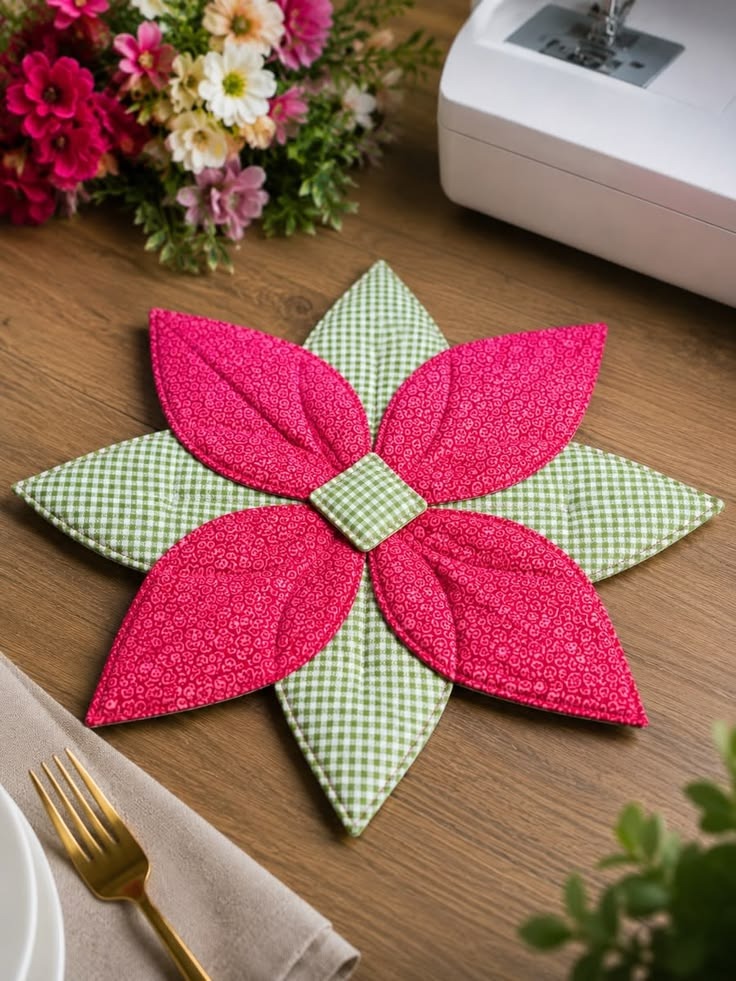
The Fabric Plant Pot Holder Pattern is a charming sewing project that combines decorative patchwork, practical fabric layering, and a beautiful flower-inspired shape. Based on the design shown in the photo, this project features several pointed fabric petals arranged in overlapping layers, creating a dimensional floral piece that can be placed beneath a decorative plant pot, vase, or lightweight container. The combination of bright pink floral fabric and green gingham gives the design a fresh handmade appearance, while the padded structure helps protect tables and shelves. It is also an excellent project for using small pieces of fabric left over from other sewing projects. Because each section is created separately before assembly, the pattern can be adapted to many color combinations, fabric styles, and decorating themes.
One of the greatest advantages of making a Fabric Plant Pot Holder Pattern is the opportunity to practice useful sewing techniques without working on an overly complicated project. You will learn how to cut symmetrical fabric shapes, create padded pieces, sew curved or pointed edges, turn fabric right side out, press accurately, and assemble multiple components into a balanced design. Beginners can use the project to improve basic machine-sewing skills, while more experienced sewists can experiment with quilting, decorative topstitching, appliqué techniques, and creative fabric combinations. The finished piece looks detailed and sophisticated, yet the construction process becomes surprisingly manageable when it is divided into small stages. Careful cutting and pressing are more important than advanced sewing skills.
Another reason this Fabric Plant Pot Holder Pattern works so well as a handmade home accessory is its versatility. Although its main purpose can be protecting a surface beneath a small indoor plant pot, the same design may also be used beneath a vase, decorative bowl, candle container, or centerpiece. When making an item intended for warm containers, always choose suitable heat-resistant materials and follow the recommendations provided by the batting manufacturer. For ordinary decorative plant pots, standard cotton batting or interfacing is normally sufficient to add structure. The flower design can be enlarged for bigger containers or reduced to create smaller decorative mats. Once you understand the basic construction method, it becomes easy to personalize the project and create coordinated sets for different rooms or seasons.
Choosing Fabrics and Preparing the Materials
For a project inspired by the photograph, begin with two coordinating cotton fabrics. A small floral print in pink, red, coral, or another strong color works beautifully for the upper petals, while a gingham, checkered, dotted, or subtle geometric print can provide contrast underneath. Quilting cotton is particularly suitable for a Fabric Plant Pot Holder Pattern because it is stable, easy to press, widely available, and simple to sew. Avoid extremely stretchy materials because they can distort while the pointed shapes are being assembled.
DISCOVER MORE FREE PATTERNS HERE!
You will need approximately 25 to 30 cm of each main fabric for a medium-sized flower, although the exact amount depends on the finished dimensions. Prepare lightweight or medium-weight batting as well. Cotton batting provides soft padding, while fusible fleece can create a slightly firmer result. You will also need coordinating sewing thread, fabric scissors or a rotary cutter, pins or sewing clips, a ruler, an iron, a sewing machine, and paper for creating the template.
The flower in the image appears to have two layers of elongated pointed pieces. To create a similar effect, prepare a leaf-shaped template approximately 18 cm long and about 9 cm wide at its widest point. These measurements can be adjusted according to the size of the plant pot you plan to use. Draw a smooth symmetrical shape with pointed ends. For easier construction, fold a piece of paper in half, draw one side of the leaf, and cut it while folded. When opened, the template will be perfectly symmetrical.
Trace the template onto your fabrics. A useful starting point is to make four bright floral petals and four contrasting green petals or leaves. For every finished component, cut two fabric pieces plus one slightly smaller piece of batting. Remember to include approximately 0.7 to 1 cm seam allowance around each shape unless your template already includes it. Accurate cutting is essential because all the pointed pieces will eventually meet near the center of the flower.
Before sewing, press all the fabric pieces carefully. Smooth fabric makes matching edges much easier and creates a cleaner finished project. If you use fusible interfacing or fusible fleece, attach it according to the manufacturer’s directions. Keep the interfacing slightly away from the seam allowance whenever possible. This helps reduce bulk along the outer edges and makes the points easier to turn neatly after sewing.
Fabric preparation also gives you an opportunity to experiment with the final arrangement. Lay the cut pieces on a flat surface before stitching anything permanently. Arrange the green sections as the lower flower layer and place the brighter floral pieces over them. Rotate and reposition the pieces until the colors look balanced. This simple preview can prevent mistakes later and allows you to visualize the completed Fabric Plant Pot Holder Pattern before assembly begins.
Sewing the Padded Petals and Leaf Sections
To make each padded section, place two matching fabric pieces with right sides facing each other. Position the batting against the wrong side of one fabric piece. Pin or clip the layers together carefully so they do not shift. Beginning along one side, sew around the entire shape using a consistent seam allowance, but leave an opening approximately 4 to 5 cm wide. This opening will allow the piece to be turned right side out.
When sewing around pointed areas, reduce your sewing speed as you approach the tip. Stop with the needle lowered into the fabric, lift the presser foot, rotate the piece, lower the presser foot again, and continue sewing. This technique creates a much sharper and more controlled point than trying to sew continuously around the corner. Repeat the process until every floral petal and green leaf section has been stitched.
Before turning the pieces, trim the seam allowances slightly and clip around curved sections where necessary. At the pointed ends, carefully trim excess fabric without cutting through the stitching. Removing bulk at the tip makes it easier to create a defined point. However, avoid cutting too close to the seam because the stitching may weaken when the piece is turned and pressed.
Turn every sewn piece right side out through the opening. Use a blunt turning tool, knitting needle, chopstick, or similar smooth object to gently push out the points. Never force a sharp object into the seam because it may pierce the fabric. Take time during this stage; carefully shaped points are one of the details that give the finished Fabric Plant Pot Holder Pattern its professional handmade appearance.
Fold the raw edges of the opening toward the inside and press the entire piece flat. The opening can be closed with a small hand stitch or secured when topstitching. Sew approximately 2 to 3 mm from the outer edge all the way around each section. This topstitching closes the opening, strengthens the shape, controls the batting, and gives the project the crisp outline visible in the photographed design.
For additional dimension, stitch a gentle line through the center of each petal. This line can begin near the base and stop before the pointed tip. The stitching slightly compresses the batting and gives the petal a folded or quilted appearance. You can use matching thread for a subtle finish or contrasting thread to emphasize the handmade detail. Repeat exactly the same method on all pieces so the finished flower remains visually balanced.
Assembling the Flower-Shaped Plant Pot Holder
Once all eight sections are complete, begin with the four contrasting green pieces. Arrange them like a four-pointed star, with their wider areas overlapping slightly in the center. Position one piece vertically, another horizontally, and adjust the remaining pieces so the spacing is even. The pointed ends should extend outward at approximately equal distances. Measure from the center to each outer point if necessary to confirm that the arrangement is symmetrical.
Pin the green sections temporarily and place the four floral petals over them. Rotate the upper petals so they fill the spaces between the green points, creating the layered flower appearance seen in the image. The lower green sections should remain visible between the brighter petals. This alternating arrangement creates depth and makes the Fabric Plant Pot Holder Pattern visually interesting even when a small pot is placed in the center.
When you are satisfied with the layout, carefully lift each upper section and secure the lower pieces together near the center. You can stitch a small square, circle, or cross through the overlapping area. Keep the permanent stitching concentrated near the middle so the outer portions remain slightly flexible. Check the shape again before adding the upper petals because correcting alignment becomes more difficult once several layers have been stitched together.
Add the colorful petals one at a time. Position their lower ends toward the center and secure them with a few strong stitches. Because several fabric and batting layers meet in this area, use a suitable sewing-machine needle and sew slowly. If your machine struggles with the thickness, a portion of the central assembly can be stitched by hand using strong thread. The goal is a secure center without unnecessary bulky stitching.
The photograph includes a small fabric-covered square in the middle of the flower. To recreate this feature, cut two squares approximately 5 to 6 cm across. Place them right sides together, add a small piece of batting, sew around the edges while leaving a turning opening, trim the corners, turn the piece, and press. Topstitch around the square before positioning it over the central seams. This small detail hides the construction stitches and gives the project a polished finish.
Place the padded square exactly over the middle of the flower and stitch it securely around the edges. Check the back of the piece to ensure that no loose threads remain. Press gently from the reverse side if necessary, taking care not to flatten all the dimensional quilting. Your flower-shaped Fabric Plant Pot Holder Pattern should now have a stable center, evenly spaced points, layered petals, and enough padding to provide a soft protective barrier beneath a decorative pot.
Finishing, Customizing, and Using the Fabric Plant Pot Holder Pattern
After assembly, inspect all seams and topstitching carefully. Trim loose threads and check that each petal is securely attached. If one section appears slightly higher or lower than another, minor adjustments can sometimes be made with a few discreet hand stitches near the center. Avoid stitching the entire overlapping area flat because part of the charm of this design comes from the dimensional layers and gently raised petal edges.
The finished size can vary considerably, but using petals approximately 18 cm long generally produces a flower suitable for many small or medium decorative containers. Before using your finished holder, place the intended plant pot over it and ensure that the base rests securely near the padded center. The fabric points should extend visibly beyond the pot, allowing the decorative flower shape to remain part of the display.
One practical advantage of the Fabric Plant Pot Holder Pattern is that you can adapt the batting according to its intended function. A thin layer creates a lightweight decorative mat, while medium batting provides additional protection for furniture. If moisture protection is important, remember that ordinary cotton fabric is not waterproof. A waterproof inner layer designed for sewing projects may be incorporated, but the plant should still be placed in a suitable saucer to prevent excess water from damaging furniture.
Color selection can completely transform the appearance of this project. Pink and green create a cheerful garden-inspired design like the one in the photo, but many other combinations work beautifully. Try red and cream for traditional décor, blue and white for a fresh look, orange and brown for autumn, or several pastel fabrics for spring. Scraps from coordinated fabric collections can also be combined to create a patchwork version.
The same construction method may be used to make coordinated gifts and home accessories. Several flower holders in different sizes can form a decorative table arrangement. Smaller versions can work as fabric coasters, while larger versions may be used as decorative center mats. Always make sure that the materials chosen are appropriate for the intended use, especially when heat, moisture, or heavy containers are involved.
Finally, record the dimensions that worked best for your finished project. Making a reusable paper or cardboard template saves time when you decide to sew another Fabric Plant Pot Holder Pattern. You can also write notes about batting thickness, seam allowance, fabric combinations, and final size directly on the template. These small records make future projects faster and help you develop your own customized version of the pattern.
Frequently Asked Questions About the Fabric Plant Pot Holder Pattern
What is a Fabric Plant Pot Holder Pattern?
A Fabric Plant Pot Holder Pattern is a sewing design used to create a padded or layered fabric mat that sits beneath a decorative plant pot. In this project, individual pointed sections are arranged to form a flower. In addition to protecting a surface from minor scratches, the holder adds color and handmade character to home décor.
Is this project suitable for beginners?
Yes. A beginner who is comfortable with basic straight stitching can complete this project. The most important skills are accurate cutting, maintaining an even seam allowance, turning sewn pieces carefully, pressing, and topstitching. Sewing the pointed ends slowly makes the process easier.
What fabric works best for this pattern?
Medium-weight quilting cotton is one of the easiest choices because it is stable and available in countless prints. Cotton blends may also work. Very stretchy, slippery, or extremely thick fabrics are more challenging because several layers meet at the center.
Do I need batting inside the petals?
Batting is strongly recommended because it creates the soft, dimensional appearance shown in the project and adds protection beneath the pot. Lightweight cotton batting, polyester batting, or fusible fleece can be used depending on how firm you want the finished piece to feel.
Can I wash a Fabric Plant Pot Holder?
That depends on the fabrics and batting selected. When all materials are washable, gentle hand washing or a delicate machine cycle may be suitable. Allow the piece to dry thoroughly and reshape the petals while damp. Prewashing cotton fabric before sewing can reduce unexpected shrinkage.
Can the pattern be made larger?
Absolutely. Enlarge the petal template proportionally to accommodate a larger plant pot. Make sure the finished center remains large and stable enough to support the base of the container. For a very large version, additional stitching through the center may be necessary.
How can I make the pointed ends look neat?
Trim excess seam allowance at the tips before turning, but do not cut into the stitching. Use a blunt turning tool to gently shape each point. Pressing and topstitching around the perimeter will also help keep the edges sharp and defined.
Can I use fabric scraps for this project?
Yes, and this is one of the best features of the Fabric Plant Pot Holder Pattern. Because each petal and leaf requires relatively small fabric pieces, the design is an excellent way to use quilting scraps. Coordinating scraps can produce a beautiful patchwork effect.
Does the fabric holder replace a waterproof plant saucer?
No. A fabric holder is primarily decorative and may offer some protection from scratches or very small amounts of moisture, but it should not replace a waterproof saucer. Always protect wooden or moisture-sensitive furniture appropriately when watering plants.
Can I use the same pattern as a hot pad?
Only if the project is constructed specifically for that purpose using appropriate heat-resistant batting, fabric, thread, and construction methods. Standard polyester batting or decorative interfacing may not be suitable for high temperatures. For a simple decorative plant pot holder, heat resistance is normally unnecessary.
How do I keep all the petals evenly spaced?
Arrange every piece before permanent stitching. Start by positioning the four lower sections like a cross or four-point star, then place the upper petals between them. Measuring from the center to each tip can help maintain symmetry. Pinning the entire arrangement before sewing is also useful.
What seam allowance should I use?
A seam allowance between approximately 0.7 cm and 1 cm works well for this type of project. The most important factor is consistency. Using the same seam allowance on every petal ensures that the pieces finish at similar sizes and fit together evenly.
Conclusion
Creating a Fabric Plant Pot Holder Pattern is a rewarding way to combine practical sewing with decorative fabric art. Throughout this project, you learned how to select coordinating quilting fabrics, prepare symmetrical templates, cut padded pieces, stitch and turn pointed shapes, add neat topstitching, arrange multiple layers, and secure the entire design with a decorative center square. These techniques are useful far beyond this single project and can be applied to many patchwork and handmade home décor ideas.
The flower-inspired structure makes the finished piece especially attractive because the contrasting lower leaves remain visible beneath the colorful upper petals. By changing the fabrics, dimensions, batting thickness, and quilting details, you can create a completely different Fabric Plant Pot Holder Pattern while still following the same basic construction process. It can be cheerful and colorful, subtle and neutral, seasonal, rustic, modern, or made entirely from leftover fabric scraps.
Most importantly, take your time during cutting, turning, pressing, and final assembly. Small improvements in accuracy during these stages can make a noticeable difference in the finished result. Handmade sewing projects do not need to look identical to one another, and those subtle variations are part of their character.
EASILY FIND THE PDF FOR THIS PATTERN HERE!
If you make this Fabric Plant Pot Holder Pattern, leave your sincere opinion about the project. Share which fabric combination you would choose, what you found easiest or most challenging, and any suggestions you have for creating a different version. Your ideas can inspire new color combinations, sizes, and creative ways to personalize this beautiful fabric flower project.