
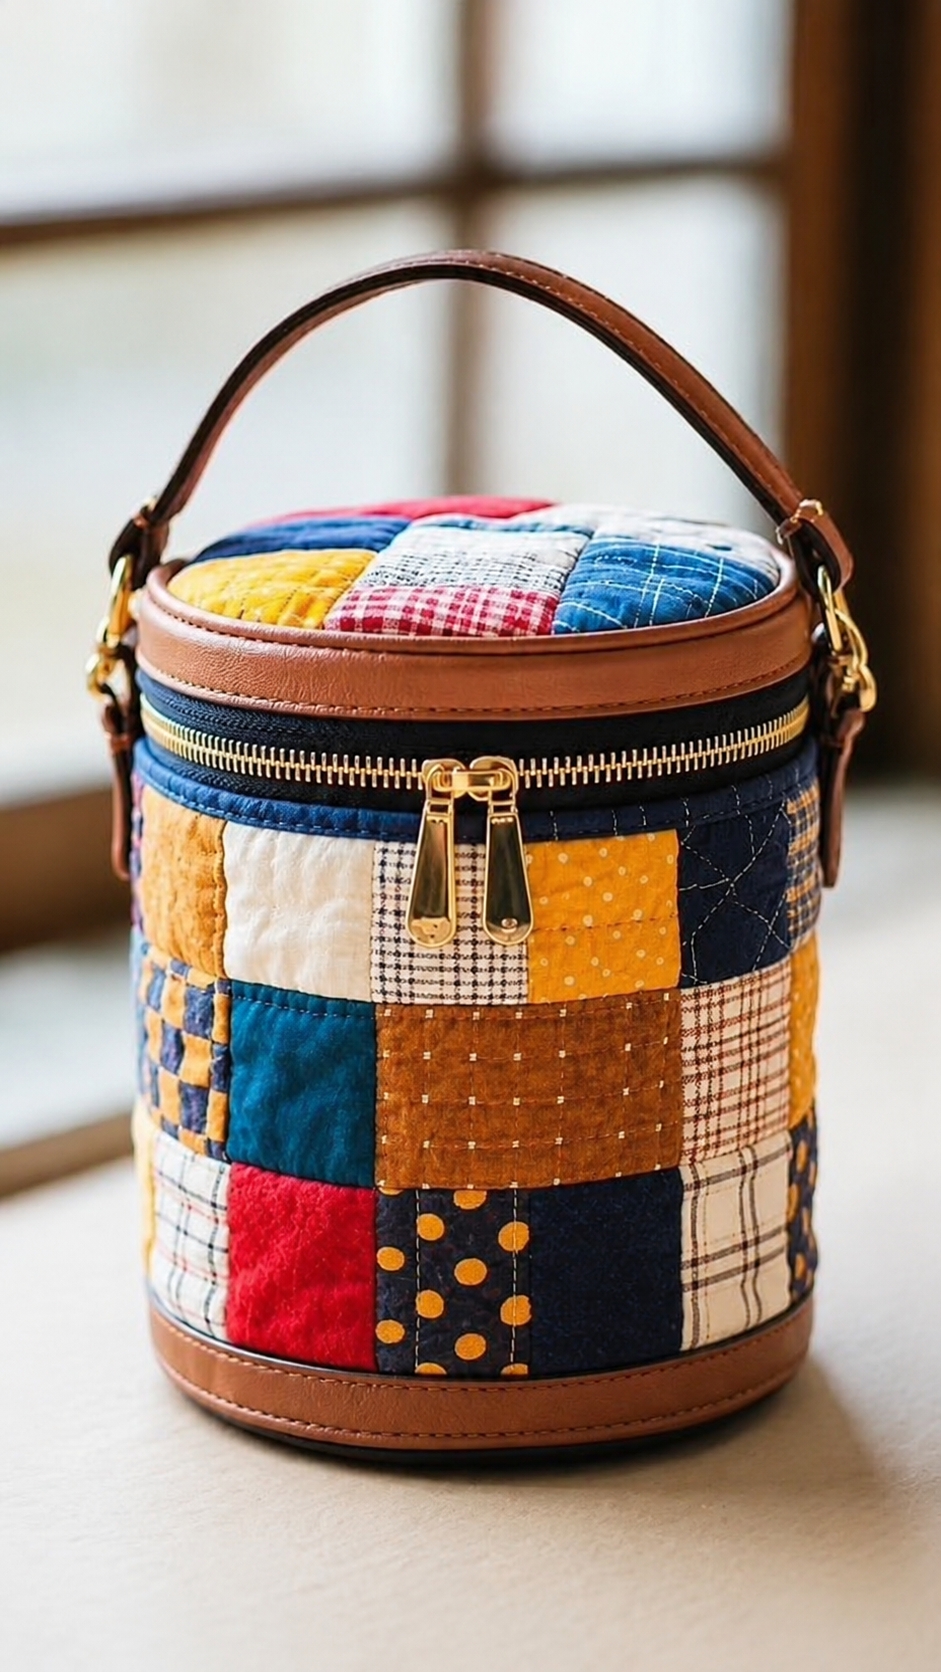
The Round Patchwork Bag Pattern is a beautiful way to combine traditional patchwork sewing with the practical construction of a structured, round-shaped bag. Inspired by the colorful bag shown in the photo, this project brings together small fabric squares, quilting, a sturdy zipper, circular top and bottom pieces, and contrasting handles for a polished handmade finish. One of the most appealing parts of this design is that no two bags need to look exactly the same because the patchwork arrangement can be created from favorite cotton prints, leftover quilting fabrics, or coordinated fabric collections. The cylindrical silhouette makes the finished piece useful for storing sewing accessories, cosmetics, craft supplies, small personal items, or even yarn and crochet tools. Although the result looks professionally constructed, the project becomes much easier when it is divided into logical sewing stages. For anyone who enjoys quilting and bag making, this pattern offers a satisfying opportunity to practice both skills in a single project.
A Round Patchwork Bag Pattern refers to a sewing pattern in which the main body of the bag is created in a rounded or cylindrical shape, often using several pieces of fabric joined together as patchwork. In this particular style, small squares and rectangles become the decorative exterior while batting and lining provide softness, protection, and structure. The circular top gives the bag its recognizable rounded appearance, while the zipper allows the entire upper section to open conveniently. Decorative topstitching, quilted lines, and carefully coordinated colors add texture and make the handmade construction an important part of the design rather than something that needs to be hidden. Brown faux-leather or fabric handles can provide an elegant contrast against the colorful cotton patchwork. The finished project combines the charm of a handmade quilt with the usefulness of a compact storage bag.
Before beginning the Round Patchwork Bag Pattern, it is helpful to think about the final size, color palette, and intended use of the bag. A practical medium-size version can be approximately 22 to 25 cm in diameter and 24 to 28 cm high, although the measurements can easily be adjusted. Choose quilting cotton for the exterior because it is easy to piece, press, and quilt, and select a medium-weight batting or stabilizer to help the cylinder maintain its shape. The lining can be made from cotton, canvas, or another washable fabric depending on how the bag will be used. A strong zipper should be long enough to travel comfortably around the upper circumference, and handles can be made from faux leather, webbing, or reinforced fabric. Preparing all materials before cutting makes construction smoother and helps prevent measurement problems later.
Materials, Measurements, and Fabric Preparation
The first step in making a Round Patchwork Bag Pattern is gathering the materials. You will need several quilting cotton fabrics in coordinating colors, approximately 50 to 70 cm of lining fabric, batting or fusible fleece, a zipper, thread, binding or trim, and material for the handles. Small fabric scraps are especially useful for this project because the exterior is divided into many individual patchwork sections. Rotary cutting tools, a quilting ruler, clips or pins, a sewing machine, and an iron will also make the process more accurate. If you want the bag to resemble the photo, choose a warm combination of navy blue, mustard yellow, red, cream, brown, and turquoise fabrics.
DISCOVER MORE FREE PATTERNS HERE!
For the patchwork body, cut squares measuring approximately 7 x 7 cm, including seam allowances. The exact number depends on the desired circumference and height of the finished bag, but preparing around 24 to 30 squares usually provides enough variety for a medium-size version. You can also include rectangles or slightly larger blocks if you prefer a less uniform patchwork arrangement. A 0.7 to 1 cm seam allowance is suitable for most bag construction. The important point is to keep the seam allowance consistent throughout the patchwork section.
Arrange the fabric squares on a flat surface before sewing. Alternate strong colors with neutral fabrics so that the design feels balanced instead of having several dark or bright blocks concentrated in one area. Plaids, dots, tiny florals, geometric prints, and solid colors can all work beautifully together. The photo demonstrates how mixed prints can still look coordinated when similar colors appear throughout the design. Take a picture of your final layout before sewing so you can easily remember the arrangement.
Begin joining the squares into horizontal rows using a straight stitch. Press each seam carefully, alternating the direction of the seam allowances from one row to the next. This makes it easier to match intersections when the rows are sewn together. Join the completed rows until you have a large rectangular patchwork panel. Measure the panel frequently so that the final width corresponds to the circumference required for your chosen bag diameter.
Once the patchwork panel is complete, place it over batting and a lightweight backing fabric. The batting should extend slightly beyond the patchwork edges because quilting can cause minor shrinkage. Secure the three layers with pins or temporary basting and quilt through them using straight lines, diagonal lines, or decorative stitching. Quilting helps stabilize the small pieces and gives the Round Patchwork Bag Pattern the softly padded appearance visible in the reference image.
After quilting, trim the panel so that the edges are straight and square. At this stage, measure the finished width and use it to confirm the required diameter of your circular pieces. The relationship between the circumference and diameter is important because the bottom and top need to fit the body without excessive gathering. Small adjustments can be made before the cylinder is assembled, which is much easier than trying to correct the dimensions after the bag has been sewn.
Constructing the Quilted Round Bag Body
With the exterior patchwork panel completed, the next stage of the Round Patchwork Bag Pattern is shaping it into a cylinder. Bring the two short ends of the panel together with right sides facing and sew them securely. Press the seam open or to one side according to the thickness of your batting. Turn the piece right side out and check that the cylinder sits evenly. If the body twists or looks uneven, correct the seam before continuing.
Create a lining cylinder using the same general measurements as the patchwork exterior. The lining does not normally require batting, although a lightweight interfacing can be used if additional structure is desired. Sew the side seam, leaving an opening of approximately 10 to 12 cm if you plan to turn the entire bag through the lining later. Press the lining seam carefully. Keeping the lining smooth is important because excess fabric can bunch inside a small round bag.
To create the bottom, draw or cut a circle that matches the finished diameter of the cylinder, adding the required seam allowance around the edge. Cut one exterior circle, one batting circle, and one lining circle. Quilt the exterior bottom circle in the same way as the body so the textures coordinate. You can use a single fabric for the bottom or continue the patchwork theme with several joined scraps. A darker fabric is often practical because the base receives more wear.
Pin or clip the quilted bottom circle to the lower edge of the patchwork cylinder with right sides facing. Divide both pieces into quarters and match the quarter marks before clipping the remaining sections. This technique distributes the fabric evenly around the curve. Sew slowly around the circumference, stopping occasionally to make sure there are no pleats. Curved seams are easier to manage when you avoid pulling the fabric while sewing.
Attach the lining bottom to the lining cylinder using the same quarter-marking method. Before moving forward, place the lining inside the exterior temporarily to check that the dimensions are compatible. The lining should fit smoothly without stretching the outer bag or creating large folds. Minor differences can be corrected by slightly increasing or decreasing the lining seam allowance. Accurate lining construction is one of the details that gives a handmade bag a professional finish.
A narrow reinforcing strip can be added around the bottom edge as a decorative feature. The photographed bag uses a brown band that visually frames the patchwork and coordinates with the handles. This effect can be recreated with faux leather, vinyl, canvas, or reinforced cotton fabric. Stitch the strip evenly around the bottom using a longer topstitching stitch. Besides improving the appearance, this additional layer can protect the lower portion of the bag from everyday wear.
Making the Round Zippered Top and Handles
The upper section is one of the most distinctive elements of the Round Patchwork Bag Pattern. Begin by preparing another circular patchwork panel for the lid. You can make this by sewing several fabric strips, rectangles, or squares together before cutting the final circle. Layer the patchwork with batting and backing fabric, then quilt it just as you did with the main body. Cut the finished circle to exactly match the upper diameter of the bag.
The zipper area can be made with two fabric or faux-leather strips that form a band around the top of the cylinder. Choose a zipper long enough to open a large portion of the circumference so that the contents of the bag are easy to reach. Sew one side of the zipper to the upper band and the opposite side to the corresponding band or lid section. Use a zipper foot to maintain an even stitching distance. Topstitching along both zipper edges keeps the fabric away from the zipper teeth.
When using a zipper around a curved bag, flexibility is extremely important. Avoid extremely stiff zipper tape unless the bag is large enough to accommodate it easily. Clip the zipper in position gradually rather than forcing it around the curve all at once. Check that both zipper sliders meet correctly if you are using a double-pull zipper similar to the one in the photo. Open and close the zipper several times before completing the final assembly.
Next, attach the completed round lid to the zipper band. Match quarter points around both pieces and sew slowly around the circle. The seam can be finished with binding on the inside to hide raw edges. Fabric binding gives the inside a neat appearance and can also strengthen the seam. If the layers are bulky, lengthen the stitch slightly and use a suitable sewing machine needle for multiple fabric layers.
Handles can dramatically change the final appearance of the Round Patchwork Bag Pattern. Faux-leather handles create the elegant contrast seen in the reference photo, but quilted fabric handles are an excellent alternative. For fabric handles, cut strips approximately 4 to 5 cm wide and long enough to create the desired carrying loop. Reinforce them with interfacing, fold the raw edges inward, and topstitch along both sides. Strong handle construction is especially important if the bag will carry heavier craft materials.
Attach the handle tabs securely to opposite sides of the bag near the zipper. Reinforce the attachment area with additional stitching because these points receive considerable tension during use. Metal rings, swivel hooks, or rectangular rings can be included if you enjoy working with bag hardware. If you prefer a completely fabric-based project, sew the handle directly to reinforced tabs instead. Whatever method you choose, make sure the handle is centered so the round bag remains balanced when lifted.
Finishing, Quilting Details, and Professional Sewing Tips
Once the structural components are assembled, concentrate on the small finishing details that make the Round Patchwork Bag Pattern look polished. Trim loose threads, check the zipper ends, and inspect every seam for small openings. Carefully press fabric areas where possible, but avoid applying a hot iron directly to vinyl or faux leather. A clean finish is especially noticeable on compact bags because the eye naturally focuses on the many small construction details.
Decorative topstitching is an effective way to emphasize the rounded shape. Use a slightly longer stitch around the zipper band, handle tabs, and bottom reinforcement strip. Thread can match the fabric for a subtle effect or contrast with the material for a handmade decorative appearance. The photo shows how visible stitching can enhance the quilted character of the design. Always test the stitch length on scraps before topstitching the finished bag.
The patchwork itself can also be personalized through quilting. Straight vertical lines provide a clean modern appearance, while diagonal quilting creates movement across square blocks. Free-motion quilting can be used for small swirls, loops, or geometric patterns if you have experience with the technique. Beginners may prefer stitching approximately 0.5 cm from each patchwork seam. This simple method reinforces the piecing while creating attractive texture.
For additional structure, insert a removable base into the bottom of the bag. A lightweight plastic canvas or firm bag stabilizer can be cut slightly smaller than the interior diameter and covered with lining fabric. This piece helps the cylindrical bag remain upright when filled with heavier materials. Because it is removable, the fabric bag can still be cleaned more easily. Avoid materials with sharp edges that could damage the lining.
Before considering the project finished, test the entire bag in practical use. Open the zipper completely, place several lightweight items inside, close it, and lift the bag by the handle. Check whether the handle tabs remain secure and whether the zipper moves freely around the curved opening. Examine the bottom seam for tension. Making these final checks allows you to reinforce any area that may need extra stitching.
The completed Round Patchwork Bag Pattern is more than a storage accessory; it is also a showcase for small pieces of beautiful fabric. Every square can represent a different color, print, or leftover from another sewing project, giving the finished bag a distinctive handmade personality. Once you understand the basic cylindrical construction, the pattern can easily be adapted into smaller cosmetic cases, larger craft organizers, travel bags, or sewing baskets. This versatility is one of the reasons round patchwork bags are such enjoyable projects for both quilting enthusiasts and creative bag makers.
Frequently Asked Questions About the Round Patchwork Bag Pattern
What fabric works best for a Round Patchwork Bag Pattern?
Quilting cotton is one of the easiest fabrics to use because it is stable, widely available, and simple to sew into small patchwork pieces. Medium-weight cotton and lightweight canvas can also work well. For the patchwork area, avoid combining fabrics with dramatically different weights unless you stabilize them first, as this can make the finished panel uneven.
Do I need batting for a round patchwork bag?
Batting is highly recommended because it provides the soft quilted texture associated with this design. It also gives the bag additional body and protects the contents. Fusible fleece is another good option if you prefer slightly firmer construction. For an especially structured bag, batting can be combined with a lightweight stabilizer.
How large should the patchwork squares be?
Squares around 7 x 7 cm are convenient for a medium-size project, but there is no required size. Smaller squares create a detailed mosaic effect, while larger blocks make the project faster to assemble. Remember that part of every square will disappear into the seam allowances.
How do I calculate the size of the round bottom?
Measure the finished circumference of your quilted body panel before sewing it into a cylinder. The approximate diameter can be calculated by dividing the circumference by 3.14. Always add your chosen seam allowance to the circular pattern piece before cutting.
Can a beginner make this bag?
Yes, although it is easier if the sewer already understands basic straight stitching, patchwork piecing, and zipper installation. The curved seams may require some patience. Marking quarter points and using clips rather than forcing the fabric around the circles makes round construction much easier for beginners.
Can I make the bag without faux leather?
Absolutely. Every brown decorative section shown in the inspiration photo can be replaced with canvas, denim, cork fabric, or reinforced quilting cotton. Fabric handles are particularly easy to make and allow the entire project to coordinate with the patchwork.
What kind of zipper should I use?
A flexible zipper suitable for bags is ideal. A double-pull zipper is especially convenient because the bag can be opened from the center. The zipper should be long enough to follow the required portion of the upper circumference without being stretched.
How can I keep the round bag from collapsing?
Use batting, fusible fleece, or bag stabilizer behind the patchwork exterior. A removable firm base placed inside the bottom can also provide excellent support. The combination of quilting and reinforcement usually gives the cylinder enough structure to stand upright.
Can I use fabric scraps for this project?
Yes. In fact, a Round Patchwork Bag Pattern is an excellent scrap-friendly sewing project. Leftover squares from previous quilts can create a charming coordinated or intentionally eclectic appearance. Organizing scraps by color before creating the layout helps the finished design feel balanced.
Can the Round Patchwork Bag Pattern be resized?
Yes. The same construction method works for several sizes. You can make a small cosmetic bag, a medium sewing organizer, or a larger storage bag by changing the diameter, height, and circumference proportionally. Remember to adjust the zipper length and handle size at the same time.
How should the finished bag be cleaned?
Cleaning depends on the materials used. A bag made entirely from washable cotton can usually be gently hand washed, while faux leather, specialty stabilizers, and metal hardware may require spot cleaning. Always consider care requirements when selecting materials before construction.
What can I store inside a round patchwork bag?
The design works well for sewing notions, quilting clips, embroidery supplies, crochet accessories, yarn, makeup, toiletries, small travel items, and many other lightweight objects. Adding interior pockets can make the bag even more useful for organizing smaller tools.
Conclusion
The Round Patchwork Bag Pattern combines practical bag construction with the creativity and warmth of traditional patchwork. Throughout this project, you learned how to select and prepare fabrics, piece colorful squares into a quilted exterior panel, calculate and sew circular sections, construct the cylindrical body, install a curved zipper, prepare the lining, create a padded round lid, add handles, and finish the seams professionally. Each stage contributes to the structured yet soft appearance that makes this style of bag so attractive.
One of the greatest advantages of this pattern is its flexibility. The dimensions, patchwork colors, quilting style, zipper, handles, and decorative bands can all be customized without changing the essential construction method. Fabric scraps that might otherwise remain unused can become an attractive and functional handmade accessory. With careful measurements and patient sewing around the curved sections, even a relatively simple combination of squares can become a sophisticated finished project.
EASILY FIND THE PDF FOR THIS PATTERN HERE!
The Round Patchwork Bag Pattern is also a wonderful project for experimenting with new color combinations and developing quilting skills. After completing one version, you can adapt the same method to create matching cosmetic cases, sewing organizers, travel containers, or handmade gifts. Most importantly, enjoy the process of turning individual pieces of fabric into something practical, colorful, and completely unique. What did you think of this Round Patchwork Bag Pattern? Leave your sincere opinion about the project and share any suggestions, color combinations, or creative modifications you would like to try. Your ideas can inspire new ways to personalize this charming patchwork bag.