
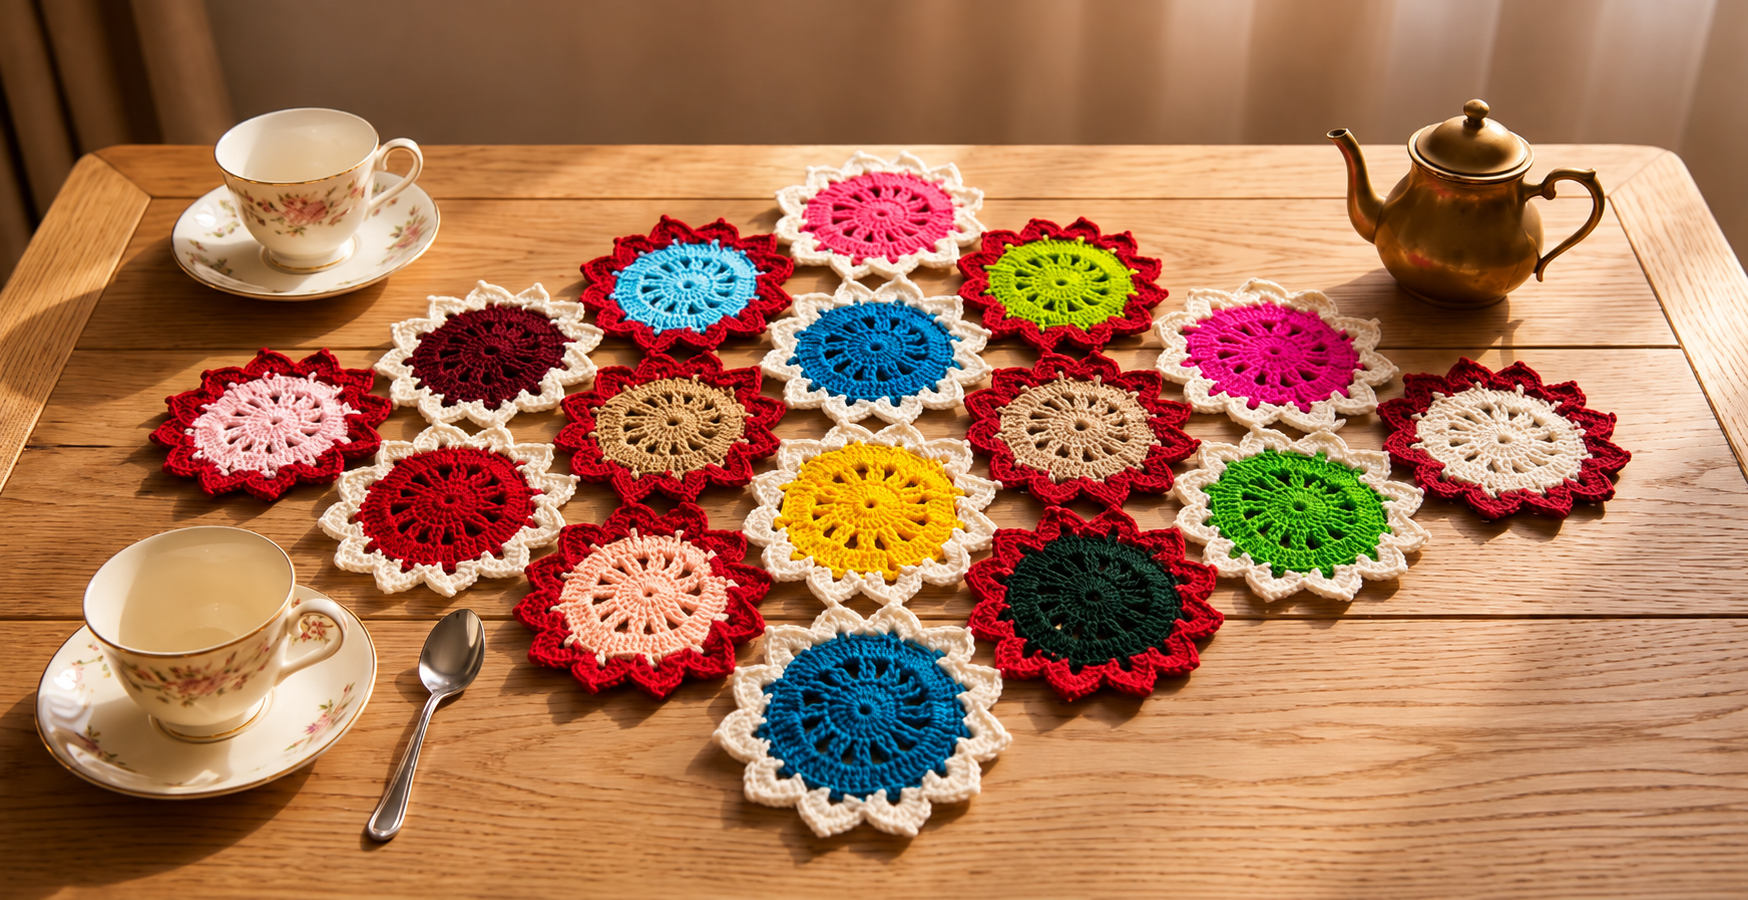
The Crochet tea time centerpiece Pattern is a charming way to turn simple crochet motifs into a colorful handmade decoration for a dining table, tea table, kitchen island, or cozy coffee corner. This project is based on joining several round floral motifs, each one worked in bright colors and finished with a contrasting scalloped border. The finished centerpiece has a cheerful vintage-inspired appearance while still feeling modern enough for contemporary home décor. One of the best features of this design is that every flower can be crocheted separately, making the pattern comfortable to work on in short sessions. Beginners who already understand basic crochet stitches can use this project to practice working in rounds, changing yarn colors, creating open spaces, and joining motifs. More experienced crocheters can easily customize the arrangement, dimensions, and color palette to create a unique crochet table centerpiece.
Before beginning the Crochet tea time centerpiece Pattern, it is helpful to understand how the design is constructed. Instead of crocheting one large continuous piece, you will make individual circular flower medallions and then arrange them into a balanced centerpiece. The photographed style uses several combinations of red, cream, blue, green, pink, yellow, beige, burgundy, and other vibrant shades. Each motif begins from the center and grows outward through rounds of crochet stitches, producing a decorative radial effect. A final pointed or scalloped round gives each motif the recognizable flower shape and creates an attractive border around the centerpiece. Because the motifs are relatively small, this project is also an excellent opportunity to use leftover yarn from previous crochet projects.
For the best result, choose yarns with similar thicknesses so that all motifs remain approximately the same size after blocking. A medium cotton yarn works especially well because cotton creates defined stitches, lies flat on the table, and is suitable for decorative household crochet. You can also use a cotton blend if you prefer a softer texture. The exact number of motifs can be adjusted according to the available table space, although a composition of approximately fifteen to seventeen flowers creates a centerpiece similar to the inspiration. Using repeated colors around the design helps create visual balance, while changing the center colors gives each flower its own personality. Following the instructions below will allow you to build the Crochet tea time centerpiece Pattern gradually, from the first magic ring to the final joining and finishing.
Materials, Crochet Stitch Key, and Preparation
For this Crochet tea time centerpiece Pattern, you will need medium-weight cotton or cotton-blend yarn in several colors. A useful palette includes cream or off-white for contrasting borders, red for strong accent borders, and additional colors such as turquoise blue, royal blue, pink, burgundy, peach, beige, yellow, lime green, dark green, and fuchsia. You do not need a full skein of every shade because each individual motif requires only a small quantity. A 3.5 mm to 4.0 mm crochet hook is a practical starting point for medium cotton yarn. You will also need scissors, a yarn needle, sewing pins, and a flat surface for blocking.
DISCOVER MORE FREE PATTERNS HERE!
The crochet key used throughout the pattern follows common US crochet terminology. MR = Magic Ring, which creates the adjustable circle at the center of each flower. CH = Chain, used for beginning rounds and creating spaces. SL ST = Slip Stitch, normally used to close rounds or move the working yarn without adding height. SC = Single Crochet, a short and firm stitch that is useful for edges and joining. HDC = Half Double Crochet, which creates medium height and can be used for shaping decorative petals.
The next important crochet symbols are DC = Double Crochet and TR = Treble Crochet. Double crochet creates most of the open, radiating structure seen in the colorful centers of the flower motifs. Treble crochet is taller and can be added to the outer points when you want more pronounced petals. CH-SP = Chain Space means that the hook should be inserted into the space created by chains instead of directly into a stitch. ST = Stitch and STS = Stitches are used when counting the completed rounds.
You may also see instructions such as REP = Repeat, meaning that a sequence inside parentheses or brackets must be repeated around the circle. For example, an instruction written as (DC, CH 1) REP around means to work one double crochet followed by one chain repeatedly until the round is complete. The notation 2 DC CL can refer to a two-double-crochet cluster worked into the same base and closed together at the top. Clusters are useful when creating textured crochet flowers because they produce a slightly raised appearance without making the motif excessively thick.
Before crocheting all of the flowers, create one test motif. The finished diameter should ideally measure approximately 10 to 12 cm, although the size may vary depending on yarn weight and hook tension. The exact measurement is less important than consistency between motifs. If your flower curls strongly upward, try using a slightly larger hook. If the flower becomes loose and wavy, try a smaller hook or reduce the number of stitches in the expanding rounds.
Color planning is also important in this crochet centerpiece pattern. Place your yarn colors on the table before you begin and decide which shades will be used for the central circles and which ones will form the outside petals. A successful arrangement usually combines warm and cool tones while repeating one or two colors throughout the composition. Cream creates a delicate traditional finish, while deep red gives the design more contrast. Alternating cream-bordered and red-bordered motifs can reproduce the lively patchwork appearance seen in a handmade tea-time centerpiece.
Step-by-Step Crochet Flower Motif Pattern
Begin Round 1 with a Magic Ring (MR). Chain 3; these chains can count as the first double crochet. Work 11 DC into the magic ring, giving you approximately 12 stitches when the beginning chain is counted. Pull the center of the magic ring firmly to close the opening. Join the round with a SL ST into the top of the beginning chain. This small circular foundation becomes the center of every flower in the Crochet tea time centerpiece Pattern.
For Round 2, chain 3 and work another DC into the same base stitch. Chain 1. Work 2 DC into the next stitch, CH 1, and repeat this sequence around the circle. Join with a slip stitch when you reach the beginning. The small chain spaces between the groups will create the first decorative openings. If you want a denser flower center, you may omit some chain spaces, but keeping them gives the motif a lighter lace-like appearance.
Round 3 begins the radiating flower structure. Slip stitch into the nearest CH-1 space, then chain 3. Work 2 DC, CH 2, 3 DC into the same chain space. Move to the next chain space and repeat 3 DC, CH 2, 3 DC. Continue this sequence around the motif. These groups create small fan-shaped sections that start resembling petals. Join with a slip stitch and fasten off if you plan to change colors.
Attach a second yarn color in any CH-2 space for Round 4. Chain 1 and work 1 SC, 1 HDC, 3 DC, 1 HDC, 1 SC into that chain space. This creates a rounded petal. Slip stitch or single crochet between the fan groups from the previous round, then repeat the same petal sequence in the next chain space. Work around the entire flower, checking frequently that the motif remains flat. This colorful round is where the crochet flower motif becomes visually distinctive.
For a more pointed outer edge, Round 5 can be worked in a contrasting color such as cream or red. Attach yarn at the top of one petal and work SC, HDC, DC, TR, CH 2, SL ST into the first CH, TR, DC, HDC, SC across the petal area. The small chain-and-slip-stitch section creates a decorative picot point. Repeat around each petal, placing small single crochets between sections when necessary. This produces the pointed star-flower effect that makes the centerpiece particularly attractive.
When the first flower is completed, fasten off and weave the yarn tails into the reverse side using a yarn needle. Do not cut the yarn tails too close to the crochet because household decorations may be washed or handled frequently. Make the remaining flowers using the same stitch counts while changing the center and border colors. Keeping the structure identical is important because motifs of different sizes can be difficult to join neatly. Make approximately 15 to 17 motifs, or continue until the arrangement reaches your preferred tabletop dimensions.
Arranging and Joining the Crochet Centerpiece
After finishing the motifs, place them on a large flat table before joining anything permanently. Start with one colorful flower near the center and arrange the remaining flowers around it. You can create a diamond, elongated oval, rectangular cluster, or irregular floral arrangement. For a tea table, a centerpiece measuring approximately 45 to 60 cm long and 35 to 45 cm wide is practical. Always check your own table dimensions so that cups, saucers, and serving pieces still have enough room.
A visually pleasing version of the Crochet tea time centerpiece Pattern uses alternating border colors. For example, position a cream-bordered motif beside a red-bordered motif rather than grouping all matching borders together. Distribute bright greens, blues, yellows, and pinks throughout the design instead of concentrating similar shades in only one area. A darker flower can become a useful focal point near the center. Photographing the temporary arrangement before joining can help you remember the final layout.
The easiest joining method is invisible sewing with a yarn needle. Place two motifs side by side with their edges touching. Thread the needle with yarn matching one of the border colors and pass it through corresponding back loops on both motifs. Make several small stitches across the area where the two petals meet. Pull the yarn firmly enough to close the gap but not so tightly that the motifs overlap or buckle. Fasten securely on the back and weave in the tail.
A crocheted joining method can also be used. Hold two motifs with the wrong sides together and insert your hook through corresponding edge stitches. Attach yarn and work a SL ST through both layers. Continue with two or three slip stitches over the touching section, then fasten off. This creates a stronger connection and can become a decorative part of the design. If you prefer a nearly invisible connection, use a joining yarn that matches the outer petals.
Continue attaching one flower at a time while keeping the centerpiece flat on your working surface. Do not join an entire row without checking the shape because even small differences in crochet tension can gradually distort the arrangement. After every three or four joins, smooth the motifs outward with your hands. If one flower begins pulling the surrounding motifs inward, remove that join and sew it again with slightly more relaxed tension. The completed centerpiece should lie naturally without stretching.
Once every motif is connected, turn the project over and inspect the back. Weave in every remaining yarn tail and trim the excess yarn carefully. You may optionally add several reinforcing stitches where three or four motifs meet. These hidden reinforcement points are useful because the center of the arrangement receives more tension when the piece is lifted or washed. With all joins secure, the structural work of the Crochet tea time centerpiece Pattern is finished and the centerpiece is ready for blocking.
Blocking, Care, Styling, and Customization
Blocking is one of the most valuable finishing steps for a crochet table centerpiece. Lightly dampen the completed piece with clean water or wash it gently according to the yarn manufacturer’s care recommendations. Remove excess water without twisting the crochet. Lay the centerpiece flat on a towel or blocking mat and carefully shape every flower. Straighten the outer points and make sure all motifs remain evenly spaced. Allow the crochet to dry completely before removing any pins.
If your centerpiece is made with cotton yarn, blocking will usually improve the stitch definition significantly. The chain spaces become clearer, the petals open outward, and the joined motifs create a smoother overall silhouette. Avoid aggressive stretching because the goal is simply to organize the stitches rather than increase the dimensions dramatically. Measure opposite sides while blocking to maintain balance. A properly blocked Crochet tea time centerpiece Pattern will look polished while preserving the handmade texture that gives it character.
For styling, place the centerpiece directly on a wooden table to emphasize the contrast between natural wood and colorful yarn. A light neutral tablecloth also works beautifully because it allows the individual crochet colors to stand out. Position teacups, a small teapot, flowers, or a decorative bowl nearby without covering too much of the crochet. Because the motif arrangement itself is visually detailed, simple surrounding décor usually produces the most elegant presentation.
Seasonal variations are easy to create with the same crochet pattern. For spring, use pastel pink, lavender, mint, pale yellow, and cream. A summer version can feature turquoise, coral, lime green, sunny yellow, and white. Autumn colors such as rust, mustard, burgundy, beige, olive, and brown create a warmer appearance. For winter celebrations, deep red, forest green, cream, and touches of gold-colored yarn can transform the same structure into a festive centerpiece.
You can also change the size without modifying the individual flower pattern. A small version made with five to seven motifs can serve as a teapot mat or decorative trivet, provided the yarn is suitable for the intended use. Nine to eleven motifs can create a compact coffee-table accent. Fifteen or more flowers produce a larger crochet centerpiece for a dining table. If you want a long table runner, simply continue adding motifs to both ends while maintaining the same balanced color distribution.
Proper care will help preserve the colors and structure for many tea times to come. Hand washing in cool or lukewarm water is often a gentle option for handmade crochet, although you should always follow the care requirements of your chosen yarn. Reshape the flowers while damp and dry the centerpiece flat. Avoid storing the crochet while damp because trapped moisture can affect fibers over time. Fold it loosely or roll it with clean tissue when storing it for long periods.
FAQ About the Crochet Tea Time Centerpiece Pattern
Is the Crochet tea time centerpiece Pattern suitable for beginners?
Yes. A confident beginner who understands chain stitches, slip stitches, single crochet, half double crochet, double crochet, and working in rounds should be able to complete the project. Making one test flower before beginning the full centerpiece is strongly recommended.
What is the best yarn for a crochet table centerpiece?
Cotton is an excellent choice because it offers clear stitch definition and usually blocks well. Cotton-blend yarn can also work. The most important factor is using similar yarn weights throughout the motifs so that the flowers remain consistent in size.
How many crochet flowers are needed?
Approximately 15 to 17 motifs create a medium decorative centerpiece similar to the design described here. However, there is no fixed requirement. Make fewer flowers for a compact centerpiece or additional motifs for a longer crochet table runner.
What size should each flower motif be?
A diameter of approximately 10 to 12 cm works well with medium-weight yarn. Your flowers may be slightly larger or smaller depending on the hook, yarn thickness, and personal tension. Consistency between flowers matters more than reaching one exact measurement.
Can I make every flower the same color?
Absolutely. A monochromatic version can look sophisticated, especially when different shades of one color are combined. However, the colorful appearance is one of the defining features of this Crochet tea time centerpiece Pattern, so using several contrasting shades creates a lively patchwork effect.
Can the motifs be joined while crocheting the final round?
Yes. Experienced crocheters may use a join-as-you-go crochet method, connecting selected picots or chain spaces while working the final round. Beginners may find it easier to complete all flowers first and join them afterward because this allows the entire color arrangement to be tested before making permanent connections.
Why is my crochet flower becoming wavy?
Excessive waviness often means that the round contains more stitches than the available space can comfortably hold. Your tension may also be too loose. Try using a smaller hook or reducing unnecessary increases while keeping the repeated sections symmetrical.
Why does my motif curl upward like a bowl?
Curling often indicates that there are not enough stitches or that the crochet tension is very tight. Try a slightly larger crochet hook and check whether every required chain space and increase has been completed. Blocking may correct mild curling, but significant curling usually requires adjusting the stitch count.
Do I have to block the finished centerpiece?
Blocking is not mandatory, but it is highly recommended. It helps open the lace sections, organize the petals, improve symmetry, and encourage the joined flowers to lie flat. This finishing step can make a noticeable difference in the final presentation.
Can this pattern be used to create other projects?
Yes. The same crochet flowers can be adapted into placemats, table runners, cushion decorations, wall hangings, bag panels, or small decorative mats. The modular construction allows you to create many layouts simply by changing the number and position of the motifs.
Conclusion
The Crochet tea time centerpiece Pattern combines colorful crochet flowers, classic stitches, and a flexible modular construction to create a cheerful handmade decoration for the home. Throughout this tutorial, you learned the essential crochet stitch key, including MR, CH, SL ST, SC, HDC, DC, TR, CH-SP, and REP, along with a practical method for building each flower from the center outward. You also learned how to form decorative petals, add contrasting borders, arrange multiple motifs, sew or crochet them together, reinforce the joins, and block the completed centerpiece.
One of the greatest advantages of this project is its flexibility. You can make the centerpiece small or large, use bold rainbow colors or a subtle coordinated palette, and arrange the flowers in many different shapes. Once you understand the basic flower construction, every additional motif becomes an opportunity to experiment with color while maintaining the same reliable structure. Whether the finished piece is displayed during afternoon tea, used as an everyday dining-table decoration, or handmade as a thoughtful gift, it can bring warmth and personality to the setting.
I hope this Crochet tea time centerpiece Pattern inspires you to explore colorful motif crochet and create your own version of this inviting table decoration. If you make this project, leave your sincere opinion about the pattern and share your suggestions as well. Which colors would you choose for your centerpiece, and what changes would you make to personalize the design? Your ideas can inspire new combinations and creative variations for future crochet projects.