
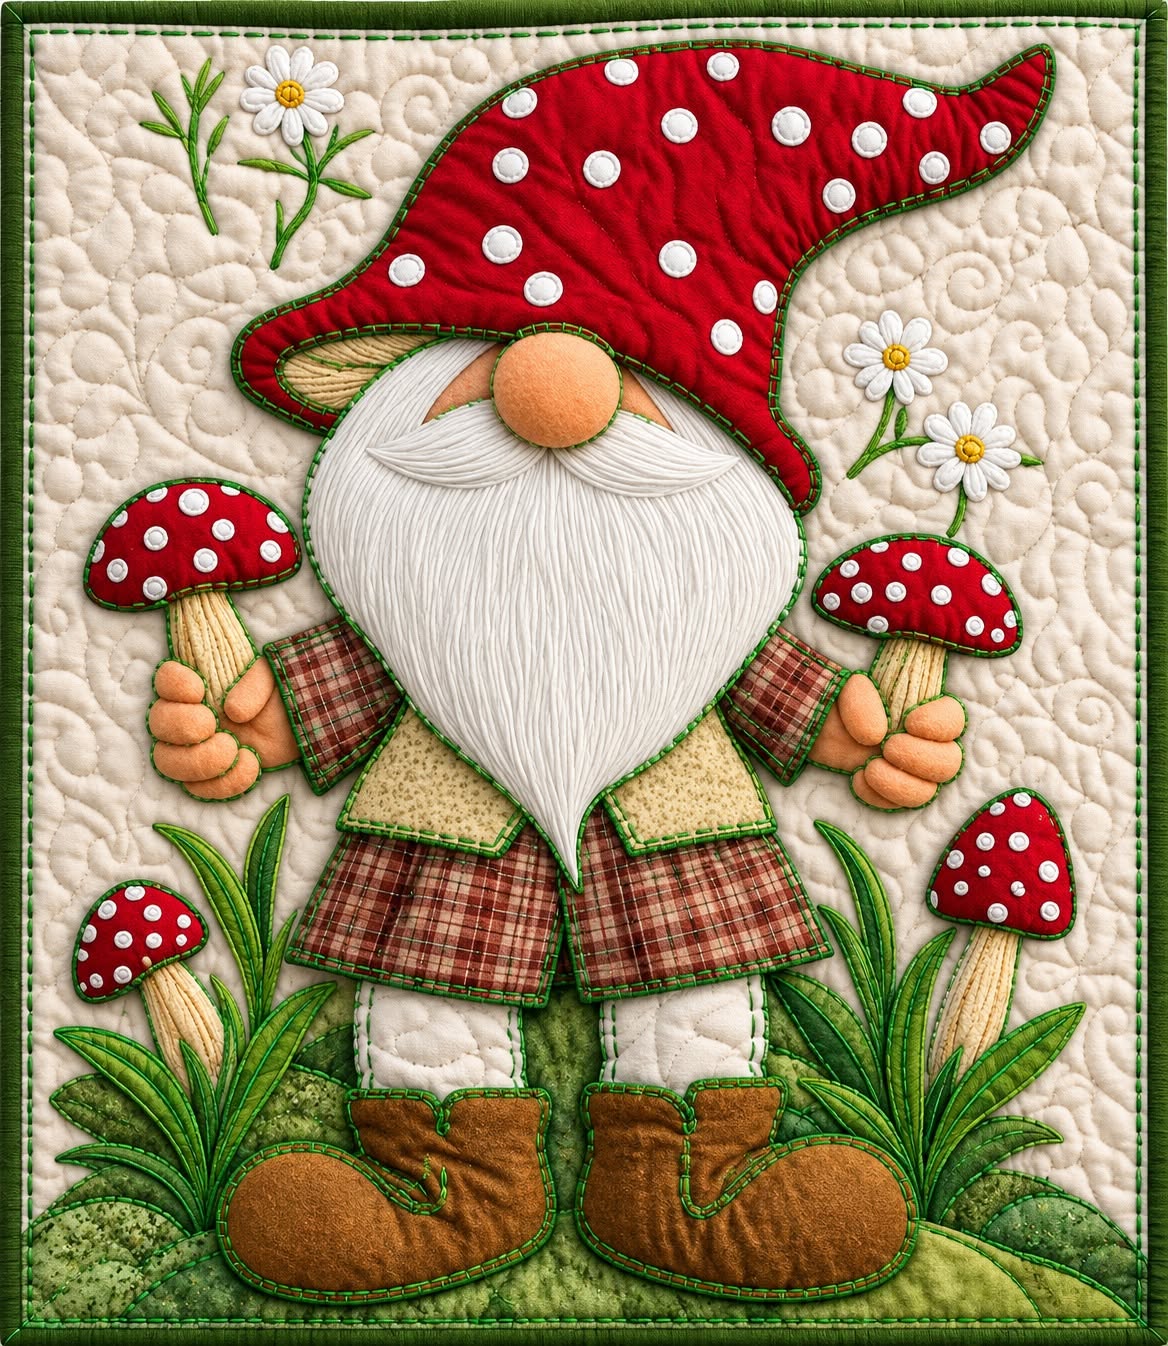
The Gnome Themed Quilt Panel Pattern is a charming sewing project that combines appliqué, dimensional fabric details, decorative quilting, and the cozy personality of a woodland gnome. Inspired by the quilt panel shown in the reference image, this design features a cheerful gnome with a large white beard, a bright red mushroom-style hat, plaid clothing, oversized boots, and small red mushrooms surrounding the central character. The neutral quilted background allows every appliqué element to stand out while still giving the finished piece a warm, handmade appearance. This type of project can become a decorative wall hanging, seasonal quilt panel, pillow front, table decoration, or centerpiece for a larger patchwork quilt. One of the biggest advantages of this design is that the shapes can be simplified or made more detailed depending on your sewing experience. With careful preparation, even someone who has never created a dimensional appliqué panel can gradually build the project from the background fabric to the final quilting stitches.
Creating a Gnome Themed Quilt Panel Pattern also gives quilters an opportunity to explore several important sewing techniques in one manageable project. The design uses layered fabric appliqué, gentle free-motion quilting, basic patchwork construction, decorative stitching, and optional stuffed or padded elements that add texture. Because the gnome is made from individual pieces, you can use fabric scraps from other sewing projects rather than purchasing large amounts of new material. Plaid cotton works beautifully for the jacket and sleeves, cream fabric creates the beard, muted greens form the woodland ground, and red cotton with white circles or appliquéd dots creates the recognizable mushroom theme. The finished result feels detailed without requiring complicated piecing blocks. Most of the visual impact comes from the placement of the shapes, the contrast between fabrics, and the texture added during quilting.
Another appealing feature of the Gnome Themed Quilt Panel Pattern is how easily it can be personalized. You can change the red hat to blue, green, burgundy, or gold, use floral fabric instead of plaid, or create mushrooms in several different colors. The beard can be made with cotton, linen, felt, or textured fabric, while the nose can be softly padded to achieve the rounded appearance seen in the reference project. The surrounding plants can be appliquéd, embroidered, or quilted directly into the background. Beginners may prefer simple raw-edge appliqué, while more experienced quilters can use turned-edge appliqué for a cleaner finish. No matter which approach you choose, accurate cutting and thoughtful layering are the keys to keeping the character recognizable and balanced. The following tutorial explains the entire construction process so you can confidently recreate the look of this whimsical quilt panel.
Preparing the Fabrics, Templates, and Quilt Background
Begin your Gnome Themed Quilt Panel Pattern by deciding the approximate finished size. A practical wall-hanging size is around 45 cm × 55 cm, although you can enlarge or reduce the pattern according to your preferred display space. Cut the background fabric approximately 5 cm larger than the desired finished size on every side. A beige, cream, oatmeal, or light taupe cotton works especially well because it provides enough contrast for the colorful appliqué fabrics while maintaining the rustic woodland appearance of the original design.
DISCOVER MORE FREE PATTERNS HERE!
For the basic supplies, prepare quilting cotton for the background, red cotton for the hat and mushrooms, plaid fabric for the jacket and sleeves, cream or white fabric for the beard, peach or light tan fabric for the nose and hands, green fabrics for the lower landscape, brown fabric for the boots, and pale yellow or beige scraps for mushroom stems. You will also need batting, backing fabric, coordinating sewing thread, fusible web if you plan to use fused appliqué, sharp fabric scissors, pins or clips, an iron, and a sewing machine. These materials form the foundation of your Gnome Themed Quilt Panel Pattern.
Before cutting fabric, make paper templates for every major shape. Separate the gnome into the hat, beard, nose, body, two sleeves, two hands, two trouser legs, and two boots. Create additional templates for the mushrooms, mushroom stems, leaves, grasses, and background landscape pieces. Adding approximately 3 to 5 mm around each template gives you flexibility if you want to turn the raw edges underneath. For fused raw-edge appliqué, you can cut the shapes closer to their final dimensions.
Arrange all templates on the background fabric before attaching anything permanently. Position the gnome approximately in the center, leaving enough room around the character for the mushrooms and decorative quilting. The hat should occupy much of the upper section, while the boots visually anchor the bottom of the panel. Try to maintain gentle symmetry without making everything perfectly identical. The slightly irregular shapes give the Gnome Themed Quilt Panel Pattern much of its handmade charm.
Once you are satisfied with the arrangement, photograph or sketch the layout before removing the pieces. This provides a useful visual reference during assembly. Mark the center of the background fabric with a temporary fabric marker and lightly indicate the approximate position of the beard, body, hat, and boots. Avoid drawing heavy lines because they may remain visible after quilting. These small registration marks make it easier to keep the appliqué centered as the project grows.
Prepare the quilt sandwich before or after appliqué depending on your preferred sewing method. For a highly textured project similar to the reference image, placing the backing, batting, and background together before some of the decorative stitching can create attractive dimension. Smooth all three layers carefully and secure them using basting spray, safety pins, or large temporary stitches. A flat, wrinkle-free foundation will help the finished Gnome Themed Quilt Panel Pattern look polished and professional.
Building the Gnome with Layered Fabric Appliqué
Start assembling the character with the pieces that sit farthest behind the others. The body, trouser legs, and sleeves should generally be positioned before the beard because portions of these shapes disappear beneath the beard. Fuse or pin the body fabric in place and secure the edges using a narrow zigzag, blanket stitch, or straight stitch close to the edge. A warm beige or muted yellow fabric works nicely for the gnome’s shirt and provides a subtle transition between the white beard and darker plaid jacket.
Next, add the plaid jacket sections. In the reference design, the plaid fabric creates a rustic country look that pairs beautifully with the woodland theme. Cut two lower jacket sections and two sleeve shapes, paying attention to the direction of the plaid lines. Carefully matching the plaid is optional, but keeping the pattern relatively straight can make the garment appear more intentional. Secure the pieces using the same appliqué quilting technique used for the body.
Create the beard as one of the largest and most recognizable components of the Gnome Themed Quilt Panel Pattern. Cut a rounded triangular beard with a wide upper section and a long tapered point. Cream, ivory, or soft white fabric provides a classic appearance. After securing the beard around the outer edges, use long, gently curved lines of stitching from the top toward the point to imitate flowing hair. Do not make every line identical. Slight variations in length and direction create a more natural textured beard.
The nose can be created as a flat appliqué piece or as a small dimensional element. To achieve a softly rounded look, cut two circles approximately 6 to 7 cm in diameter, sew around the edge with a small opening, turn the piece right side out, and add a small amount of polyester filling. Close the opening and hand stitch the nose securely over the upper center of the beard. This three-dimensional detail instantly adds personality to the Gnome Themed Quilt Panel Pattern.
Now construct the oversized red hat. Cut a long curved hat shape that widens near the lower edge and gradually narrows toward the tip. The hat should overlap the top of the beard slightly, creating the illusion that the gnome’s eyes are hidden underneath it. Attach small white fabric circles across the red surface to create the spotted mushroom-inspired design. These circles can be fused, appliquéd, or even embroidered. Add a darker red edge or stitched outline around the hat to define its silhouette against the neutral background.
Finish the main character by adding the hands, legs, and boots. The hands can be simplified rounded shapes or carefully cut finger shapes like those visible in the reference image. Brown suede-look cotton, flannel, or textured quilting fabric works beautifully for the boots. Add stitched curves, folds, and contour lines across the boots to imitate the appearance of worn leather. These subtle details turn basic fabric shapes into expressive elements and give the completed gnome much greater visual depth.
Adding Mushrooms, Plants, Texture, and Decorative Quilting
The surrounding mushrooms are essential to the woodland character of the Gnome Themed Quilt Panel Pattern. Create several mushrooms in different sizes rather than making every mushroom identical. Use pale beige or light tan fabric for the stems and red cotton for the caps. Position one mushroom near each hand so the gnome appears to be holding them, then distribute smaller mushrooms near the bottom of the quilt panel to balance the composition.
Add small white circles to each red mushroom cap. You can cut tiny circles from white fabric and fuse them into position or use satin stitching to create circular spots. Slightly irregular spacing often looks more natural than perfectly measured placement. Outline each mushroom cap with dark red thread to emphasize the shape. Decorative stitching along the stems can imitate the fine vertical lines commonly seen underneath mushroom caps and create additional texture without adding more fabric layers.
Next, construct the grassy woodland area beneath the gnome. Layer several irregular green fabric shapes across the lower portion of the background, using darker greens near the bottom and lighter or muted greens closer to the character. These shapes do not need to resemble traditional patchwork blocks. Organic curves work better because they suggest natural ground, moss, leaves, and small hills. Overlap the pieces slightly to prevent small gaps between fabrics.
Create grasses and leaves around the mushrooms using narrow appliqué shapes or machine embroidery. Long green stitches can represent stems, while small angled stitches can form leaves. Vary the thread colors slightly for a richer appearance. Olive, sage, forest green, and muted yellow-green tones complement the earthy palette of the Gnome Themed Quilt Panel Pattern. These details help connect the larger appliqué pieces to the quilted background.
Once the appliqué is secure, begin the decorative free-motion quilting across the open background. The reference panel uses swirling lines, loops, flowers, and leaf-like designs. Start with simple curves if you are new to free-motion quilting. Move gradually around the appliqué shapes and avoid quilting too densely directly beside dimensional elements. The goal is to flatten the background slightly while allowing the gnome and mushrooms to remain visually prominent.
Consider quilting a few large floral shapes into the neutral background. Draw temporary flower outlines if necessary, or sew them freehand. Combine petals, vines, loops, circles, and gentle spirals to fill empty areas without overwhelming the character. This quilting stage is important because it transforms the plain background into a decorative surface. The contrast between the densely stitched background and softer appliqué areas creates the dimensional appearance that makes this Gnome Themed Quilt Panel Pattern so attractive.
Finishing, Binding, and Displaying the Quilt Panel
After completing the quilting, examine the entire piece from a short distance. Look for areas that appear unusually empty or overly dense. Add a few additional quilted curves, leaves, or texture lines where necessary. Check that all appliqué edges are securely stitched and that none of the mushroom spots, hat details, hands, or clothing pieces are lifting. Small corrections at this stage can significantly improve the durability of the finished panel.
Trim the outer edges carefully so the quilt forms an even rectangle. A rotary cutter, quilting ruler, and cutting mat make this process easier. Measure from several points rather than relying only on the original fabric edge because quilting can sometimes cause slight distortion. Leave enough space around the design so the binding does not overlap any important appliqué details.
Prepare approximately 5 to 6 cm wide binding strips and join them end to end. A dark olive, brown, deep green, or muted red binding works beautifully with the Gnome Themed Quilt Panel Pattern. Fold the strip lengthwise, press it, and stitch it around the front perimeter of the quilt. Fold the binding toward the back and secure it by machine or hand stitching. Mitered corners provide a clean professional appearance.
If you want to display the panel as wall art, add a hanging sleeve to the back. Cut a fabric strip slightly shorter than the width of the quilt, fold and finish the edges, and hand stitch it along the upper back section. A wooden dowel can then slide through the sleeve. This method allows the panel to hang evenly without placing stress on individual parts of the quilt.
You can also adapt the Gnome Themed Quilt Panel Pattern into other projects. Reduce the template size to create decorative pillow covers, tote bags, placemats, table runners, or seasonal mini quilts. A larger version could become the center panel of a bed quilt surrounded by patchwork borders. Because the design is made from separate shapes, changing the overall scale is relatively straightforward as long as the proportions remain consistent.
Finally, give the quilt a gentle press from the back using a pressing cloth when necessary. Avoid flattening dimensional elements such as the padded nose. Remove any temporary marking lines and loose threads. Allow the quilt to rest flat before displaying it. The combination of appliqué, layered fabrics, quilting, and textured details should now create a warm decorative piece that captures the whimsical personality of the original Gnome Themed Quilt Panel Pattern.
Frequently Asked Questions About the Gnome Themed Quilt Panel Pattern
What is a Gnome Themed Quilt Panel Pattern?
A Gnome Themed Quilt Panel Pattern is a decorative quilting design centered around a gnome character. Instead of relying only on traditional geometric quilt blocks, the project combines appliqué fabric pieces to build a recognizable scene. Hats, beards, clothing, mushrooms, flowers, grass, and other decorative elements are layered over a quilted background.
Is this project suitable for beginners?
Yes, particularly if the shapes are simplified and raw-edge appliqué is used. Beginners can start with straightforward stitching around each piece and use gentle curves for the background quilting. More experienced quilters can add turned-edge appliqué, detailed free-motion quilting, embroidery, and dimensional fabric elements.
What is the best fabric for this quilt pattern?
High-quality quilting cotton is one of the easiest materials to use because it is stable, easy to cut, and available in many prints. Cotton can be combined with carefully selected textured fabrics, but extremely stretchy material should usually be avoided because it can distort during appliqué and quilting.
Can I make the gnome beard dimensional?
Yes. The beard can remain flat, or you can place a thin layer of batting underneath it before stitching around the edges. Quilting long curved lines across the beard also creates noticeable texture. Another option is to use textured fabric that naturally resembles hair or fibers.
How can I create the white spots on the red hat and mushrooms?
Small circles can be cut from white quilting cotton and attached with fusible web before stitching around the edges. They can also be embroidered with dense satin stitching or created from small pieces of felt. Fabric appliqué usually coordinates best with the rest of the project.
Do I need a special sewing machine for free-motion quilting?
Not necessarily. Many standard sewing machines can perform free-motion quilting when used with a compatible quilting or darning foot and lowered or covered feed dogs. If free-motion quilting is not available, decorative background designs can also be created with a walking foot using gentle lines and curves.
Should the appliqué be added before or after quilting the background?
Both methods are possible. Adding appliqué before quilting allows you to quilt around the shapes and create strong dimensional contrast. Some quilters partially quilt the background first and then add appliqué details afterward. For this particular design, completing most of the appliqué before the final background quilting is usually the easiest approach.
How can I prevent the fabric edges from fraying?
Fusible web combined with a narrow zigzag, satin stitch, or blanket stitch helps protect raw edges. Turned-edge appliqué offers even greater protection because the raw fabric edge is folded underneath before stitching. The best method depends on the appearance you want and your experience level.
Can the colors of the pattern be changed?
Absolutely. While red, cream, brown, green, and plaid fabrics create the traditional woodland appearance shown in the project, the Gnome Themed Quilt Panel Pattern can be customized with almost any color palette. Blue and silver could create a winter version, while orange and burgundy could create an autumn-inspired design.
How do I make the quilt panel look more professional?
Accurate cutting, careful pressing, consistent stitching, balanced fabric placement, and controlled quilting density make a significant difference. Taking time to test your stitches on fabric scraps before working on the final panel can also help produce cleaner results.
Can I turn this design into a larger quilt?
Yes. The finished panel can become the center of a larger quilt. Simply add one or more fabric borders around the completed scene and continue building outward with patchwork blocks, solid strips, or complementary appliqué designs.
What makes this pattern visually interesting?
The combination of contrasting textures is one of the strongest features of this project. The smooth red hat contrasts with the flowing beard, plaid clothing, textured boots, layered landscape, spotted mushrooms, and heavily quilted background. Together, these elements create depth even though most of the project is constructed from relatively simple shapes.
Conclusion
The Gnome Themed Quilt Panel Pattern is a creative way to combine traditional quilting skills with playful fabric art. Throughout this tutorial, you learned how to prepare the background, create templates, organize the appliqué layers, construct the gnome’s clothing and beard, make a dimensional nose, sew the mushroom-inspired hat, add woodland mushrooms and plants, and finish the entire composition with decorative free-motion quilting.
The project also demonstrates how fabric appliqué, patchwork, decorative stitching, and thoughtful fabric selection can transform simple pieces of cotton into a highly detailed scene. By working from the largest background shapes toward the smallest decorative elements, the construction remains organized and manageable. The final quilting then brings everything together by creating texture and contrast throughout the neutral background.
Remember that your Gnome Themed Quilt Panel Pattern does not need to be identical to the reference design. One of the joys of handmade quilting is giving every project its own personality. Experiment with different plaids, hat colors, mushroom arrangements, embroidery details, and quilting motifs until the panel reflects your personal sewing style.
EASILY FIND THE PDF FOR THIS PATTERN HERE!
Whether you turn the finished design into a wall hanging, cushion, seasonal decoration, or centerpiece for a larger quilt, this charming gnome project offers plenty of opportunities to practice and improve your quilting techniques. Take your time during the cutting and positioning stages, enjoy the decorative stitching process, and allow the small handmade variations to become part of the character of your quilt. If you make your own version of this Gnome Themed Quilt Panel Pattern, leave your sincere opinion about the project and share any suggestions you may have. Your ideas about different colors, fabrics, appliqué methods, quilting designs, or creative adaptations can inspire even more possibilities for this cheerful woodland quilt.