
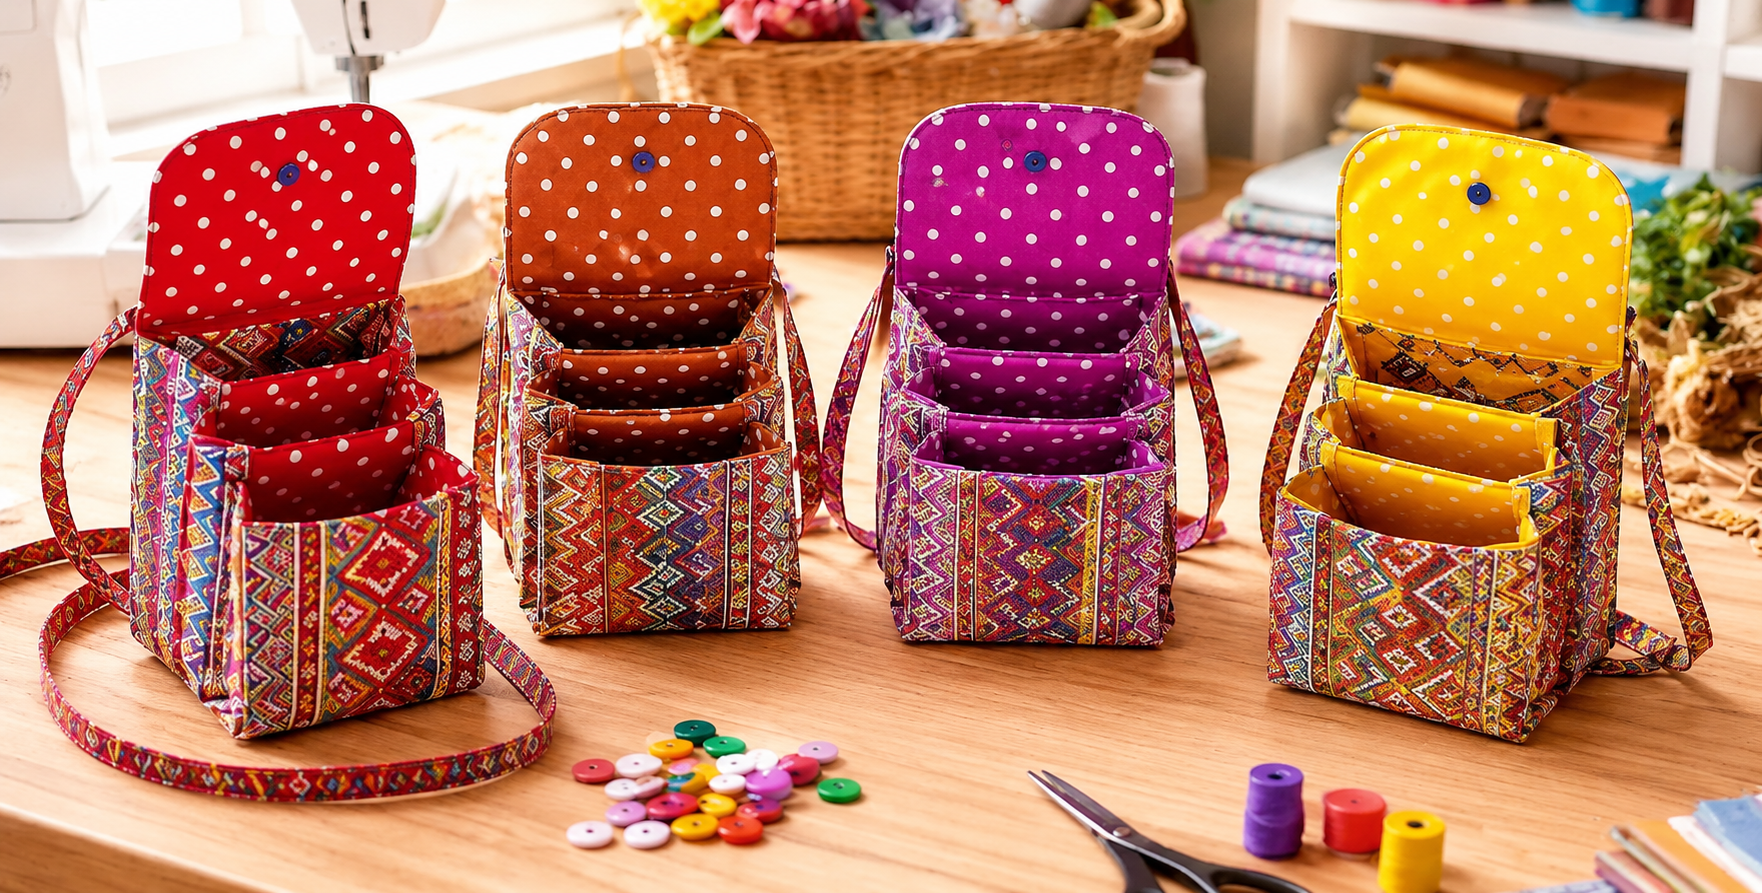
The 5 Pocket Bag Fabric Pattern is a colorful and practical sewing project designed for anyone who enjoys combining organization, fabric creativity, and useful handmade accessories. Inspired by the structured fabric organizers shown in the photo, this project features multiple expanding compartments arranged inside a compact bag-style body, along with a protective flap and carrying strap. The finished organizer can hold sewing notions, crochet supplies, small tools, cosmetics, stationery, craft accessories, or other everyday essentials. One of the most appealing details is the opportunity to mix a bold geometric exterior with cheerful polka-dot lining fabrics. Even though the finished piece looks detailed and professionally constructed, the project becomes much easier when it is divided into individual components. By carefully preparing the fabric, stabilizer, pockets, lining, flap, and strap, you can create a durable organizer that is both decorative and functional.
Working with a 5 Pocket Bag Fabric Pattern is also a wonderful way to practice important sewing techniques without needing an extremely large amount of fabric. The project introduces skills such as accurate measuring, interfacing, topstitching, pocket construction, lining, binding, curved sewing, and assembling several fabric layers. Beginners with basic sewing-machine experience can complete it by working slowly, while experienced makers can personalize the construction with quilting, decorative stitching, coordinated prints, or contrasting fabrics. The organizer visible in the inspiration photo uses bright colors and traditional geometric prints on the exterior, while each interior features a different polka-dot color. This contrast gives each bag personality without changing its basic structure. Choosing fabrics that are visually different but harmonious is one of the simplest ways to achieve the same energetic handmade appearance.
Before beginning the 5 Pocket Bag Fabric Pattern, remember that accuracy has a greater impact on the finished result than sewing speed. Every pocket must sit at approximately the same angle and distance so that the compartments open naturally without becoming bulky or uneven. Pressing after each major seam also helps the bag maintain its defined shape. A medium-weight cotton fabric is generally easier to control than very lightweight material, and a stabilizer provides the firmness needed for the organizer to stand upright. You can make a coordinated version using only two fabrics or create a scrap-friendly version using several prints. The goal is not simply to reproduce the colors in the photograph but to understand the construction method so you can create a personalized, reusable fabric organizer bag that reflects your own sewing style.
Materials, Measurements, and Fabric Preparation for the 5 Pocket Bag Fabric Pattern
For a medium-sized 5 Pocket Bag Fabric Pattern, begin with approximately 50 cm of exterior fabric, 50 cm of lining fabric, and 40 to 50 cm of medium-weight fusible interfacing or stabilizer. You may need slightly more if you want to carefully match a directional print. Cotton quilting fabric is an excellent option because it is stable, easy to press, and available in many coordinated prints. A geometric fabric similar to the exterior shown in the photo creates a strong decorative statement, while polka dots make a playful lining. You will also need matching thread, scissors or a rotary cutter, sewing clips or pins, an iron, a ruler, and a sewing machine.
DISCOVER MORE FREE PATTERNS HERE!
The main body can be prepared from two exterior rectangles measuring approximately 28 cm wide by 32 cm high, depending on how large you want the finished organizer. Cut corresponding pieces of stabilizer and lining fabric. These measurements include enough space for seam allowances and the five-pocket construction. If you prefer a smaller organizer for jewelry or sewing notions, reduce the measurements proportionally. Always create a test paper template before cutting expensive fabric when changing the size of the original bag sewing pattern.
The five fabric pockets should gradually step forward, which creates the accordion-like appearance seen in the reference project. A useful starting size for each pocket panel is approximately 24 cm wide by 16 cm high, although the depth can be adjusted depending on what you plan to store. Cut five exterior pieces and five lining pieces for the pocket sections. If you want each compartment to have more volume, add side gussets approximately 4 to 5 cm deep. Carefully label the pocket pieces from one to five so that they remain organized throughout assembly.
The flap is another important feature of this fabric organizer pattern because it protects the contents while adding a polished finish. Cut one exterior flap piece and one lining flap piece approximately 24 cm wide by 18 cm high. Round the two upper corners using a small plate, curved ruler, or paper template. Add fusible interfacing to the exterior flap piece so that it remains firm when opened. A magnetic snap, sew-on snap, button, or hook-and-loop closure can be installed near the center of the flap.
For the shoulder or carrying strap, cut a strip approximately 7 cm wide by 100 to 120 cm long. The exact length depends on whether you want a short handle or a longer shoulder strap. Fold the strip lengthwise, press the raw edges toward the center, fold again, and topstitch along both sides. Adding a narrow strip of interfacing inside the strap creates extra strength. This detail is especially useful if your 5 Pocket Bag Fabric Pattern will be used for heavier sewing or crafting supplies.
Before sewing, fuse the interfacing to the wrong side of all exterior body pieces according to the manufacturer’s instructions. Avoid dragging the iron across the fabric because this can distort the shape. Instead, press and lift the iron repeatedly until the stabilizer bonds securely. Trim loose threads and compare all matching pieces before moving to construction. Accurate preparation may feel like a slow stage, but it dramatically improves the final appearance and makes the remaining steps easier.
How to Sew and Assemble the Five Pockets
Start the pocket construction by placing one pocket exterior piece and its matching lining piece with right sides together. Sew around the edges using approximately a 1 cm seam allowance, leaving a small opening for turning. Trim the corners and carefully turn the piece right side out. Press it flat and topstitch across the upper edge. Repeat this process until you have five clean, finished fabric pocket panels ready for assembly.
To create depth, fold approximately 2 cm to 3 cm inward along each side of a pocket panel and press the folds firmly. These folds act as simple gussets and allow the pocket to expand when filled. Another method is to insert separate side gusset pieces, which produces an even deeper organizer. For a project inspired by the photo, moderate accordion folds create an attractive stepped effect without making the bag excessively wide. Test each fold with clips before sewing so that all five compartments have consistent dimensions.
Position the lowest front pocket approximately 3 cm above the bottom edge of the bag body. Center it carefully and clip the lower and side edges in place. Stitch around the sides and bottom while leaving the top completely open. Reinforce the upper corners with a few extra stitches because these areas experience the most stress. Maintaining an even topstitching distance will give your 5 pocket organizer a professional handmade appearance.
Place the second pocket slightly higher and behind the first one. The top edge should remain visible above the previous compartment, creating the layered design. Continue positioning each additional pocket approximately 3 to 4 cm higher than the pocket in front of it. By the time you attach the fifth pocket, you should have a clear staircase arrangement. Before permanent stitching, place all five pockets on the body and check that the spacing looks balanced.
The sides of the compartments may be connected with short fabric gussets or accordion folds to keep them from collapsing forward. Stitch these side sections slowly because several fabric layers can become thick. A longer stitch length may help your machine move smoothly through bulky areas. If necessary, use a denim or quilting needle for added strength. This is one of the most important stages in the 5 Pocket Bag Fabric Pattern, because strong pocket attachment determines how well the finished organizer performs.
After all five compartments have been attached, fill them temporarily with folded fabric scraps to test their shape. The pockets should open independently without pulling the main body out of alignment. Check that the upper edges form an even progression from front to back. If one pocket sits too low or appears twisted, adjusting it now is easier than after the entire bag has been assembled. Press the completed pocket unit carefully without flattening the gussets excessively.
Constructing the Bag Body, Flap, Strap, and Lining
With the five pockets complete, focus on constructing the outer bag body. Place the prepared body panels with right sides together and sew the side and bottom seams using approximately a 1 cm seam allowance. To create a flat base, box the lower corners by aligning each side seam with the bottom seam. Measure approximately 3 cm from the corner point and stitch straight across. Trim the excess fabric while leaving enough seam allowance to maintain strength.
Turn the exterior body right side out and gently push the corners into shape. The bag should now stand more easily because of the boxed base and stabilizer. Check the front pocket assembly to ensure that it remains centered. If your fabric features directional motifs, this is also the moment to confirm that the pattern is facing correctly. Press the sides and bottom carefully to give the organizer the crisp structure visible in the inspiration photo.
Next, sew the exterior and lining pieces of the flap with right sides together, leaving the straight bottom edge open. Clip around the curved corners so that they turn smoothly without puckering. Turn the flap right side out, press it carefully, and topstitch approximately 3 mm from the edge. Decorative stitching can also be added at this stage. Attach one half of your preferred closure to the flap and position the matching half on the front of the fabric organizer bag.
Attach the prepared strap to both sides of the exterior body. Position each end approximately 3 to 4 cm below the upper edge and reinforce it using a rectangle-and-cross stitching pattern. Make certain the strap is not twisted before sewing the second end. Because the organizer may carry several small tools or notions, secure stitching is important. A reinforced strap also allows the bag to be transported between a sewing room, craft class, or work area.
Construct the lining by placing the lining body pieces right sides together and sewing around the sides and bottom. Leave an opening approximately 8 to 10 cm wide along the bottom seam for turning. Box the lining corners using the same measurement used for the outer bag. The lining should closely match the exterior dimensions so that it fits smoothly without excessive loose fabric. Press the seams open whenever possible to reduce bulk.
Insert the exterior bag inside the lining so that the right sides are facing one another. Sandwich the flap between the exterior and lining at the back edge, positioning the raw edges together. The strap should remain tucked safely inside the bag during this stage. Clip around the entire upper opening and sew slowly, checking that the flap and strap are not accidentally caught in unwanted areas. Turn the entire 5 Pocket Bag Fabric Pattern through the opening left in the lining.
Finishing, Topstitching, Customization, and Everyday Uses
After turning the organizer right side out, close the lining opening with a narrow machine stitch or invisible hand stitch. Push the lining fully into the exterior shell and press the upper edge carefully. Topstitch around the opening approximately 3 to 4 mm from the edge. This line of stitching holds the lining in place and provides a finished appearance. Take extra care when sewing over the thick areas near the strap attachments.
Test the flap to make sure it folds naturally over the pockets and aligns with the closure. If you are using a magnetic snap, the flap should close without pulling excessively on the fabric. For a button closure, add an elastic loop or stitched buttonhole. Decorative buttons similar to the small colored fasteners visible in the photo can make the organizer even more charming. These finishing details transform a simple sewing organizer into a distinctive handmade accessory.
You can personalize the 5 Pocket Bag Fabric Pattern through your fabric choices. Bright polka dots create a playful interior, while floral prints offer a softer style. Geometric, ethnic-inspired, patchwork, denim, or solid fabrics can completely change the personality of the same pattern. Another attractive idea is assigning a different lining color to each organizer while using the same exterior print. This approach creates a coordinated collection without making every bag identical.
The five-pocket arrangement makes this project especially useful for craft organization. One compartment can store scissors, another can hold thread, another can contain measuring tapes, and smaller pockets can organize clips, needles, or marking tools. Crocheters can use the pockets for hooks, stitch markers, yarn needles, and small yarn balls. The organizer can also serve as a compact travel bag for toiletries, art supplies, stationery, or children’s craft materials.
Regular care will help your handmade fabric bag remain attractive. If you use washable cotton and compatible stabilizer, gentle hand washing is usually the safest option. Avoid excessively hot water because it may affect the stabilizer or cause strong colors to bleed. After washing, reshape the organizer and allow it to air dry. Light pressing can restore crisp edges, but always protect plastic or magnetic closures from direct iron contact.
Most importantly, treat your first 5 Pocket Bag Fabric Pattern as an opportunity to learn the structure. Your next organizer may be slightly wider, taller, deeper, or more heavily quilted depending on your preferences. Sewing patterns become much more versatile once you understand why each part exists. The body provides structure, the gussets add volume, the pockets create organization, the lining hides raw seams, and the flap protects the contents. Understanding these principles allows you to confidently adapt the design for many future sewing projects.
FAQ – Frequently Asked Questions About the 5 Pocket Bag Fabric Pattern
Is the 5 Pocket Bag Fabric Pattern suitable for beginners?
Yes. A confident beginner who already knows how to operate a sewing machine, sew straight seams, and turn fabric pieces can complete this project. The five separate compartments make the construction look complicated, but each component is created using simple sewing techniques. The best approach is to prepare and label every piece before beginning assembly.
What fabric works best for a five-pocket bag?
Medium-weight quilting cotton is one of the easiest materials to use because it is stable and simple to sew. Canvas can create an even stronger organizer, while denim gives the bag a casual appearance. If you use lightweight cotton, adding fusible interfacing or another suitable stabilizer is recommended to provide structure.
Why is interfacing important in this fabric organizer?
Interfacing gives the bag enough stiffness to remain upright instead of collapsing when the pockets are empty. It also strengthens the flap and main body. A medium-weight fusible interfacing is appropriate for many versions of this project, although heavier stabilizers can be used when a more structured finish is desired.
Can I make the pockets deeper?
Absolutely. Increase the width of the side folds or create separate gusset pieces. For example, changing a 2 cm fold to a 4 cm fold can provide noticeably more capacity. Keep in mind that deeper compartments increase the overall depth of the finished 5 pocket fabric bag, so the base may also need to be enlarged.
Can I reduce the number of pockets?
Yes. The construction method can easily be adapted to three or four pockets. Simply remove the unwanted compartment pieces and adjust the spacing between the remaining pockets. However, keeping all five compartments gives the organizer the distinctive layered appearance associated with the 5 Pocket Bag Fabric Pattern.
What can I store in the organizer?
The pockets are ideal for sewing notions, quilting clips, thread, scissors, rulers, embroidery supplies, crochet hooks, stationery, cosmetics, small art materials, or craft tools. Avoid placing extremely heavy or sharp objects inside unless the pocket seams and lining have been reinforced appropriately.
How can I make the bag stand upright?
Use a suitable stabilizer and create boxed corners at the bottom. A structured base can also be added by inserting a removable piece of firm interfacing covered with fabric. Keeping the lower pocket attachment straight will further help the finished organizer maintain its shape.
Do I need a special sewing machine?
No. A standard domestic sewing machine can handle the project when used with the correct needle. A universal needle may work for quilting cotton, but a heavier needle can help when sewing several stabilized layers. Sew slowly over bulky seams rather than forcing the fabric through the machine.
Can this pattern be made with fabric scraps?
Yes, and scrap sewing is a wonderful way to personalize the project. The pockets, lining, flap, strap, and body can all use different coordinating fabrics. You can combine leftover quilting cotton pieces while maintaining one repeated color throughout the project to create visual unity.
How do I achieve neat topstitching?
Press the fabric carefully before stitching and use the edge of the presser foot as a visual guide. Sew at a consistent speed and avoid pulling the fabric. A slightly longer stitch can create an attractive decorative finish around the flap, pockets, strap, and upper edge.
Can the strap be made adjustable?
Yes. Instead of sewing a fixed-length strap directly to the bag, add metal or plastic rings and an adjustable slider. This modification allows the organizer to function as a shoulder bag or crossbody-style craft carrier. Reinforce the attachment points because adjustable hardware places additional pressure on these areas.
How long does it take to sew the complete project?
The sewing time depends on experience and the amount of decorative work involved. Cutting, interfacing, pressing, pocket assembly, and finishing usually require more time than the basic seams themselves. Rather than trying to complete everything quickly, focus on accurate construction because neat pocket alignment is one of the most noticeable features of the design.
Conclusion
The 5 Pocket Bag Fabric Pattern combines creative fabric selection with practical organization, making it a rewarding sewing project for both everyday use and handmade gifting. Throughout this tutorial, you learned how to select suitable cotton fabrics, prepare interfacing, calculate practical measurements, construct five layered pockets, create gussets, assemble the structured exterior, sew the lining, prepare the flap, make a reinforced strap, install a closure, and finish the organizer with clean topstitching. Each technique contributes to the sturdy, colorful appearance that makes this style of bag so appealing.
Once you understand the basic construction, the possibilities for customization are extensive. You can change the dimensions, make deeper pockets, experiment with quilting, combine scrap fabrics, add decorative buttons, use contrasting linings, or adapt the strap to your preferred length. The same 5 Pocket Bag Fabric Pattern can become a sewing organizer, crochet supply carrier, craft storage bag, travel accessory, or practical everyday organizer simply by changing a few details.
The most important lesson is to work carefully through each stage and enjoy the creative process. Accurate cutting, consistent seam allowances, careful pressing, sturdy interfacing, and thoughtful fabric combinations can turn basic pieces of fabric into a functional handmade project that looks polished and unique. If you make your own version of this 5 Pocket Bag Fabric Pattern, leave your sincere opinion about the project and share your suggestions. Your ideas about colors, pocket sizes, fabrics, closures, and possible improvements can inspire new variations and make future sewing projects even more creative.