
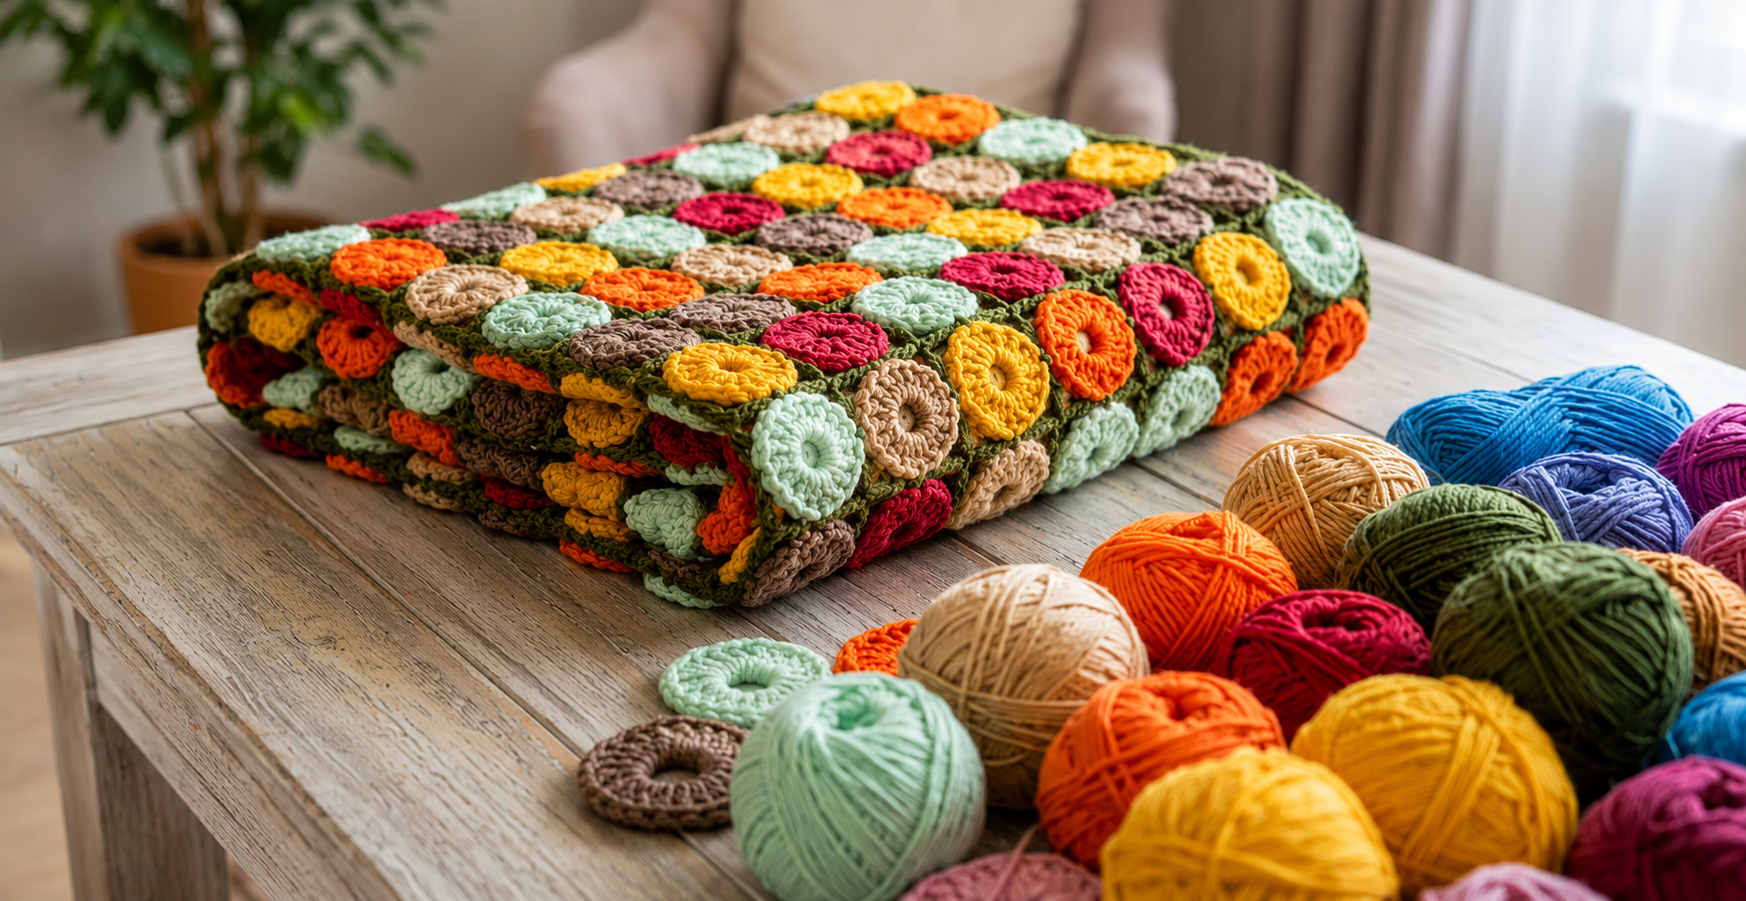
Crochet blanket with colorful circles Pattern is a cheerful crochet project that combines small circular motifs, rich texture, and a beautiful mix of warm and refreshing colors. The design is especially attractive because every circle becomes a small decorative feature while the darker green joining areas visually connect the entire blanket. Instead of working one enormous piece from the beginning, you can crochet the individual circles first and organize them later, which makes the project comfortable to carry and easy to manage. This approach is useful for beginners who want to practice repetitive crochet stitches while also giving experienced crocheters plenty of freedom to experiment with color placement. The finished blanket can be adapted for a sofa, reading chair, nursery, guest room, or bedroom simply by increasing or reducing the number of motifs. Throughout this tutorial, you will learn how to understand the crochet stitch key, make each colorful circle, create the surrounding section, join the motifs, and finish the blanket neatly.
One of the most appealing features of this Crochet blanket with colorful circles Pattern is the balance between repetition and creativity. Every motif follows essentially the same construction method, but changing the yarn color creates a completely different visual effect from one circle to the next. Colors such as mustard yellow, orange, raspberry red, mint green, beige, brown, and olive green can create the warm handmade appearance seen in the inspiration image. You do not have to duplicate those colors exactly, however, because the pattern works beautifully with leftover yarn, coordinated yarn packs, pastel palettes, neutral combinations, or bold rainbow shades. Using the same yarn weight throughout the blanket is more important than using identical colors, since consistent yarn thickness helps every motif maintain approximately the same diameter. A carefully planned palette also makes the blanket feel intentional rather than random, even when many different shades are included. Before crocheting a large quantity of circles, make a sample motif so you can confirm that your hook size, tension, yarn, and finished measurements work well together.
Another important part of the Crochet blanket with colorful circles Pattern is understanding the crochet abbreviations and stitch symbols before beginning. For this pattern, the main stitch key is ch = chain, sl st = slip stitch, sc = single crochet, hdc = half double crochet, dc = double crochet, st = stitch, sp = space, MR = magic ring, inc = increase, and rep = repeat. A chain stitch creates height and connecting spaces, while a slip stitch closes rounds or moves the yarn without adding significant height. Single crochet produces a compact fabric, half double crochet adds moderate height and softness, and double crochet creates taller stitches that allow the circle to expand quickly. If you normally use UK terminology, remember that the names differ, so this tutorial follows standard U.S. crochet terminology throughout. Keeping this crochet key nearby while working will make the instructions easier to follow and help you understand how each round contributes to the shape.
Materials, Crochet Stitch Key, and Preparation
Choose a medium-weight yarn that feels soft but has enough structure to keep the circular motifs clearly defined. Worsted-weight or similar yarn is a practical option for a blanket because it works up steadily and produces a comfortable fabric without making the motifs excessively bulky. Depending on the final dimensions and yarn thickness, a medium throw may require approximately 1,200 to 1,800 grams of yarn in total. This amount is only a planning estimate because individual tension, motif size, border width, and yarn type can change the final quantity significantly. Reserve a generous amount of your joining color because it will appear around nearly every circle and may also be used for the outer border. In the pictured style, an olive or moss green creates an attractive framework around the brighter circles.
DISCOVER MORE FREE PATTERNS HERE!
Select a crochet hook recommended for your yarn, usually somewhere around 4 mm to 5.5 mm for medium-weight yarn. The ideal hook is the one that produces a flexible fabric without leaving excessively large spaces between stitches. If your circles feel stiff, try increasing the hook size slightly. If they feel loose or floppy, a slightly smaller hook may give better definition. Blanket gauge does not have to be as exact as garment gauge, but consistent tension is still important because all motifs should fit together evenly. Crochet one complete test motif before committing to the full blanket.
Your basic crochet stitch key begins with MR, or magic ring. The magic ring creates an adjustable center that can be pulled tightly closed after the first round. If you do not enjoy using a magic ring, chain 4 and join the first and last chain with a sl st to form a small ring. Crochet the first round into this ring instead. Both methods can produce a good result, so use whichever technique gives you greater control. The most important goal is a secure center that does not leave a large unwanted hole.
The abbreviation dc, meaning double crochet, will do much of the work in the colorful circle. To make one double crochet, yarn over, insert the hook into the specified stitch or space, yarn over and pull up a loop, yarn over and pull through two loops, then yarn over again and pull through the final two loops. Double crochet stitches create height and help the motif expand efficiently. When multiple double crochets are worked into one stitch, they form an increase. Increases are essential when crocheting flat circles because each new round has a larger circumference.
You will also use sc, or single crochet, particularly when creating a firm transition or joining section. Insert the hook into the stitch, yarn over and pull up a loop, then yarn over and pull through both loops on the hook. Single crochet is shorter and denser than double crochet, making it useful for controlling the shape. Sl st, or slip stitch, is made by inserting the hook, pulling up a loop, and immediately pulling that loop through the loop already on the hook. Slip stitches are commonly used to close each round cleanly.
Before beginning multiple motifs, organize your colors. One helpful method is to place the yarn balls beside each other and decide approximately how often each shade should appear. You might use mint green and beige frequently, raspberry and orange as bright accents, mustard yellow for warmth, and brown for visual depth. The green joining yarn can remain consistent across all motifs. Photographing or writing down your planned color sequence can prevent accidental clustering. A little preparation at this stage can make the finished colorful crochet blanket look far more balanced.
How to Crochet the Colorful Circle Motifs
Begin the first circle with your chosen color and make an MR. Chain 3; these chains may count as the first double crochet depending on your preferred method. Work 11 dc into the magic ring so that you have approximately 12 stitch positions around the center when the beginning chain is included. Pull the magic ring gently until the center closes neatly. Join the round with a sl st into the top of the beginning chain. This creates the compact center of your first circular motif.
For Round 2, chain 3 and work one additional dc into the same stitch. Continue by working 2 dc in each stitch around. This is the first major increase round and should approximately double your stitch count. Join with a slip stitch when you reach the beginning. The motif should now resemble a small flat disc rather than a cup. If the edges curl strongly upward, check that you have not accidentally missed an increase.
For Round 3, begin with chain 3. Work 2 dc in the next stitch, 1 dc in the following stitch, and repeat this sequence around the circle. Another common way to describe the same structure is [1 dc, inc] rep around. The purpose of this round is to add circumference gradually instead of placing an increase in every stitch. Join with a slip stitch at the end. Your circle should continue lying reasonably flat on the table.
If you want larger circles, continue the mathematical increase sequence. On the next round, use approximately [1 dc in next 2 sts, 2 dc in next st] around. A following round could use [1 dc in next 3 sts, 2 dc in next st] around. Each additional round places one more regular stitch between increases. This gradual expansion prevents excessive ruffling. However, the inspiration design uses relatively compact circles, so approximately three to five rounds per circle may be enough depending on yarn weight and hook size.
Fasten off the circle by cutting the yarn while leaving a tail of approximately 10 to 15 cm. Pull the tail completely through the final loop and tighten gently. Weave the yarn end through several stitches on the back using a tapestry needle. Change direction at least once so the tail remains secure during normal use and washing. Avoid simply cutting the tail close to the knot because crochet fabric stretches and movement can loosen short ends over time. Careful finishing is one of the details that separates a durable handmade blanket from a temporary decorative piece.
Continue crocheting circles in multiple colors until you have enough motifs for your planned blanket. For example, a small throw might contain approximately 60 to 100 motifs, while a larger blanket can require significantly more. Lay the circles on a bed, table, or clean floor occasionally to evaluate the color balance. Try to avoid placing too many identical colors next to one another unless you specifically want grouped sections. This stage is where the Crochet blanket with colorful circles Pattern becomes truly personal because every arrangement creates a different final appearance.
Turning the Circles into Joinable Crochet Motifs
Once the colorful circles are complete, attach the joining color to the edge of one circle. Olive green works beautifully for an earthy appearance, but forest green, cream, navy, gray, or another neutral shade can work just as well. Chain 1 and begin crocheting sc stitches evenly around the circle. This first transition round provides a stable foundation for shaping the motif. Do not pull the stitches too tightly because the edge needs enough flexibility for the following rounds. Join with a slip stitch after completing the circumference.
The next step is converting the circular form into a shape that can sit neatly beside neighboring motifs. One practical method is to create four subtle corner points around the circle. Divide the stitch count as evenly as possible into four sections and mark those positions with removable stitch markers. At each marked corner, work a combination such as 2 dc, ch 2, 2 dc into the same space. Between the corners, work regular double crochet stitches or a mixture of hdc and dc as needed to keep the edges smooth. These corner increases gradually transform the outer edge into a rounded square.
On the following round, continue working around the motif in the same green yarn. Crochet dc along each side and place 2 dc, ch 2, 2 dc into each corner space. If the sides begin to ripple, reduce unnecessary increases between corners. If the motif starts pulling inward or forming a bowl shape, it may need slightly more spacing or an additional stitch along each side. Crochet is flexible, and small tension adjustments are normal. The goal is not mathematical perfection but four usable sides that will align cleanly with neighboring motifs.
When the green frame is finished, place the motif on a flat surface and measure it. Make a note of the width and height because every additional motif should remain reasonably close to the same dimensions. A difference of a few millimeters can often disappear during blocking, but large size differences may create puckering during assembly. If one motif is considerably smaller, check whether you accidentally skipped stitches. If it is larger, your tension may have loosened. Consistency at this stage will make joining much easier.
Repeat the framing process around every colored circle. This repetitive step may seem time-consuming, but it gives the blanket its distinctive appearance. The green background visually separates the bright circles while simultaneously connecting them into one cohesive design. It also allows you to correct slight differences in the sizes of the central circles by adjusting the surrounding stitches. Keep the number of rounds around each circle consistent unless you intentionally need a small correction. Place finished motifs into stacks so they remain organized.
Before joining, arrange all framed motifs into rows. Move them around until the colors feel evenly distributed. Step several feet away and look at the layout as a complete composition rather than individual pieces. Photograph the final arrangement with your phone so you can reconstruct it if the motifs become mixed while joining. This simple organizational trick is extremely useful for a crochet blanket with colorful circles, especially when dozens of different colors are involved. Once you are satisfied with the arrangement, you can begin transforming the individual motifs into a single blanket.
Joining, Border Finishing, and Caring for the Blanket
There are several ways to join crochet motifs, but a slip stitch join creates a durable seam with visible handmade texture. Place two motifs with their desired sides facing each other or facing outward, depending on the seam appearance you prefer. Insert your hook through the corresponding edge stitches of both motifs and make a slip stitch. Continue along the entire side while matching stitch positions carefully. Avoid tightening each slip stitch aggressively because an overly tight seam can make the finished blanket stiff.
For a flatter appearance, you can use a single crochet join or sew the motifs together using a tapestry needle and matching green yarn. Whichever method you select, join the motifs first into horizontal rows. Once each row is complete, connect the rows to one another. This systematic approach is easier to control than trying to attach motifs in random directions. Check the blanket frequently while joining to make sure the seams remain aligned. Smooth the fabric gently on a flat surface after completing every few rows.
After all motifs have been joined, inspect the outer edge of the blanket. Small variations may appear where motifs meet, and a crochet border is an effective way to unify these areas. Attach the green yarn at any convenient corner and work one round of sc evenly around the entire blanket. At each outer corner, work approximately 3 sc in the same corner stitch or space so the border can turn without pulling. Join with a slip stitch. This simple first border round creates a clean foundation.
For the second border round, you can continue with single crochet for a minimalist finish or switch to hdc for a slightly softer edge. Work one stitch into each stitch around and place three appropriate stitches into each corner. A third round can be added if you want a wider border. You may continue using green so the border visually matches the motif frames, or introduce one of the circle colors for additional contrast. Keeping the border uncomplicated allows the colorful motifs to remain the main feature.
Blocking helps the Crochet blanket with colorful circles Pattern settle into its final shape. Follow the care recommendations appropriate for your yarn fiber. Many acrylic projects can be gently washed and laid flat to dry, while wool and other natural fibers may require different handling. Arrange the damp blanket carefully on a large clean surface, smoothing the motifs and aligning the edges without overstretching them. Allow the project to dry completely before folding or using it. Proper blocking can significantly improve the appearance of the seams and outer border.
For long-term care, store the blanket clean and completely dry. Washing requirements depend on your yarn, so keep the original yarn label for reference. When machine washing is permitted, a gentle cycle and cool water are often preferable for handmade crochet pieces. Avoid rough handling that may stretch the joined motifs unnecessarily. Periodically inspect the blanket for loose yarn tails, particularly after the first few washes. With secure finishing and appropriate care, this colorful crochet blanket can remain beautiful for many years.
Frequently Asked Questions About the Crochet blanket with colorful circles Pattern
Is the Crochet blanket with colorful circles Pattern suitable for beginners?
Yes. A confident beginner who understands basic stitches such as chain, slip stitch, single crochet, and double crochet can complete this design. The project is particularly useful for developing consistent tension because the same circular construction is repeated many times. Beginners can practice with a few sample circles before starting the full blanket.
What does MR mean in a crochet pattern?
MR means magic ring or magic circle. It is a technique used to begin crochet projects worked from the center outward. After crocheting the first stitches into the adjustable loop, the yarn tail is pulled to close the center. If the technique feels uncomfortable, a small ring made from several chain stitches can usually be substituted.
Why is my crochet circle curling?
Curling often occurs when the round contains too few increases, the hook is too small, or the crocheter is working with very tight tension. Compare your stitch count with the pattern and confirm that increases have not been skipped. Moving to a hook approximately 0.5 mm larger may also help if your natural tension is very tight.
Why does my crochet circle become wavy or ruffled?
A wavy edge generally indicates that the circle contains more increases than necessary for your particular yarn and tension. Reduce the number of increases slightly on the following round. Crochet formulas are helpful guides, but yarn construction and personal tension can affect how quickly a circle needs to expand.
Can I use leftover yarn for this blanket?
Absolutely. This pattern is an excellent scrap yarn crochet project because each circle requires a relatively small amount of yarn. For the most consistent result, try to use yarns with similar thickness and fiber characteristics. Very thick and very thin yarns combined in the same blanket can create uneven motif sizes.
How many colors should I use?
There is no required number. Six to eight colors can create a rich multicolored effect similar to the inspiration piece, while three or four shades can produce a more controlled palette. You can also make every circle a different color. Keeping one consistent joining color helps unify even a highly varied collection of motifs.
How many circles do I need for a blanket?
The number depends on the finished size of each framed motif and the desired blanket dimensions. After completing one framed sample, measure it from edge to edge. Divide your desired blanket width and length by the motif measurement to estimate how many motifs you need in each direction. Multiply those numbers to estimate the total quantity.
What yarn works best for a colorful crochet blanket?
A soft medium-weight yarn is a convenient choice because it offers a good balance of warmth, drape, durability, and stitch definition. Acrylic yarn is often practical for everyday blankets, while cotton can create a heavier, breathable fabric. Wool or wool blends provide warmth but should be cared for according to the fiber instructions.
Can the circles be made larger?
Yes. Continue adding increase rounds using the standard flat-circle progression. After a round containing an increase every two stitches, the next round can place an increase every three stitches, then every four stitches, and so forth. Stop when the circle reaches your preferred diameter before adding the joining-color frame.
Do all the motifs have to be blocked individually?
Individual blocking can produce extremely consistent motifs, but it is not always necessary. If your tension is stable and all motifs are similar in size, you can assemble the blanket and block the entire finished piece. If the motifs vary noticeably, blocking them before joining can make assembly easier.
What is the best way to hide yarn ends securely?
Use a tapestry needle to weave each tail through several stitches on the wrong side of the motif. Change direction at least once and avoid pulling so tightly that the fabric puckers. Trimming the yarn only after it has been securely woven helps reduce the risk of the ends working loose.
Can I make this pattern into a baby blanket?
Yes. Simply reduce the number of motifs to create the dimensions you want and select a soft, washable yarn appropriate for the intended use. Make sure every yarn tail is securely woven and that the finished construction does not include detachable embellishments. The colorful circular design can create a cheerful and visually engaging baby blanket.
Can I use one color instead of several colors?
Certainly. Although the Crochet blanket with colorful circles Pattern is designed to highlight multiple colors, a monochromatic version can look elegant and sophisticated. You could use several shades of one color, such as light blue through navy, or create cream circles surrounded by a contrasting border.
How can I stop the blanket border from curling?
Make sure the border contains enough stitches along each side without overcrowding them. At the corners, work additional stitches into one space so the edge can turn naturally. If the border ruffles, you may have too many stitches. If it curls inward, you may need slightly more stitches or a larger hook.
Conclusion
The Crochet blanket with colorful circles Pattern combines simple crochet techniques with creative color planning to produce a warm, textured, and highly customizable handmade blanket. Starting with a magic ring, you learned how to build the circles using double crochet increases, how to understand essential crochet abbreviations such as ch, sl st, sc, hdc, dc, MR, st, sp, inc, and rep, and how to maintain a flat circular shape while increasing each round.
You also learned how to surround each colored circle with a consistent joining shade, gradually transform the round motif into a joinable shape, arrange the colors before assembly, and connect the motifs using slip stitches, single crochet, or sewing. These techniques make the pattern flexible enough for small throws, baby blankets, large bed covers, and many other sizes.
The finishing process is equally important. A carefully worked outer border helps unify the motifs, while secure yarn ends, consistent joining, and appropriate blocking improve both durability and appearance. Rather than rushing through these final steps, consider them part of the creative process because careful finishing can make a significant difference in the finished blanket.
Most importantly, this project gives you room to create something personal. Change the colors, enlarge the circles, experiment with the joining shade, or adjust the number of motifs until the design suits your own style. The basic construction remains approachable while offering countless opportunities for variation. If you make your own Crochet blanket with colorful circles Pattern, I would love to know what you think about the design and the step-by-step instructions. Leave your sincere opinion, share which color combination you would choose, and feel free to suggest ideas or variations that could make this crochet pattern even more useful and inspiring for other crocheters.