
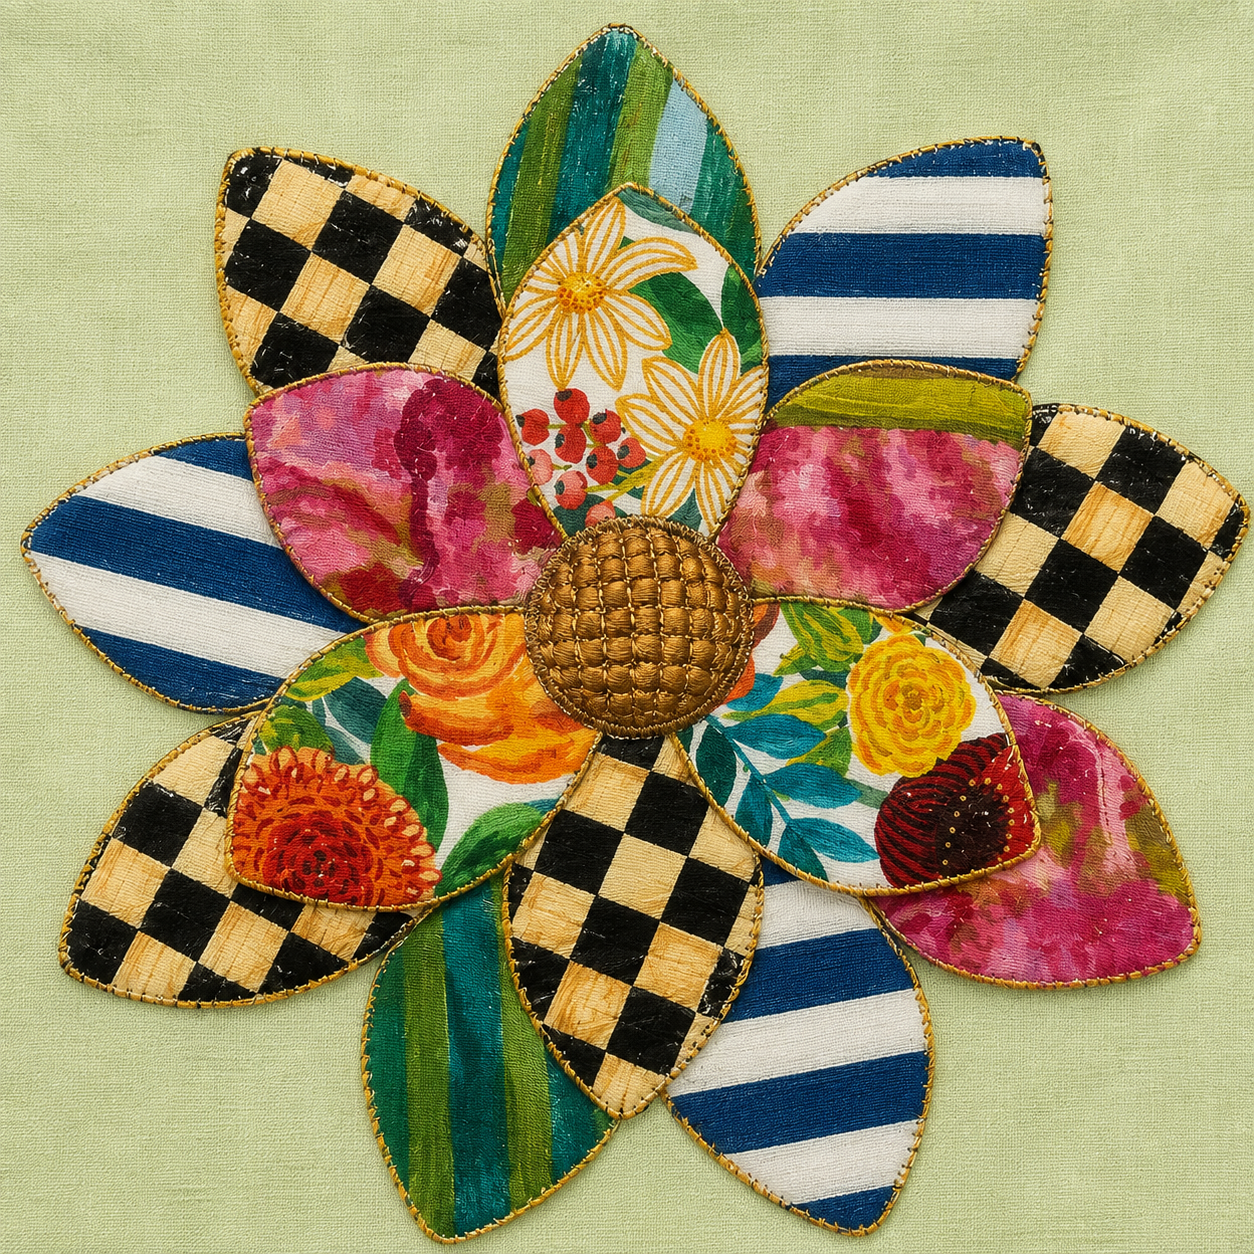
The Flower Wall Panel Fabric Pattern is a colorful fabric-craft project that transforms petal-shaped pieces into an eye-catching decorative flower for a wall, sewing room, craft corner, or creative studio. Inspired by the photo, this design combines several prints, bold colors, contrasting patterns, and a textured circular center. The finished flower has a layered appearance, with petals arranged in different directions to create volume and movement. One of the most attractive features of this project is that every petal can have its own personality, making the Flower Wall Panel Fabric Pattern ideal for using coordinated fabric scraps or a carefully selected collection of prints. Although the original inspiration has a polished, almost ceramic appearance, the same composition can be recreated beautifully with fabric, interfacing, batting, decorative stitching, and a sturdy backing. The result is a cheerful textile decoration that feels handmade, artistic, and completely customizable.
A Flower Wall Panel Fabric Pattern can also be a wonderful project for sewists who enjoy appliqué, patchwork, fabric collage, and dimensional textile art. Instead of constructing a traditional square quilt block, you work with individual petal templates and build the design outward from the center. This approach makes the project easy to personalize because the petals do not need to match. Florals, stripes, checkerboard prints, abstract fabrics, greens, pinks, blues, yellows, and neutral tones can all work together when the overall arrangement is balanced. The key is to alternate strong prints with calmer fabrics so that the design remains visually clear. You can also use this project to practice accurate template cutting, interfacing, turning curved edges, topstitching, layering, and arranging fabric pieces before final assembly.
Another advantage of the Flower Wall Panel Fabric Pattern is that you can adapt the dimensions to the space where you want to display it. A small version can become a decorative hoop project, while a larger version can serve as a statement wall hanging. For a design similar to the photograph, the petals should be elongated with rounded or slightly pointed tips, arranged in overlapping rings around a raised center. The outer petals can be approximately 20 to 24 cm long, while the smaller inner petals can measure around 15 to 19 cm. These measurements do not need to be exact because the handmade character comes from slight variations in size, pattern, and placement. What matters most is maintaining a consistent petal shape and arranging the pieces evenly around the center before permanently attaching them.
Materials and Preparing the Flower Wall Panel Fabric Pattern
To begin your Flower Wall Panel Fabric Pattern, gather several coordinating cotton fabrics. Approximately 8 to 12 different prints will give you enough variety to recreate the lively appearance shown in the inspiration image. Look for floral fabric, bold stripes, checks, painterly prints, greens, pinks, yellows, blues, and black-and-cream designs. Quilting cotton is a particularly good option because it is easy to cut, press, stabilize, and sew. If you prefer a richer appearance, you can also mix cotton with linen-look fabrics, canvas, or carefully stabilized decorative fabrics.
DISCOVER MORE FREE PATTERNS HERE!
You will also need fusible interfacing or medium-weight stabilizer. This material helps the petals keep their shape instead of becoming soft or floppy. For a dimensional wall panel, medium-weight fusible interfacing is usually more practical than very stiff craft stabilizer. You can also add a thin layer of batting inside each petal if you want a padded effect. The batting gives the finished flower more depth and makes the decorative stitching around the edge more visible.
For the pattern, prepare two main petal templates. A practical outer petal can measure approximately 22 cm long and 11 cm wide, while a smaller inner petal can measure about 17 cm long and 9 cm wide. Draw the petal with a broad lower section that narrows slightly toward a rounded or pointed tip. Add approximately 0.7 to 1 cm seam allowance around the template if you plan to sew and turn the petals. If you prefer raw-edge appliqué, you can cut directly on the finished template line.
The flower shown in the reference has several overlapping petals, so plan for approximately 12 to 16 petals depending on the final diameter you want. A balanced arrangement might include eight larger petals in the back layer and six to eight smaller petals in the front layer. You do not have to follow a strict number. Before cutting all your fabrics, make a few paper templates and arrange them in a circle. This gives you a good idea of the final size and helps you decide whether additional petals are necessary.
For the center, cut two fabric circles approximately 11 to 14 cm in diameter. You can make the center from gold, mustard, brown, bronze, or another contrasting color. To imitate the dimensional center shown in the image, insert batting between the fabric layers and quilt a grid, curved lines, or small squares across the surface. Another option is to create a gathered or stuffed center using polyester filling. The important goal is to make the center visually strong enough to anchor the colorful petals.
Before sewing, wash and press the fabrics if necessary. Pressing is especially important for the Flower Wall Panel Fabric Pattern because crisp fabric makes template cutting more accurate. Apply interfacing to the wrong side of the fabric according to the manufacturer’s general heat-setting method, being careful not to stretch the pieces. Once everything is stabilized and pressed, you are ready to cut and construct the individual petals.
Cutting, Sewing, and Shaping the Fabric Petals
Trace your petal templates onto the wrong side of the prepared fabrics. To capture the playful appearance of the Flower Wall Panel Fabric Pattern, pay attention to print placement while tracing. A large flower can be centered inside a petal, while stripes can run horizontally, vertically, or diagonally. Checkerboard fabric looks especially attractive when the checks are positioned at an angle. This intentional placement makes every petal look like a small piece of textile artwork.
For a turned-edge petal, cut two matching fabric pieces for each petal. Place them right sides together and pin around the edges. If you are using batting, place a thin batting piece underneath one fabric layer. Sew around the petal using a seam allowance of approximately 0.7 cm, leaving an opening of about 4 to 5 cm along one lower side. Sew slowly around the rounded tip so the final curve remains smooth.
Trim the seam allowance slightly around tight curves and clip carefully where necessary. Do not cut through the stitching. Turn the petal right side out through the opening, using a blunt turning tool to gently shape the tip and curved edges. Press the petal carefully with an iron. Fold the raw edges of the opening inward so they align with the sewn seam. The opening can be closed later with topstitching or a small hand stitch.
Topstitch approximately 2 to 3 mm from the petal edge. This step gives the petals a neat outline and helps them remain flat. You may use matching thread for a subtle finish or contrasting thread for a decorative appearance. If you want the fabric version to resemble the outlined edges in the photo, gold, mustard, dark brown, or black topstitching can create an attractive border around each colorful petal.
Repeat this process with every petal, alternating fabrics and designs. When several petals are completed, place them side by side and evaluate the color distribution. Try not to place identical patterns directly next to one another. For example, separate two striped petals with a floral or solid-looking print. Likewise, distribute dark checkerboard fabrics around the flower rather than grouping them in one area. This creates the balanced, energetic look that defines the Flower Wall Panel Fabric Pattern.
If you want even more dimension, slightly shape the base of each petal before assembly. Make a small pleat of approximately 1 to 2 cm at the bottom edge and secure it with a few stitches. This makes the petal rise slightly away from the backing. Use this technique only on selected petals because too much volume can make the wall panel difficult to hang neatly. A combination of flat and gently raised petals often gives the most natural layered effect.
Assembling the Layered Flower Wall Panel
Before permanently joining anything, arrange all the large petals on a table or design board. Place their lower ends toward the center, creating the first circular layer. Rotate each petal slightly so the tips form an even outer silhouette. The Flower Wall Panel Fabric Pattern looks best when the flower feels balanced without appearing overly symmetrical. Small variations in spacing make the design look artistic and handcrafted.
Once you like the outer layer, photograph or mark the arrangement so you can reproduce it. Begin attaching the large petals to a backing. A round backing approximately 35 to 45 cm in diameter works well for a medium wall flower, although your exact size depends on the petals. You can use heavy cotton, canvas, felt, or fabric-covered foam stabilizer. Position the lower portion of each petal on the backing and stitch securely across the base.
After attaching the first layer, begin placing the smaller petals over the gaps between the large petals. This overlapping arrangement is what gives the Flower Wall Panel Fabric Pattern its dramatic layered structure. Rotate the smaller petals until the colors are evenly distributed. Place your strongest feature fabrics where they can remain visible rather than hiding their designs under neighboring petals. Pin or clip each petal temporarily before sewing.
Attach the second layer by stitching only near the base of each petal. Leaving the upper portion free creates a slight three-dimensional appearance. You can use a straight stitch, reinforced stitching, or hand sewing with strong thread. Because this project is primarily decorative and will hang vertically, the seams do not need to withstand the stress required for clothing or bags, but they should still be secure enough to support the flower over time.
Now prepare the decorative center. If you are using two circles, sew them right sides together while leaving a small opening. Turn the circle, lightly stuff it with polyester filling or insert batting, then close the opening. Quilt a grid or decorative pattern across the center to create texture. A raised center approximately 12 cm wide creates a strong focal point and hides the attachment seams at the base of the petals.
Position the center directly over the petal bases and check that it covers all visible stitching. Hand sewing is often easiest for this step because it gives you more control over the thick layered structure. Use small, strong stitches around the entire circumference. When the center is attached, lift and adjust the petals gently. Your Flower Wall Panel Fabric Pattern should now resemble a large layered blossom with multiple prints radiating from a textured central disk.
Finishing, Hanging, and Customizing the Flower Wall Panel Fabric Pattern
The back of the wall panel should be finished neatly, especially if you intend to give the project as a handmade gift. Cut a second backing piece slightly smaller than the first and position it over the visible construction stitches. Turn the raw edge inward and sew it by hand with a ladder stitch or slip stitch. Felt is particularly convenient for this purpose because it does not fray and can easily cover the back of the fabric wall decoration.
To create a hanging system, sew a small fabric sleeve, hanging loop, or two strong tabs near the upper back section. A lightweight wooden dowel can be inserted into a sleeve if your wall flower is large. For smaller projects, a strong fabric loop may be sufficient. Make sure the hanging point is centered so the flower remains level. Test the panel before final installation because the layered petals may shift the visual center slightly.
You can personalize the Flower Wall Panel Fabric Pattern by changing the entire color palette. A spring version could use pink, yellow, lavender, pale green, and sky blue. A farmhouse version could feature cream, black, muted green, beige, and warm mustard. For a dramatic modern wall hanging, try black-and-white prints mixed with emerald green, ruby red, and metallic accents. Because the project is based on repeated petal shapes, the fabric choices determine most of its personality.
Scrap lovers can turn this project into a fabric scrap wall art piece. Small remnants from previous quilts, bags, cushions, or appliqué projects can become individual petals. This approach adds sentimental value because each print can represent a previous handmade project. For better visual balance, choose one or two repeated colors that appear in several petals. These repeated colors help connect unrelated prints and prevent the design from looking chaotic.
Decorative stitching is another effective way to enhance the project. Try blanket stitch, zigzag stitching, free-motion quilting, or simple embroidered lines around selected petals. You can quilt veins through the petals or add small hand-embroidered details over floral fabrics. However, avoid adding decoration to every surface. The Flower Wall Panel Fabric Pattern already contains a large amount of visual information, so a few carefully placed details are usually more effective than excessive embellishment.
After completing the panel, inspect the entire project from a distance. Look for petals that fold awkwardly, loose threads, uneven spacing, or areas where the backing is visible. Adjust the petals gently and secure any sections that need additional support. A quick final press may be useful, but avoid pressing heavily over dimensional batting or stuffing. Once finished, the project becomes a vibrant piece of handmade textile wall art that can add color and personality to almost any creative space.
FAQ About the Flower Wall Panel Fabric Pattern
What is a Flower Wall Panel Fabric Pattern?
A Flower Wall Panel Fabric Pattern is a textile project made by arranging fabric petal shapes around a central decorative piece. The petals can be sewn, appliquéd, padded, quilted, or layered to create a large flower designed primarily for wall decoration.
What fabric works best for this project?
Quilting cotton is one of the easiest choices because it is stable, easy to sew, and available in countless prints. Medium-weight cotton, linen blends, and lightweight canvas can also work. When combining different fabric weights, adding fusible interfacing helps create a more consistent structure.
How many petals should I make?
For a medium-size flower, approximately 12 to 16 petals usually create a full appearance. You might use eight larger petals for the back layer and six to eight smaller petals for the front. The exact number depends on your petal dimensions and desired flower size.
Can beginners make the Flower Wall Panel Fabric Pattern?
Yes. A confident beginner can complete this project with patience. The main skills are tracing templates, cutting fabric, sewing curved seams, turning pieces, topstitching, and basic hand sewing. Because the project does not require complicated fitting or garment construction, it is a good way to practice dimensional sewing.
Do I need batting inside the petals?
No. Batting is optional. Without batting, the petals will be flatter and lighter. Adding a thin layer of batting gives the fabric flower wall hanging more body and creates a soft quilted appearance. Avoid very thick batting because it may make the petal edges difficult to turn neatly.
Can I make this project with raw-edge appliqué instead?
Absolutely. Cut each petal from fabric backed with fusible web, fuse the petals to a sturdy fabric background, and stitch around the edges. Raw-edge appliqué creates a flatter wall panel and may be faster than making individually turned petals.
How can I make the petals stay firm?
Use medium or heavyweight fusible interfacing, depending on the desired structure. You can also add thin batting or sew a second layer of fabric to each petal. For very large flowers, foam stabilizer can be used selectively, but it should be thin enough to avoid making the project bulky.
What size should the finished wall flower be?
There is no required size. Using outer petals around 22 cm long can create a flower approximately 45 to 60 cm across, depending on overlap and arrangement. You can enlarge or reduce the templates proportionally to create a different finished diameter.
How do I choose fabrics that look good together?
Start with one feature fabric containing several colors. Choose the remaining fabrics by pulling colors from that print. Mix large-scale florals with stripes, checks, abstract prints, and quieter designs. Repeating a few colors around the flower helps unify the Flower Wall Panel Fabric Pattern.
Can I wash the finished wall panel?
Because it is a decorative layered project, frequent machine washing is generally unnecessary. Light dust can usually be removed carefully. If you expect the project to require washing, prewash the fabrics before construction and use washable stabilizers and fillings.
Can the flower be made without a backing panel?
Yes, but a backing makes assembly easier and keeps the petals securely positioned. For a completely dimensional flower, the petal bases can be stitched together and covered with a center piece, although the structure may require additional reinforcement.
How can I make the center look dimensional?
Add batting or a small amount of polyester filling inside a fabric circle. Quilt lines, grids, or small geometric sections over the surface. This produces a textured center similar to the raised focal point seen in the inspiration design.
Is this a good project for fabric scraps?
Yes. The project is excellent for scrap fabric sewing because each petal requires a relatively small piece of fabric. Mixing scraps also gives the flower the colorful patchwork character that makes this design especially appealing.
Can I enlarge the Flower Wall Panel Fabric Pattern?
Yes. Increase the dimensions of both petal templates proportionally. For a very large flower, use stronger stabilizer and a sturdier backing. You may also need additional petals to maintain a full circular arrangement.
What other projects can be created from the same petal pattern?
The petal templates can be adapted for table decorations, cushion appliqués, fabric wreaths, quilt blocks, tote bag embellishments, seasonal decorations, and smaller framed textile art. Changing the scale gives the basic pattern many creative possibilities.
Conclusion
The Flower Wall Panel Fabric Pattern is a creative way to combine sewing, fabric selection, appliqué-inspired layering, and dimensional textile art in one colorful project. By preparing two sizes of petal templates, stabilizing your fabrics, sewing and shaping each petal, arranging the pieces in overlapping layers, and finishing everything with a padded center, you can recreate the striking floral composition inspired by the photograph.
Throughout the project, the most important elements are fabric balance, accurate cutting, thoughtful arrangement, and secure assembly. You do not need perfectly matching prints or identical petals. In fact, contrasting florals, checks, stripes, painterly fabrics, and bold colors are what give the Flower Wall Panel Fabric Pattern its distinctive handcrafted personality. This project can also be adapted to your own sewing style. You can create a flat appliqué version, add batting for dimension, use scraps from previous quilts, embroider the petals, or completely change the color palette. The same basic pattern can produce everything from a cheerful spring flower to an elegant neutral wall decoration.
EASILY FIND THE PDF FOR THIS PATTERN HERE!
Most importantly, enjoy experimenting with the arrangement before sewing everything permanently. Fabric crafting becomes especially rewarding when a simple template can be transformed through color and creativity into something completely personal. If you make your own Flower Wall Panel Fabric Pattern, leave your sincere opinion about the project and share any suggestions, color combinations, or creative variations you would love to try. Your ideas may inspire an entirely new version of this beautiful fabric flower.