
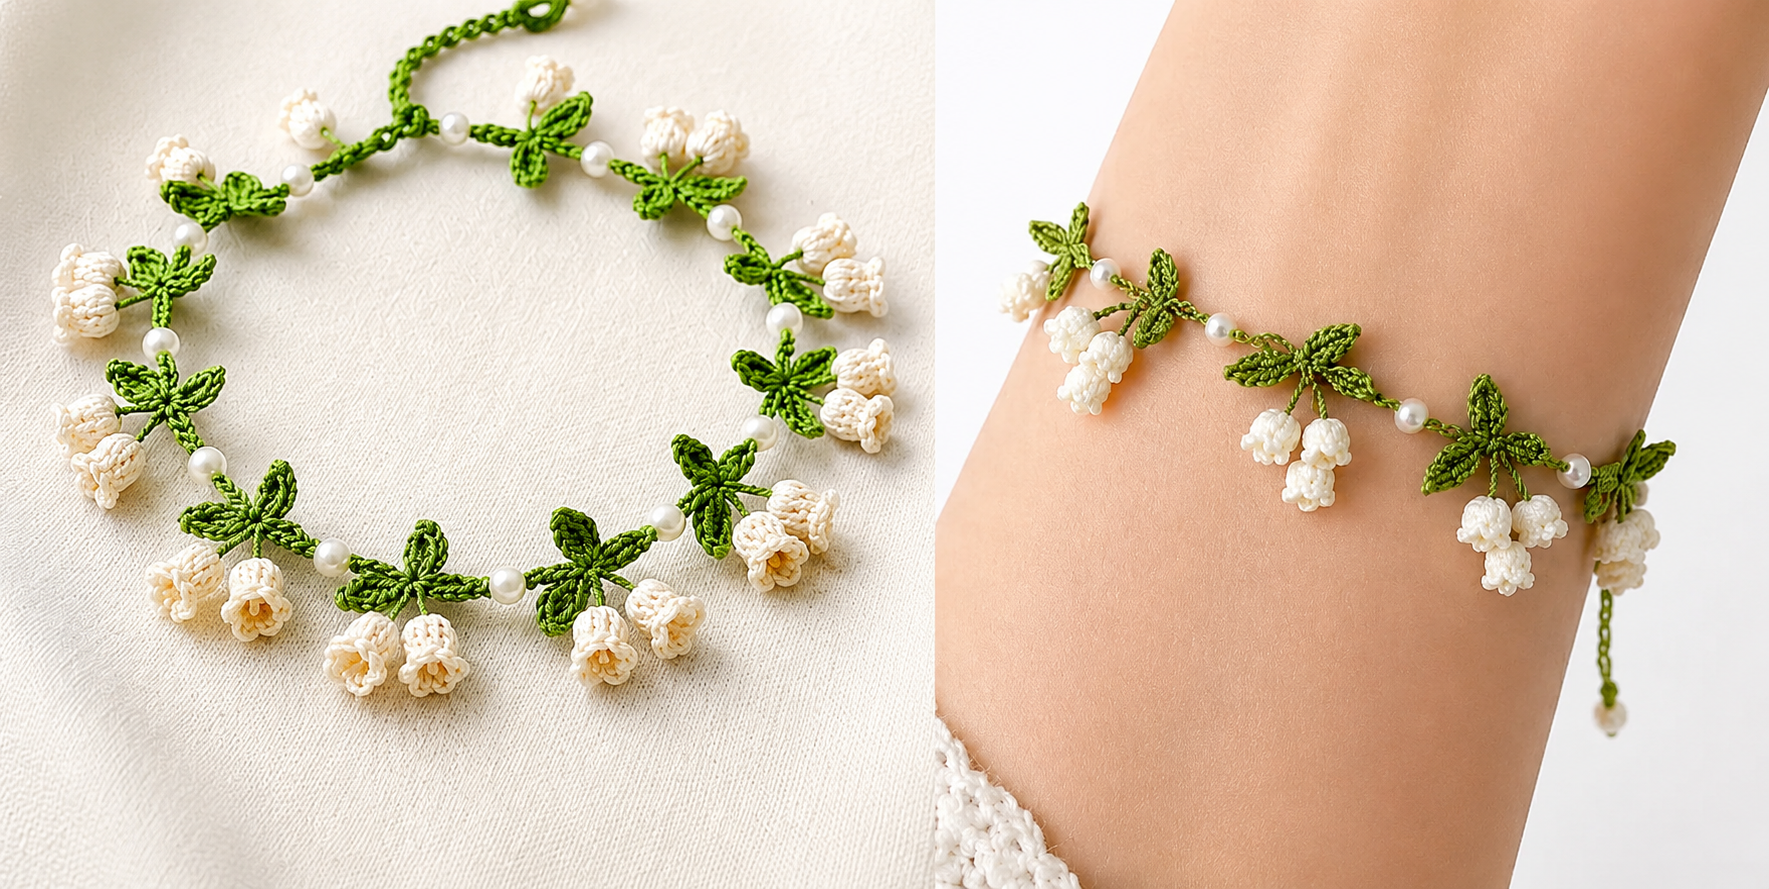
The Crochet bracelet Pattern is a beautiful way to combine delicate crochet stitches, floral details, tiny leaves, and decorative beads into a handmade accessory that looks elegant and lightweight. Inspired by the floral bracelet shown in the reference image, this project features a slender green crochet vine decorated with small leaves, creamy white bell-shaped flowers, and pearl-style beads placed between the motifs. Although the finished bracelet looks intricate, most of the construction is based on simple crochet techniques that can be learned with a little patience. The small scale also makes this project an excellent way to practice precision, tension control, and miniature crochet. Throughout this tutorial, the instructions use US crochet terminology so that crocheters can follow the pattern consistently. You can also adjust the number of flowers, leaves, and beads to create a bracelet that perfectly matches your preferred style.
One of the most charming features of this Crochet bracelet Pattern is its botanical appearance. Instead of creating a traditional solid bracelet, the design uses a narrow crocheted chain that resembles a climbing vine. Small leaves extend naturally from the main stem while clusters of crochet flowers hang gently below it, giving the accessory movement and texture. Pearl-style beads placed between the leaves add another decorative element without overwhelming the crochet work. The combination works especially well with green thread and ivory or white flowers, but the pattern can easily be customized with other colors. Pastel flowers create a soft spring look, bright colors make the bracelet playful, and metallic or neutral threads can create a more sophisticated handmade accessory.
Before beginning this Crochet bracelet Pattern, it is important to understand that miniature crochet usually requires a smaller hook and thinner thread than standard crochet projects. The stitches themselves are familiar, but working them on a smaller scale requires slightly more control. Do not pull the stitches excessively tight because you will need enough flexibility to insert the hook into chains and stitch spaces. Keep the bracelet comfortably flexible so it can follow the natural curve of the wrist. Beginners may want to practice one flower and one leaf separately before assembling the entire bracelet. Once those two motifs feel comfortable, the repeating construction becomes much easier and the bracelet can be completed one decorative section at a time.
Materials, Crochet Stitch Key, and Preparation
For this Crochet bracelet Pattern, choose a fine crochet cotton thread in green for the vine and leaves and an ivory, cream, or white thread for the flowers. Fine mercerized cotton is especially suitable because it provides clear stitch definition and enough strength for a wearable accessory. A crochet hook of approximately 1.25 mm to 1.75 mm works well for many fine threads, although you should always select a hook that matches your chosen yarn or thread. You will also need small pearl-style beads, a yarn needle, small scissors, and optionally a jewelry clasp if you prefer a metal closure instead of a crocheted loop.
DISCOVER MORE FREE PATTERNS HERE!
The crochet stitch key used throughout the pattern follows US crochet terms. ch = chain, sl st = slip stitch, sc = single crochet, hdc = half double crochet, dc = double crochet, tr = treble crochet, st = stitch, sts = stitches, sp = space, sk = skip, rep = repeat, and FO = fasten off. When the pattern says to work several stitches into the same chain or stitch, insert the hook into the same location for every stitch listed inside the parentheses. This technique helps create the rounded shapes required for the leaves and flowers.
Before crocheting, measure the wrist where the finished bracelet will sit. Add approximately 1 to 1.5 cm for comfortable movement, especially if you plan to use a loop-and-button style closure. The floral bracelet should rest gently around the wrist rather than fitting tightly. Because crochet thread can stretch slightly during wear, avoid making the foundation excessively long. If the bracelet is intended as a gift and the wrist measurement is unavailable, an adjustable chain section at the end can make the finished accessory more versatile.
Prepare the pearl-style beads before starting the vine. Depending on the type of beads you are using, they can either be threaded onto the crochet thread before crocheting or sewn into the finished bracelet afterward. Sewing them afterward is often easier for beginners because it gives you complete control over their placement. If you prefer to crochet the beads directly into the vine, slide the required beads onto the green thread before making the first chain. Keep them pushed farther down the thread until each bead is needed.
The crochet leaves are made from short chains that branch from the central vine. A simple miniature leaf can be created by making ch 5, then beginning in the second chain from the hook and working sl st, sc, hdc, sc along one side. Rotate the small chain carefully and work along the opposite side with sc, hdc, sc, sl st. Finish with a sl st at the base of the leaf. This creates a narrow pointed shape similar to the leafy details visible in the bracelet design.
The flowers are worked separately using the lighter thread and attached to short green stems. Each miniature crochet bell flower begins with a small magic ring or short chain ring. The stitches are arranged so the base stays narrow while the lower edge opens slightly like a tiny blossom. If you are new to miniature crochet, make several practice flowers before starting the final bracelet. Small variations in tension can dramatically change the size of tiny motifs, so practicing helps keep all of the flowers approximately the same size.
Step-by-Step Crochet Vine and Leaf Pattern
Begin the Crochet bracelet Pattern with the green thread. Make ch 8 to create the beginning of the fastening loop. Join with a sl st in the first chain to form a small loop. This loop can later fit around a bead, crocheted button, or decorative closure at the opposite end of the bracelet. After forming the loop, continue with ch 5 to begin the main vine. Keep these chains even but not overly tight because the vine should remain soft and flexible.
To make the first leaf section, ch 5 from the main vine. Starting in the second chain from the hook, work sl st in next ch, sc in next ch, hdc in next ch, sc in last ch. Rotate the chain so you can work along the opposite side of the foundation. Work sc, hdc, sc, sl st along the second side and finish with a sl st into the main vine. You have now created the first miniature leaf. For a fuller appearance, make a second leaf from the same point, positioning it in the opposite direction.
Continue the vine with ch 4 or ch 5, depending on how much space you want between decorative sections. At this point, add a pearl bead if you are crocheting beads directly into the pattern. Slide one bead close to the hook, make ch 1 around the bead, and gently tighten the chain so the bead remains secure. Continue with another ch 3 or ch 4. If you plan to sew the pearls on later, simply crochet the spacing chains and mark these areas mentally as bead-placement points.
Create the next leaf cluster by repeating the miniature leaf pattern. For a natural botanical appearance, alternate the direction and number of leaves. One section may contain two leaves, while another can contain three smaller leaves arranged around the same point. The bracelet shown in the reference style has a delicate irregularity that makes it resemble a real flowering vine. Therefore, the motifs do not need to be perfectly symmetrical. Maintaining similar spacing is more important than making every cluster identical.
Continue repeating vine chains, leaf clusters, pearl spaces, and flower attachment points until the bracelet reaches approximately 1 to 2 cm less than the desired final length. Remember that the end closure will add a little extra length. Lay the bracelet flat frequently while working because the leaves can make it difficult to judge the actual length when the vine is curled. You can also gently wrap the unfinished piece around the wrist to check the fit, making sure not to stretch the crochet.
Finish the opposite end with a decorative bead, crocheted knot, or small button that fits through the beginning loop. For a completely crocheted closure, make a small round button using 6 sc into a magic ring, pull the ring closed, and join with a sl st. Work a second round of 2 sc in each st around, then fasten off and securely sew the button to the end of the vine. Test the closure before weaving in the thread ends. It should pass through the loop comfortably but remain secure while the bracelet is being worn.
How to Crochet the Flowers and Assemble the Bracelet
To create one small flower for the Crochet bracelet Pattern, use the white or ivory crochet thread and make a magic ring. Work 6 sc into the ring and pull it gently closed. Join with a sl st to the first single crochet. For the next round, work ch 1, sc in the same st, then 2 sc in each remaining stitch around. The small circle should begin to curve naturally. Do not worry if it does not lie completely flat because the goal is to create a three-dimensional flower.
For the bell-shaped portion, work ch 2, followed by 1 hdc in each stitch around. Join with a sl st. On the following round, work a decorative edge by repeating (sl st in next st, ch 2, sc in next st) around the flower. This creates tiny scallops around the opening and gives the blossom a delicate appearance. If you want a more pronounced flower, replace some of the sc stitches with hdc stitches. Fasten off while leaving a thread tail long enough for assembly.
The floral clusters can contain either two or three blossoms. Cut a short length of green thread and crochet ch 5 to ch 7 to create a small hanging stem. Attach one flower to the end with a secure sl st or sew it into place with a yarn needle. For a second flower, create another short stem from the same attachment area. Making one stem slightly longer than the other helps the flowers hang naturally instead of sitting directly beside each other.
Attach the completed flower clusters underneath the leaf sections of the vine. Position each cluster so the leaves remain visible behind or above the flowers. Using a yarn needle and matching green thread, sew the top of each flower stem securely around the main bracelet vine. Pass through the crochet stitches several times, but avoid making a large knot that could feel uncomfortable against the skin. Once the cluster feels secure, weave the thread tail through several nearby stitches and trim the excess.
If the pearl beads were not crocheted directly into the vine, sew them between the decorative clusters now. Thread a fine needle with strong matching thread and pass through the pearl, then through a secure crochet stitch on the vine. Repeat the pass once or twice before tying off discreetly. Space the pearls between the leaves and flower clusters rather than placing them directly next to every flower. This creates visual breathing room and preserves the delicate appearance of the handmade crochet bracelet.
After all motifs have been attached, place the bracelet flat and inspect the overall arrangement. Gently reshape the leaves with your fingers, separate any flowers that became twisted during sewing, and make sure all thread ends are properly hidden. If the crochet feels slightly uneven, light blocking can help. Place the bracelet on a towel, gently shape the flowers and leaves, lightly dampen the crochet without soaking the beads, and allow it to dry completely. Proper finishing gives the Crochet bracelet Pattern a neat and professional appearance.
Crochet Bracelet Pattern FAQ
What crochet thread is best for a Crochet bracelet Pattern? Fine mercerized cotton crochet thread is one of the best options because it produces clean stitches while remaining strong enough for wearable accessories. Thread in approximately size 10 or another fine crochet weight can work well, but the ideal choice depends on the size of the hook and the appearance you want. Thinner thread creates very delicate flowers and leaves, while slightly thicker thread creates a more noticeable statement bracelet.
Is this Crochet bracelet Pattern suitable for beginners? A patient beginner can make this bracelet, especially after practicing the individual motifs. The main skills required are chain stitches, slip stitches, single crochet, half double crochet, working into a magic ring, and joining motifs. The greatest challenge is not the complexity of the stitches but their small size. Beginners may find it helpful to use a slightly thicker thread and larger hook for the first practice version.
How can I make the crochet bracelet longer or shorter? The easiest method is to adjust the number of chain stitches between the leaf and flower sections or add another complete motif repeat. Measure the bracelet as you work rather than relying entirely on a fixed stitch count because different crocheters may have different tension. For a shorter bracelet, remove one decorative repeat or reduce the spacing chains. For a longer bracelet, add another leaf, pearl, and flower sequence before making the closure.
Can I make the bracelet without beads? Yes. The pearl-style beads are decorative and are not structurally necessary. If you prefer an entirely crocheted bracelet, simply replace each bead space with several small chain stitches. You can also make tiny crocheted circles or small knots instead of pearls. Removing the beads creates a softer bracelet that can be easier to wash and is ideal for anyone who prefers accessories made completely from thread.
How do I keep the tiny crochet flowers from losing their shape? Consistent tension is the most important factor. Work firmly enough that the stitches hold together but avoid making them extremely tight. After finishing the bracelet, gently shape each blossom with your fingers. Light blocking may also help maintain the flower shape. Avoid heavy pressing because it can flatten the three-dimensional petals. When storing the bracelet, place it flat rather than folding or crushing the flowers.
Can I change the colors in this Crochet bracelet Pattern? Absolutely. Color customization is one of the easiest ways to make the pattern unique. Traditional green leaves with white flowers create a fresh botanical appearance, while pink flowers can resemble tiny roses, purple can suggest lavender-inspired jewelry, and yellow can create a cheerful spring accessory. You can also experiment with several flower colors on one bracelet. For a more understated design, choose neutral leaves with cream blossoms and pearl beads.
Conclusion
The Crochet bracelet Pattern combines miniature crochet, floral motifs, leaves, decorative beads, and a delicate vine structure to create a charming handmade accessory. You learned how to prepare the materials, understand the crochet stitch key, build the green foundation vine, crochet miniature leaves, create bell-shaped flowers, add pearl details, assemble the motifs, and finish the bracelet with a secure closure. The construction is flexible, so you can easily adjust the length, flower quantity, leaf arrangement, and colors to create your own variation.
A project like this is also a wonderful opportunity to practice small crochet motifs without committing to a large piece. Once you understand how the leaves and flowers are constructed, the same techniques can be adapted for necklaces, anklets, decorative chains, bag charms, bookmarks, or other handmade accessories. The important thing is to maintain consistent tension and secure every motif carefully so the finished piece remains comfortable and durable.
If you make your own version of this Crochet bracelet Pattern, experiment with different combinations of thread colors, pearl sizes, and flower arrangements. Small creative changes can completely transform the personality of the finished bracelet while keeping the same basic crochet construction. Please leave your sincere opinion about the pattern and share any suggestions or ideas for future crochet projects. Your feedback can inspire new variations and help other crochet lovers discover creative ways to personalize this delicate floral bracelet.