
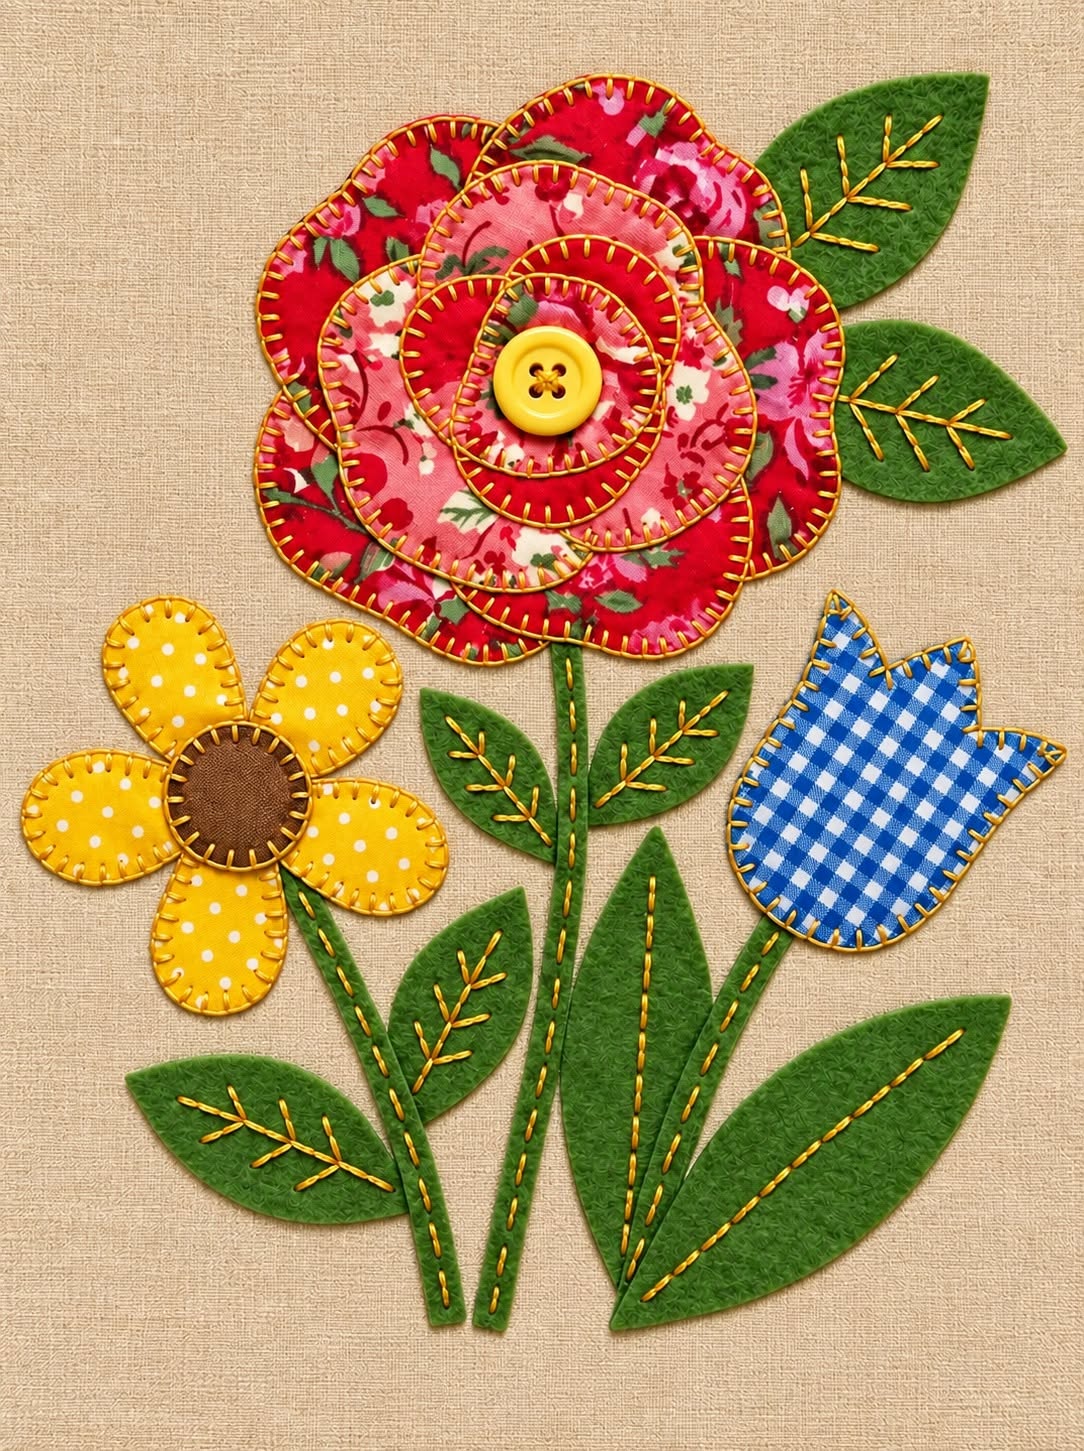
The Mini Quilt with Flower Appliqué Pattern is a charming sewing project that combines traditional quilting, colorful fabric appliqué, hand stitching, and simple botanical shapes in one cheerful design. Inspired by the handmade piece shown in the reference photo, this project features a large layered red flower, a smaller yellow flower, a blue tulip-style bloom, green stems, and several leaves arranged on a light fabric background. A striped fabric border completes the composition and gives the mini quilt a polished, framed appearance. Because the shapes are intentionally simple and slightly organic, this is a wonderful project for anyone who enjoys the relaxed beauty of handmade appliqué rather than perfectly mechanical results.
One of the most appealing aspects of this Mini Quilt with Flower Appliqué Pattern is the opportunity to use small fabric scraps that might otherwise remain forgotten in a sewing basket. Floral cotton prints work beautifully for the large rose-inspired flower, while polka dots, gingham, felt, and solid fabrics can be mixed to create contrast. The term flower appliqué refers to decorative fabric shapes that are positioned on top of a background fabric and then secured with hand or machine stitching. In this project, the visible blanket-style stitches become part of the decoration, emphasizing the edges of each petal, leaf, and stem while adding a cozy handcrafted character.
You do not need an advanced quilting setup to make this project successfully. Basic sewing supplies, patience, and careful preparation are more important than expensive equipment. The finished piece can be displayed as a small wall quilt, incorporated into a pillow front, used as a decorative fabric panel, or adapted into another handmade item. The instructions below explain how to recreate the overall appearance of the photographed design while allowing enough flexibility to make the project your own. Since handmade appliqué naturally varies from one maker to another, small differences in petal curves, leaf placement, and stitching will add personality rather than detract from the finished appliqué mini quilt.
Materials, Fabric Selection, and Preparing the Mini Quilt
Begin by selecting the fabric for the background. A light cream, ivory, natural cotton, or soft white fabric provides an excellent foundation because it allows the colorful flowers and green leaves to stand out clearly. For a manageable mini quilt, you can begin with a background rectangle approximately 35 x 42 cm (about 13 3/4 x 16 1/2 inches), although the dimensions can be adjusted according to your intended use. Cut the background slightly larger than the desired finished size so you have room to square the piece after completing the appliqué.
DISCOVER MORE FREE PATTERNS HERE!
Next, collect several coordinating scraps for the flowers. To achieve an appearance similar to the reference project, choose two or three red and pink floral cotton prints for the large layered bloom. Select yellow fabric with small dots or another simple print for the smaller flower, brown fabric or felt for its center, and blue gingham or checked cotton for the tulip-shaped flower. The combination of floral fabric, polka-dot cotton, and gingham fabric creates visual variety while maintaining the friendly country-style character of the original design.
For the leaves and stems, medium green felt works especially well because its edges do not fray easily. Cotton can also be used, but you may prefer fusible web or a turned-edge appliqué method if fraying is a concern. Prepare several leaf shapes in different sizes so the arrangement looks natural. The photograph includes both small leaves near the flower heads and longer leaves near the bottom, which helps create movement and keeps the flower appliqué design visually balanced.
You will also need coordinating embroidery floss or strong sewing thread, a hand-sewing needle, fabric scissors, pins or fabric clips, an iron, and an optional washable fabric marker. A small yellow four-hole button can be used for the center of the large flower, reproducing one of the most distinctive details visible in the reference image. If you prefer not to use a button, a small fabric circle can provide a softer alternative.
Before cutting your final fabrics, sketch the individual appliqué pattern pieces on paper. Draw a large irregular flower with rounded petals, several progressively smaller flower layers, five rounded petals for the yellow flower, a circle for its center, and a simple tulip silhouette for the blue bloom. Add narrow stem templates and pointed oval leaf templates in several sizes. Keeping the shapes slightly irregular will help preserve the handmade appearance of the inspiration piece.
Wash and press cotton fabrics before cutting if you expect the finished project to be washed later. Pressing is especially important because wrinkles can distort small appliqué pieces and make accurate positioning more difficult. Once everything is prepared, place the background fabric on a flat surface and arrange the paper templates over it temporarily. This simple planning stage allows you to check proportions before committing your favorite fabric scraps to the final Mini Quilt with Flower Appliqué Pattern.
Creating the Flowers, Leaves, and Appliqué Details
Start with the largest flower because it acts as the visual focal point. Cut one large flower silhouette from a red floral fabric, then cut progressively smaller irregular flower shapes from contrasting red and pink prints. Three or four layers are enough to create the dimensional, rose-like effect shown in the photograph. Each layer should reveal some of the fabric beneath it, creating concentric rings of color and pattern.
Arrange the layers from largest to smallest and temporarily secure them with pins, a small amount of fabric-safe adhesive, or fusible web according to your preferred appliqué technique. Stitch around the perimeter of every layer using a blanket stitch or whip stitch. Contrasting thread can emphasize the handmade construction, while matching thread creates a more subtle finish. Try to keep the stitch spacing reasonably consistent without worrying about absolute perfection.
Place a small yellow button at the center of the layered flower and sew it firmly through the appliqué layers. If the mini quilt will be used around very young children, consider replacing the removable button with a securely stitched fabric circle. The bright center provides an attractive contrast against the red and pink fabrics and immediately draws attention toward the focal flower. This small detail is particularly effective because it introduces another color without overwhelming the composition.
For the yellow flower, cut five rounded petal shapes individually rather than creating one continuous flower silhouette. Position them around a brown circular center, leaving the petals slightly separated or gently overlapping depending on your preference. Stitch around each petal using visible blanket stitches. Then attach the brown center over the inner ends of the petals, which hides minor inconsistencies and gives the fabric flower appliqué a neat finished appearance.
The blue flower requires fewer pieces. Create a single tulip-like silhouette with a rounded lower portion and three pointed sections across the top. Blue-and-white gingham gives the design a fresh country look, but any small-scale print can work. Stitch around the entire edge with coordinating thread. The simplicity of this flower is important because it visually balances the much more detailed layered red flower.
Finally, cut the green leaves and narrow stems. Long stems can be slightly curved rather than perfectly straight, making the flowers appear more natural. Cut leaves in several proportions, including small pointed leaves and larger elongated shapes. If you are using felt, the raw edges can remain exposed. Add simple embroidered veins using straight stitches and small branching stitches. These embroidered leaf details provide texture and transform otherwise plain green shapes into decorative elements.
Arranging and Sewing the Complete Flower Appliqué Design
Lay the prepared background fabric on a large flat surface and begin arranging the pieces before sewing anything permanently. Position the large red flower toward the upper center-left area, allowing enough open space around it so its layered construction remains clearly visible. Place the yellow flower lower and farther to the left, then position the blue tulip toward the right. This creates an informal triangular arrangement that distributes color across the mini quilt design.
Next, position the stems beneath the flower heads. The stem supporting the large flower should be relatively vertical, while the yellow and blue flower stems can angle gently toward their respective blooms. Place leaves along the stems and add several larger leaves near the lower section. Avoid arranging every leaf at exactly the same height or angle. Slight asymmetry helps the finished flower appliqué quilt feel lively and natural.
Once you are satisfied with the composition, take a quick reference photo or lightly mark the placement with a removable fabric marker. Then remove most of the loose pieces and begin attaching them from the elements that visually sit farthest behind. Stems should generally be attached before flowers because the flower heads can cover the upper stem ends. Similarly, leaves that appear behind stems or other leaves should be stitched first.
Secure each green piece and sew around its perimeter. Blanket stitch is particularly suitable for felt appliqué because it both anchors and decorates the edges. After the leaves are attached, embroider their veins using a slightly lighter or darker green thread. A central line with several angled branches is enough to suggest the natural structure of a leaf without making the embroidery unnecessarily complicated.
Attach the flower heads after completing the stems and leaves. Begin with the yellow and blue flowers and finish with the large layered red flower. Frequently place the project flat on a table and look at it from a short distance. This makes it easier to notice any areas that need adjustment. The goal is not to reproduce every millimeter of the reference image, but to capture its balanced arrangement, cheerful colors, and handcrafted appliqué quilting style.
When all appliqué pieces have been attached, press the project carefully from the back using a suitable temperature for your fabrics. Avoid pressing directly over a plastic button or synthetic felt with excessive heat. If desired, add a thin layer of batting and a backing fabric at this stage. Light quilting around the flowers or across the open background can provide extra texture, but keep it understated so the appliqué remains the primary feature.
Adding the Border, Finishing the Quilt, and Creative Variations
The striped border is an important characteristic of the photographed project because it frames the light background and echoes the green used in the stems and leaves. Choose a narrow green-and-cream striped cotton or another coordinating print. Cut four border strips wide enough to create the desired frame. A finished width of approximately 2.5 to 4 cm (1 to 1 1/2 inches) works nicely for a small appliqué quilt, depending on its overall dimensions.
You can create straight borders or use mitered corners for a more frame-like appearance. For simple straight borders, attach the side strips first using a consistent seam allowance, press them outward, and then attach the top and bottom strips. For mitered corners, allow extra length and join the strips diagonally at each corner. Press carefully after sewing so the frame lies flat without pulling the center panel out of shape.
If you want a quilted finish, make a sandwich with the completed top, thin batting, and backing fabric. Smooth the layers carefully and baste them together. Quilt around the major appliqué shapes, following the outlines of the flowers, stems, and leaves. This technique, sometimes called outline quilting, helps the appliqué stand slightly forward while securing all three layers of the quilt.
Finish the outer edge with binding or another clean edge-finishing technique. A coordinating green stripe can create a cohesive appearance, while a solid green binding can define the perimeter more strongly. Take extra care around the corners and press the finished quilt gently. If the piece will be displayed on a wall, a hanging sleeve can be added to the back without affecting the decorative front.
The same Mini Quilt with Flower Appliqué Pattern can be customized in many ways. Try pastel flowers for a softer spring-inspired appearance, use denim scraps for a rustic version, or create all the flowers from leftover quilting cottons for a true scrap-friendly project. You can also enlarge the templates to create a cushion cover or reduce them for a small decorative panel. The underlying construction remains essentially the same.
The most important finishing step is simply to inspect your work and secure any loose threads. Check the button, appliqué edges, embroidered veins, and border seams. Trim stray fibers carefully and give the fabric one final gentle press. The result should celebrate the visible stitching and varied textile textures that make handmade flower appliqué projects so appealing.
FAQ About the Mini Quilt with Flower Appliqué Pattern
What is a Mini Quilt with Flower Appliqué Pattern?
A Mini Quilt with Flower Appliqué Pattern is a small quilted or fabric panel decorated with flower shapes attached to the surface through appliqué. The flowers, leaves, and stems are cut separately and stitched onto a background. This technique allows makers to combine many colors, prints, and textures without piecing the entire background from small blocks.
Is this flower appliqué project suitable for beginners?
Yes. The project is beginner-friendly because most of the shapes are simple and intentionally organic. Beginners can practice cutting, positioning, blanket stitching, simple embroidery, border construction, and basic quilting in one manageable project. Starting with felt leaves can make the process even easier because felt generally does not require turned edges.
What is the best fabric for flower appliqué?
Quilting cotton is an excellent choice for the flowers because it is easy to cut, available in many prints, and comfortable to stitch by hand or machine. Felt works especially well for leaves and stems when you want visible raw edges. Small floral prints, dots, checks, and solids can be mixed to give the appliqué flowers greater visual depth.
Do I need fusible web for this project?
No. Fusible web is optional, although it can make positioning easier. Pieces can also be temporarily held with pins, fabric-safe adhesive, or careful basting before stitching. If you enjoy traditional hand appliqué, you may prefer to secure each shape manually instead of using a fusible product.
Can I sew the appliqué by machine instead of by hand?
Absolutely. A sewing machine can be used with a blanket stitch, zigzag stitch, or narrow satin stitch. Hand stitching creates the charming folk-art appearance visible in the inspiration piece, while machine stitching can make construction faster. Both approaches can produce an attractive flower appliqué mini quilt.
How large should the finished mini quilt be?
There is no required finished measurement. A panel around 35 x 42 cm before final trimming provides a practical starting point, but you can resize the entire design. The key is to resize all flowers, stems, and leaves proportionally so that the composition remains balanced.
How do I stop appliqué fabric from fraying?
Felt naturally minimizes fraying. For woven cotton, you can use fusible web, a turned-edge appliqué method, or closely spaced decorative stitching around the raw edge. The best method depends on the appearance you prefer and whether the project will be washed frequently.
Can I use fabric scraps to make this project?
Yes, and this is one of the best projects for using leftover fabric. The layered flower requires several relatively small pieces, while individual petals and leaves require even less material. Combining scraps can make every Mini Quilt with Flower Appliqué Pattern completely unique.
Should I quilt the background after finishing the appliqué?
Quilting the background is optional for a purely decorative panel, but it is recommended if you are making a traditional three-layer mini quilt. Simple outline quilting around the appliqué shapes is enough. Avoid extremely dense quilting unless that is part of your intended style, because the colorful flowers should remain the visual focus.
Can this pattern be turned into a pillow or wall hanging?
Yes. The completed appliqué panel can become the front of a decorative pillow, a wall hanging, a bag panel, or another fabric project. For a wall hanging, add batting, backing, binding, and a hanging sleeve. For a pillow, complete the appliqué first and then construct the pillow using your preferred closure method.
How can I make the flowers look more dimensional?
Layering is the easiest way to create dimension. The large red flower demonstrates this beautifully because several progressively smaller fabric shapes are stacked together. Contrasting prints, visible blanket stitches, a button center, and lightly padded quilting can further enhance the dimensional effect.
What makes this appliqué design look handmade rather than mass-produced?
The slightly irregular flower shapes, visible stitches, mixed fabrics, embroidered leaf veins, and layered construction create its handcrafted personality. Do not worry if every stitch is not identical. Consistency is helpful for durability, but subtle variations are part of the charm of handmade appliqué quilting.
Conclusion: Completing Your Mini Quilt with Flower Appliqué Pattern
Creating a Mini Quilt with Flower Appliqué Pattern is an enjoyable way to explore several classic sewing techniques within one compact project. Beginning with a neutral fabric background, you learned how to select coordinating scraps, prepare simple appliqué templates, build a layered red flower, create individual yellow petals, form a blue tulip, and add green stems and leaves. These individual components work together to reproduce the cheerful garden-inspired character of the reference piece.
You also learned how blanket stitching, simple leaf embroidery, fabric layering, and thoughtful placement can transform basic shapes into a detailed textile composition. The project does not depend on perfect symmetry. Instead, its personality comes from the combination of different prints, visible stitches, organic shapes, and small handcrafted variations.
Finishing the piece with a striped fabric border gives the design a strong visual frame, while optional batting, backing, quilting, and binding can turn the appliqué panel into a complete miniature quilt. Once you understand the construction process, the same techniques can be adapted to pillows, wall hangings, bags, larger quilts, and many other creative sewing projects.
EASILY FIND THE PDF FOR THIS PATTERN HERE!
Most importantly, use this Mini Quilt with Flower Appliqué Pattern as a starting point for your own creativity. Experiment with different flower colors, recycled fabric scraps, alternative border prints, embroidery details, or different arrangements of leaves and stems. A handmade project becomes especially meaningful when it reflects the maker’s personal choices. If you make your own version, leave your sincere opinion about the project and share your suggestions. Which flower, fabric combination, or stitching detail did you enjoy the most? Your ideas can inspire new variations and help other sewing enthusiasts discover creative ways to personalize this colorful flower appliqué pattern.