
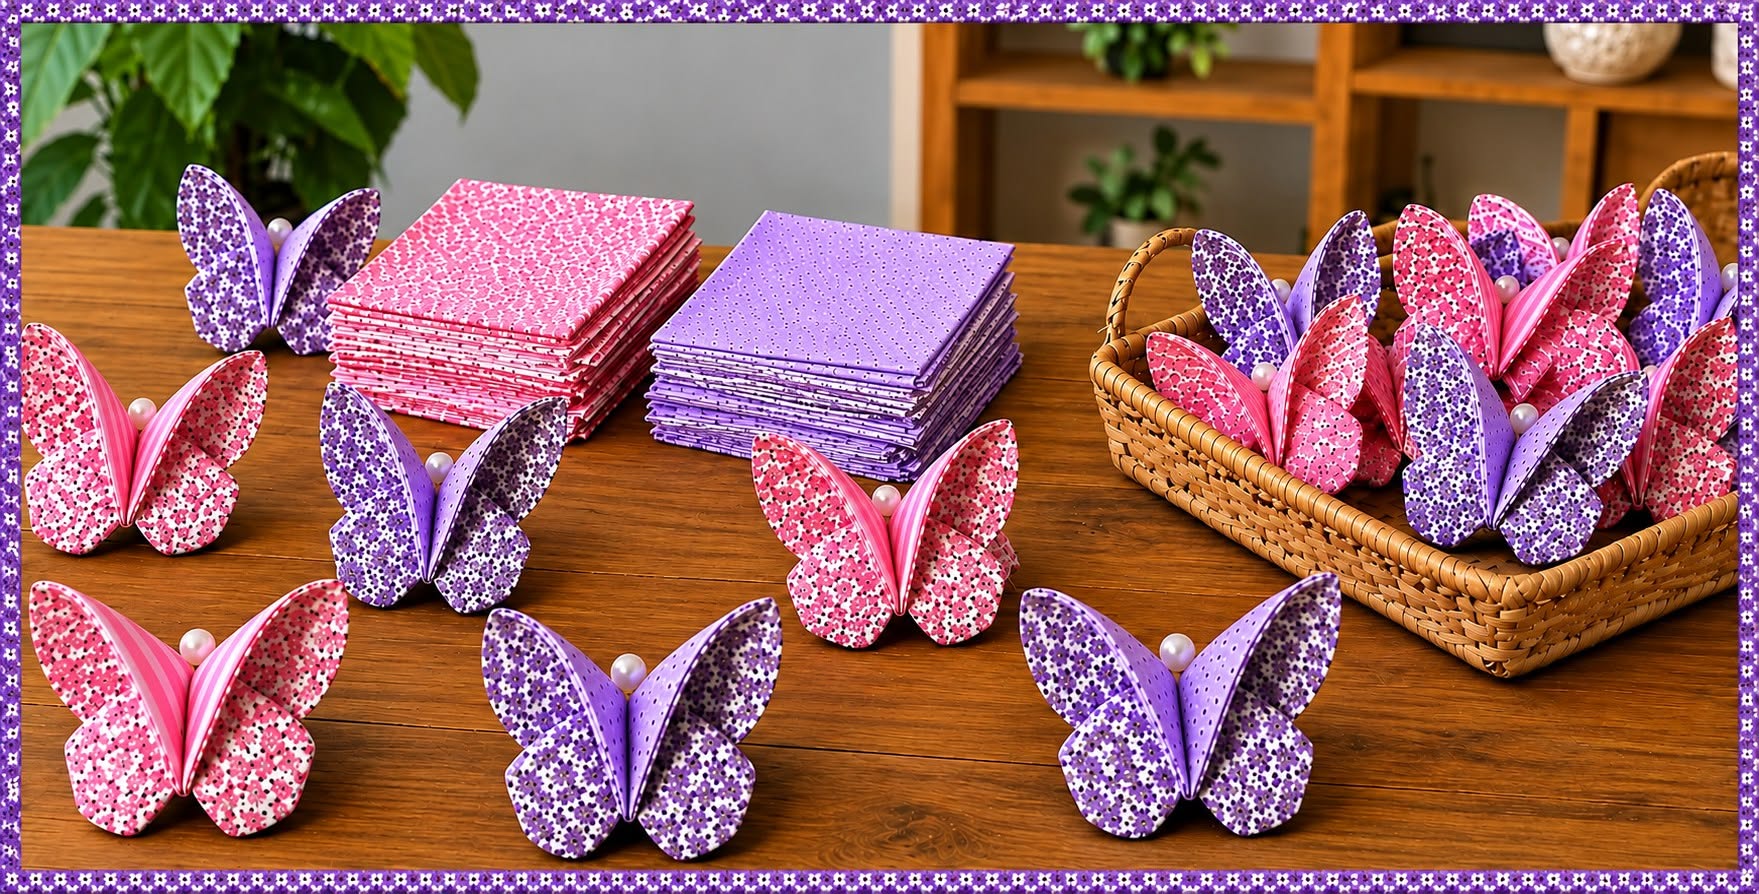
DIY: Turning a Fabric Scrap into a Beautiful Butterfly Pattern is a charming sewing project that proves you do not need a large amount of fabric to create something beautiful. Small floral scraps, leftover quilting cotton, and even pieces from previous sewing projects can be transformed into decorative three-dimensional butterflies with personality and color. Inspired by the fabric butterflies shown in the photo, this project combines simple cutting, careful folding, light sewing, and creative finishing details. The finished butterflies can be displayed on a craft table, placed in a decorative basket, attached to gifts, or incorporated into seasonal decorations. Best of all, the project is approachable enough for beginners while still offering plenty of possibilities for experienced makers who enjoy experimenting with fabric combinations and handmade details.
The idea behind DIY: Turning a Fabric Scrap into a Beautiful Butterfly Pattern is especially useful for anyone who keeps a collection of leftover fabric pieces after quilting or sewing. Instead of throwing those scraps away, you can organize them by color and turn them into a coordinated butterfly collection. Floral prints work particularly well because the small-scale patterns give the wings a delicate appearance, but polka dots, stripes, gingham, geometric prints, and solid fabrics can also look wonderful. Pink and purple fabrics, similar to those visible in the inspiration photo, create a cheerful and romantic result. By pairing an exterior print with a contrasting or coordinating fabric inside the wings, you can create visual depth without making the sewing process complicated.
Another appealing feature of this fabric butterfly pattern is that every butterfly can be slightly different. You may make larger wings for a dramatic decoration, smaller butterflies for garlands, or several matching butterflies for a centerpiece. The construction method can also be adapted according to the materials you already have. A lightly padded butterfly looks soft and dimensional, while a butterfly made from interfaced cotton holds a sharper shape. Pearl beads or small decorative buttons can be added near the center for an elegant finish. Throughout this tutorial, you will learn how to select materials, create a reusable butterfly sewing pattern, prepare the fabric, assemble the wings, shape the butterfly, and finish it so that the final result looks neat and intentional.
Materials and Preparation for the Fabric Butterfly Pattern
Begin by gathering your fabric scraps and deciding on the overall color palette. For a result similar to the inspiration photo, choose combinations of pink floral fabric, purple floral fabric, and coordinating striped or dotted cotton. Quilting cotton is an excellent choice because it is easy to cut, press, and sew. Scraps approximately 15 to 25 cm wide are usually enough for one butterfly, depending on the size you want to create. Using scraps from the same fabric collection can produce a coordinated look, while mixing unrelated prints creates a playful patchwork effect.
DISCOVER MORE FREE PATTERNS HERE!
You will also need basic sewing supplies such as fabric scissors or a rotary cutter, a cutting mat, sewing thread, pins or sewing clips, a hand-sewing needle, an iron, and a sewing machine if you prefer machine stitching. Although a sewing machine speeds up construction, most of this DIY fabric butterfly can also be sewn by hand. For beginners, cotton thread in a neutral shade is often easiest because it blends with several prints. If you want visible decorative stitching, choose a contrasting thread that coordinates with the wings.
To give the butterfly enough structure to stand upright, prepare a lightweight interfacing or thin batting. Lightweight fusible interfacing creates crisp wings without adding much thickness, while thin batting creates a softer and slightly padded appearance. Avoid very thick batting because it can make the folds bulky and difficult to shape. You only need a small amount, making this project an excellent opportunity to use leftover interfacing from bags, placemats, appliqué projects, or other sewing crafts.
For the decorative center, consider using pearl beads, small wooden beads, covered buttons, or tiny pom-poms. The butterflies in the inspiration image have a soft, elegant handmade appearance, and pearl-style accents complement that style especially well. Make sure any embellishment is securely attached, especially if the finished item will be handled frequently. If the butterflies will be used around very young children, leaving off small detachable embellishments is a safer decorative choice.
Next, create a simple butterfly pattern template on paper or lightweight cardstock. Draw one elongated wing shape approximately 12 to 15 cm tall and 5 to 7 cm wide at its widest point. The upper portion should be longer and slightly broader than the lower portion so the finished silhouette resembles a butterfly wing. You can create a symmetrical template by folding the paper, drawing half of the shape, and cutting through both layers. The exact measurements are flexible because handmade butterflies can look attractive in several proportions.
Before cutting your favorite fabric, make one test butterfly from inexpensive scrap material. This allows you to check the size, seam allowance, stiffness, and overall shape. A 0.7 to 1 cm seam allowance works well for most cotton fabrics. Testing first is especially helpful if you want to make several butterflies because you can refine one pattern and then use that same template repeatedly. Once you are happy with the proportions, label the template and keep it for future projects.
Cutting and Sewing the Butterfly Wings Step by Step
Fold or layer your chosen fabrics with their right sides facing each other, then place the paper wing template on top. Trace around the template using a removable fabric marker or tailor’s chalk. For each butterfly, cut pieces for both sides of the wing sections according to the construction style you prefer. If you want contrasting inner and outer surfaces, use one floral fabric for the front and a coordinating stripe, dot, or solid for the back. Accurate cutting helps the finished fabric butterfly wings look balanced.
Cut matching pieces of lightweight interfacing slightly smaller than the fabric shapes. Keeping the interfacing just inside the seam allowance reduces unnecessary bulk around the edges. If you are using fusible interfacing, follow the manufacturer’s pressing directions and attach it to the wrong side of the fabric before sewing. Use a pressing cloth when necessary and avoid moving the iron back and forth aggressively, as this can distort small fabric pieces. A brief press is usually sufficient.
Place each paired fabric section with the right sides together and secure the edges using pins or clips. Sew around the perimeter using your chosen seam allowance while leaving a small opening of approximately 3 to 4 cm. This opening will allow you to turn the piece right side out. Sew slowly around the curved sections because smooth stitching produces cleaner wing edges. If sewing by hand, use small, consistent backstitches for strength.
After sewing, trim the seam allowance slightly around tight curves without cutting through the stitching. Make small notches along inward curves if your design includes them. These tiny adjustments help the fabric lie flat after turning. Carefully turn each piece right side out through the opening. A blunt turning tool, chopstick, or rounded knitting needle can help push out the curves, but avoid using anything too sharp because it may pierce the fabric.
Once the wings are turned, gently press them with an iron. Pressing is one of the most important steps in creating a polished handmade fabric butterfly because it defines the edges and removes wrinkles. Fold the raw edges of the turning opening inward so they align with the stitched edge. Close the opening using a ladder stitch by hand, or topstitch around the entire piece approximately 2 to 3 mm from the edge. Topstitching can also help the wings maintain their shape.
Repeat the process until you have all the wing components needed for your butterfly. Before assembling them, place the pieces on the table and experiment with their orientation. The larger portions should generally point upward, while smaller curves form the lower wings. At this stage, compare both sides and make adjustments so the butterfly appears visually balanced. Handmade pieces do not need to be perfectly identical, but careful positioning will make the final butterfly sewing project look more refined.
Shaping, Assembling, and Decorating the Butterfly
To create the dimensional appearance seen in the inspiration image, begin shaping each wing section by bringing the inner edges slightly toward the center. Depending on your template, you can form a soft accordion fold or a narrow pleat. Finger-press the fold before sewing so you can evaluate the shape. The goal is to create enough volume for the wings to stand instead of lying completely flat. A small amount of asymmetry can make the butterfly look natural and handmade.
Secure the center fold with a few strong hand stitches. Pass the needle through several layers of fabric and pull the thread firmly, but not so tightly that the fabric puckers excessively. Wrap the thread around the center a few times and knot it securely. This creates the narrow body area characteristic of a 3D fabric butterfly. If your fabric is particularly thick, use a sturdy hand-sewing needle and polyester thread for additional strength.
Position the left and right wing sections together at the center. Adjust the angle until the upper wings open gracefully and the lower portions support the butterfly. Hand-stitch the central sections together, keeping the stitches hidden whenever possible. Check the butterfly from the front and back before making the final knot. If one side appears lower than the other, loosen the stitches slightly, reposition the wing, and secure it again.
For an elegant detail, sew a pearl bead near the upper center of the butterfly. You can also create a simple fabric body using a narrow rolled strip of coordinating cotton. Fold the strip lengthwise, press it, and wrap it around the central stitches. Secure the ends on the back with several small stitches. Another option is to use embroidery thread wrapped around the center, producing a more rustic handmade appearance.
If you would like to add antennae, cut a short piece of thin craft wire and bend it gently in half. Curl the ends around a pencil or small tool to form delicate spirals, then secure the folded portion behind the butterfly body. Alternatively, embroidery floss can create soft antennae without wire. Antennae are optional; the project still clearly resembles a butterfly without them, especially when the upper and lower wing shapes are well defined.
After assembly, gently bend and arrange the wings until the butterfly stands comfortably. Lightweight interfacing allows you to shape the fabric without making it rigid. Avoid aggressively creasing the finished wings unless you want a sharply folded effect. Several butterflies displayed together can look especially attractive when their angles vary slightly. Making a collection in pink, lavender, purple, cream, and floral prints gives you a decorative arrangement similar to a handmade spring garden.
Creative Uses, Care Tips, and FAQ About DIY Fabric Butterflies
A collection created with DIY: Turning a Fabric Scrap into a Beautiful Butterfly Pattern can be used in many decorative ways. Arrange several finished butterflies in a shallow wicker basket for a cheerful craft-room display, place them along a table runner for a spring centerpiece, or attach them to handmade fabric wreaths. Because they are lightweight, they can also be incorporated into wall hangings, mobiles, garlands, or sewing-room decorations.
These butterflies can also become lovely embellishments for handmade gifts. Attach one to a fabric gift bag, reusable wrapping cloth, decorative box, or quilted pouch. A removable butterfly can become part of the present rather than disposable packaging. When attaching the butterfly to another project, stitch through the center rather than the wings so the dimensional shape remains intact. This method also makes it easier to remove the butterfly later if desired.
For seasonal decorating, simply change the fabrics. Pastel floral cotton creates a springtime look, bright prints work for summer, orange and brown scraps produce autumn butterflies, and metallic or jewel-toned fabrics can create festive holiday decorations. This flexibility is one reason a fabric scrap sewing project can be so useful. One basic pattern can be adapted throughout the year without requiring new sewing techniques.
To store the butterflies, keep them in a box large enough that the wings are not crushed. If they become wrinkled, reshape them gently by hand or use a low-temperature iron when the fabric permits. Always protect decorative beads, synthetic materials, or delicate embellishments from direct heat. A light steam treatment can sometimes help cotton wings regain their shape, but test your materials first.
What is the best fabric for making a fabric butterfly? Quilting cotton is one of the easiest materials to use because it has enough body to hold a clean shape while remaining easy to sew and turn. Cotton floral prints are particularly attractive for this type of butterfly fabric craft. Lightweight linen or cotton-linen blends may also work, although they can fray more. Very stretchy fabrics are generally more difficult for beginners because they may distort during sewing.
Do I need a sewing machine to make this project? No. A sewing machine makes the process faster, particularly when producing several butterflies, but the project can be completed with hand sewing. Small backstitches can be used for the main seams, while ladder stitches work well for closing openings. Because the pieces are relatively small, a hand-sewn butterfly is completely achievable with patience and careful stitching.
Can I make the butterfly without interfacing? Yes, especially if you use medium-weight cotton. However, interfacing helps the wings maintain their dimensional shape. Without it, the finished butterfly may appear softer or flatter. If you do not have interfacing, you can experiment with two layers of cotton or insert a very thin piece of batting. Always test the material combination before creating a large batch.
How large should a fabric butterfly be? There is no required size. For tabletop decorations, a finished width of approximately 15 to 20 cm creates a noticeable butterfly without becoming difficult to sew. Smaller butterflies can be made for garlands or gift embellishments, while larger versions can become wall decorations. When resizing your butterfly sewing pattern, enlarge or reduce all pieces proportionally so the overall silhouette stays balanced.
What can I do with very small fabric scraps? Tiny scraps can be pieced together before cutting the butterfly pattern. Sew several coordinating scraps into a miniature patchwork panel, press the seams, and then cut the wing pieces from that new fabric. This technique creates truly unique scrap fabric butterflies and helps use pieces that would otherwise be too small for the main pattern. Small scraps can also be used to make the butterfly’s center strip or decorative details.
Can beginners make this fabric butterfly? Yes. The project uses fundamental sewing skills such as tracing a pattern, cutting fabric, sewing curved seams, turning fabric right side out, pressing, and making a few hand stitches. Beginners may find the curved edges challenging at first, but working slowly makes the process manageable. Creating a test version from inexpensive fabric is a good way to practice before using favorite scraps.
How can I make the wings more dimensional? Add lightweight batting or interfacing and create a small pleat at the center of each wing. When securing the center, angle the wings slightly forward rather than pressing everything flat. Once stitched, gently separate and curve the fabric with your fingers. The combination of structure, folding, and positioning is what gives a 3D butterfly pattern its characteristic depth.
Can these butterflies be washed? That depends on the materials used. A simple cotton butterfly without beads, wire, or glued decorations may be gently hand washed, although repeated washing can affect its shape. Decorative versions are better treated as ornaments and spot cleaned when necessary. If you plan to attach the butterfly permanently to a washable project, prewash the fabrics before sewing and select washable embellishments.
How can I make several butterflies look like a coordinated collection? Choose a limited color palette and repeat certain fabrics throughout the group. For example, use several shades of pink and purple while alternating floral, striped, and dotted prints. Repeating a pearl detail or the same central fabric also creates continuity. The butterflies do not need to match exactly; coordinated variation often makes a handmade arrangement more visually interesting.
Can I sell finished butterflies made from this general technique? Handmade fabric butterflies created from your own template and your own materials can be developed into craft items, decorations, or gift accessories. If you plan to sell handmade projects, create your own distinctive dimensions, finishing details, and presentation. Accurate product descriptions, secure stitching, and consistent craftsmanship are especially important when producing several pieces for customers.
What is the easiest way to make a reusable butterfly template? Once you are satisfied with your paper pattern, transfer it to cardstock, template plastic, or another sturdy material. Label the template with its finished size, seam allowance, and any placement marks you find helpful. Store it flat with your other sewing patterns. A durable template allows you to quickly turn future fabric leftovers into matching butterflies without redrawing the pattern each time.
Why is this a good scrap-busting sewing project? The pieces require only small sections of fabric, and no single butterfly needs a large continuous cut. This makes DIY: Turning a Fabric Scrap into a Beautiful Butterfly Pattern especially practical after quilting, bag making, or other cotton sewing projects. Instead of allowing attractive remnants to accumulate unused, you can transform them into decorations while practicing useful sewing techniques.
Conclusion
Creating DIY: Turning a Fabric Scrap into a Beautiful Butterfly Pattern is a simple way to turn leftover fabric into something colorful, decorative, and full of handmade character. Starting with a small paper template, you can cut coordinating cotton fabrics, add lightweight interfacing, sew the wing pieces, turn and press them carefully, and shape the center to create the distinctive three-dimensional butterfly form. Details such as contrasting fabrics, tiny pleats, decorative stitching, pearl beads, or optional antennae allow every butterfly to feel unique.
This project also demonstrates how valuable even small scraps can become when approached creatively. A few pieces of floral quilting cotton that seem too small for another project may be exactly the right size for a butterfly. By organizing scraps according to color and creating several butterflies at once, you can build a coordinated collection for baskets, centerpieces, garlands, handmade gifts, or seasonal displays. The same basic pattern can be adapted again and again by changing the size, fabric style, embellishments, and finishing technique.
Most importantly, allow your butterflies to reflect your own sewing style. Handmade projects do not have to be identical to be beautiful. Experiment with different prints, adjust the folds, try different wing proportions, and discover which combinations you enjoy most. If you make your own version of this fabric butterfly pattern, leave your sincere opinion about the project and share any suggestions or creative variations you would like to try. Your ideas may inspire an entirely new way to transform the next collection of fabric scraps into something special.