
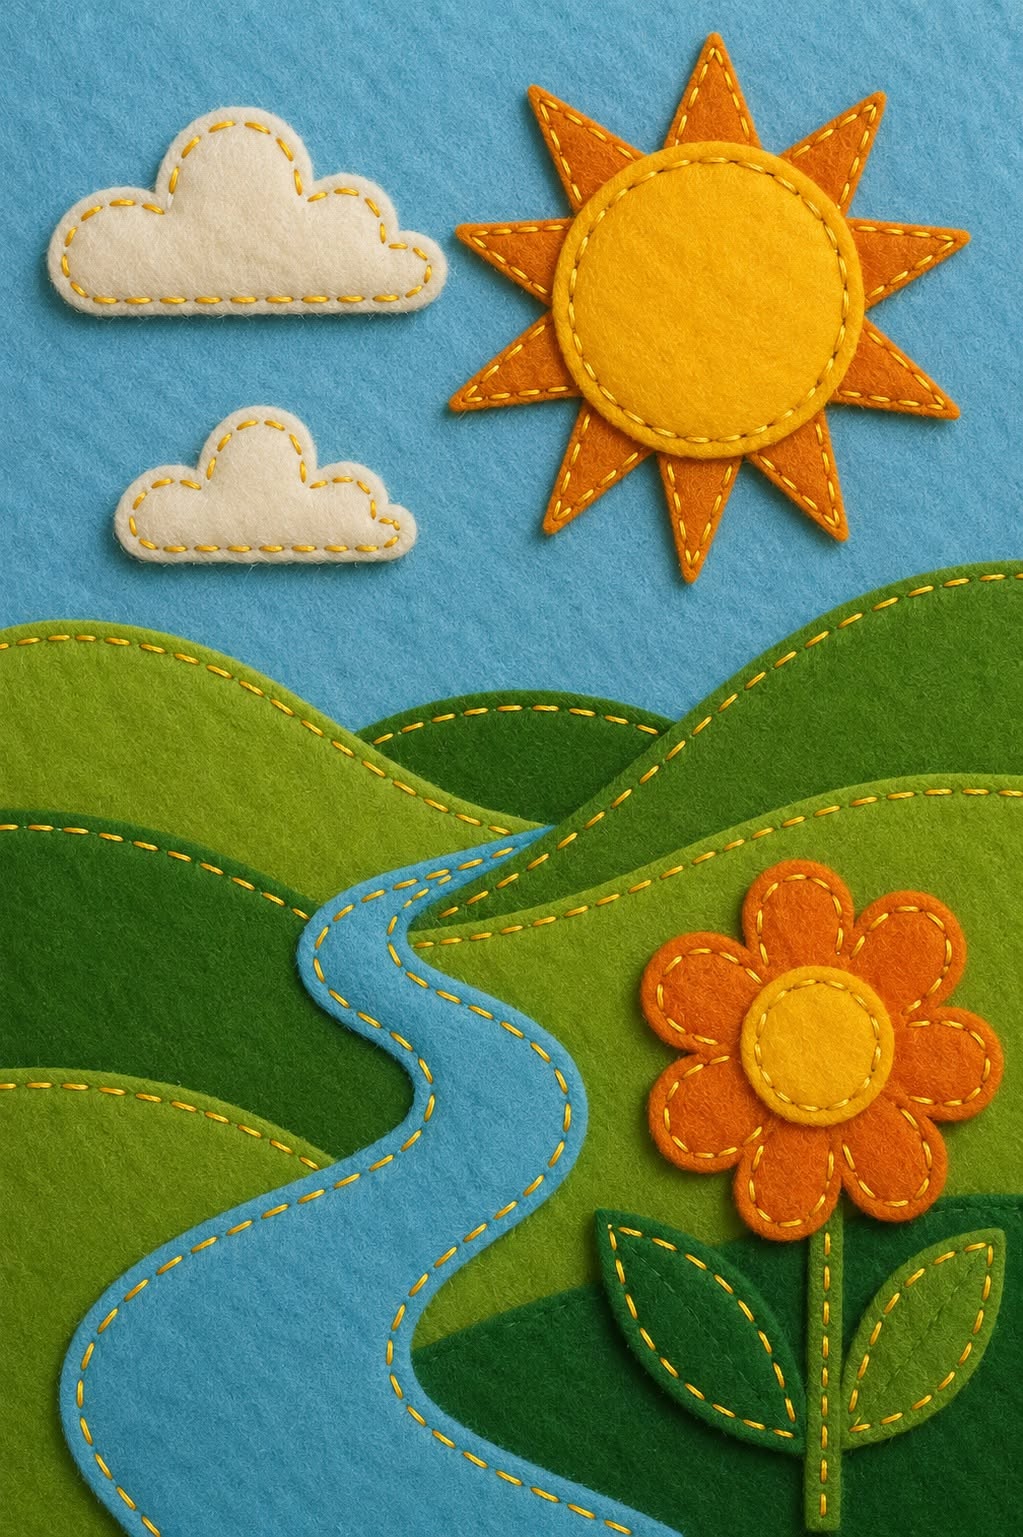
Felt Appliqué Landscape Panel Fabric Pattern is a cheerful sewing project that transforms simple pieces of felt into a colorful countryside scene filled with rolling hills, a winding blue river, soft clouds, a bright sun, and a dimensional flower. The design is especially attractive because it does not depend on complicated patchwork techniques or advanced sewing equipment. Instead, the project is built by layering carefully cut felt shapes and securing them with simple stitching. The soft texture of felt gives the finished landscape a warm handmade appearance that works beautifully as fabric wall art, a decorative panel, a nursery decoration, or part of a larger textile project. Even beginners can enjoy the process because the individual shapes are easy to recognize and can be adjusted without affecting the overall beauty of the scene.
The expression Felt Appliqué Landscape Panel Fabric Pattern describes both the technique and the finished design. “Felt appliqué” means that individual felt pieces are cut into decorative shapes and sewn onto a fabric or felt background. “Landscape panel” refers to the complete picture created from those pieces, while “fabric pattern” describes the templates and arrangement used to reproduce the design. In this project, each element is deliberately simple: curved green shapes create hills, an irregular blue strip becomes a river, rounded white shapes form clouds, and layered circles and triangles create the sun. Because the pattern uses clean silhouettes rather than extremely detailed pieces, it is an excellent introduction to felt appliqué sewing while still producing an impressive finished result.
Another advantage of the Felt Appliqué Landscape Panel Fabric Pattern is how easily it can be personalized. The green hills may be replaced with autumn browns, the blue background can become a soft sunset shade, the flower can be made pink or purple, and additional trees, birds, houses, or animals can be added later. The essential technique remains the same: prepare the background, create templates, cut the felt accurately, arrange the pieces, and stitch each layer securely in place. Working slowly through these stages will help you achieve clean edges and balanced proportions. The following tutorial explains the entire process from choosing materials to completing the final details, allowing you to recreate the charming felt landscape shown in the inspiration image while developing skills that can be used in many future appliqué projects.
Materials and Preparing the Felt Appliqué Landscape Panel Fabric Pattern
Start by selecting a firm piece of blue felt for the background. A panel measuring approximately 30 x 40 cm works well for a small wall decoration, although the measurements can easily be enlarged. Choose felt that is thick enough to remain stable but flexible enough to sew comfortably. Wool-blend felt usually produces a refined finish, while good-quality craft felt is an affordable option for beginners.
DISCOVER MORE FREE PATTERNS HERE!
For the landscape, prepare several shades of green felt. Using three or four different greens is important because the color variation creates depth. A lighter green can represent the closest hill, while medium and darker greens can suggest hills that are farther away. You will also need light blue felt for the river, white or cream felt for the clouds, yellow and orange felt for the sun, and orange, yellow, and green felt for the flower.
You will also need fabric scissors, small detail scissors, sewing needles, pins or temporary fabric adhesive, matching embroidery thread, paper for templates, a pencil, and a ruler. Embroidery floss is particularly suitable for this felt appliqué project because visible stitches can become part of the decorative design. You may work with matching thread for a subtle result or slightly darker shades for stronger definition.
Before cutting any felt, create paper templates. Draw several gently curved hill shapes, making some higher and some lower. The curves do not need to be perfectly symmetrical because natural landscapes are irregular. Sketch a winding river that begins narrow near the center of the picture and gradually becomes wider toward the bottom. This simple change in width creates the illusion of distance and perspective.
Next, draw two cloud templates. Each cloud can be made from a continuous rounded outline with two or three soft bumps along the upper edge. For the sun, draw one large circle and approximately eight triangular rays. The circle will sit on top of the rays, covering their inner edges and producing the layered appearance seen in the Felt Appliqué Landscape Panel Fabric Pattern.
Finally, create the flower templates. Draw a small circle for the center, six rounded petals, two leaves, and a narrow strip for the stem. Keep the flower slightly oversized so that it becomes a strong foreground element. Once all templates have been checked for proportion, cut them from paper and place them temporarily on the background to make sure the composition feels balanced before cutting your felt.
Cutting and Building the Rolling Hills, River, Sun, and Clouds
Begin constructing the felt landscape panel with the hills because they form the main foundation of the design. Place your paper hill templates on the selected shades of green felt and trace around them carefully. Cut each piece using smooth, continuous movements. Uneven cutting can be corrected easily because felt does not fray, but clean curves will make the final panel look more polished.
Arrange the darkest green hills near the upper middle section of the blue background. Place lighter or brighter green hills over portions of the darker pieces. Overlapping is essential because it makes the landscape appear layered rather than flat. Do not sew anything immediately. Continue rearranging the shapes until the curves flow naturally from one side of the panel to the other.
Now add the winding felt river. Cut the river from turquoise or light blue felt and position its narrow end between the distant hills. Allow it to curve from side to side as it travels toward the foreground. The lower section should become significantly wider. This perspective technique is one of the most important visual features of the Felt Appliqué Landscape Panel Fabric Pattern, because it naturally guides the viewer’s eye through the scene.
Once you are happy with the arrangement, secure the hills and river with pins or small amounts of temporary fabric adhesive. Sew around the edges using a small running stitch. Try to maintain a consistent distance between stitches. Approximately 3 to 5 mm between stitches gives the design a charming handmade appearance without making the edges look too busy.
Next, construct the felt sun appliqué. Arrange the orange triangular rays in a circular formation near the upper-right area of the background. Overlap their inner points slightly. Place the yellow circle over the center and stitch around its edge using yellow or orange embroidery thread. You may also sew around the individual rays, although securing them beneath the center circle is often enough for a lightweight decorative panel.
Finish the upper portion of the design with two soft white clouds. Position the larger cloud toward the upper-left side and the smaller one underneath it. Stitch around each cloud using cream or white thread. Slightly imperfect hand stitches complement the texture of felt and reinforce the handcrafted character of this fabric appliqué landscape.
Creating the Dimensional Felt Flower and Sewing the Appliqué Pieces
The flower provides a bright focal point in the foreground of the Felt Appliqué Landscape Panel Fabric Pattern. Start by cutting six rounded petals from orange felt. Arrange them in a circular formation to check their spacing. Because felt is forgiving, every petal does not need to be identical. Small variations often make handmade flowers feel more organic.
Cut a yellow circle for the flower center and position it over the inner ends of the petals. The center should cover any small gaps where the petals meet. Pin the pieces temporarily before sewing. Attach each petal with matching orange thread, then stitch around the yellow center with a neat running stitch. This layered construction gives the flower subtle dimension.
For the stem, cut a narrow strip of medium or dark green felt. Position it vertically underneath the flower head, extending toward the lower section of the landscape. Avoid making the stem perfectly straight if you want a more natural effect. A very gentle curve can make the flower look as though it is growing naturally from the hillside.
Next, cut two elongated felt leaves with pointed ends. Place one leaf on each side of the stem at slightly different heights. Overlap the bottom portion of each leaf with the stem before stitching. You can add a simple line of running stitches through the center of each leaf to suggest a vein and provide additional decorative detail.
When sewing all the felt appliqué pieces, avoid pulling your thread too tightly. Excess tension can cause the felt to wrinkle or the background panel to distort. Keep the stitches firm enough to hold the shapes securely but relaxed enough for the fabric to remain flat. If the panel begins to curl, gently smooth it on a flat surface before continuing.
Take time to examine the entire composition after completing the flower. The goal is to create a visual balance between the large sun in the upper area and the strong flower in the foreground. The winding river connects these elements by directing attention from the distant hills toward the bottom edge, helping the Felt Appliqué Landscape Panel Fabric Pattern feel unified rather than like a collection of separate shapes.
Finishing, Displaying, and Personalizing Your Felt Landscape Panel
After all the main appliqué pieces have been stitched, inspect every edge carefully. Look for loose threads, unsecured corners, or areas where a shape might lift away from the background. Add small reinforcing stitches when necessary. This final inspection is important because neat finishing increases the durability of your handmade felt panel and gives the project a professional appearance.
You can leave the background edges raw because felt does not fray, or you can create a more finished border. One easy option is to place the completed panel onto a slightly larger piece of felt in a contrasting color. Allow approximately 1 to 2 cm to remain visible around every side, creating a simple frame without distracting attention from the landscape itself.
If you prefer a softer finish, add a fabric backing. Cut cotton fabric or another piece of felt to the same size as the panel and sew the two layers together around the perimeter. The backing hides knots and stitching on the reverse side while also making the Felt Appliqué Landscape Panel Fabric Pattern stronger and easier to handle.
The completed piece can be displayed in several ways. It can be placed inside a frame without glass, attached to a wooden dowel as a small textile wall hanging, or sewn into the front of a cushion. The same design can also become a decorative section of a child’s activity book, a quilt block, or a fabric organizer.
Personalization is one of the most enjoyable parts of this technique. Add small felt trees beside the river, create birds in the sky, place a tiny cottage on one of the distant hills, or include additional flowers in the foreground. You can even change the season by using orange and brown hills for autumn or white hills for a winter-inspired felt landscape pattern.
Most importantly, enjoy the handmade character of the finished piece. Perfect symmetry is unnecessary in this style of sewing. Slight differences in the curves of the hills, the size of the petals, or the spacing of stitches contribute to the personality of the artwork. The Felt Appliqué Landscape Panel Fabric Pattern is successful because simple shapes, strong colors, and visible hand stitching work together to create a warm and inviting scene.
Frequently Asked Questions About the Felt Appliqué Landscape Panel Fabric Pattern
What is felt appliqué?
Felt appliqué is a decorative sewing technique in which pieces of felt are cut into shapes and stitched onto a larger background. Because felt does not usually fray along cut edges, the pieces can be used without folding or finishing the seam allowances, making the technique particularly suitable for beginners.
What type of felt is best for this project?
A medium-weight felt that holds its shape is usually the easiest choice. Wool or wool-blend felt can provide a softer and more durable finish, while quality synthetic craft felt is also suitable for decorative projects. Avoid extremely thin felt because it may stretch or wrinkle during stitching.
Do I need a sewing machine to make the landscape panel?
No. The entire Felt Appliqué Landscape Panel Fabric Pattern can be completed by hand. In fact, visible hand stitching is part of the charm of this design. A basic running stitch is enough to secure most shapes, although blanket stitch can also be used around the edges if you prefer a more decorative finish.
What stitch should I use for felt appliqué?
The running stitch is the simplest option and matches the relaxed appearance of the inspiration design. Blanket stitch is another popular choice because it produces a decorative border around each appliqué shape. Backstitch can be useful when adding small details such as leaf veins or flower stems.
Should I use seam allowance when cutting felt appliqué shapes?
Normally, no seam allowance is necessary for this type of raw-edge felt appliqué. The paper template can represent the exact final size of each piece. Simply trace around the template and cut directly along the marked line.
How can I keep the felt pieces from moving while sewing?
Use pins, small clips, or a tiny amount of temporary fabric adhesive. When using adhesive, apply only enough to keep the felt in position. Too much glue may make hand stitching difficult by creating a hard area beneath the needle.
How do I make the river look like it goes into the distance?
Make the upper part of the river narrow and gradually widen it as it approaches the bottom of the panel. This change in scale creates visual perspective. Positioning the narrow end between overlapping hills also strengthens the illusion that the river continues into the distance.
Can beginners make this Felt Appliqué Landscape Panel Fabric Pattern?
Yes. This project is particularly beginner-friendly because the shapes are large, the construction is straightforward, and felt does not require traditional edge finishing. Beginners can practice cutting curved shapes, arranging appliqué pieces, and making consistent hand stitches while creating a complete decorative project.
Can I resize the pattern?
Absolutely. The entire composition can be enlarged or reduced as long as the relative proportions of the individual pieces remain similar. A larger version could become a wall hanging, while a miniature version could decorate a bag, pouch, notebook cover, or small cushion.
How can I make the panel more durable?
Use good-quality felt, secure every appliqué edge carefully, avoid extremely long stitches, and consider adding a backing fabric. If the project will be handled frequently, stitching the pieces rather than relying primarily on glue will provide greater durability.
Can I change the colors of the landscape?
Yes. Color customization is encouraged. You can create spring greens, autumn oranges, muted neutral tones, pastel colors, or even a fantasy landscape. Keeping a clear difference between the sky, hills, river, sun, and flower will help each element remain easy to identify.
What can I make with the finished felt landscape?
The completed Felt Appliqué Landscape Panel Fabric Pattern can become wall décor, a framed textile picture, a cushion front, part of a quilt, a bag panel, a nursery decoration, or the cover of a handmade fabric book. Once you understand the basic construction, the same technique can be adapted to many different projects.
Conclusion
Creating a Felt Appliqué Landscape Panel Fabric Pattern is a relaxing way to explore appliqué while building a complete fabric scene from simple shapes. Throughout this tutorial, you learned how to select suitable felt, prepare paper templates, cut rolling hills, create perspective with a winding river, assemble layered clouds and a bright sun, construct a dimensional flower, and secure every element with decorative hand stitching.
The project also demonstrates how powerful simple design choices can be. Several curved green pieces are enough to suggest an entire countryside, while a gradually widening strip of blue felt creates the impression of a river traveling through the landscape. Carefully layered shapes and visible stitches give the finished panel character without requiring complicated sewing techniques.
EASILY FIND THE PDF FOR THIS PATTERN HERE!
Once you have completed the basic Felt Appliqué Landscape Panel Fabric Pattern, use it as a starting point for your own ideas. Experiment with different seasons, flower styles, sky colors, trees, animals, cottages, or other small details that make the landscape unique. Every variation can become a completely new handmade artwork while using the same fundamental appliqué skills. If you make your own version of this project, leave your sincere opinion about the tutorial and share your suggestions. It would also be wonderful to hear which colors, details, or landscape elements you would add to create your own personalized felt panel.