
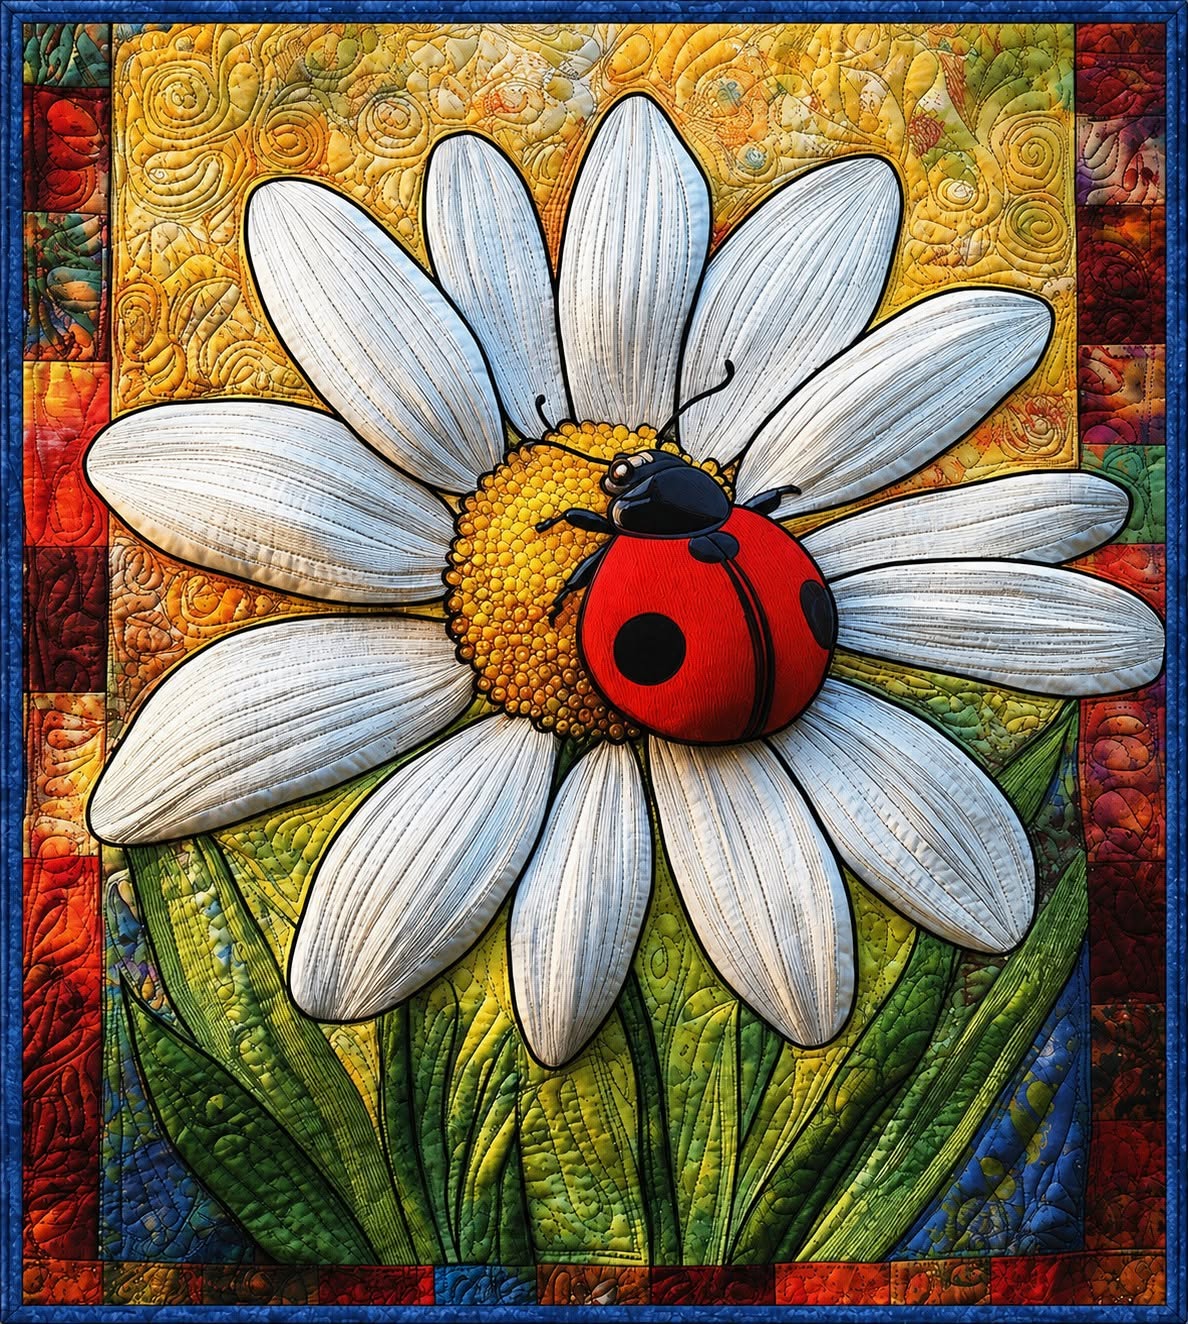
The Bedspread with Daisy and Ladybug Appliqué Quilt Pattern is a charming textile project that combines appliqué, patchwork, decorative quilting, and nature-inspired details in one colorful design. The large white daisy immediately becomes the focal point, while the bright red ladybug creates contrast and gives the composition a playful personality. Around these central elements, shades of green, yellow, orange, red, and blue create the appearance of a small garden made entirely from fabric. Although the finished project looks detailed, it can be created gradually by separating the design into simple shapes and working one section at a time. This approach makes the project suitable for quilters who already understand basic sewing techniques as well as adventurous beginners who want to improve their appliqué skills. The result can become a beautiful quilted bedspread, wall hanging, decorative throw, or centerpiece for a handmade bedroom collection.
The expression Bedspread with Daisy and Ladybug Appliqué Quilt Pattern describes a quilt design in which decorative fabric shapes are positioned and sewn onto a larger background before the final quilting is completed. A bedspread is generally larger than a small wall quilt and is intended to cover part or all of a bed, so the central motif may be enlarged or repeated depending on the desired finished dimensions. Daisy appliqué refers to creating the flower from individual fabric pieces, especially the petals and circular center, instead of printing the flower directly onto the fabric. Ladybug appliqué uses the same technique to create the insect from rounded red and black fabric shapes. Finally, the word quilt pattern refers to the overall plan used to determine placement, proportions, fabric choices, stitching order, and finishing. Understanding these terms before cutting the fabric makes it much easier to organize the project and achieve a balanced result.
One of the most attractive features of this appliqué quilt pattern is the mixture of realistic shapes and artistic quilting textures. The daisy petals can be made from white, ivory, cream, or very pale gray fabrics, while subtle stitching creates dimension without making the flower unnecessarily complicated. The yellow flower center can be built with textured fabric or enhanced with small circular quilting stitches to imitate seeds and pollen. Green fabric strips and irregular leaf shapes create the garden below the flower, while a colorful patchwork border frames the entire composition. The ladybug provides the strongest contrast with its vivid red wings, black head, black spots, and curved body. By combining these elements carefully, you can create a quilt that looks intricate and expressive while still relying on straightforward cutting, appliqué, and quilting methods.
Materials, Fabric Choices, and Preparation for the Appliqué Quilt
Begin by deciding whether you want to create a single large quilt block inspired by the photograph or expand the design into a full daisy and ladybug bedspread. For a decorative block, a square between approximately 45 and 60 cm works well. For a larger bedspread, the same central block can be enlarged or surrounded by additional patchwork sections. Always calculate the finished measurement before cutting so you can include sufficient fabric for borders, backing, binding, and seam allowances.
DISCOVER MORE FREE PATTERNS HERE!
Choose a sturdy quilting cotton for the main background. Golden yellow fabric is especially effective because it creates strong contrast against the white daisy petals and green foliage. You can use one solid fabric, a subtle tonal print, or several golden scraps pieced together for additional texture. If you prefer a softer result, mustard, honey, pale ochre, or warm cream backgrounds can also work beautifully.
For the daisy appliqué, prepare approximately 12 to 14 elongated petal shapes. Each petal should taper slightly toward the center while remaining rounded at the outer end. White cotton is the classic choice, but mixing several subtle white-on-white, ivory, and pale gray fabrics can make the flower appear more dimensional. Before cutting the final fabric, test one paper petal on your background to make sure its proportion fits the overall block.
The flower center can be cut as a large circle or slightly irregular oval using golden yellow, ochre, or orange-yellow fabric. A diameter of approximately 10 to 14 cm works well for a medium-sized block, although the measurement should always be adjusted to the size of your petals. Small pieces of darker brown, gold, and orange fabric may also be added around the edge of the center to imitate natural texture. Decorative stitching later will create even more visual depth.
For the ladybug appliqué, gather red and black fabric scraps. The main body can be created from an oval red piece, while a narrow black line can divide the wings. Use a smaller rounded black piece for the head and several black circles for the characteristic wing spots. You may also add tiny fabric or embroidered antennae, but keep them simple so they remain durable when the quilt is washed.
Finally, prepare batting, backing fabric, coordinating thread, appliqué thread, pins or fabric clips, fabric scissors, a quilting ruler, a marking pencil, and your preferred appliqué stabilizer if necessary. Cotton or cotton-blend batting works particularly well because it provides enough loft to emphasize the quilting without becoming excessively bulky. Wash and press your fabrics before cutting if you normally prewash quilting cotton. Careful preparation will help prevent distortion and make the following construction steps much more enjoyable.
Creating the Daisy, Leaves, and Ladybug Appliqué Pieces
Start the construction of your Bedspread with Daisy and Ladybug Appliqué Quilt Pattern by making paper templates for the flower. Draw one elongated petal, cut it out, and use it as a master template so all of the petals remain visually consistent. They do not have to be absolutely identical because slight variations can make the flower appear more natural. Trace the template onto your chosen appliqué material or directly onto the fabric according to the appliqué method you prefer.
Arrange the petals on the background before attaching anything permanently. Begin with the upper petals and gradually work around the circular flower center. Allow the inner ends of the petals to overlap slightly because they will eventually be covered by the yellow center. Rotate a few petals gently rather than positioning every piece at exactly the same angle; this creates movement similar to the flower shown in the reference design.
Once you are satisfied with the arrangement, secure the petals using your preferred appliqué technique. Fusible appliqué is convenient for beginners because the pieces remain stable during stitching, while traditional needle-turn appliqué creates softer edges. Machine appliqué with a narrow zigzag or blanket stitch is another practical choice for a frequently used bedspread. Select a technique that matches both your experience level and the final appearance you want.
Next, create the lower foliage using several shades of green quilting fabric. Cut long tapered leaf shapes, narrow stems, and irregular pieces that resemble grass or overlapping garden leaves. Position darker greens behind lighter greens to give the base of the flower more depth. You can also include touches of yellow-green or blue-green fabric to keep this section from appearing flat.
The ladybug should be assembled separately before being placed over the flower. Start with the red oval body, position the black head near one end, and add the black dividing line through the center of the wings. Place two or more black spots on each side, changing their sizes slightly for a more organic appearance. Stitch these small components securely because they become important visual details in the finished ladybug quilt appliqué.
Position the completed ladybug partially over the yellow flower center and slightly over one or two petals. This overlapping placement creates the illusion that the insect is actually resting on the daisy instead of floating above the background. Angle the body diagonally rather than keeping it completely vertical. When you are satisfied with the placement, appliqué it securely using coordinating thread and add small antennae with embroidery or narrow black stitching if desired.
Assembling, Quilting, and Adding the Colorful Patchwork Border
After completing the central appliqué, press the quilt top carefully from the reverse side whenever possible. Avoid pressing directly over dimensional embroidery or delicate appliqué edges. Check that every petal, leaf, spot, and insect component is securely stitched. This is the best moment to correct loose edges before the batting and backing are added.
To recreate the colorful frame seen in the inspiration image, construct a patchwork quilt border from small rectangular or square fabric scraps. Use warm reds, rust, orange, dark green, blue, burgundy, and occasional golden pieces. These colors echo the natural garden palette while providing a strong frame around the bright central flower. Scrappy fabrics work especially well because subtle differences in print and texture make the border more interesting.
Sew the border pieces together into four strips. Press the seams in alternating directions to reduce bulk, then attach the side borders first and the top and bottom borders afterward. Measure through the center of the quilt rather than relying only on the outer edge measurement. Correctly measured borders help prevent unwanted waves and keep the quilt top square.
Create the quilting sandwich by placing the backing fabric right side down, the batting in the middle, and the completed quilt top right side up. Smooth every layer carefully to remove wrinkles. Baste the layers using your preferred method so nothing shifts while quilting. A bedspread requires especially good basting because large sections can move easily during machine quilting.
Quilt around the edges of each petal, leaf, flower center, and ladybug shape first. This technique, often called outline quilting, emphasizes the appliqué and helps separate the individual design elements. Additional curved stitching inside the white petals can follow their natural length and create the ribbed appearance visible in the original artwork. In the golden background, free-motion spirals, loops, flowers, or gentle meandering stitches can create beautiful texture.
The green foliage can be quilted with long lines that imitate leaf veins, while the yellow center can receive small circular or pebble-style quilting. The colorful border may be quilted more simply with straight lines or gentle curves so it does not compete with the central design. Good decorative quilting should support the appliqué rather than overpower it. When viewed from a short distance, the eye should still be drawn first to the white daisy and red ladybug.
Finishing the Bedspread and Personalizing the Quilt Pattern
Once all quilting is finished, trim the excess batting and backing carefully so the quilt has straight, clean edges. Use a large quilting ruler whenever possible and check the corners before cutting. A precise final trim greatly improves the professional appearance of the project. If your quilt has become slightly distorted during quilting, make small corrections rather than removing excessive fabric.
Prepare binding strips in a color that complements the patchwork border. Dark red, burgundy, deep green, navy, or a multicolored print can all work effectively. Join the strips diagonally to reduce bulk and press the finished binding in half lengthwise. Sew it around the quilt perimeter, carefully forming neat mitered corners.
After attaching the binding, inspect the entire Bedspread with Daisy and Ladybug Appliqué Quilt Pattern for loose threads or missed stitches. Secure any thread tails and gently press the finished piece if your fabrics allow it. Washing can help the quilt develop the slightly textured, soft appearance that many handmade quilts are known for. Always follow the care instructions appropriate for the fabrics, batting, and threads you selected.
You can easily personalize the pattern by changing the flower colors. A yellow daisy with a brown center creates a sunflower-inspired appearance, while pink petals can transform the motif into a completely different garden flower. The ladybug can remain bright red to preserve the recognizable contrast. Another option is to create several coordinating flower blocks and combine them into a larger botanical bedspread.
For a larger appliqué bedspread, consider placing the main daisy block in the center and surrounding it with simpler blocks featuring leaves, smaller daisies, ladybugs, or plain quilted fabric. This keeps the main motif visually important while allowing you to reach the dimensions required for a bed. Repeated patchwork borders can also increase the final size without requiring a single oversized appliqué. Planning the enlargement in stages makes the project easier to handle on a home sewing machine.
The most important part of this quilt is not perfect duplication but balanced composition. Handmade appliqué naturally contains tiny differences in curves, stitch length, and fabric placement, and these variations contribute to its character. Take time to arrange your colors before sewing and step back occasionally to view the work from a distance. If the white petals remain clear, the ladybug stands out strongly, and the surrounding greens and warm border colors feel balanced, your daisy and ladybug appliqué quilt will have the same cheerful visual impact as the inspiration piece.
FAQ – Frequently Asked Questions About the Bedspread with Daisy and Ladybug Appliqué Quilt Pattern
What is a Bedspread with Daisy and Ladybug Appliqué Quilt Pattern?
A Bedspread with Daisy and Ladybug Appliqué Quilt Pattern is a decorative quilt design featuring a large appliquéd daisy, a contrasting ladybug, foliage, quilting details, and often a patchwork border. Individual fabric shapes are layered onto a background before the quilt is assembled with batting and backing. The pattern can be adapted to create anything from a small wall hanging to a full decorative bedspread.
Is this appliqué quilt suitable for beginners?
Yes, particularly if you use fusible appliqué and machine stitching. The shapes themselves are relatively simple because most components consist of petals, ovals, circles, leaves, and strips. Beginners may want to practice stitching curved appliqué edges on scrap fabric before beginning the main project. Working slowly and assembling the design in sections makes the process much easier.
What is the best fabric for the daisy appliqué?
Quilting cotton is one of the most practical choices because it is stable, easy to cut, and available in many subtle tones. White-on-white prints, ivory cotton, and pale gray fabrics are excellent for creating individual petals. Using two or three slightly different pale fabrics can create more dimension than using one completely uniform white.
How many petals should the daisy have?
There is no mandatory number, but approximately 12 to 14 petals creates a full flower similar to the inspiration image. The exact number depends on the width of your petals and the diameter of the flower center. Arrange all paper templates before cutting fabric if you want to confirm the spacing.
How can I make the ladybug look three-dimensional?
The easiest method is to layer the red body over the flower and add curved quilting lines around its edges. Slightly darker red fabric near one side can also suggest shadow. Black wing spots, a defined center line, and a rounded black head create strong contrast that naturally makes the ladybug stand out.
Can I hand appliqué this quilt instead of using a sewing machine?
Absolutely. Traditional needle-turn appliqué can produce elegant, nearly invisible edges. Hand stitching takes longer, especially on a bed-sized project, but many quilters enjoy the control and softness it provides. You can also combine hand appliqué with machine quilting.
What type of quilting design works best around the daisy?
Curved free-motion quilting works beautifully because it contrasts with the larger appliqué shapes. Spirals, loops, small floral forms, and gentle meandering patterns are all appropriate. Inside the petals, longer curved lines can emphasize their shape, while small circular quilting works well in the flower center.
Can this pattern be enlarged into a full-size bedspread?
Yes. Instead of enlarging the central flower excessively, one practical approach is to keep the main appliqué as a large central block and add coordinating blocks or borders around it. Leaves, small flowers, plain quilted blocks, and additional patchwork strips can gradually increase the finished dimensions. This method also makes the quilt easier to assemble and quilt.
Do I need special equipment for this project?
No specialized industrial equipment is necessary. A standard sewing machine capable of straight stitching and zigzag stitching can complete the project. A rotary cutter, quilting ruler, cutting mat, appliqué scissors, marking tools, and walking or free-motion quilting foot can make the work more convenient, but many steps can also be completed using basic sewing supplies.
How do I prevent appliqué pieces from moving while stitching?
Fusible web is one of the simplest options because it temporarily bonds the pieces to the background. Fabric glue designed for quilting, appliqué pins, or temporary basting stitches can also be used. Whatever technique you choose, arrange the entire flower and ladybug composition before permanently securing the individual pieces.
What colors work best for this quilt pattern?
The classic combination is white for the daisy petals, golden yellow for the center and background, red and black for the ladybug, and several greens for the foliage. Red, orange, blue, burgundy, and green scraps work beautifully in the surrounding border. These complementary colors create the rich garden effect that gives the design its distinctive character.
How can I keep the quilt from becoming too stiff?
Avoid using excessively heavy stabilizers underneath every appliqué piece. Choose lightweight appliqué products whenever possible and use batting appropriate for a bedspread. Quilting adds structure naturally, so the quilt does not need to be heavily reinforced. After finishing and washing, quality cotton fabrics often soften considerably.
Conclusion
The Bedspread with Daisy and Ladybug Appliqué Quilt Pattern combines several enjoyable quilting techniques in a single nature-inspired project. Beginning with the warm background, you learned how to prepare elongated white daisy petals, construct the textured yellow center, create layered green foliage, and assemble the recognizable red-and-black ladybug appliqué. Careful placement of these pieces creates the depth and movement that make the central composition so attractive.
You also learned how a colorful patchwork border can frame the appliqué and how decorative quilting can enhance every part of the design. Curved stitching gives the petals texture, small circular stitches emphasize the flower center, and leaf-shaped quilting brings additional detail to the green sections. Once the quilt sandwich is complete, neat trimming and binding provide the polished finish needed for a decorative handmade bedspread.
EASILY FIND THE PDF FOR THIS PATTERN HERE!
Most importantly, this pattern can be customized without losing its original character. Different flower colors, additional garden blocks, alternative borders, or enlarged surrounding sections can transform the same concept into a completely personal appliqué quilt project. Whether you create it as a wall hanging, decorative throw, or large bedspread, the combination of a cheerful daisy and bright ladybug makes the finished quilt warm, colorful, and memorable. If you decide to make your own Bedspread with Daisy and Ladybug Appliqué Quilt Pattern, share your sincere opinion about the project. Which colors would you choose for the daisy, border, and background? Your suggestions and creative ideas can inspire new variations and help other quilting enthusiasts discover even more ways to personalize this beautiful garden-themed design.