
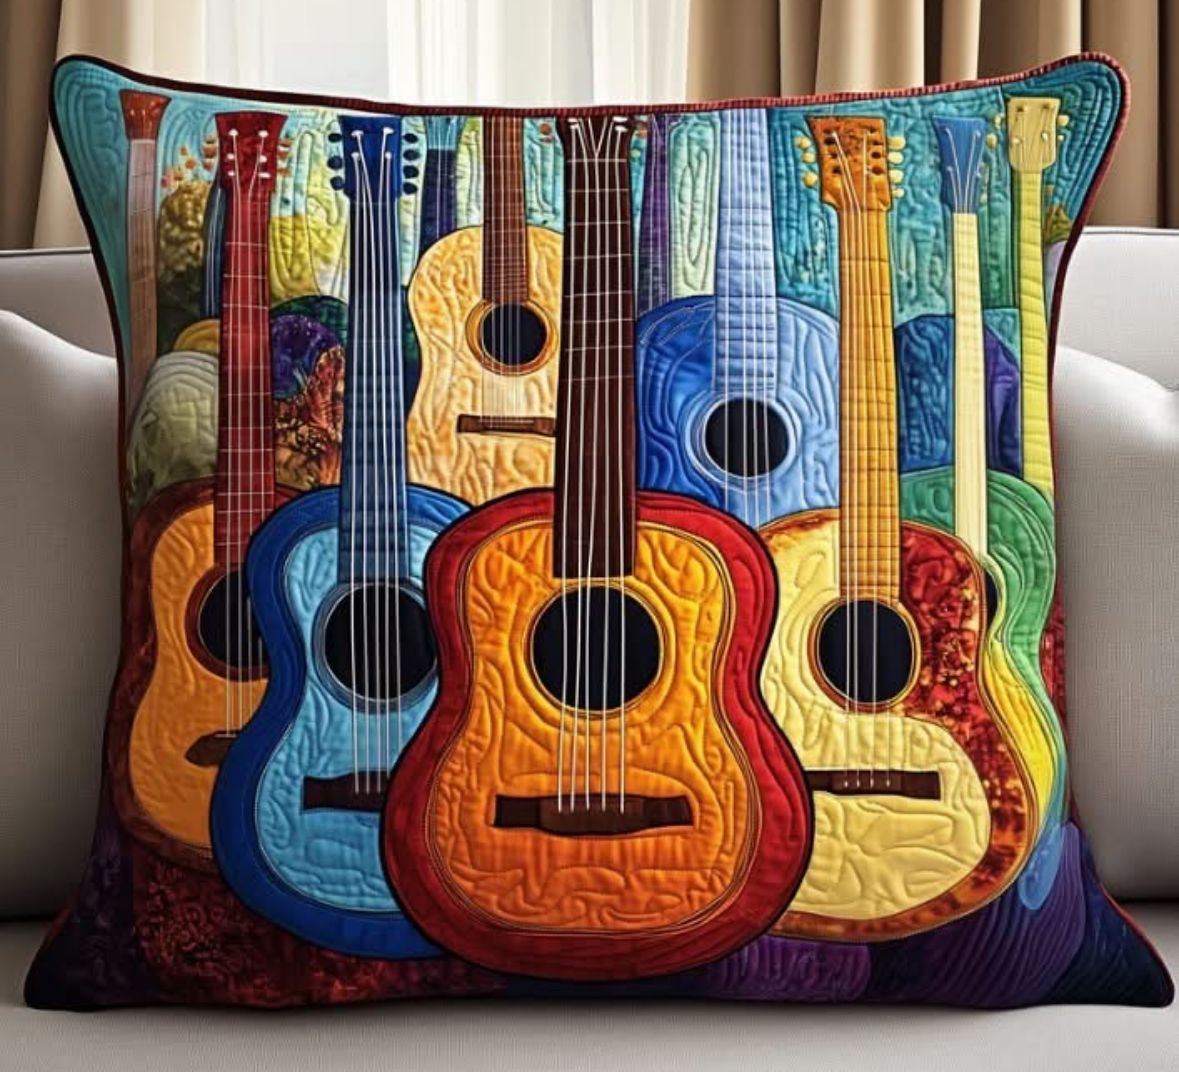
Quilted Cushion with Guitar Appliqué Fabric Pattern is a creative sewing project that combines the warmth of quilting with the personality of music-inspired appliqué. The cushion shown in the reference image stands out because several colorful guitars overlap across a richly quilted background, creating depth, movement, and a handmade artistic appearance. Instead of relying on a single printed motif, the design can be recreated by cutting individual guitar shapes from coordinating fabrics and building the composition layer by layer. This makes the project especially appealing for quilters who enjoy fabric appliqué, decorative stitching, scrap-friendly sewing, and unusual home décor. With careful planning, even complex-looking details such as guitar bodies, necks, sound holes, bridges, and strings can be simplified into manageable fabric pieces. The finished cushion can become an eye-catching accent for a living room, music room, bedroom, studio, or handmade gift.
Creating a Quilted Cushion with Guitar Appliqué Fabric Pattern also gives you an excellent opportunity to experiment with color without needing a large amount of fabric. Warm orange, yellow, red, brown, turquoise, navy, blue, green, and burgundy fabrics can be combined to reproduce the lively appearance of the photographed cushion. Solid fabrics work beautifully because quilting stitches become easier to see, while subtle prints can add texture to selected instruments or background areas. You do not need every guitar to be identical; in fact, small variations make the cushion feel more artistic and handcrafted. The key is keeping the general guitar silhouette recognizable while maintaining contrast between overlapping shapes. Beginners can reduce the number of guitars, while experienced quilters can add additional instruments, decorative free-motion quilting, detailed strings, and more intricate fabric sections.
The construction process is easier when the cushion is treated as a small appliqué quilt panel before being turned into a pillow cover. First, prepare and quilt the background, then make paper templates for the guitars, transfer those templates to fabric, arrange the pieces, fuse or pin them in place, and stitch around each appliqué. Afterward, smaller details can be layered over the larger shapes before the completed front panel is assembled with a backing. This method keeps the design organized and helps prevent distortion. For a practical finished size, a cushion around 45 x 45 cm works well, although the pattern can be enlarged or reduced depending on your preferred pillow insert. Throughout this tutorial, the focus will remain on recreating the visual character of the Quilted Cushion with Guitar Appliqué Fabric Pattern while making each construction stage understandable and adaptable.
Preparing the Fabrics, Tools, and Quilted Cushion Background
Begin by collecting cotton quilting fabrics for the cushion front, appliqué pieces, backing, and binding or piping if desired. For a 45 x 45 cm cushion, cut the front background slightly larger, approximately 50 x 50 cm, so you have room for quilting and trimming. Choose several colors for the guitars, including yellow, orange, red, turquoise, blue, green, brown, and dark accent fabrics. A varied palette gives the project the layered appearance visible in the reference design. Small pieces from your scrap collection are ideal for this type of guitar appliqué fabric pattern.
DISCOVER MORE FREE PATTERNS HERE!
You will also need batting, backing fabric for the quilted front, fusible web or another appliqué stabilizer, coordinating sewing thread, a sewing machine, fabric scissors, small precision scissors, pins or clips, an iron, marking tools, a quilting ruler, and a rotary cutter. Decorative threads may be useful for the guitar strings and outlines. If you enjoy free-motion quilting, prepare your quilting foot as well, although simple straight or gently curved quilting lines can also produce an attractive result.
To build the front panel, create a basic quilt sandwich using the background fabric on top, batting in the middle, and a lightweight backing underneath. Smooth all three layers carefully so they remain flat. Secure them with quilting pins or temporary basting. The background in the inspiration image contains visible stitched texture, so quilting the panel before attaching the guitars is important. This texture gives the cushion its characteristic dimensional, handcrafted quality.
Quilt the background with gentle curves, irregular organic shapes, wavy lines, or free-motion patterns. You do not need to copy every stitch shown in the photograph. Instead, aim for consistent texture across the entire surface. A quilted background helps the colorful appliqué shapes stand forward visually while also making the cushion front stronger and more structured. Keep the quilting density moderate so the finished panel remains flexible rather than becoming overly stiff.
Once quilting is complete, press the panel lightly from the front using a pressing cloth if necessary. Avoid stretching the edges. Square the panel to approximately 47 x 47 cm, leaving additional trimming for the final assembly. Waiting to cut the front to its exact finished measurement gives you some flexibility because quilting can cause a small amount of shrinkage. Always measure from the center outward to keep the panel balanced.
Before cutting any appliqué fabric, place the quilted panel on a flat surface and study how much space is available. The reference cushion creates interest by allowing some guitars to extend upward toward the top border while larger guitar bodies dominate the lower center. Planning this arrangement before sewing saves time and prevents the design from becoming crowded. Take a quick photograph of your preferred arrangement once the paper templates are positioned so you can refer to it during assembly.
Creating the Guitar Appliqué Fabric Pattern and Cutting the Pieces
The most recognizable element of the Quilted Cushion with Guitar Appliqué Fabric Pattern is the guitar silhouette. To make your own template, draw a simple acoustic guitar shape on paper. Begin with a rounded lower body, narrow the shape through the waist, widen it again around the upper body, and extend a long rectangular neck from the center. Add a small headstock at the top. Perfect mathematical symmetry is unnecessary because a handmade appliqué can have charming individual character.
For a large foreground guitar on a 45 cm cushion, the entire instrument can measure approximately 38 to 42 cm tall, including the neck. Smaller background guitars may range from 30 to 36 cm tall. Creating two or three basic sizes is usually enough to produce the layered effect. Trace each template onto sturdy paper or template plastic so it can be reused. Label the templates clearly as large, medium, or small.
Separate the main guitar into manageable pieces if you prefer easier cutting. The body, neck, headstock, sound hole, bridge, and optional decorative side panels can all be prepared independently. This method allows you to combine multiple fabrics in one instrument. For example, an orange guitar body may have a red outer section, a dark brown bridge, and a black sound hole. Combining fabrics is one of the easiest ways to add visual depth to your fabric appliqué.
Apply fusible web to the wrong side of the fabrics according to the manufacturer’s instructions for the product you are using. Let each piece cool before tracing the templates. Remember that a template may need to be reversed when using fusible appliqué, particularly if the design has a specific directional orientation. Guitar shapes are mostly symmetrical, so small reversals generally do not affect the overall look. Trace carefully and cut each component with sharp fabric scissors.
Create several guitars using different color families rather than repeating the same combination. One guitar might feature turquoise and navy, another orange and yellow, another red and cream, and another green and yellow. Dark brown, burgundy, navy, or black fabrics work particularly well for outlines, bridges, and sound holes because they provide contrast. Color contrast in appliqué quilting is important because overlapping shapes need clear boundaries to remain recognizable.
Keep all pieces organized before beginning the final layout. One practical method is to place the components of each guitar in a separate envelope or small tray. Number the guitars according to their placement, such as background guitar 1, middle guitar 2, foreground guitar 3, and so on. This simple organizational step becomes especially useful when recreating a dense composition like the Quilted Cushion with Guitar Appliqué Fabric Pattern, where several necks and bodies overlap.
Arranging, Fusing, and Stitching the Guitar Appliqué Design
Start the appliqué arrangement with the instruments that should appear farthest in the background. Position their bodies first and allow their necks to rise toward the top edge of the cushion. Do not permanently fuse anything immediately. Arrange all major pieces and evaluate the balance of color, spacing, and overlap. The photographed design succeeds because the guitars appear layered rather than lined up evenly, creating a feeling of depth similar to instruments standing together in a collection.
When you are satisfied with the arrangement, carefully lift the foreground pieces away while leaving the lowest layer in place. Fuse those background pieces according to the instructions for your fusible web. Continue working forward, adding one layer at a time. This layered appliqué technique is much easier than trying to fuse the entire composition simultaneously. It also helps you control which guitar body or neck visually sits in front of another.
Stitch around the edges of each fused shape for durability. A narrow zigzag stitch, blanket stitch, satin stitch, or straight appliqué stitch can all work well. Straight stitching close to the raw edge creates a casual modern appearance, while a dense satin stitch gives the shapes a more graphic outline. Choose the finish that best matches your sewing experience. For the handmade quilted appearance of the reference project, slightly visible decorative stitching is especially effective.
Add the sound holes after the large guitar bodies have been secured. Cut dark circles or slightly oval shapes and position them near the upper-middle area of each body. A narrow contrasting ring can be added around the sound hole using another fabric circle with the center removed. The sound hole appliqué is a small detail, but it immediately makes each fabric silhouette read more clearly as a guitar.
Next, add the bridges near the lower portion of each guitar body. These can be made from small brown, burgundy, or black fabric rectangles with slightly softened corners. Stitch them securely because decorative strings will eventually appear to connect visually from the bridge toward the neck. You may also quilt additional lines inside each guitar body to imitate wood grain, contours, or decorative construction. These stitched details are optional but can dramatically enrich the finished surface.
Finish the instrument details by adding strings. The safest decorative method for a cushion is machine stitching rather than loose cords that could snag during use. Sew several closely spaced straight lines from the bridge, across the sound hole area, and upward along the neck. Contrasting light thread can resemble metallic guitar strings, while dark thread creates a more graphic look. Slowly guide the fabric so the lines stay reasonably parallel. Slight irregularities are perfectly acceptable in a handmade music-themed quilted cushion.
Finishing the Quilted Cushion Cover and Caring for the Project
Once all appliqué pieces are stitched, inspect the cushion front carefully. Trim loose thread ends and check that every small edge is secure. If certain areas look too flat compared with the surrounding quilted background, add a few controlled quilting lines inside the guitar bodies or around the instruments. Quilting around the outer edges of the appliqué can create a subtle raised effect and make the guitars appear more dimensional.
Square the finished cushion front to your final desired measurement. For a 45 x 45 cm cushion insert, you can trim the panel to approximately 45 x 45 cm for a comfortably filled appearance, or slightly smaller if you prefer a fuller pillow. Check that important appliqué details remain safely inside the seam allowance. The tips of the guitar headstocks should not sit directly on the final stitching line.
For an easy removable cushion cover, create an envelope-style back. Cut two backing rectangles approximately 45 cm wide by 32 cm high. Hem one long edge of each piece by folding the raw edge twice and stitching. Place the quilted front right side up, then place the backing pieces right side down so their hemmed edges overlap across the center. Pin or clip around all four sides.
Sew around the entire cushion using approximately a 1 cm seam allowance. Reinforce the corners and the areas where the envelope panels overlap. Trim excess bulk from the corners without cutting through the stitching, then turn the cover right side out. Push the corners outward gently with a blunt turning tool. Press around the perimeter so the cushion maintains a neat square shape.
If you want a more defined frame similar to a decorative designer cushion, add piping or a narrow binding around the outer edge. Burgundy, dark red, brown, or navy can complement the multicolored guitars without competing with them. A contrasting border visually contains the busy appliqué composition and gives the Quilted Cushion with Guitar Appliqué Fabric Pattern a polished finish suitable for display.
Insert the cushion form and adjust the corners until the filling sits evenly. For everyday care, gentle cleaning is preferable because appliqué projects contain many stitched layers. If the fabrics were prewashed before construction, the cover will usually be easier to maintain. Avoid excessive heat when pressing areas containing fusible web. With careful construction and proper care, this handmade guitar appliqué cushion can remain a colorful decorative piece for years.
FAQ About the Quilted Cushion with Guitar Appliqué Fabric Pattern
What is a Quilted Cushion with Guitar Appliqué Fabric Pattern?
A Quilted Cushion with Guitar Appliqué Fabric Pattern is a sewing project in which guitar-shaped fabric pieces are applied to a quilted cushion front. The individual pieces are usually fused, pinned, or basted before being permanently stitched. Decorative quilting and layered fabrics give the cushion additional texture.
Is this guitar appliqué cushion suitable for beginners?
Yes, especially if the design is simplified. Beginners can start with three or four larger guitars instead of creating a densely layered composition. Basic shapes, fusible web, and straight machine stitching make the project much easier. More experienced quilters can add detailed strings, multiple overlapping instruments, decorative stitching, and free-motion quilting.
What type of fabric works best for guitar appliqué?
Quilting-weight cotton is one of the easiest materials to use because it cuts cleanly, presses well, and works reliably with fusible appliqué products. Cotton scraps are particularly useful because the project requires many small sections in different colors. Avoid fabrics that stretch significantly unless you stabilize them first.
Do I need fusible web for the appliqué?
Fusible web is not absolutely required, but it makes the process much easier. It temporarily holds the guitar pieces in position while you stitch them, reducing shifting and distortion. Traditional needle-turn appliqué or carefully pinned raw-edge appliqué can also be used if you prefer those techniques.
How many guitars should I include on the cushion?
There is no fixed number. The reference style uses numerous overlapping guitars to create a colorful, abundant composition. For a simpler cushion, three to five instruments can still create a strong musical theme. The important factor is maintaining enough contrast so each guitar remains visible.
How can I make the guitar strings without using real cord?
Machine stitching is an excellent solution. Use straight stitches with contrasting thread and sew several parallel lines from the bridge toward the neck. This creates the visual suggestion of guitar strings while keeping the surface practical and washable. Decorative embroidery stitches may also be used.
Can the Quilted Cushion with Guitar Appliqué Fabric Pattern be resized?
Yes. Scale the guitar templates and cushion dimensions proportionally. A smaller 40 x 40 cm version works well for compact spaces, while a 50 x 50 cm or larger cushion provides additional room for detailed appliqué. Always leave sufficient space around the design for seam allowances.
Should I quilt before or after adding the guitar appliqué?
For this design, quilting the main background first is convenient because it establishes an evenly textured base. You can then add the guitars and perform additional stitching around or inside them. Some quilters prefer quilting after appliqué, and that method can also work, but dense overlapping shapes may make free-motion quilting more difficult.
What colors work best for a music-themed quilted cushion?
Bright complementary colors work particularly well. Orange, turquoise, red, yellow, blue, green, and brown create the energetic character seen in this style. Dark accents around sound holes, bridges, and outlines help separate the shapes. A successful guitar appliqué quilt pattern usually includes a combination of warm, cool, light, and dark tones.
Can I use fabric scraps for this project?
Absolutely. This design is ideal for a scrap fabric quilting project because guitar bodies, necks, bridges, sound holes, and decorative sections can all be cut from relatively small pieces. Using leftovers also creates natural variation between the instruments and gives the cushion a distinctive handmade personality.
Conclusion
The Quilted Cushion with Guitar Appliqué Fabric Pattern transforms ordinary quilting cotton, batting, thread, and colorful scraps into a detailed music-inspired home décor project. By beginning with a quilted background, preparing reusable guitar templates, cutting contrasting fabric components, arranging them from background to foreground, and securing each layer with appliqué stitching, you can recreate the rich dimensional appearance of the photographed cushion without needing every instrument to be identical.
The most important lessons are to plan your composition before fusing, maintain strong color contrast between overlapping guitars, work in layers, and use stitched details to create recognizable sound holes, bridges, necks, and strings. Whether you choose a simplified version with only a few instruments or a dramatic composition filled with colorful guitars, the same basic Quilted Cushion with Guitar Appliqué Fabric Pattern technique can be adapted to your sewing level and personal style.
EASILY FIND THE PDF FOR THIS PATTERN HERE!
This project is also a wonderful way to practice fabric appliqué, machine quilting, scrap coordination, decorative stitching, and cushion construction in a single project. Once you understand the basic process, you can personalize future cushions with different guitar shapes, color palettes, musical instruments, quilting motifs, or fabric combinations. If you make your own version of this Quilted Cushion with Guitar Appliqué Fabric Pattern, leave your sincere opinion about the project and share your suggestions. Your ideas about colors, appliqué techniques, quilting styles, or variations can inspire even more creative versions of this colorful music-themed cushion.