
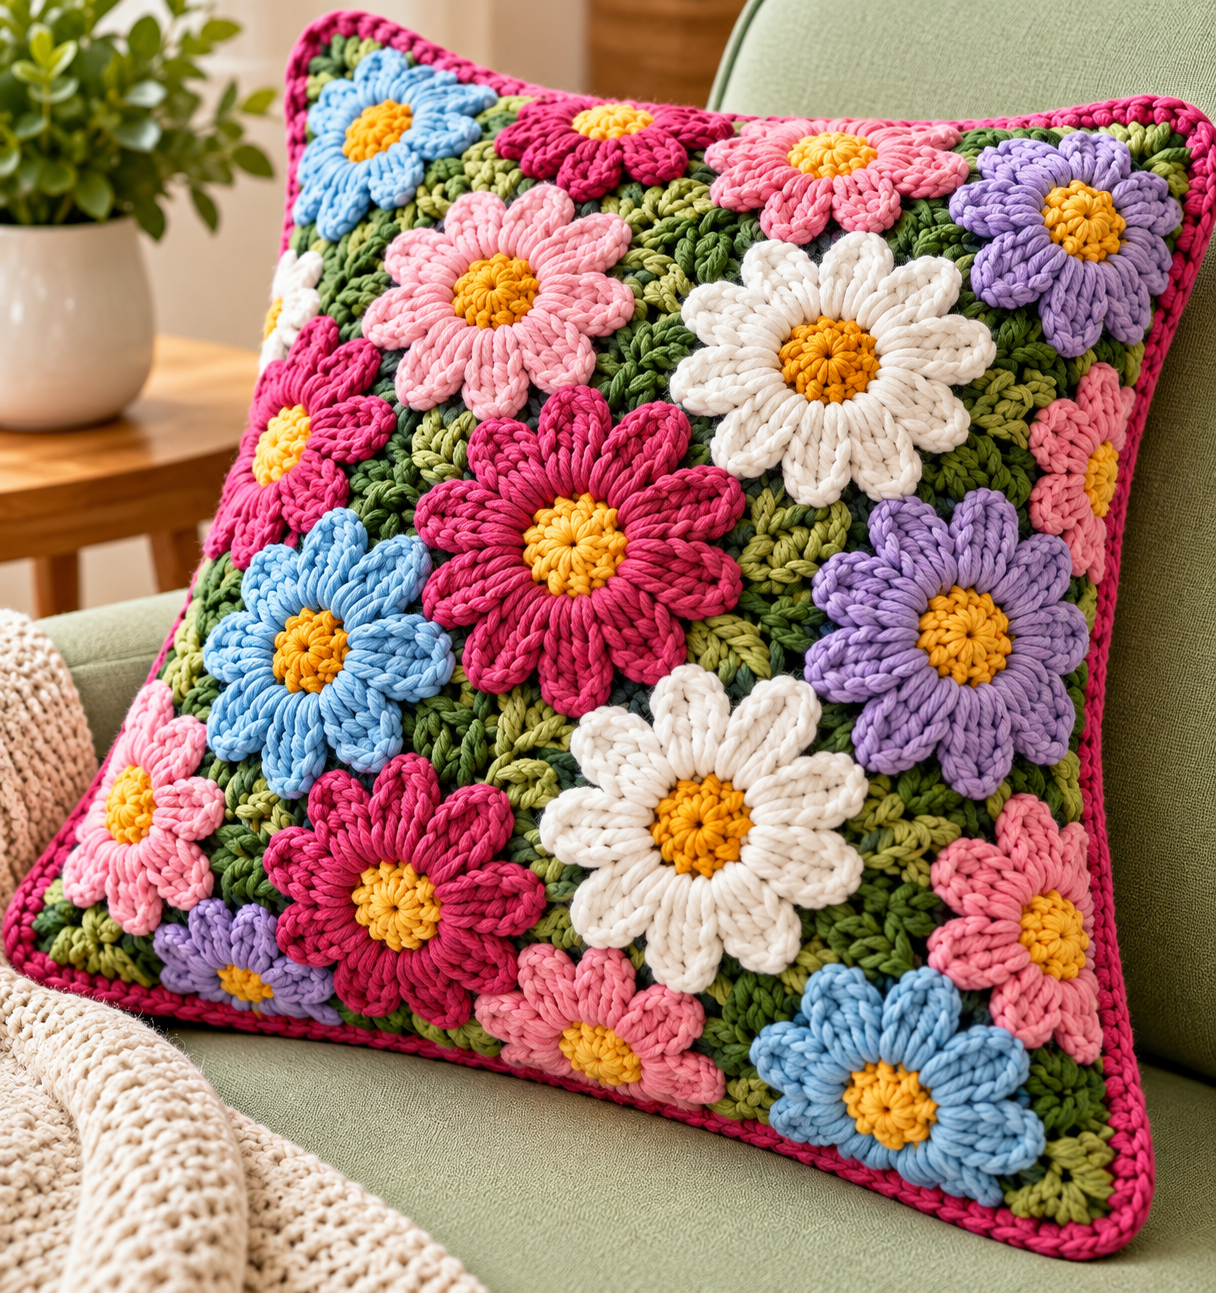
The Crochet Cushion with Daisy Flower Pattern is a beautiful project for anyone who loves colorful handmade décor, textured crochet, and floral designs that can brighten a living room, bedroom, reading corner, or cozy chair. Inspired by raised crochet flowers and the cheerful appearance of daisies, this pattern combines individual floral motifs with a comfortable cushion construction. One of the most attractive features of this project is the freedom to combine colors such as cream, orange, mustard yellow, red, olive green, and blue to create a vintage or modern appearance. Even though the finished cushion looks detailed, the construction becomes much easier when it is divided into small crochet sections. Each flower can be worked separately or incorporated into a motif before the pieces are joined together. Throughout this guide, you will learn the essential crochet stitches, abbreviations, flower construction, joining techniques, and finishing steps needed to create your own cushion.
Making a Crochet Cushion with Daisy Flower Pattern is also an excellent way to practice several important crochet skills in a single project. You will work with a magic ring, chains, single crochet, half double crochet, double crochet, slip stitches, increases, petal shaping, motif joining, and decorative edging. The raised petals give the cushion a three-dimensional appearance, while the surrounding stitches provide stability and help the individual flowers fit together neatly. Beginners who already understand basic crochet stitches can approach the project slowly, completing one flower at a time before moving to the cushion assembly. More experienced crocheters can customize the number of flowers, colors, dimensions, and arrangement to create an entirely original design. Because handmade crochet naturally varies according to yarn weight, hook size, and personal tension, checking the measurements as you work is an important part of achieving professional-looking results.
Another advantage of this crochet daisy cushion pattern is that it can use small quantities of yarn left over from other projects. Instead of making every flower identical, you can alternate colorful petals and centers while maintaining a balanced palette across the cushion. Cotton yarn is particularly suitable when you want defined stitches and durable flowers, while acrylic or cotton-blend yarn can create a softer and more flexible cushion cover. For a comfortable decorative cushion, medium-weight yarn and a crochet hook appropriate for that yarn are practical choices. The instructions below use standard U.S. crochet terminology, and the stitch key is explained before the pattern begins so that each stage is easier to follow. With careful counting, consistent tension, and secure finishing, the final result can become a charming handmade accent piece with plenty of texture and personality.
Crochet Materials, Stitch Key, and Pattern Preparation
Before beginning the Crochet Cushion with Daisy Flower Pattern, gather medium-weight yarn in several coordinating colors, a suitable crochet hook, scissors, a yarn needle, stitch markers, and a cushion insert. A hook between approximately 4 mm and 5 mm often works well with medium-weight yarn, although the yarn label should always be considered. You can select a square cushion insert around 40 x 40 cm or another preferred size. The exact number of flowers required will depend on the finished dimensions of your individual motifs.
DISCOVER MORE FREE PATTERNS HERE!
For this pattern, the main crochet stitch key uses common U.S. abbreviations: MR = magic ring, ch = chain, sl st = slip stitch, sc = single crochet, hdc = half double crochet, dc = double crochet, tr = treble crochet, st = stitch, sts = stitches, sp = space, rep = repeat, and FO = fasten off. When you see an instruction inside parentheses followed by a repeat number, complete everything inside the parentheses the stated number of times. Learning these abbreviations makes written crochet patterns much easier to understand.
The magic ring forms the center of each daisy and helps prevent a noticeable hole in the middle of the flower. To make it, create a loop with the yarn, insert the hook into the loop, pull up a strand, and chain one to secure it. Work the required stitches directly around the loop. Once the first round is complete, gently pull the yarn tail until the center closes. Secure the tail carefully because flower centers can loosen if the magic ring is not finished properly.
Color planning is especially important for a floral cushion. Choose two or three colors for the flower centers, several shades for the petals, and complementary greens or blues for the spaces surrounding the flowers. For an appearance similar to a cheerful garden, consider orange crochet flowers, white daisies, mustard-yellow flowers, deep red flowers, olive leaves, and muted blue background sections. Repeat colors throughout the cushion rather than concentrating one color in a single area. This helps create visual balance.
Make one complete flower before producing all your motifs. Measure its diameter and place it against your cushion insert to estimate how many motifs will be necessary. Crochet naturally stretches, so the cover should generally fit snugly rather than being significantly larger than the insert. If your first flower looks too loose, try a slightly smaller hook. If it feels stiff and difficult to work, a larger hook may improve the fabric.
Keep your stitch tension as consistent as possible throughout the Crochet Cushion with Daisy Flower Pattern. Very tight stitches can make raised petals curl excessively, while loose stitches may cause flowers to lose definition. Do not worry if the first flower is not perfect. Use it as a test motif, adjust your tension or hook size, and then begin the flowers that will become part of the finished cushion.
Step-by-Step Crochet Daisy Flower Pattern
Begin each crochet daisy flower with the center. Make an MR, then work ch 1 and 10 sc into the ring. Pull the magic ring closed and join with a sl st to the first sc. For a slightly larger center, you can work 12 sc instead, but use the same stitch count for every flower of the same size. Fasten off if you want to change colors before beginning the petals.
Join the petal color to any stitch of the center. Make ch 3, then work 2 dc into the same st. Next, make ch 3 and sl st into the same st to complete one small raised petal. Slip stitch into the next center stitch and repeat the sequence around the flower. If you began with 10 center stitches, you should finish with approximately 10 petals. Keep the petals relaxed so they remain soft and rounded.
For fuller flowers like those commonly seen on textured crochet cushions, you can create a larger petal using sl st, ch 2, hdc, 2 dc, hdc, ch 2, sl st in the selected stitch or space. This produces a thicker and slightly longer petal. Another option is ch 3, 3 dc, ch 3, sl st, which makes a pronounced petal with plenty of texture. Choose one petal formula and repeat it consistently within each flower.
After completing the petals, gently arrange them with your fingers before starting the surrounding round. Join the background color behind a petal and work ch 1. Crochet sc stitches into available spaces between the petals, adding chains where necessary to bridge small gaps. The goal is to create a stable outer foundation without flattening the raised flower. Keep the petals toward the front of the work while the structural stitches remain behind them.
To transform the round flower into a motif that can be joined easily, create four corner areas. A simple corner formula is 2 dc, ch 2, 2 dc in each selected corner space. Between corners, work dc or hdc stitches evenly across the side. Continue around the motif and join with a sl st. The exact stitch count may vary slightly depending on the size of your flower, but all motifs should finish with approximately equal dimensions.
Make enough flowers to cover the front panel of your cushion. Arrange the finished pieces on a flat surface before joining them. Mix white, orange, red, mustard, and other flower colors so similar flowers do not cluster too heavily in one section. Take a quick photo of the arrangement before moving the motifs; this makes it much easier to remember the intended layout while joining your crochet flower cushion.
Joining the Flowers and Finishing the Crochet Cushion
There are several ways to join the motifs for a Crochet Cushion with Daisy Flower Pattern, but a slip-stitch join provides a firm and attractive result. Place two motifs with the correct sides facing each other. Insert the hook through corresponding outer stitches on both motifs and work a sl st through both layers. Continue across the entire side, matching stitches carefully. Avoid pulling the joining yarn too tightly because this can cause the finished panel to ripple.
Another useful method is the single crochet join. Hold two motifs together and work sc through corresponding stitches along both edges. This technique creates a visible decorative ridge that can complement the textured flowers. If you prefer a flatter appearance, use a yarn needle and whip stitch the motifs together through their outer loops. Whichever method you choose, use the same joining technique throughout the entire panel.
Join motifs first into horizontal or vertical strips and then join those strips together. Check the panel frequently to make sure the flowers remain aligned. After all motifs are connected, place the panel on a flat surface and gently shape it into a square. If small gaps appear where four motifs meet, close them carefully with a few stitches using the same yarn as the surrounding background. This gives the crochet cushion cover a more polished appearance.
For the back of the cushion, you can crochet a simple solid panel. Begin with a foundation chain approximately as wide as the finished front panel, then work rows of hdc or dc until the back reaches the same height. A basic formula is ch the required width, hdc in the second or third ch from the hook, hdc across, ch 2, turn, and repeat. Check the back panel regularly against the flower panel rather than relying only on a predetermined stitch count.
An envelope-style back makes the cushion insert easier to remove. Instead of making one full back panel, crochet two overlapping rectangular pieces. Each rectangle should cover slightly more than half of the cushion height so they overlap in the center. Place them behind the flower panel with the correct sides facing outward. Pin or mark the pieces in position before crocheting around the outside edge.
Complete the cushion with a decorative border. Join the border yarn in one corner and work sc evenly around all four sides, using 3 sc in each corner to help the cushion remain square. For a slightly stronger border, add another round of sc or reverse single crochet. Fasten off securely, weave in every yarn tail with a yarn needle, insert the cushion form, and gently shape the corners. Your Crochet Cushion with Daisy Flower Pattern is now ready to become a colorful handmade feature in your home.
Frequently Asked Questions About the Crochet Cushion with Daisy Flower Pattern
Is the Crochet Cushion with Daisy Flower Pattern suitable for beginners? It is suitable for confident beginners who already know basic stitches such as chain, single crochet, double crochet, and slip stitch. The flowers may look complicated because they have raised petals, but they are constructed through repeated stitch sequences. Making one practice flower before beginning the final cushion can help you understand the pattern and establish comfortable tension.
What is the best yarn for a crochet daisy cushion? Cotton, acrylic, and cotton-acrylic blends can all work well. Cotton yarn produces excellent stitch definition and helps flower petals hold their shape, while acrylic yarn is usually softer and lightweight. A blend can provide characteristics of both fibers. Choose yarns of approximately the same weight when combining colors so that the motifs finish at similar sizes.
How many crochet flowers are needed for one cushion? The number depends on the cushion size and flower diameter. For example, if your completed motifs are approximately 8 to 10 cm across, several rows of motifs may be required for a 40 cm cushion. Instead of relying on a universal number, complete one motif, measure it, and create a layout that matches your cushion insert. This method produces a more accurate fit.
Can I change the colors in the Crochet Cushion with Daisy Flower Pattern? Absolutely. Color customization is one of the strongest features of this design. You can create a vintage palette with mustard, burnt orange, cream, olive, and deep red, or choose softer pastel colors for a delicate look. A modern version could use white flowers with bold centers against a neutral background. Repeating each chosen color in several areas usually creates the most balanced result.
Why are my crochet flower petals curling? Slight curling is normal because the petals are designed to have dimension. Excessive curling, however, may indicate tight tension, a hook that is too small, or too many stitches in a restricted space. Try relaxing your tension or increasing the hook size slightly. You can also gently shape the finished flower with your fingers before joining it to the surrounding motif.
How should I care for a handmade crochet cushion? Always consider the washing instructions for the yarn you used. Removable cushion covers are convenient because the insert can be taken out before cleaning. Gentle hand washing or a delicate machine cycle may be appropriate for many washable yarns, followed by careful reshaping and flat drying. Avoid excessive heat unless the yarn manufacturer specifically states that the fiber can tolerate it.
Conclusion
Creating a Crochet Cushion with Daisy Flower Pattern is a rewarding way to combine decorative crochet, colorful yarn, and practical home décor. Throughout this tutorial, you learned how to choose yarn and colors, understand the main crochet stitch abbreviations, create a magic-ring flower center, crochet raised daisy petals, build the surrounding motif, join multiple flowers, construct the cushion back, and finish everything with a neat border.
The key to achieving an attractive result is consistency. Keep your flower sizes similar, check your tension regularly, secure your magic rings carefully, and plan the color arrangement before joining the motifs. These small details make a noticeable difference once dozens of individual stitches become one finished crochet flower cushion.
Do not hesitate to personalize the pattern. You can use larger daisies, smaller flowers, different center colors, alternative background shades, or a completely different cushion size. The same basic techniques can also inspire matching decorative pieces, allowing you to develop your own recognizable crochet style while continuing to practice important skills.
Most importantly, enjoy the process rather than rushing through the individual motifs. Each small flower contributes to the final design, and watching the panel gradually grow is part of what makes this project enjoyable. A handmade Crochet Cushion with Daisy Flower Pattern can bring warmth, texture, and a cheerful garden-inspired feeling to almost any interior.
EASILY FIND THE PDF FOR THIS PATTERN HERE!
If you make this cushion, leave your sincere opinion about the pattern and share any suggestions that could make the project even better. Your experience with yarn choices, flower colors, stitch combinations, and finishing techniques can inspire new variations and creative ideas. As a useful next step, you can prepare a simple color chart before starting, assigning a center color, petal color, and background shade to each motif. This makes the crochet process faster and helps keep the finished cushion beautifully balanced.