
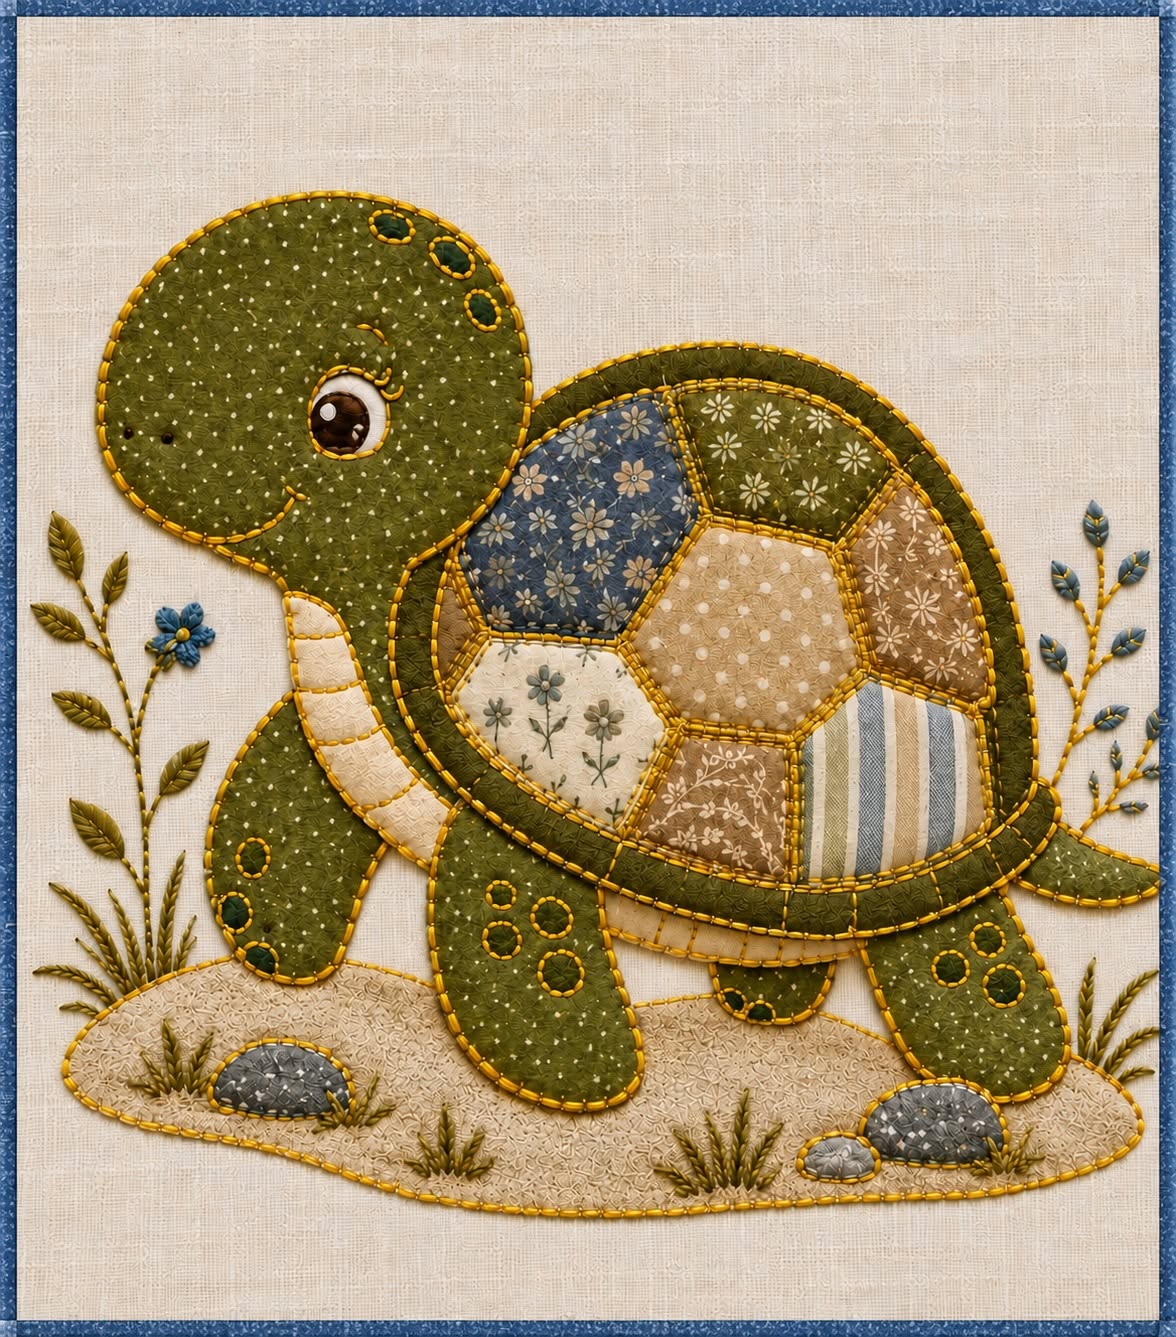
The Turtle Themed Panel with Appliqué and Patchwork Fabric Pattern is a charming sewing project that combines the softness of fabric appliqué with the creative possibilities of patchwork. Inspired by the handmade turtle panel shown in the reference image, this design uses carefully layered pieces of fabric to create the turtle’s head, legs, neck, shell, tail, ground, stones, plants, and small decorative details. The result has the warm personality often associated with handmade textile art while still being achievable with straightforward sewing techniques. One of the most appealing features of this project is the turtle shell, where several differently shaped fabric pieces create a beautiful patchwork mosaic effect. Muted greens, beige fabrics, floral prints, stripes, and soft blue accents work together naturally, although the palette can easily be personalized. Whether the finished piece becomes a wall hanging, decorative quilt panel, nursery decoration, cushion front, or framed textile artwork, the same construction principles can be used.
Before beginning the Turtle Themed Panel with Appliqué and Patchwork Fabric Pattern, it helps to understand the two main techniques involved. Appliqué is the process of positioning smaller fabric shapes on top of a larger background fabric and securing those shapes by hand or machine stitching. Patchwork, meanwhile, involves combining different pieces of fabric to create a larger decorative composition, and in this project it is especially visible inside the turtle shell. Combining these techniques allows the maker to build a detailed image without relying on complicated piecing throughout the entire panel. The visible blanket-style stitches around many shapes can become part of the design rather than something that needs to disappear. Small embroidered features such as the eye, mouth, spots, grasses, leaves, and flowers add even more dimension. For beginners, the project also offers an excellent opportunity to practice accurate cutting, fabric placement, curved appliqué, decorative stitching, and controlled layering.
A successful fabric turtle appliqué begins with thoughtful preparation rather than immediately cutting into the final fabrics. Gather a neutral background fabric, several coordinated cotton prints, lightweight fusible web if desired, paper for templates, fabric scissors, small embroidery scissors, pins or fabric glue, sewing thread, embroidery floss, needles, an iron, and basic marking tools. Quilting cotton works particularly well because it is stable, easy to cut, and available in countless prints suitable for the patchwork turtle shell. Before cutting, press every fabric so the shapes lie flat and the edges can be traced accurately. It is also helpful to arrange the potential fabrics together before making a final decision, checking whether light, medium, and darker values are balanced throughout the turtle. Avoid using too many highly contrasting prints because they may compete with the turtle’s facial expression and stitched details. A coordinated selection of small-scale patterns generally produces the soft handcrafted appearance seen in this style of textile panel.
Preparing the Turtle Appliqué Pattern and Fabric Pieces
Begin by creating the complete outline for your Turtle Themed Panel with Appliqué and Patchwork Fabric Pattern on paper. Break the turtle into separate components: head, neck, front legs, back legs, tail, lower body section, outer shell, inner shell, and individual shell patches. You can draw these pieces freehand while using the reference image as visual inspiration, or enlarge a basic turtle drawing to the desired finished size. Keep the shapes rounded and slightly irregular because this contributes to the friendly handmade character of the design. Mark every template clearly so pieces are not confused during cutting. Adding placement marks for overlapping sections can also make final assembly much easier.
DISCOVER MORE FREE PATTERNS HERE!
The head should be proportionally large and softly rounded, because the oversized head is one of the strongest visual characteristics of this cute turtle appliqué pattern. Draw a curved neck extending beneath the shell and create four broad legs with rounded ends. The tail can remain small and simple because it serves mainly as a finishing detail behind the shell. When preparing templates, remember that some parts will overlap others, so hidden portions do not have to be perfectly shaped. Leave enough fabric beneath overlapping areas to prevent gaps from appearing after stitching. If you plan to use traditional turned-edge appliqué, add an appropriate seam allowance around the templates before cutting.
For raw-edge or fusible fabric appliqué, templates can generally be traced at their finished size because the edges remain visible and are secured with decorative stitching. Fusible web can make placement easier, especially around the curved shell and smaller patches. Trace the shapes onto the paper side of the fusible material, roughly cut around them, and fuse them to the wrong side of the selected fabrics according to the product instructions. After cooling, cut precisely along the drawn lines. This method minimizes shifting during sewing and helps maintain accurate curves. If you prefer a softer traditional finish, skip the fusible material and use pins, temporary fabric glue, or hand-basting instead.
Choose fabrics that provide clear separation between the turtle’s body and its shell. A soft olive green fabric with tiny dots or subtle texture works beautifully for the head and legs, while beige or cream can be used for the neck and underside. The shell benefits from a darker olive outer border because it visually frames the colorful center. For the shell patches, combine several prints such as miniature florals, dots, botanical motifs, stripes, and understated geometric designs. Using approximately six to eight coordinated fabrics provides variety without making the design appear excessively busy. Repeating one or two colors throughout the panel keeps everything visually connected.
Create the background from a neutral woven-looking cotton or linen-blend fabric if you want to recreate the quiet, natural style of the reference. Neutral fabric backgrounds are especially useful for appliqué because they allow the stitched shapes to remain the focal point. Cream, oatmeal, warm white, pale beige, and very light gray can all work well. Cut the background slightly larger than the planned finished panel so it can be squared after the appliqué and embroidery are complete. Press it carefully before transferring any placement marks. If the fabric is lightweight, adding a removable stabilizer to the back can reduce puckering during decorative stitching.
Before attaching anything permanently, place every major piece onto the background to check the composition. Begin with the turtle body and shell, then add the ground and later the botanical elements around the animal. Step away from the project for a moment and check whether the turtle patchwork design feels balanced from a distance. The shell should dominate the center without completely hiding the legs and neck. Make minor adjustments now because moving pieces becomes much more difficult after they have been fused or stitched. Once satisfied, take a quick reference photo or make small positioning marks so the arrangement can be reconstructed accurately.
Building the Patchwork Turtle Shell
The shell is the centerpiece of the Turtle Themed Panel with Appliqué and Patchwork Fabric Pattern, so spend extra time planning its shape and fabric distribution. Start with a large rounded shell base in a medium or dark olive fabric. This base provides stability beneath the individual patchwork sections and prevents tiny spaces between patches from revealing the background. Add a slightly smaller inner shell shape on top if you want to create the double-border appearance visible in the inspiration image. Carefully align these curved pieces before securing them. Consistent spacing around the shell will make the finished project appear more polished.
Next, divide the inner shell into several irregular patchwork fabric sections. These pieces do not need to be mathematically identical; in fact, gentle variation gives the shell an organic appearance reminiscent of natural turtle scutes. A central polygon can be surrounded by curved or angular patches extending toward the shell edge. Use a combination of lighter and darker fabrics so adjacent pieces do not visually disappear into one another. A pale floral piece might sit beside a dusty blue print, while a beige polka-dot section can balance a darker botanical fabric. Arrange everything before stitching to evaluate the complete color distribution.
When selecting fabric placement, think about visual balance in patchwork rather than simply choosing favorite prints one at a time. If all of the darkest patches appear on one side, the turtle may look visually heavy in that direction. Distribute strong colors such as blue or deep olive around the shell and use beige or cream sections as resting areas for the eye. Small prints are often easier to use on compact appliqué shapes because their motifs remain recognizable after cutting. Stripes can add interest when positioned intentionally, particularly near the lower portion of the shell. Rotate fabrics before cutting to see how the direction of each print influences the final appearance.
Secure the shell sections using your preferred appliqué stitching technique. Blanket stitch is particularly appropriate because the visible thread creates a handcrafted outline around each patch. You can sew it by hand for a traditional appearance or use a machine blanket stitch for greater speed and consistency. Choose thread that coordinates with the earthy palette rather than using extremely high contrast unless you specifically want bold outlines. Work slowly around curves and corners so the spacing between stitches remains controlled. The stitching does not need to look mechanically perfect; slight variations can enhance the handmade personality.
Once the inner patchwork is secured, stitch around the shell borders. Multiple rows of decorative stitching can create the layered appearance seen in the reference project and give the shell extra definition. Consider using running stitch, blanket stitch, or a combination of both around the curved bands. If sewing by machine, shorten the stitch length when navigating tight curves. When sewing by hand, keep the fabric comfortably supported so it does not distort as the thread is pulled. Avoid pulling stitches too tightly because this can cause puckering around the shell edges.
Finally, inspect the entire shell before continuing with the body details. Trim loose threads and gently press the piece from the wrong side using an appropriate pressing cloth. The completed patchwork turtle shell should appear dimensional even though it is constructed mostly from flat layers. The combination of different prints, outlined sections, curved borders, and visible stitching naturally creates depth. This shell-building method can also be adapted for other animal appliqué designs in future sewing projects. Once it is complete, the rest of the turtle can be assembled around this strong visual centerpiece.
Sewing the Turtle Body and Decorative Details
Position the head, neck, legs, underside, and tail according to the layout established earlier. In a layered turtle appliqué project, pieces that appear behind the shell should normally be attached first. The neck, portions of the legs, and tail can extend slightly beneath the shell so their joins remain hidden. Fuse, glue, baste, or pin these pieces in position depending on your chosen technique. Check the turtle silhouette carefully before sewing because these body shapes determine the character of the finished animal. Rounded curves and slightly oversized feet help preserve the gentle appearance of the design.
Stitch around the body pieces using the same technique used on the shell, or intentionally vary the stitching to introduce texture. A traditional blanket stitch appliqué works beautifully around the head and legs because it defines their silhouettes clearly against the light background. Use a thread color that coordinates with the green fabric, such as olive, brown, taupe, or muted gold. Around smaller curves, reduce your stitch spacing slightly so the outline remains smooth. Stop periodically to allow the fabric to relax instead of forcing it through difficult curves. This patient approach improves both accuracy and the final appearance.
The turtle’s face transforms the panel from a simple animal silhouette into a character with personality. Create the eye using small layered fabric circles, embroidery, or a combination of both. A dark brown or nearly black center with tiny cream highlights can imitate the bright expressive eye visible in the inspiration. Add a curved embroidered mouth using dark brown thread and keep the expression subtle and friendly. Small stitched eyelashes can be added if desired. These embroidered turtle details should remain proportionate because an overly large mouth or eye can distract from the delicate patchwork shell.
Decorative circular spots can be added to the head and legs using small fabric circles, embroidered satin stitches, or appliquéd dots. Vary the sizes slightly to keep the design organic. Olive, dark green, brown, and muted blue-gray spots coordinate well with the natural color palette. Sew each one securely because tiny appliqué pieces can loosen more easily than larger shapes. If very small circles are difficult to turn under, raw-edge appliqué is a practical alternative. These details help connect the turtle body visually with the multiple colors found throughout the shell.
Create the sandy ground using one irregular piece of beige textured fabric positioned beneath the turtle’s feet. This grounding element prevents the animal from appearing to float on the background. Add several small fabric appliqué stones in gray, blue-gray, taupe, or brown, then use simple embroidery stitches to create blades of grass around them. Mixing fabric appliqué with embroidery produces more visual depth than relying on one technique alone. Keep the vegetation fairly low near the turtle so it supports rather than hides the main design. A few irregular grass clusters can make the scene feel pleasantly natural.
Finish the surrounding decoration with slender branches, leaves, and one or two small flowers. These elements frame the turtle without requiring an additional physical border around the panel. Leaves can be cut from scraps of the same fabrics used in the shell, helping unify the appliqué and patchwork fabric pattern. Alternatively, embroider stems first and add tiny appliquéd leaves individually. Small blue flowers provide a gentle contrast against the dominant greens and beiges. Keep some open background visible around the turtle because negative space is important for a calm and balanced composition.
Finishing and Displaying the Turtle Fabric Panel
After all appliqué pieces and embroidery details are complete, inspect the panel for loose threads, unsecured edges, or areas that need additional stitching. Place the work on a flat surface and evaluate the overall silhouette of the Turtle Themed Panel with Appliqué and Patchwork Fabric Pattern. If some patchwork edges lift slightly, secure them with additional hand stitches. Remove temporary stabilizers according to their instructions and press the project carefully from the reverse side. Avoid aggressively pressing raised embroidery because doing so may flatten the dimensional texture. A light final press is usually enough to create a neat appearance.
If you want the project to function as a small quilted wall hanging, layer the finished top with thin batting and backing fabric. Secure the layers using pins or temporary basting and quilt around the main turtle silhouette. Additional quilting can follow the shell borders, ground line, branches, and open areas of the background. Outline quilting is especially effective because it emphasizes the appliqué while adding gentle dimension. Keep quilting density reasonably consistent throughout the panel. Excessively dense quilting in only one area may cause uneven texture.
Another finishing option is to convert the design into a cushion front. In this case, square the appliqué panel after all decorative work has been completed and add fabric borders if necessary to reach the desired cushion size. A turtle patchwork cushion can work especially well in children’s rooms, reading areas, craft rooms, or nature-inspired interiors. Use a durable backing fabric and consider an envelope-style closure if you want the cover to be removable. If the cushion will be frequently washed, secure every appliqué edge especially carefully. Machine stitching can provide additional durability for regularly handled items.
The design can also become framed textile wall art. Mounting the completed fabric panel over a stable fabric-covered board can create a clean presentation while preserving the visible hand stitching. Leave enough breathing room between the turtle and the frame so the detailed branches and leaves do not feel cramped. A simple wood-toned, white, beige, or muted green frame can complement the earthy colors. Avoid placing thick glass directly against heavily textured stitches or dimensional appliqué. The craftsmanship itself should remain the main visual focus.
For makers who want to personalize the project, the color palette can be changed without altering the construction method. A brighter Turtle Themed Panel with Appliqué and Patchwork Fabric Pattern could include aqua, coral, yellow, turquoise, and cheerful floral prints. A woodland version might combine moss green, rust, cream, brown, and mustard fabrics. Pastel pink, sage, lavender, and cream could create a gentle nursery interpretation. The most important design principle is maintaining enough contrast between adjacent shell sections and between the turtle and background. Coordinated colors make the patchwork look intentional rather than random.
Save the paper templates after completing the first panel because they can be reused for future versions. Once you understand how the fabric turtle pattern is assembled, it becomes easy to experiment with different prints, sizes, backgrounds, and decorative embroidery. You might simplify the shell for a beginner-friendly project or increase the number of patches for a more detailed version. The same template can also be adapted for quilts, tote bags, table runners, pillow covers, nursery banners, and seasonal decorations. This versatility is one of the biggest advantages of combining appliqué with patchwork.
FAQ – Frequently Asked Questions About the Turtle Themed Panel with Appliqué and Patchwork Fabric Pattern
What is a Turtle Themed Panel with Appliqué and Patchwork Fabric Pattern?
A Turtle Themed Panel with Appliqué and Patchwork Fabric Pattern is a textile project featuring a turtle assembled from individual fabric shapes. Appliqué is used for the turtle’s body, decorative plants, stones, and other details, while patchwork is used primarily to create the multi-fabric shell. The finished design can be displayed as wall art or incorporated into another sewing project.
Is this turtle appliqué project suitable for beginners?
Yes. A beginner can successfully create this project by working slowly and assembling the design in stages. The most important beginner skills are tracing templates, cutting fabric accurately, positioning appliqué pieces, and sewing around curved edges. Using fusible web can make the process easier because it stabilizes the pieces before stitching.
What is the best fabric for a turtle appliqué panel?
Quilting cotton is one of the easiest choices because it is stable, widely available, and simple to cut and sew. Lightweight linen blends can work well for the background, while cotton prints are ideal for the shell sections. Very stretchy fabrics are more difficult to control and are generally less convenient for this type of detailed appliqué.
What colors work best for a patchwork turtle shell?
Earthy shades such as olive green, sage, taupe, beige, cream, dusty blue, brown, and gray create a natural look similar to the project shown. However, there are no strict rules. Bright fabrics, pastels, modern prints, scraps, or seasonal colors can all be used as long as neighboring patchwork sections have enough contrast to remain visually distinct.
Should I sew appliqué by hand or by machine?
Both approaches work well. Hand appliqué provides a traditional handcrafted appearance and offers excellent control around small curves. Machine appliqué is faster and can be very durable. Blanket stitch, zigzag stitch, and straight stitching close to raw edges are common choices. The best method depends on your experience and the appearance you want.
Do I need fusible web for this fabric pattern?
No. Fusible web is optional, but it can be very helpful because it prevents the fabric pieces from shifting before they are stitched. Traditional appliqué techniques may use turned edges, pins, basting, or fabric glue instead. Choose the method that feels most comfortable for your sewing style.
How can I prevent the appliqué from puckering?
Use a stable background, avoid pulling thread too tightly, press the fabrics before assembly, and consider using temporary stabilizer behind the panel. When machine stitching, allow the fabric to move naturally instead of forcing it through curves. Gentle pressing after stitching can also help the fabric lie smoothly.
How do I make the shell look dimensional?
Layering is the key. Use a larger dark shell base, an inner shell area, individual patchwork shell pieces, and visible decorative stitching around the sections. Different fabric values also create depth. Quilting around the shell after adding batting can increase the three-dimensional effect even further.
Can I use fabric scraps for this project?
Absolutely. This design is an excellent fabric scrap project because many shell pieces, leaves, flowers, stones, and spots require only small amounts of fabric. Using scraps from previous quilting projects can also give the panel a meaningful handmade character while reducing fabric waste.
Can the turtle pattern be enlarged or reduced?
Yes. The templates can be resized as a complete set as long as all pieces are changed by the same percentage. A larger turtle is generally easier for beginners because curves and small details are less difficult to handle. Miniature versions require more precise cutting and stitching.
What can I make with the finished turtle design?
The completed design can become a wall hanging, cushion cover, quilt block, nursery panel, tote bag decoration, table runner section, fabric book page, or framed textile artwork. When applying it to an item that will be frequently washed or handled, reinforce the appliqué edges carefully for additional durability.
How can I give the turtle more personality?
Small details make a significant difference. Experiment with the shape of the eye, embroidered eyelashes, the curve of the mouth, differently sized spots, and decorative shell fabrics. Keeping the expression simple usually creates the sweetest result. You can also personalize the surrounding flowers, plants, or embroidered elements.
Conclusion
The Turtle Themed Panel with Appliqué and Patchwork Fabric Pattern brings together several enjoyable textile techniques in one creative project. Starting with a carefully planned turtle template, you can construct the body from soft appliqué shapes, build a richly detailed patchwork turtle shell, add decorative blanket stitching, create expressive facial features, and complete the scene with fabric stones, embroidered grasses, leaves, branches, and flowers. The combination of coordinated prints and visible stitching creates a warm handcrafted effect without requiring an overly complicated construction process.
The most important lessons are to prepare the fabrics carefully, establish the complete layout before permanent stitching, work from background layers toward foreground elements, maintain balanced colors throughout the shell, and allow decorative stitches to become part of the visual design. Whether you use hand stitching, machine appliqué, fusible techniques, or a mixture of methods, the project can be adapted to your preferred way of sewing.
EASILY FIND THE PDF FOR THIS PATTERN HERE!
Once finished, your Turtle Themed Panel with Appliqué and Patchwork Fabric Pattern can become much more than a single decorative panel. The same techniques can be adapted for quilts, cushions, wall hangings, bags, nursery decorations, and countless other fabric projects. Most importantly, different fabric combinations ensure that every turtle can have its own personality and character. If you make your own version, leave your sincere opinion about the project and share your suggestions. Which colors would you choose for the patchwork shell, and what details would you add to make your turtle unique? Your ideas can inspire even more creative variations of this charming appliqué and patchwork fabric pattern.