
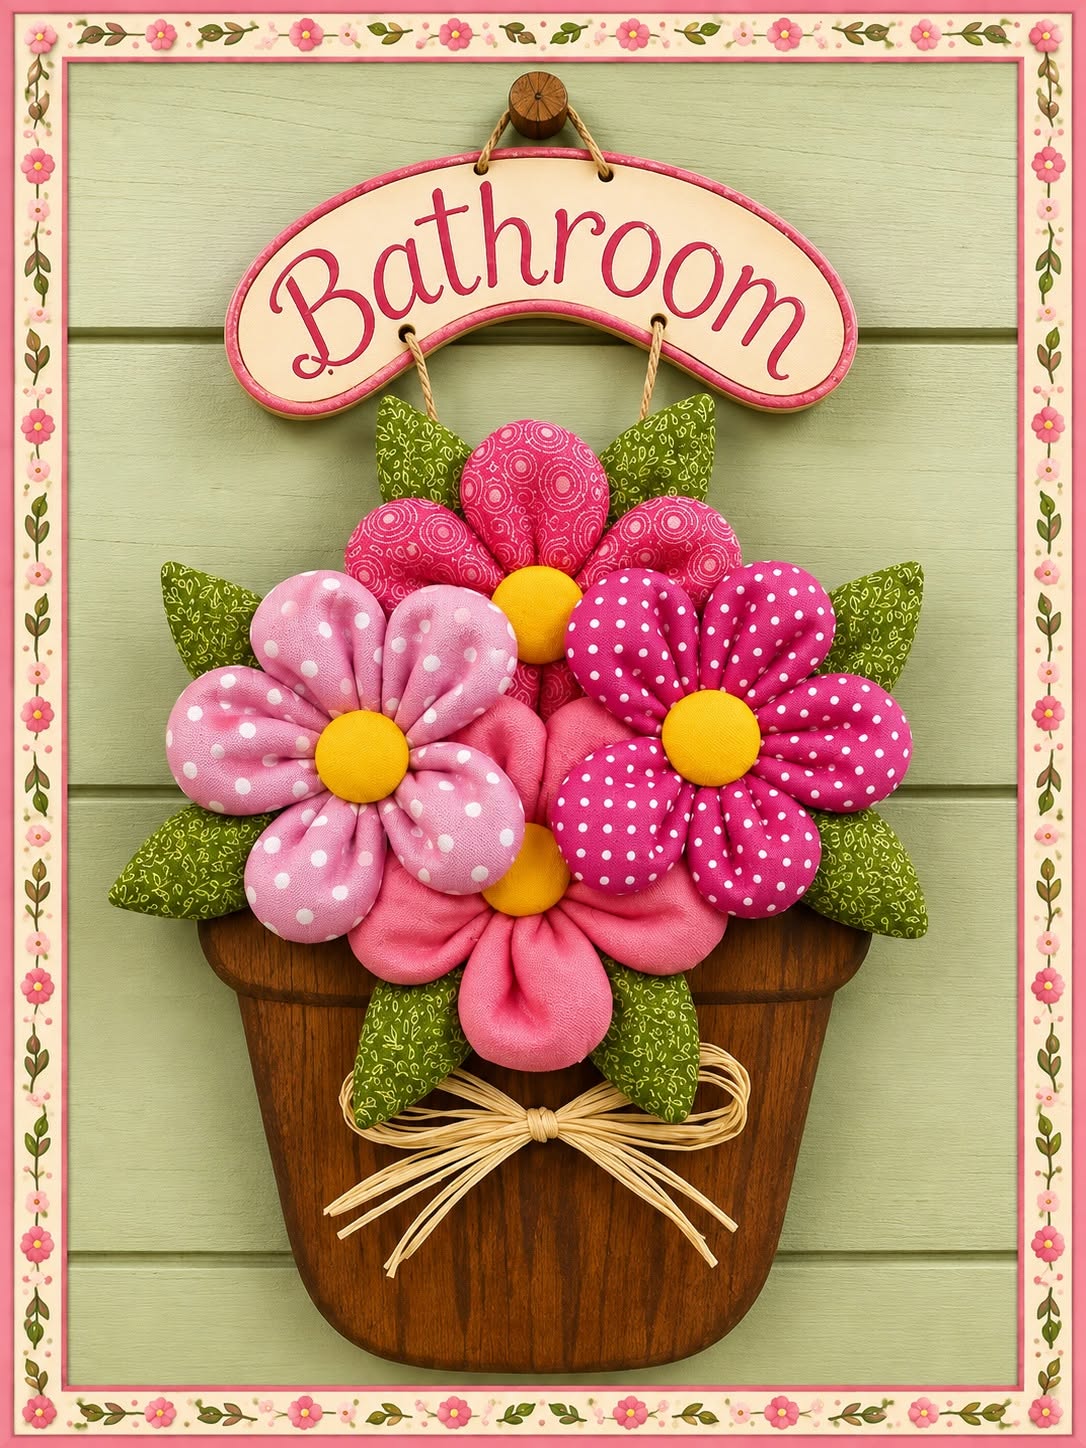
The Decorative Bathroom Door Sign Fabric Planter with Small Plaque: Complete Sewing Tutorial Pattern is a charming sewing project that combines fabric flowers, soft appliqué techniques, decorative stitching, and a welcoming handmade plaque into one beautiful piece of bathroom décor. Inspired by the project shown in the photo, this design features a flower-filled planter topped with a small curved sign, creating the appearance of a cheerful fabric flower arrangement hanging directly on a door or wall. It is an excellent project for anyone who enjoys sewing, fabric crafts, patchwork, appliqué, and handmade home decorations. Because the individual pieces can be made from fabric scraps, this project is also a creative way to use leftover materials while producing something attractive and practical.
One of the most appealing qualities of this Decorative Bathroom Door Sign – Fabric Planter with Small Plaque: Complete Sewing Tutorial Pattern is the opportunity to customize practically every detail. The flowers can be created with pink fabrics like those in the inspiration photo, or you can choose blue, yellow, purple, peach, or neutral fabrics to coordinate with your bathroom. The leaves can be made from several shades of green, while the planter can imitate brown wood through printed cotton or carefully selected tonal fabrics. Even the small bathroom plaque can be personalized with embroidery, fabric paint, appliqué letters, or machine stitching. The finished piece therefore becomes more than a simple sign; it becomes a unique example of handmade fabric wall décor.
This complete tutorial explains how to build the project from the beginning, including preparing the pattern, selecting fabrics, creating dimensional flowers, making padded leaves, assembling the planter, constructing the plaque, and finishing the hanging system. Although the original design looks detailed, it can be divided into simple sewing stages that are manageable for confident beginners and enjoyable for experienced sewists. The main techniques include basic machine sewing, hand stitching, gathering fabric, light stuffing, appliqué, layering, and decorative assembly. By working carefully and checking the position of every component before final stitching, you can create a balanced fabric arrangement with plenty of dimension and personality.
Materials, Pattern Preparation, and Fabric Selection
Begin by preparing the supplies for your Decorative Bathroom Door Sign Fabric Planter with Small Plaque. You will need cotton fabric in several coordinating colors, lightweight batting or fusible fleece, polyester fiberfill, matching sewing thread, embroidery thread if desired, a hand-sewing needle, fabric scissors, pins or clips, a fabric marker, ruler, iron, and sewing machine. For the hanging cords, you can use cotton cord, twine, ribbon, or narrow fabric strips. A small amount of raffia or decorative ribbon is also useful for creating the bow on the front of the planter.
DISCOVER MORE FREE PATTERNS HERE!
For the flower arrangement, choose approximately three to five coordinating fabrics. The inspiration project uses several variations of pink, including polka dots and printed designs, which creates depth without making the arrangement look overly busy. Combining small-scale prints, solid fabrics, and subtle textures usually produces the best visual result. If you prefer a farmhouse style, consider dusty pink, cream, sage green, and brown. For a brighter bathroom, turquoise, yellow, coral, and fresh green fabrics can create a lively appearance.
The planter can be drafted as a simple tapered flowerpot shape. For a medium-sized wall decoration, begin with a paper rectangle approximately 24 cm wide by 27 cm high. Mark the upper corners and gradually taper the sides inward until the bottom measures approximately 17 cm wide. Round the bottom corners slightly. This becomes the basic planter template. Add approximately 1 cm seam allowance around the outside unless your pattern already includes it.
Create a second paper template for the curved plaque. A finished plaque around 27 cm wide and 9 cm high works well for a planter of this size. Draw a gentle curved rectangle or elongated oval shape with enough central space for the word “Bathroom.” If you intend to appliqué the letters individually, make sure the sign is tall enough for readable lettering. You can also embroider the word or use permanent fabric paint specifically formulated for textiles.
The flowers are made from simple petal shapes. Draft a rounded petal approximately 7 to 8 cm long and 5 cm wide. Larger flowers can use petals measuring around 9 cm by 6 cm, while smaller background flowers can use petals closer to 6 cm by 4 cm. The design looks particularly attractive when several flower sizes are combined. Each dimensional flower generally requires five or six petals, depending on how full you want it to appear.
Finally, create a leaf template measuring approximately 9 cm long by 5 cm wide. You can make a second smaller leaf pattern for additional variety. When all templates are ready, arrange them on the selected fabrics before cutting. This planning stage helps distribute prints and colors evenly. The goal is to make the fabric planter sewing pattern look intentionally coordinated rather than randomly assembled.
How to Sew the Dimensional Fabric Flowers and Leaves
Start the flowers by cutting two fabric pieces for each petal. Place the pieces right sides together and stitch around the curved edges with approximately a 0.7 cm seam allowance, leaving the bottom open. Clip carefully around the curves without cutting through the stitching. Turn each petal right side out and gently shape the rounded edge using a turning tool or the blunt end of a pencil. Press lightly, being careful not to flatten the dimensional effect completely.
Add a small amount of polyester fiberfill inside each petal. The petals should feel soft and slightly padded, not heavily stuffed. Overfilling will make them difficult to arrange. Fold the raw edges at the bottom inward and secure them temporarily with a few hand stitches. Repeat this process until you have enough petals for all the flowers in your Decorative Bathroom Door Sign – Fabric Planter with Small Plaque: Complete Sewing Tutorial Pattern.
Arrange five or six petals in a circle, overlapping the base of each petal slightly. Hand stitch through all the lower edges using strong thread. Pull the thread firmly to gather the petals toward the center, then knot securely. Shape the petals with your fingers until the flower appears evenly rounded. Slight variations are part of the handmade charm, so the flowers do not need to be perfectly identical.
For the yellow flower centers, cut small fabric circles approximately 6 to 7 cm in diameter. Sew a running stitch around the outer edge of each circle. Place a small amount of fiberfill in the center and gently pull the thread until the fabric forms a padded ball. Tuck the raw edges inward, tighten the thread, and secure it. Stitch one yellow center over the gathered middle of each flower.
The leaves are constructed in a similar way. Cut two green fabric pieces for each leaf and place them right sides together. Stitch around the outside while leaving a small turning opening. Clip the curves, turn the leaf right side out, and press. For slightly padded leaves, insert a thin layer of batting before closing the opening. Topstitch a line through the middle to imitate a leaf vein and to give the shape more structure.
Prepare enough leaves to surround the flowers without hiding them. For a composition similar to the photograph, approximately 8 to 12 leaves works well. Some leaves should extend upward behind the flowers, while others can point toward the sides and lower portion of the arrangement. Using two green prints adds extra detail and helps reinforce the patchwork flower decoration appearance.
Sewing the Fabric Planter and Creating the Bathroom Plaque
Cut two planter pieces from brown fabric using your prepared template. If your cotton fabric is lightweight, add fusible fleece or batting to the wrong side of one or both pieces. This reinforcement is important because the planter must support the dimensional flowers. You may also use a brown fabric with a subtle woodgrain print to imitate the rustic wooden appearance of the planter shown in the photo.
Place the planter pieces right sides together and stitch around the side and bottom edges. Leave the top open. Clip the curves around the bottom corners, turn the planter right side out, and press carefully. Topstitch approximately 3 to 5 mm from the edge to create a defined outline. For additional depth, quilt several vertical lines into the front panel. These lines can imitate wooden boards while also keeping the batting securely in place.
Create the top rim of the planter using a strip of brown fabric approximately 6 cm high and slightly wider than the planter opening. Fold the strip in half lengthwise, press, and position it across the upper edge. Stitch securely and topstitch if desired. A slightly darker fabric for this rim can create attractive contrast. The goal is to make the planter appear dimensional even though it remains lightweight enough to hang easily.
For the decorative plaque, cut two pieces of your chosen background fabric and one matching piece of batting using the curved sign template. Place the batting behind one fabric piece. Add the word “Bathroom” before assembling the plaque if you are using machine embroidery, hand embroidery, or appliqué. A handwritten-style font works especially well with this country-inspired project. Keep the letters centered and leave enough space around them for the seam allowance.
Place the plaque fabrics right sides together with the batting positioned behind them. Stitch around the outside, leaving a turning gap approximately 5 cm wide along the lower edge. Clip around the curves and turn the plaque right side out. Press carefully, turn the raw edges of the opening inward, and close the gap using ladder stitch or narrow machine stitching. Add decorative topstitching around the perimeter if desired.
Two cords connect the sign to the floral arrangement. Cut two pieces of cord approximately 16 to 20 cm long, depending on the final spacing you prefer. Secure one cord near each side of the lower plaque and attach the opposite ends behind the upper portion of the planter or flower arrangement. A separate hanging loop can be sewn to the top of the plaque. Reinforce every hanging point with several rows of stitching because the completed decoration contains multiple padded components.
Final Assembly, Decoration, Hanging, and Finishing Details
Before sewing anything permanently, place the planter on a flat surface and arrange the completed flowers above it. Begin with the largest flowers near the center, then add medium and smaller flowers around them. Overlap the petals slightly so the arrangement appears full. Try to avoid perfectly straight rows. A natural arrangement usually looks better when some flowers sit slightly higher or lower than others.
Slide the leaves behind and between the flowers. Allow some leaves to extend beyond the sides of the floral cluster to create a recognizable plant silhouette. You can temporarily secure everything using pins, clips, or small hand-basting stitches. Step away from the project periodically and look at the full composition. This makes it easier to identify gaps or areas that appear visually heavy.
Once you are satisfied with the arrangement, hand stitch each flower securely to the supporting fabric or planter backing. Use strong polyester thread and stitch through the base rather than through the visible petals. Attach each leaf in the same manner. Several hidden stitches are usually preferable to one large stitch because they distribute the weight more evenly. This is especially important for a fabric door hanging decoration that may be moved frequently.
Add the decorative bow to the front of the planter. Raffia creates a rustic country appearance similar to the inspiration image, while satin ribbon produces a cleaner and more polished effect. A fabric strip tied into a bow can coordinate perfectly with the flowers. Stitch the center of the bow directly to the planter so it does not shift or become loose over time.
Inspect the entire Decorative Bathroom Door Sign Fabric Planter with Small Plaque: Complete Sewing Tutorial Pattern before hanging it. Trim loose threads, straighten the petals, reshape any flattened flower centers, and make sure the plaque hangs horizontally. If the planter curls inward, you can add a small piece of plastic canvas, firm interfacing, or additional batting inside the back to improve stability.
The finished decoration can be hung from a bathroom door, wall hook, cabinet knob, or decorative peg. Because the project is primarily constructed from lightweight fabrics, it does not require heavy wall hardware. Keep it away from locations that receive direct splashes of water. When cleaning is necessary, gentle surface cleaning is generally preferable because the padded flowers and structured components may lose their shape during machine washing.
FAQ About the Decorative Bathroom Door Sign Fabric Planter
What type of fabric is best for this bathroom door sign?
Medium-weight 100% cotton fabric is one of the easiest choices because it is stable, easy to sew, widely available, and suitable for both dimensional flowers and appliqué. Quilting cotton is particularly useful because it comes in many coordinated colors and small prints.
Can beginners make this fabric planter project?
Yes. A beginner who understands basic straight stitching and simple hand sewing can complete the project. The dimensional flowers may require a little patience, but the construction techniques are straightforward. Working one flower at a time makes the project easier to manage.
How large should the finished decoration be?
The measurements can be adjusted, but a medium finished project might measure approximately 30 to 35 cm wide and 45 to 55 cm high, including the plaque and hanging cords. Always scale the flowers and plaque proportionally if you change the planter dimensions.
Do I need a sewing machine?
A sewing machine makes the project faster and produces clean seams, but most parts can technically be sewn by hand. If sewing entirely by hand, use small backstitches for structural seams and strong thread for attaching the flowers and hanging cords.
Can I use felt instead of cotton fabric?
Yes. Felt is especially useful for leaves, letters, and small appliqué details because it does not fray. However, cotton generally creates softer, more dimensional flowers. Combining felt and cotton can also work very well.
How can I make the flowers look fuller?
Use six petals instead of five, lightly stuff every petal, and overlap their bases before securing them together. You can also place smaller flowers partially behind the main flowers to create a layered bouquet.
What can I use for the flower centers?
Padded fabric circles are simple and safe, but covered buttons can also be used. For a soft decorative wall hanging, fabric-covered centers keep the entire piece lightweight and maintain the handmade textile appearance.
Can I personalize the bathroom plaque?
Absolutely. Instead of Bathroom, the plaque could say Bath, Washroom, Powder Room, or a family name. You could also create coordinating versions for a bedroom, sewing room, kitchen, laundry room, or craft room.
How do I keep the planter from losing its shape?
Use fusible fleece, medium-weight interfacing, batting, or plastic canvas inside the planter. Reinforcement is particularly useful when several stuffed flowers are attached to the upper section.
Can fabric scraps be used for this project?
Yes. This is an excellent fabric scrap sewing project because most petals and leaves require relatively small pieces of material. Coordinating scraps from previous quilting projects can create a beautiful patchwork effect.
Should seam allowance be included in the templates?
It depends on how you draft the pattern. For the measurements described in this tutorial, adding approximately 0.7 to 1 cm seam allowance is recommended unless your paper templates already include it. Marking this clearly prevents accidentally making the finished pieces smaller than intended.
How should the finished sign be cleaned?
Because the project includes stuffing, layered flowers, decorative cords, and possibly interfacing, spot cleaning is usually the safest method. Use a slightly damp cloth and mild soap when needed, then allow the project to air dry completely.
Can the design be enlarged for a wall decoration?
Yes. Enlarge the planter, plaque, flowers, and leaves proportionally. If creating a much larger version, reinforce the backing and hanging loop so that they can safely support the additional weight.
What sewing techniques are used in this project?
The main techniques include straight stitching, curved seams, turning fabric pieces, stuffing, gathering, hand stitching, appliqué, topstitching, and layered fabric assembly. These techniques make the project useful for practicing several fundamental sewing skills.
How long does the project normally take?
The time varies depending on experience and the number of flowers. A simple version can often be completed in an afternoon, while a more detailed version with embroidery, many flowers, and decorative stitching may require several sewing sessions.
Conclusion
The Decorative Bathroom Door Sign Fabric Planter with Small Plaque: Complete Sewing Tutorial Pattern combines several enjoyable fabric techniques in one distinctive handmade decoration. By creating the planter first, preparing the dimensional flowers and padded leaves separately, and then carefully layering everything together, you can achieve the cheerful three-dimensional appearance seen in the inspiration photo. The small plaque completes the design by clearly identifying the room while adding another decorative handmade feature.
Throughout this tutorial, you learned how to select coordinating fabrics, draft simple templates, sew and stuff individual flower petals, create fabric-covered centers, construct padded leaves, reinforce the planter, make the curved bathroom plaque, and assemble the finished arrangement. You also learned how basic sewing, appliqué, patchwork, gathering, stuffing, and decorative stitching techniques can be combined to create professional-looking fabric décor without requiring complicated equipment.
EASILY FIND THE PDF FOR THIS PATTERN HERE!
One of the best aspects of this pattern is its flexibility. You can reproduce the pink floral look shown in the photo or completely transform it with your own preferred colors, prints, lettering, and decorative details. Whether displayed on a bathroom door or used as handmade wall art, this Decorative Bathroom Door Sign – Fabric Planter with Small Plaque: Complete Sewing Tutorial Pattern can add warmth, texture, and personality to a home. If you make your own version, leave your sincere opinion about the tutorial and share any suggestions or creative changes you would make to the pattern. Your ideas may inspire new color combinations, flower styles, plaque designs, and other variations of this handmade sewing project.