
The DIY Denim Patchwork Cap Fabric Pattern is a creative sewing project that turns denim scraps, old jeans, or coordinated blue fabrics into a stylish handmade baseball-style cap. Inspired by the project shown in the reference image, this design combines several denim shades to create a segmented crown, a curved brim, and a comfortable adjustable-looking back structure. The beauty of this project is that the pieces do not need to match perfectly; differences in fading, texture, and stitching are part of the denim patchwork character. It is also an excellent way to practice curved seams while giving leftover fabric a useful new purpose. A carefully assembled cap can look modern, casual, and professionally finished while still keeping the handcrafted personality that makes patchwork special. Throughout this tutorial, the DIY Denim Patchwork Cap Fabric Pattern will be explained from fabric preparation to the final topstitching.
A good result begins with understanding how the cap is constructed. Most classic fabric caps use several curved crown panels that meet at the top, plus a visor or brim made from two fabric layers surrounding a firm stabilizer. For the patchwork effect visible in the inspiration image, different washes of denim can be alternated around the crown, such as dark indigo denim, medium blue, faded blue, and light washed denim. You can cut individual crown panels from separate fabrics or first sew small scraps together and then cut the final pattern pieces from the patchwork fabric. Both approaches work, although individual panels are easier for beginners to control. Contrasting denim also makes every seam line more visible and gives the finished hat its distinctive handcrafted appearance.
Before cutting, remember that denim behaves differently depending on its weight and stretch. Medium-weight cotton denim is generally easier to sew than very heavy jeans fabric, especially where several crown seams meet at the top. If you are recycling jeans, avoid extremely thick areas near pockets, belt loops, or bulky factory seams when cutting your pattern pieces. Press every fabric scrap before measuring so that the pieces remain accurate, and use a fresh sewing-machine needle suitable for denim. The DIY Denim Patchwork Cap Fabric Pattern becomes much easier to assemble when the materials are prepared carefully instead of trying to correct distorted pieces later. A little preparation at the beginning creates cleaner curves, smoother seams, and a brim that keeps its shape.
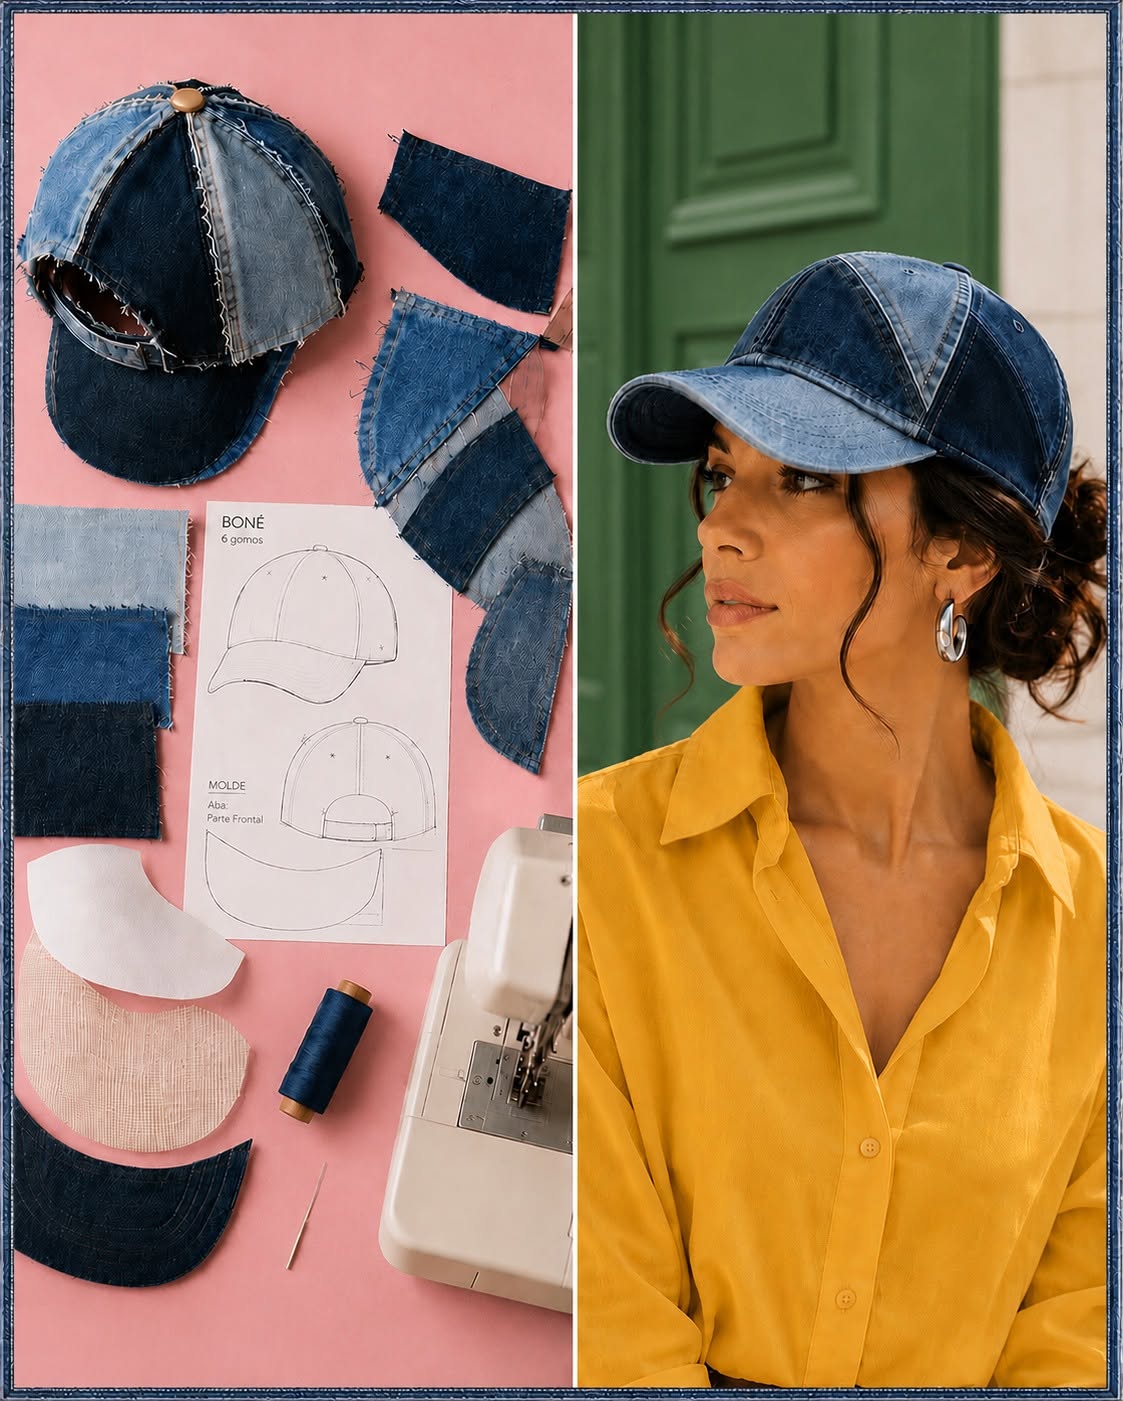
Preparing the Denim, Pattern Pieces, and Sewing Materials
Start by gathering several coordinating pieces of denim. Three to six shades create enough contrast for an attractive patchwork cap, although you can also work entirely with scraps from one pair of jeans for a more subtle look. Wash recycled denim before cutting because previously worn fabric may contain areas that shrink differently when cleaned. After drying, press each piece flat with steam. Arrange the fabrics from darkest to lightest so you can visualize how the tones will alternate around the crown.
DISCOVER MORE FREE PATTERNS HERE!
For a traditional six-panel cap, prepare six curved crown sections. A finished adult cap commonly has a circumference close to 56–60 cm, but the exact size should be adjusted to the intended wearer. If you already have a comfortable cap, you can use its general proportions as a reference when preparing your paper template without cutting the original hat apart. Each crown panel should be narrow near the top, wider through the middle, and gently curved toward the bottom edge. Add approximately 1 cm seam allowance around the sewing edges if your paper template does not already include it.
Next, prepare the brim pattern. The brim usually consists of an upper denim piece, a lower denim piece, and a firm inner layer. Draw a smooth crescent-like visor shape with a curved outer edge and a curved inner edge that will connect to the front of the crown. For extra accuracy, fold the paper pattern in half before cutting so that both sides remain symmetrical. Label the center front on the brim because this mark will later be aligned with the center front of the cap.
The brim needs structure, so choose a stabilizer that can bend slightly without becoming floppy. Heavy fusible interfacing, bag stabilizer, or a suitable sew-in visor insert can work well. If you prefer a softer casual cap, use several layers of firm interfacing instead of a rigid insert. Cut the stabilizer slightly smaller than the denim brim pieces so that excessive bulk does not become trapped in the outer seam. Keeping the seam allowance free makes turning and topstitching the brim much easier.
You will also need strong polyester thread, fabric scissors or a rotary cutter, pins or sewing clips, a denim sewing-machine needle, and an iron. A 90/14 or 100/16 denim needle is suitable for many medium to heavy denim fabrics, although the correct size depends on the thickness of your specific material. Clips are particularly useful because several layers of denim can be difficult to pin. Keep a seam ripper nearby as well; accurate curved seams sometimes require small adjustments during construction.
Before cutting all your valuable denim, make one crown panel from inexpensive fabric or paper and check the scale. Six test panels can even be temporarily taped or basted together to confirm the approximate shape of the crown. This simple fitting test is one of the most useful steps in creating a dependable DIY Denim Patchwork Cap Fabric Pattern. Once the proportions look correct, transfer all markings clearly to the final fabric, including the center points, lower edges, and top tips.
Cutting and Sewing the Patchwork Crown
Place each crown pattern piece on a different denim shade to reproduce the alternating appearance of the inspiration project. Pay attention to the grain of the fabric, particularly when using recycled jeans that have stretched during wear. Keeping the main grain running vertically through each panel helps prevent the finished crown from twisting. Cut slowly around the curves and transfer any alignment marks with tailor’s chalk or another removable fabric marker. Do not trim away the seam allowance accidentally.
Arrange the six cut panels on your work surface before sewing. Alternate light, medium, and dark pieces until the combination feels balanced. A visually pleasing layout could begin with dark indigo, followed by faded blue, medium blue, another dark section, and additional contrasting pieces. There is no strict rule because the irregular mix is part of the denim patchwork cap aesthetic. Taking a quick photo of your chosen arrangement can help you remember the sequence while sewing.
Begin by placing two neighboring crown panels right sides together. Align the curved side edges and sew from the lower edge toward the top using the seam allowance included in your pattern, commonly around 1 cm. Sew slowly because a small change in the curve can affect how accurately all six pieces meet at the top. After completing the first seam, join another panel to the group. Continue until you have two groups of three panels or one gradually expanding crown section.
Pressing the crown seams is important for a professional-looking result. Depending on the thickness of your denim, press each seam allowance open or press both layers toward one side. Then add topstitching approximately 2–3 mm from the original seam. The visible topstitching reinforces the construction and gives the cap the distinctive jeans-inspired finish seen on commercially made denim garments. You may use matching navy thread for a subtle result or contrasting thread for stronger definition.
After completing two sets of three panels, place them right sides together along the remaining center seam. Match the top points carefully before sewing from one lower edge, across the top, and down toward the opposite side. When all panels are connected, inspect the center of the crown. If a small amount of bulk has collected where the six seams meet, carefully grade the seam allowances without weakening the stitches. Press the crown over a rounded pressing surface if available.
The visible seam texture is one of the most attractive features of the DIY Denim Patchwork Cap Fabric Pattern. For a rustic look similar to recycled-jeans projects, some seam edges can be deliberately emphasized with slightly distressed or raw-looking details, provided the structural stitching remains secure. For a cleaner version, keep all raw edges inside and finish them with a zigzag stitch or overlocker. Whichever style you choose, consistency is important. Intentional finishing makes patchwork look designed rather than accidental.
Constructing the Curved Denim Brim and Joining the Cap
To build the brim, place the upper and lower denim pieces right sides together. Position the stabilizer against the wrong side of one layer according to the type of interfacing you are using. If it is fusible, apply it following the manufacturer’s heat recommendations before sewing the two denim pieces together. Keep the stabilizer centered and away from the seam allowance where possible. Mark the center front on both fabric layers.
Sew around the outer curved edge of the brim while leaving the inner curved edge open. Use a consistent seam allowance and slow down around the curve. After sewing, trim the seam allowance slightly and make tiny notches along the curved edge without cutting into the stitching. These small clips help the fabric spread smoothly when the brim is turned right side out. Turn the piece carefully and push the curved edge into shape without stretching the denim.
Press the brim thoroughly, working from the center toward each side. Denim can hold impressions strongly, so avoid creating unwanted creases in the visor. Once the shape is smooth, add several rows of decorative topstitching that follow the outer curve. Two or three parallel rows approximately 5–7 mm apart create the familiar baseball-cap appearance. Besides being decorative, these lines help keep the denim layers firmly attached to the stabilizer.
Before attaching the brim, mark the center front of the crown. Match this point with the center mark on the inner curve of the brim. Pin or clip outward from the center so that the two ends of the brim sit evenly on both sides. The crown may need gentle shaping to follow the brim curve. Avoid stretching either piece aggressively because that can cause ripples along the front of the finished cap.
Sew the brim to the lower edge of the crown using a strong straight stitch. Check the outside before finishing the seam to make sure the brim sits symmetrically. If one side projects farther than the other, correct the alignment now instead of trying to disguise it later. Once you are satisfied, reinforce the seam with a second line of stitching if your denim is particularly heavy. Trim excessive bulk carefully while preserving enough seam allowance for strength.
A narrow fabric band or internal sweatband can cover the raw seam around the lower edge. Cut a strip of soft cotton, lightweight denim, or twill long enough to follow the cap circumference. Sew one edge of the strip to the inside lower edge, fold it over the raw seam, and secure it neatly. This step improves comfort because the wearer will not feel rough denim seam allowances against the forehead. It also gives the DIY Denim Patchwork Cap Fabric Pattern a much more finished interior.
Finishing the Back, Top Button, Fit, and Professional Details
The back of the cap can be finished in several ways depending on the style you prefer. For a simple fitted design, shape the crown to the correct circumference and close the back completely. For a more adjustable cap, leave a curved opening at the center back and finish its edges with narrow denim facings or binding. A short fabric strap with hook-and-loop tape, snaps, or a cap buckle can then be added. Choose hardware that is comfortable and appropriate for the thickness of your denim.
If you create a back opening, reinforce its curved edges because this area receives regular handling when the cap is put on and removed. A lightweight interfacing layer can provide stability without making the opening stiff. Fold raw edges toward the inside, press them carefully, and topstitch close to the edge. Try to keep the topstitching width consistent with the stitching already used on the crown seams and brim.
At the top center, many traditional caps include a small fabric-covered button. You can purchase a cover-button kit or create a decorative denim button using a suitable base. Cut a small circle from one of the denim shades used in the crown, wrap it securely around the button, and attach it over the point where all crown panels meet. This detail hides minor inconsistencies in the center seams while giving the cap a classic appearance.
Try the cap on before completing the final internal stitching. Check whether the crown sits naturally without pulling around the forehead and whether the brim is centered over the face. If the fit feels slightly loose, the internal band can sometimes be adjusted before it is fully secured. If it is too tight, however, increasing the size requires altering the crown seams, which is why testing the pattern before cutting is so valuable. Fit is just as important as decorative details.
For a handcrafted vintage effect, gently wash the completed cap after all seams have been securely finished. This can soften new denim and make contrasting washes blend more naturally. If you intentionally left small raw edges visible, washing may also create subtle fraying. Always consider the materials used inside the brim before washing; some rigid stabilizers should not be machine washed. When in doubt, spot cleaning is the safer choice.
Finally, inspect every seam and trim loose threads. Steam the crown lightly rather than flattening it with the iron, and shape the brim gradually with your hands. The completed DIY Denim Patchwork Cap Fabric Pattern should display the contrast between the different denim panels while maintaining a balanced, wearable silhouette. Small differences in fading, seam texture, and fabric color are not imperfections in this project. They are what transform recycled denim into a unique handmade accessory.
Frequently Asked Questions About the DIY Denim Patchwork Cap Fabric Pattern
Can I make this cap from old jeans?
Yes. Recycled jeans are ideal for a DIY Denim Patchwork Cap Fabric Pattern because a single pair often contains several natural shades created through wear and fading. Remove thick areas such as waistbands, pockets, and bulky seams before laying out your pattern. Flat sections from the legs usually provide the easiest fabric to cut and sew.
How many crown panels should a denim cap have?
Six panels are common for a traditional baseball-style cap and work especially well for patchwork because each section can feature a different denim shade. However, four-panel and five-panel constructions are also possible. This tutorial focuses on the familiar six-panel shape suggested by the reference design.
What is the best denim weight for a patchwork cap?
Medium-weight denim is usually the easiest option. Extremely lightweight denim may need interfacing to hold its shape, while very heavy denim can become difficult to sew where multiple seams intersect. When combining scraps, try to choose fabrics with reasonably similar thicknesses.
Do I need interfacing for the crown?
Not always. Medium-weight denim can often support itself. If your fabric is soft, stretchy, or heavily worn, lightweight fusible interfacing can make the crown more stable. Avoid very stiff interfacing because a cap should still conform comfortably to the head.
What should I use inside the brim?
Firm fusible interfacing, sew-in stabilizer, or a purpose-made visor insert can provide structure. The best option depends on whether you want a flexible casual brim or a firm baseball-cap shape. Whatever you choose, keep excessive thickness away from the outer seam allowance.
Can a regular sewing machine sew denim?
Most household sewing machines can handle medium-weight denim if they are equipped with an appropriate denim needle and strong thread. Sew slowly over bulky seam intersections and avoid pulling the fabric. If necessary, use a seam-leveling tool when crossing thick areas.
How do I prevent the crown seams from becoming bulky?
Trim and grade excess seam allowance after sewing, especially near the top where several panels meet. Press the seams carefully and avoid stacking all seam allowances in the same direction. Consistent trimming greatly improves the shape of the finished crown.
Can I add visible raw seams to the cap?
Yes. Exposed or lightly frayed seams can emphasize the recycled patchwork denim style. Make sure there is still a secure structural seam beneath the decorative raw edge so that continued fraying does not weaken the cap.
How can I resize the pattern?
Measure the intended head circumference and compare it with the finished circumference of your test crown. Small changes can be distributed evenly across all crown panels. Making a fabric test version before cutting your best denim is the safest way to confirm both size and shape.
How can I make the cap look professionally finished?
Accurate cutting, symmetrical panel placement, careful pressing, even topstitching, a structured brim, and a clean internal band make the biggest difference. Professional appearance usually comes from consistent details rather than complicated techniques.
Conclusion
The DIY Denim Patchwork Cap Fabric Pattern combines practical sewing techniques with the character of recycled denim. By selecting several complementary denim washes, preparing six shaped crown panels, sewing and topstitching the curved seams, constructing a stabilized visor, and carefully finishing the lower edge and back opening, you can create a distinctive handmade cap inspired by the project in the image. The method also teaches valuable skills such as sewing curves, reducing bulky seam allowances, working with interfacing, and producing even decorative topstitching.
EASILY FIND THE PDF FOR THIS PATTERN HERE!
Most importantly, this project allows every finished cap to be different. You can create a subtle version using similar shades of blue, a bold patchwork design with dramatic contrasts, or a sustainable version made entirely from old jeans. Once you understand the basic denim cap sewing pattern, the same construction can be adapted with embroidered panels, printed denim, decorative stitching, appliqué, or personalized fabric combinations. If you make your own version of this DIY Denim Patchwork Cap Fabric Pattern, leave your sincere opinion about the project and share any suggestions for future sewing tutorials. Your ideas can inspire new color combinations, finishing techniques, and creative ways to transform fabric scraps into useful handmade pieces.