
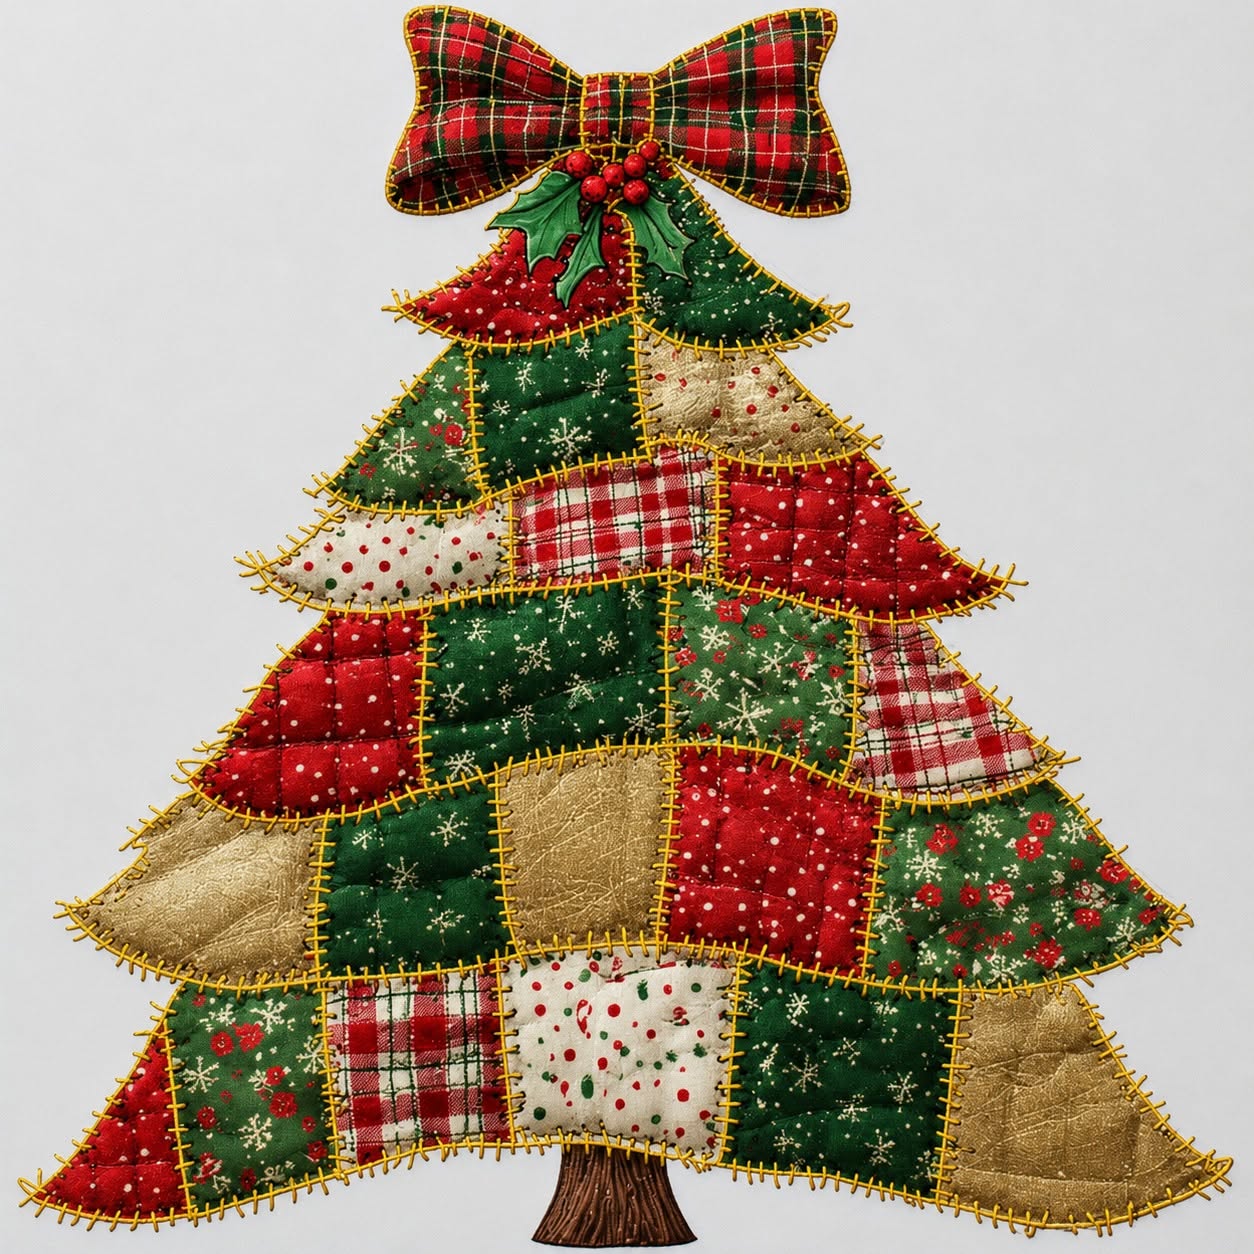
Patchwork Christmas Tree Fabric Pattern is a charming seasonal sewing project that combines the warmth of traditional patchwork with the unmistakable shape of a Christmas tree. Inspired by the photographed design, this project uses an assortment of red, green, cream, plaid, floral, and golden fabrics arranged in irregular sections to create a tree full of movement and handmade character. Decorative blanket-style stitching around the fabric pieces gives the project its rustic finish, while the plaid bow, holly leaves, berries, and small brown trunk complete the festive composition. The pattern works especially well as a Christmas wall hanging, fabric panel, door decoration, table centerpiece, or appliqué element for a larger quilt. Although the finished piece looks detailed, the construction can be approached one section at a time, making the Patchwork Christmas Tree Fabric Pattern suitable for sewists who already know basic cutting and stitching techniques as well as adventurous beginners who want to practice appliqué and patchwork.
One of the most attractive characteristics of this Christmas tree fabric pattern is that the fabrics do not need to match perfectly. In fact, variety is what gives the project its personality. Traditional Christmas colors such as dark green, holly green, burgundy, bright red, ivory, beige, and antique gold work beautifully together, while plaid and small floral prints introduce additional texture. You can use fabric scraps left over from previous sewing projects, which makes this an excellent stash-friendly Christmas craft. The tree in the reference image is composed of several horizontal layers that gradually become wider toward the bottom. Each layer is divided into contrasting fabric sections, creating the appearance of a whimsical patchwork Christmas tree. Slightly uneven edges and visible decorative stitches contribute to the handmade style rather than making the piece look unfinished, so precise geometric piecing is not essential for achieving a beautiful result.
Before cutting fabric, it is helpful to decide how large you want the completed decoration to be. A medium wall panel measuring approximately 45 to 55 cm high works well for displaying the details while remaining manageable on a domestic sewing machine. The tree body can be drawn directly onto pattern paper, beginning with a narrow top and gradually widening each tier toward the bottom. Add approximately 0.7 to 1 cm around pieces when your chosen construction method requires a seam allowance. If you are using raw-edge appliqué, a traditional seam allowance may not be necessary, although leaving a few extra millimeters can make trimming easier. Keep the original image nearby as visual inspiration while arranging your colors, but allow yourself some creative freedom. The goal of the Patchwork Christmas Tree Fabric Pattern is not to reproduce every patch identically; it is to create a balanced, festive composition using fabric, texture, and decorative stitching.
Materials, Fabric Selection, and Pattern Preparation
Begin your Patchwork Christmas Tree Fabric Pattern by gathering several cotton fabrics in coordinating Christmas colors. Quilting cotton is particularly convenient because it is easy to cut, press, layer, and sew. Choose approximately six to ten different prints so that neighboring patches remain visually distinct. Red fabric with tiny dots, green fabric with snowflakes, traditional tartan plaid, cream fabric with small holiday motifs, muted floral prints, and metallic-looking gold cotton are all excellent options for recreating the style seen in the photograph.
DISCOVER MORE FREE PATTERNS HERE!
You will also need a backing fabric, lightweight batting or fusible interfacing, coordinating sewing thread, embroidery or decorative thread, fabric scissors, pins or clips, an iron, pattern paper, a pencil, and a sewing machine if you prefer machine stitching. A rotary cutter and cutting mat can make preparation faster, but scissors work perfectly well. For the decorative edge treatment, black or very dark brown thread gives strong definition to each fabric section and resembles the rustic blanket stitching visible around the patches.
To draft the Christmas tree sewing pattern, draw a vertical centerline approximately 45 cm long on pattern paper. Mark several horizontal levels that represent the individual tree tiers. The top tier should be narrow, while every subsequent level should become gradually wider. Rather than drawing perfectly straight triangular branches, create slightly curved or gently irregular points. This produces the soft, folk-art character visible in the reference design and prevents the finished tree from looking overly geometric.
Divide each horizontal tier into two, three, or four separate sections. These sections will become your individual patchwork fabric pieces. Make some rectangles, some trapezoids, and a few irregular quadrilateral shapes. Avoid making all patches exactly the same size. The contrast between larger and smaller fabric blocks is an important feature of this rustic design. Number the pattern sections before cutting them apart so you can easily reconstruct the original layout later.
Create a small rectangular or slightly tapered pattern piece for the trunk. A finished size around 6 cm wide by 8 cm high is appropriate for a medium tree. Brown fabric with a wood-grain print is ideal, but plain brown cotton can also be enhanced with several vertical lines of dark thread. The trunk should extend slightly behind the bottom tree layer so that the attachment remains concealed.
Finally, draft the decorative top elements. Draw a generous bow measuring approximately 18 to 22 cm across, several pointed holly leaves, and a group of small circular berries. These details visually complete the fabric Christmas tree decoration and give the project a polished seasonal appearance. If you prefer a simpler version, the tree can be completed without the bow and holly, but these accents are particularly effective when the finished piece will be displayed as Christmas wall décor.
Cutting and Arranging the Patchwork Christmas Tree
Once the templates are prepared, place them over your selected fabrics and experiment with color placement before cutting. Try to avoid positioning two identical colors directly beside one another. For example, if one section is made from dark green snowflake fabric, place cream, plaid, red, or gold next to it. Alternating colors creates the lively mosaic effect that defines the Patchwork Christmas Tree Fabric Pattern.
Cut each fabric section carefully and return it immediately to its corresponding position on your work surface. This simple habit prevents confusion when working with many irregular pieces. If you are using fusible web for raw-edge appliqué, trace each shape onto the paper side of the fusible material first, remembering that the final shape will be reversed. Fuse it to the wrong side of your fabric according to the manufacturer’s temperature recommendations, then cut along the traced lines.
Prepare a large backing panel slightly larger than your final tree. A piece around 55 × 60 cm provides comfortable working space for a medium design. If you want a soft quilted appearance, layer the backing with thin batting. Alternatively, use lightweight interfacing when you want structure without noticeable loft. Press everything flat before arranging the patches because small wrinkles can distort the alignment of irregular sections.
Start assembling the patchwork Christmas tree from the bottom upward. Position the widest tier first and check that it is centered. Continue adding each layer, gradually narrowing the tree toward the top. Allow the edges of neighboring tiers to overlap slightly if you are using appliqué construction. This overlap helps prevent gaps from appearing between sections after stitching.
When all sections are positioned, step away from the project and look at the entire tree rather than focusing on individual fabrics. Check whether one color dominates excessively. If most reds are concentrated on one side, exchange a few pieces with greens, creams, or golds. Good Christmas patchwork design depends on distributing color and visual weight throughout the composition rather than following a rigid formula.
Once you are satisfied with the arrangement, secure the fabric pieces. Fusible web offers the easiest method because everything can be lightly pressed in place before stitching. If you prefer not to use adhesive, secure each piece with fine pins, temporary fabric glue, or hand basting. Work carefully because maintaining the original arrangement at this stage makes the decorative sewing much easier.
Stitching, Appliqué, and Decorative Details
The characteristic outline of this Patchwork Christmas Tree Fabric Pattern comes from visible decorative stitching around each section. A blanket stitch is an excellent choice because it secures the raw edges while producing a traditional handcrafted appearance. Many sewing machines include a blanket-stitch setting, but the same technique can also be worked by hand using embroidery thread.
Begin with the interior patch boundaries before sewing around the outer edge of the tree. Stitch slowly along each shape, especially around corners and curved sections. When machine sewing, stop with the needle down whenever you need to pivot. This keeps the decorative stitches aligned and prevents obvious gaps. Dark thread gives the strongest rustic contrast, while coordinating thread will create a softer and more contemporary Christmas appliqué pattern.
Do not worry if every decorative stitch is not perfectly identical. Slight variation actually suits this style very well. The inspiration image has an intentionally handmade appearance, with visible thread contributing to the character of the piece. If you enjoy free-motion sewing, you can even add small irregular extensions or accent stitches around selected edges to imitate a primitive or folk-art textile finish.
After completing the tree body, attach the trunk underneath the lowest tier. If you are using brown fabric without a printed texture, stitch several slightly curved vertical lines over it with darker brown thread. These lines create the suggestion of wood grain. A little batting behind the trunk can also add dimensional texture without making the piece bulky.
Next, create the bow. Plaid fabric works particularly well because it introduces another classic Christmas motif. Interface the bow pieces lightly if the fabric feels too soft. Depending on your preferred technique, the bow can be appliquéd flat or constructed separately and attached afterward for a slightly raised appearance. Position it directly above the tree so that its center aligns with the central axis of the fabric Christmas tree.
Complete the top decoration with green holly leaves and several red fabric berries. Small circles can be challenging to appliqué neatly, so felt, fabric yo-yos, embroidered circles, or tiny padded appliqué pieces can be substituted. Add vein stitching to the holly leaves and a few highlights to the berries if desired. These finishing details turn a basic patchwork tree into a recognizable seasonal centerpiece with a handcrafted heirloom quality.
Finishing, Quilting, Display Ideas, and Creative Variations
After all appliqué sections are stitched, inspect the entire Patchwork Christmas Tree Fabric Pattern for loose threads or unsecured fabric edges. Trim thread tails neatly and reinforce any areas that appear fragile. If you created the project on a larger fabric panel, this is also the stage when you can decide whether to keep a visible background or trim closely around the tree silhouette.
For a wall quilt, layer the completed top with batting and backing fabric. Quilt lightly around the tree and through some of the individual patches. Simple echo quilting approximately 1 to 2 cm outside the tree creates definition without competing with the decorative fabrics. Straight-line or gently wavy quilting can also add texture to open background areas while keeping the Christmas quilt pattern visually clean.
Finish the outer edge with traditional quilt binding if the project remains rectangular. A red, green, plaid, or gold binding can frame the design beautifully. If you prefer a freestanding tree-shaped ornament, trim around the silhouette after securing all layers and finish the raw edge with a dense zigzag stitch, blanket stitch, narrow binding, or another suitable edge-finishing technique.
The completed tree can be displayed in many ways. Add a hanging sleeve to the back for a seasonal wall panel, attach a loop at the top for a lightweight door decoration, or incorporate the design into a larger Christmas quilt. A smaller version of the Patchwork Christmas Tree Fabric Pattern can decorate pillow covers, tote bags, table runners, placemats, fabric gift bags, or handmade holiday cards.
You can also customize the project by changing the color palette. Traditional red and green create the classic Christmas look, but cream and gold produce an elegant neutral tree. Blue, white, and silver fabrics can create a winter-inspired variation, while pastel pink, sage green, and ivory produce a softer modern aesthetic. The basic patchwork tree pattern remains the same regardless of the fabrics you choose.
Most importantly, allow the project to reflect your personal sewing style. Use leftover fabrics from meaningful projects, add embroidered names or dates, sew small buttons onto selected patches, or incorporate pieces of fabric connected to family memories. Because a patchwork design naturally combines many textiles, this Christmas tree can become a keepsake that grows more meaningful each year it is displayed.
FAQ About the Patchwork Christmas Tree Fabric Pattern
What is a Patchwork Christmas Tree Fabric Pattern?
A Patchwork Christmas Tree Fabric Pattern is a sewing design that creates a Christmas tree by combining multiple pieces of fabric instead of using one continuous piece. Different prints and colors are arranged into tree-shaped tiers, then joined or appliquéd onto a foundation. Decorative stitching can be added around the individual patches to emphasize the handmade look.
Is this project suitable for beginners?
Yes, especially when fusible appliqué is used. Beginners can simplify the pattern by making larger patches and using fewer sections. The most important skills are basic fabric cutting, pressing, arranging, and sewing around edges. More experienced quilters can add detailed blanket stitching, free-motion quilting, hand embroidery, or dimensional embellishments.
What fabric is best for a patchwork Christmas tree?
Quilting cotton is one of the best choices because it is stable, easy to cut, widely available in Christmas prints, and suitable for both machine and hand stitching. Cotton scraps are particularly useful for this project. Fabrics with very different thicknesses can be used, but they may require additional stabilizing.
How much fabric do I need?
Because the design consists of many small pieces, relatively little fabric is required. Fat quarters, fabric scraps, or leftover pieces from previous quilting projects are usually enough for a medium tree. You will need a larger continuous piece only if you plan to create a rectangular background and backing.
Does every fabric patch need a seam allowance?
Not necessarily. Traditional piecing generally requires seam allowances, while raw-edge appliqué usually does not. If you choose turned-edge appliqué, you will need additional fabric around each template so the edges can be folded underneath. Decide which construction method you want to use before cutting the pieces.
What stitch should I use around the fabric pieces?
A blanket stitch is especially suitable for this Christmas tree fabric pattern because it secures the edges while creating a decorative outline. A narrow zigzag stitch, satin stitch, straight stitch, or hand embroidery can also be used. Dark thread provides a strong folk-art appearance, while matching thread creates a subtler finish.
Can I make the tree without a sewing machine?
Yes. The entire design can be constructed with hand appliqué and hand embroidery. Blanket stitching by hand gives the project an especially traditional appearance. Hand sewing takes longer, but it can be enjoyable for anyone who prefers portable or slow-stitching projects.
Can the pattern be enlarged or reduced?
Absolutely. The proportions of the tree can be scaled to create anything from a small ornament to a large wall quilt. When reducing the pattern significantly, simplify some of the smallest patches so they remain easy to sew. When enlarging it, additional patchwork sections can be introduced without changing the overall tree silhouette.
How do I keep the patchwork pieces from moving while sewing?
Fusible web is one of the easiest solutions because it temporarily bonds the appliqué pieces to the foundation. Temporary fabric adhesive, pins, clips, or hand basting are alternatives. Secure every section before decorative stitching so the final layout stays balanced.
Can I wash the finished project?
A washable project is possible when all fabrics, batting, thread, and adhesives are suitable for laundering. Prewashing cotton fabric can reduce unexpected shrinkage or color bleeding. If the project contains dimensional decorations, specialty trims, or delicate embellishments, gentle cleaning may be preferable.
What can I make using this pattern besides wall décor?
The same Patchwork Christmas Tree Fabric Pattern can be adapted for cushions, table runners, placemats, quilt blocks, tote bags, fabric banners, Christmas stockings, reusable gift bags, and decorative panels. A miniature version can even become a fabric ornament.
How can I make the finished tree look more professional?
Press the fabrics carefully throughout construction, distribute colors evenly, maintain consistent decorative stitching, secure all thread ends, and take time positioning the patches before sewing. Professional-looking patchwork does not require absolute perfection; careful preparation and balanced fabric choices usually make the greatest difference.
Conclusion
The Patchwork Christmas Tree Fabric Pattern is a creative way to transform ordinary fabric scraps into a festive handmade decoration filled with texture, color, and personality. Throughout this project, you learned how to plan the Christmas tree silhouette, divide it into irregular patchwork sections, select contrasting fabrics, prepare appliqué pieces, arrange the individual tiers, and secure everything onto a stable foundation. These steps create the distinctive layered appearance that makes the design so appealing.
You also learned how decorative blanket stitching can define each fabric section while reinforcing the rustic character of the project. Details such as the brown trunk, plaid bow, holly leaves, and red berries add recognizable Christmas elements without overwhelming the patchwork itself. By combining thoughtful fabric placement with simple appliqué methods, even relatively small scraps can become part of an impressive holiday piece.
EASILY FIND THE PDF FOR THIS PATTERN HERE!
Another advantage of the Patchwork Christmas Tree Fabric Pattern is its flexibility. The design can be enlarged, reduced, simplified, or embellished according to your experience and intended use. Traditional red and green fabrics can create a nostalgic Christmas decoration, while modern palettes can transform the same pattern into something completely different. Whether you turn it into a wall hanging, cushion, table runner, quilt block, or handmade gift, the basic construction principles remain accessible and adaptable. If you make your own version, leave your sincere opinion about the project and share any suggestions that could make the Patchwork Christmas Tree Fabric Pattern even more useful for other sewing and quilting enthusiasts. Creative variations, different color combinations, stitching ideas, and practical construction tips are always valuable because patchwork grows through experimentation and personal interpretation. As a next step, creating a printable template with seam allowance and English labels can make this project even easier to reproduce from start to finish.