
The Boxy Zipper Bag (DIY) Fabric Pattern is a practical sewing project designed for anyone who wants to create a structured fabric bag with a spacious interior, a secure zipper closure, and a convenient carrying handle. Inspired by the colorful rectangular bag shown in the reference photo, this project combines functionality with the freedom to choose beautiful fabrics, prints, and finishing details. The term Boxy Zipper Bag describes the characteristic rectangular, three-dimensional shape created by boxed corners and structured fabric layers. Unlike a flat zipper pouch, this style offers more internal capacity and can stand upright on a table. It can be used as a sewing organizer, cosmetic case, toiletry bag, craft storage bag, travel organizer, or everyday accessory. Because the construction is based primarily on rectangles and straightforward seams, it is also an approachable project for sewists who want to improve their zipper installation and bag-making skills.
The DIY Fabric Pattern portion of the name means that the project can be created from measurements and basic pattern pieces rather than depending on a complicated commercial template. You can adapt the dimensions depending on how large you want your finished organizer to be while following the same construction principles. A beautiful floral cotton similar to the fabric in the photo creates a striking handmade appearance, but quilting cotton, canvas, lightweight denim, linen blends, and other stable woven fabrics can also work well. The bag in the reference image has a defined rectangular body, a long zipper positioned across the top, a fabric handle, and enough structure to maintain its shape when placed on a surface. Adding interfacing, batting, or foam stabilizer between the exterior fabric and lining is an important part of recreating this professional-looking finish. Coordinating the zipper tape and lining fabric can make the completed Boxy Zipper Bag (DIY) Fabric Pattern look even more polished.
Making your own Boxy Zipper Bag also gives you complete control over the organization and appearance of the finished project. You can make the exterior elegant, colorful, minimal, floral, geometric, or completely personalized depending on your fabric choice. Inside, you may keep the construction simple with one large compartment or add optional pockets for smaller objects. For the tutorial below, a medium-sized bag is used as an example, approximately 10 inches wide, 5 inches high, and 5 inches deep when completed. These measurements do not need to be followed exactly because the same technique can be scaled up or down. Seam allowances, stabilization, zipper placement, boxed corners, and careful pressing are the elements that make the greatest difference in the final result. By understanding each stage rather than simply copying measurements, you will be able to reuse this fabric pattern for many future handmade bags.
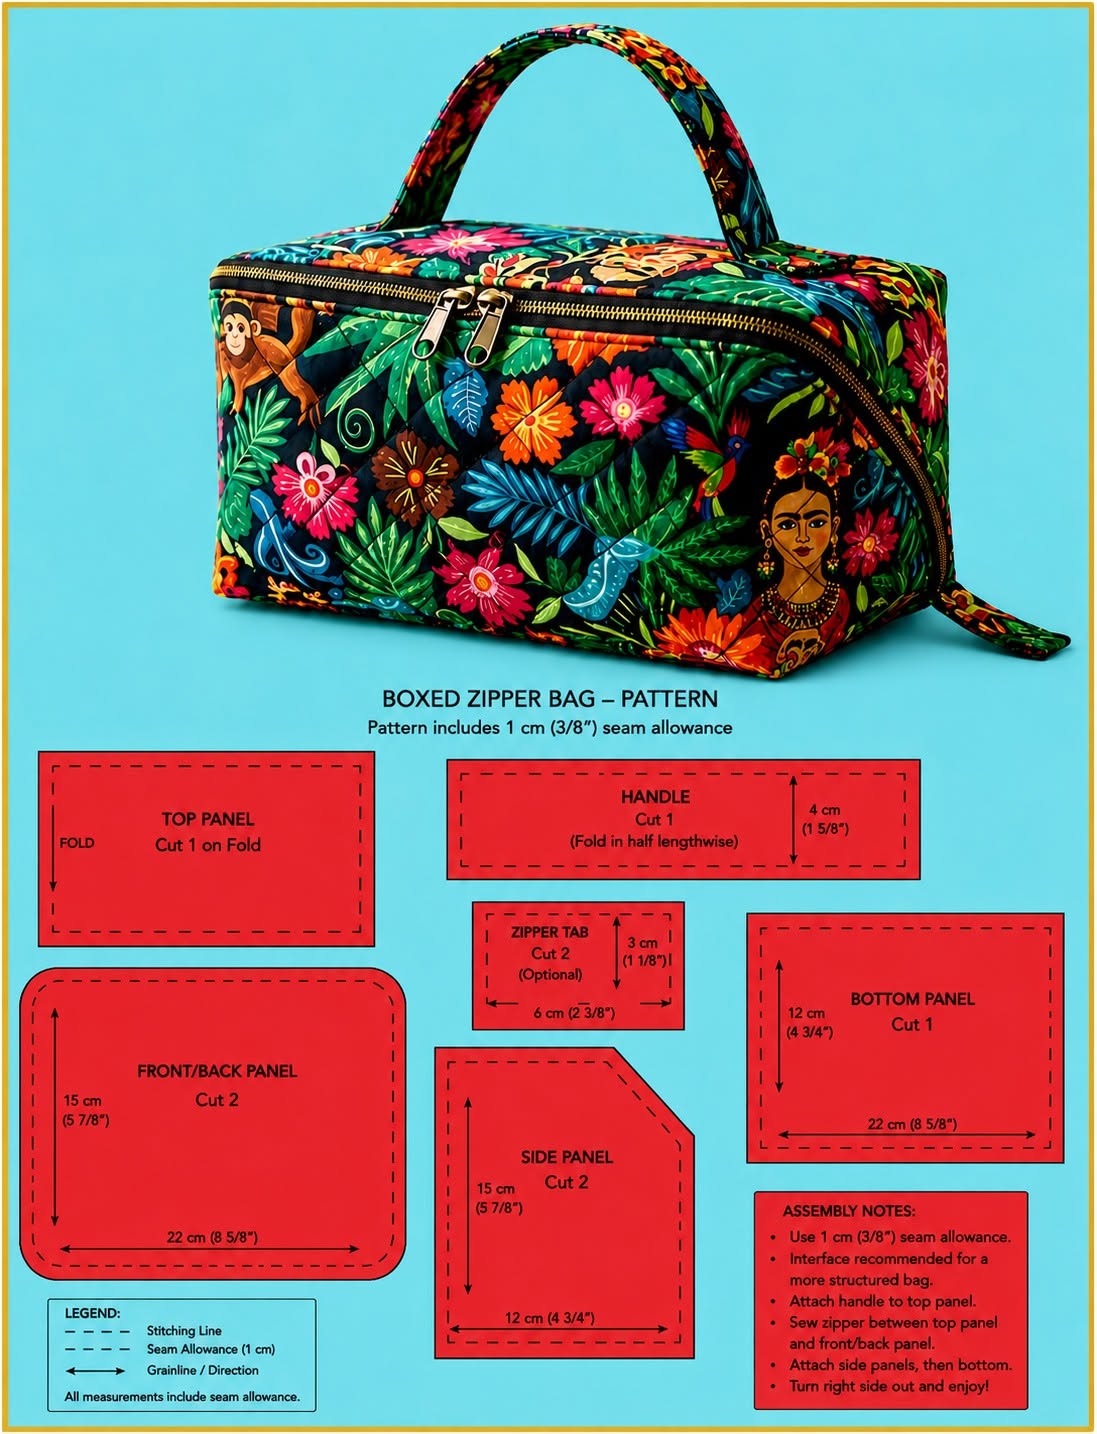
Materials and Fabric Pattern Preparation
For a medium Boxy Zipper Bag (DIY) Fabric Pattern, begin with two exterior fabric rectangles approximately 11 x 11 inches and two lining rectangles of the same size. You will also need two pieces of interfacing, fusible fleece, or bag foam cut slightly smaller than the exterior pieces. A zipper measuring approximately 12 to 14 inches works well because having a zipper slightly longer than the fabric makes installation easier. You can trim the excess zipper tape later.
DISCOVER MORE FREE PATTERNS HERE!
Choose a medium-weight woven fabric for the exterior. Quilting cotton works particularly well when combined with fusible fleece or foam stabilizer. Canvas can provide extra firmness, while lighter cotton fabrics will usually need stronger interfacing. If you want a result similar to the colorful example, select a bold floral or botanical print and pair it with a coordinating solid-color lining.
The seam allowance is the distance between the raw fabric edge and the stitching line. A 3/8-inch or 1/2-inch seam allowance works well for this project. Whichever measurement you select, use it consistently throughout the construction. Consistent seam allowances help both sides remain symmetrical and make it easier to produce neat boxed corners.
Before cutting, press your fabric carefully to remove folds and wrinkles. Position the fabric pattern pieces according to the direction of the print. This is especially important with fabrics containing flowers, faces, animals, words, or directional illustrations. If the exterior has a noticeable motif, decide which portion you want centered on the front before cutting.
Cut the exterior, lining, and stabilizer accurately using a rotary cutter and ruler or fabric scissors. Small measurement differences can become noticeable after the corners are boxed. Transfer any required center markings with a removable fabric marker or small clips. Avoid permanent ink because it may remain visible after construction.
Prepare a handle from a fabric strip approximately 3 inches wide and 11 to 13 inches long. Fold the strip in half lengthwise and press it. Open it again, fold both long raw edges toward the center crease, press, and fold the strip closed. Topstitch near both long edges. The finished fabric handle should be strong enough to comfortably lift the completed bag.
Installing the Zipper and Creating the Main Bag Panels
Place one exterior piece right side facing upward. Position the zipper along the upper edge with the zipper teeth facing down toward the fabric. Place one lining piece over the zipper with its right side facing the exterior. The zipper should now be sandwiched between the exterior and lining layers. Secure everything with sewing clips or pins.
Using a zipper foot, stitch along the zipper edge without sewing too close to the teeth. Open the fabrics and gently press them away from the zipper. Topstitch approximately 1/8 inch from the seam. This topstitching keeps the fabric away from the zipper teeth and gives the project a clean, professional appearance.
Repeat the same process with the remaining exterior and lining rectangles on the opposite zipper tape. Carefully align the fabric edges before sewing so both sides of the bag remain even. After stitching, open the panels and press them flat. Topstitch the second side just as you did the first.
Check the zipper before continuing. Open and close it several times to confirm that no fabric has been caught in the stitching. A smooth zipper is essential for a functional Boxy Zipper Bag. If the zipper feels tight, inspect the topstitching and correct the problem before assembling the bag body.
At this stage, the exterior fabric should appear on one side of the zipper and the lining should remain hidden behind it. Apply the stabilizer to the exterior panels according to the manufacturer’s recommendations if you have not already done so. Fusible interfacing is generally pressed onto the wrong side of the exterior fabric before construction, while foam stabilizer may be basted or quilted in place.
If you want decorative quilting, complete it before assembling the final body. Simple straight lines approximately one inch apart provide subtle texture without competing with a busy printed fabric. Quilting also joins the exterior and stabilizer together, which can make the DIY zipper bag firmer and more durable during regular use.
Sewing the Body, Boxed Corners, and Handle
Open the zipper approximately halfway before sewing the body. This small step is extremely important because the partially open zipper provides the opening needed to turn the project right side out later. Arrange the exterior pieces right sides together and the lining pieces right sides together. Carefully align all edges.
Attach the prepared handle to the exterior where you want it positioned. For a bag similar to the reference photo, center the handle across the top area so that it arches comfortably above the zipper when the project is finished. Baste the handle ends securely within the seam allowance, making certain the handle itself stays away from the side seams.
Pin or clip around the perimeter. Sew the exterior sections together, and then sew the lining sections while leaving a 4- to 5-inch opening in the bottom of the lining. This opening will be used for turning the entire bag. Backstitch at both ends of the opening so the seam does not pull apart.
To create the characteristic boxy bag shape, flatten each corner so that the side seam lines up with the bottom seam. The corner should form a triangular point. Measure approximately 2 to 2 1/2 inches from the point, depending on the depth you want, and draw a line perpendicular to the seam.
Stitch directly across the marked line and reinforce the seam with a second row of stitching if desired. Trim the triangular excess fabric, leaving approximately a 1/2-inch seam allowance. Repeat this process on every corresponding exterior and lining corner. Keeping all corner measurements identical is essential for an even rectangular structure.
The boxed corners are what transform a simple flat pouch into a three-dimensional storage bag. A larger corner measurement creates a deeper bag with a smaller front and back height, while a smaller measurement produces a shallower bag. If you plan to modify the original Boxy Zipper Bag (DIY) Fabric Pattern, testing the proportions with scrap fabric can help you determine your preferred dimensions.
Once every corner has been sewn, check that the handle remains properly secured and that the zipper is still partially open. Trim bulky seam allowances where necessary, but avoid cutting too close to the stitching. You are now ready for the final turning and finishing stage.
Turning, Finishing, and Customizing Your Boxy Zipper Bag
Reach through the opening left in the lining and carefully begin pulling the exterior bag through it. Work gradually, especially around the corners and zipper ends. Once the exterior is completely turned right side out, gently push out the corners with a blunt turning tool. Avoid sharp objects that could puncture the fabric.
Pull the lining outside temporarily and close its opening. You can machine-stitch it close to the edge for a quick finish or use a ladder stitch by hand for a nearly invisible result. Push the lining back inside the Boxy Zipper Bag and smooth it carefully into every corner.
Press the finished project using the temperature recommended for your fabric and interfacing. Avoid placing a hot iron directly against plastic zipper teeth. Shape the sides with your hands while pressing so the rectangular profile becomes more defined. Good pressing is one of the simplest ways to improve the appearance of handmade sewing projects.
Inspect the zipper ends and handle attachment points. These areas receive repeated stress, so they should feel secure. If necessary, add another line of stitching at the handle bases. You can also sew a small rectangular reinforcement or an X-shaped stitch pattern over each attachment area for additional durability.
Customization is one of the biggest advantages of a DIY Fabric Pattern. Consider adding an interior slip pocket before assembling the lining, installing elastic loops for small tools, using contrasting zipper tape, or attaching a decorative zipper pull. A small fabric tab at one or both zipper ends can also make opening the bag more comfortable.
The same basic Boxy Zipper Bag (DIY) Fabric Pattern can produce many different projects. Make a compact version for sewing notions, a medium version for cosmetics, or a larger one for travel accessories. Changing the exterior fabric can completely transform the look without changing the construction method, making this an excellent reusable pattern for handmade gifts or personal organization.
Frequently Asked Questions About the Boxy Zipper Bag (DIY) Fabric Pattern
What is a Boxy Zipper Bag?
A Boxy Zipper Bag is a structured zipper pouch with a rectangular three-dimensional shape. Its depth is usually created by sewing boxed corners. Unlike a basic flat pouch, it has a wider base and more usable interior space.
Is the Boxy Zipper Bag suitable for beginners?
Yes. A beginner who is comfortable sewing straight seams can complete this project. Installing the zipper may be the most unfamiliar part, but working slowly and using a zipper foot makes the process much easier.
What fabric is best for a Boxy Zipper Bag?
Quilting cotton, cotton canvas, lightweight denim, linen blends, and other woven fabrics are good choices. Lightweight fabrics should generally be combined with interfacing or stabilizer so the finished bag holds its shape.
Do I need interfacing for this DIY Fabric Pattern?
Interfacing is strongly recommended if you want the structured appearance seen in the reference project. Fusible fleece provides softness and moderate structure, while foam stabilizer creates a firmer and more dimensional bag.
What zipper size should I use?
For a medium bag approximately 10 inches wide, a zipper between 12 and 14 inches is convenient. Using a zipper longer than necessary often makes sewing easier because the zipper slider can be moved away from the needle while stitching.
How do I make the bag more structured?
Use stronger stabilizer and make sure it covers most of the exterior panels. Foam stabilizer is particularly useful for bags that need to stand upright. Accurate boxed corners and thorough pressing also improve the final shape.
Can I add pockets to the lining?
Absolutely. Interior pockets should be sewn onto the lining panels before the main bag is assembled. You can add a simple slip pocket, divided pocket, or even a small zipper pocket depending on your sewing experience.
Can this Boxy Zipper Bag Fabric Pattern be resized?
Yes. Because the main pieces are rectangular, the project is easy to resize. Increase the width and height of both exterior and lining pieces equally. Remember that changing the size of the boxed corners will also change the bag’s depth and final proportions.
Why are my boxed corners uneven?
Uneven corners usually happen when the seam intersections are not aligned or when the corner measurements differ. Measure carefully from each corner point and make sure the side seam and bottom seam are positioned directly against each other before stitching.
Can I quilt the exterior fabric?
Yes. Quilting can add texture, durability, and structure. Quilt the exterior fabric to batting or stabilizer before installing the zipper and assembling the bag. Straight-line quilting is an easy option for beginners.
How can I prevent the lining from becoming too large?
Use accurate seam allowances and consider sewing the lining seams approximately 1/8 inch deeper than the exterior seams. This small adjustment can help the lining fit neatly inside without excessive fabric bunching at the bottom.
What can I use the finished Boxy Zipper Bag for?
The finished bag is highly versatile. It can store cosmetics, toiletries, sewing supplies, embroidery tools, small craft materials, travel accessories, chargers, stationery, or other everyday essentials.
Conclusion
The Boxy Zipper Bag (DIY) Fabric Pattern is an excellent project for learning how simple fabric pieces can be transformed into a useful and attractive three-dimensional bag. Throughout this tutorial, you learned how to select exterior and lining fabrics, prepare stabilizer, create a reinforced handle, install a zipper, assemble the main panels, sew accurate boxed corners, turn the bag, finish the lining, and customize the final project.
Once you understand the basic construction, the pattern becomes extremely adaptable. Different fabrics, zipper colors, handle styles, pockets, quilting designs, and dimensions can produce an entirely new DIY fabric bag while using exactly the same sewing principles. This makes the project useful not only as a single handmade accessory but also as a foundation for experimenting with future bag designs.
EASILY FIND THE PDF FOR THIS PATTERN HERE!
Most importantly, take your time with accurate cutting, zipper alignment, seam allowances, and corner measurements. These details have a significant effect on the shape and professional finish of your completed Boxy Zipper Bag. With practice, the construction becomes quicker and easier, and you can create coordinated organizers in many sizes for sewing supplies, travel, storage, gifts, or everyday use. If you make your own Boxy Zipper Bag (DIY) Fabric Pattern, leave your sincere opinion about the project and share your suggestions. Tell us which fabric combination you would choose, what size would be most useful for you, and what features you would like to add to your next handmade zipper bag.