
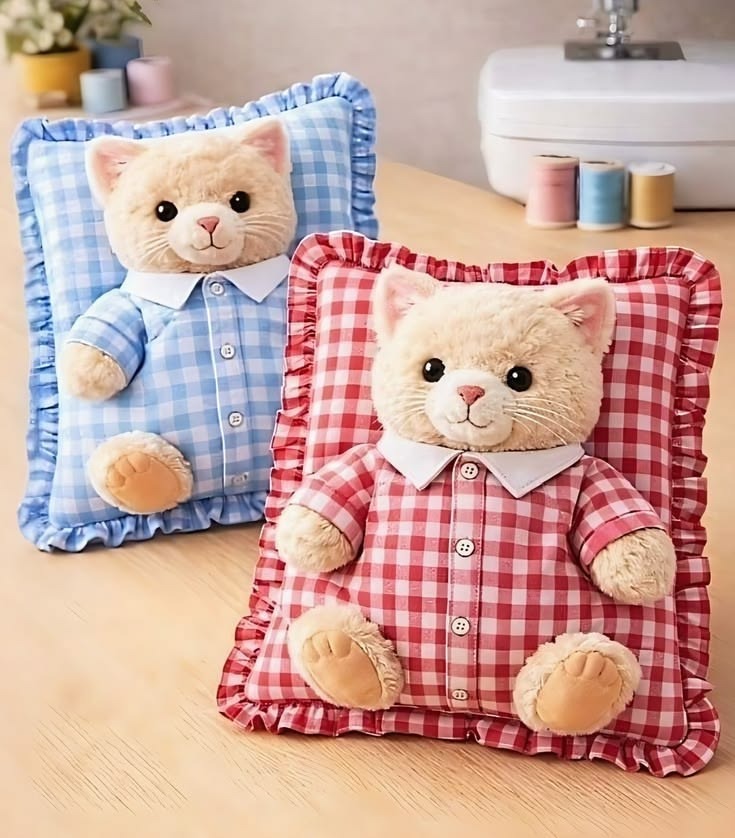
Teddy bear cushion sewing tutorial Fabric Pattern is a charming project that combines decorative sewing, soft-toy construction, and practical home décor in one creative design. Inspired by the handmade cushions shown in the reference image, this project features a soft teddy bear attached to a padded rectangular cushion with a gathered ruffle around the edges. The bear wears a checked fabric outfit with a contrasting white collar, decorative buttons, plush paws, and a friendly embroidered face. Although the finished piece looks detailed, the construction can be divided into manageable stages, making it suitable for confident beginners and experienced sewing enthusiasts alike.
This teddy bear cushion sewing tutorial teaches you how to prepare the cushion base, create a simple fabric pattern, sew the bear’s body components, and assemble all the decorative elements securely. You can make the cushion in classic gingham, floral cotton, polka dots, linen blends, or any other medium-weight fabric that suits your decorating style. Soft fleece, minky, or short-pile plush works especially well for the teddy bear’s head, ears, paws, and feet. The result can be displayed in a sewing room, nursery, reading corner, guest room, or craft studio as a cheerful handmade accent.
The term Fabric Pattern refers to the set of templates used to cut every component of the project, including the cushion panels, ruffle strips, bear body, head, ears, arms, legs, collar, and paw pads. A well-prepared pattern makes the sewing process more accurate and helps both sides of the teddy bear remain symmetrical. In this guide, you will learn how to draft your own templates using simple measurements, add seam allowances correctly, choose safe decorative details, and finish the cushion neatly. Always supervise young children around handmade items that contain buttons or other small embellishments.
Materials and Fabric Pattern Preparation
Begin your Teddy bear cushion sewing tutorial Fabric Pattern by collecting the main materials. You will need medium-weight cotton fabric for the cushion and bear clothing, soft plush fabric for the head and paws, white cotton for the collar, lightweight interfacing, polyester stuffing, matching thread, embroidery thread, and basic sewing tools. Prepare scissors, pins or sewing clips, a fabric marker, a ruler, a hand-sewing needle, and a sewing machine.
DISCOVER MORE FREE PATTERNS HERE!
For a medium-sized finished cushion, draft two rectangles measuring approximately 38 cm wide by 48 cm high. Add a 1 cm seam allowance around every edge if it is not already included in your measurements. This size creates a comfortable decorative cushion similar to the proportions shown in the image, but you can reduce or enlarge the dimensions according to your needs.
To create the ruffle, cut enough fabric strips to measure approximately two to two-and-a-half times the total perimeter of the cushion. Strips measuring 7 to 9 cm wide will produce a noticeable gathered border. Join the short ends of the strips with straight seams, press the seams open, and fold the long strip lengthwise with the wrong sides together.
Draft the bear’s body as a rounded shape that fits comfortably within the cushion front. A body approximately 24 cm high and 18 cm wide works well for a medium cushion. Draw the body with slightly curved shoulders and a rounded lower edge. Add a 1 cm seam allowance around the template before cutting two mirrored pieces from the checked cotton fabric.
For the head, draw a softly rounded shape approximately 18 cm wide and 16 cm high. The upper area should be wide enough to accommodate two small ears. Cut two head pieces from plush fabric and four ear pieces. Each ear can be shaped like a small semicircle measuring about 6 cm wide, with the lower edge left straight for attachment.
Complete the fabric pattern by drafting two arms, two legs, four paw-pad shapes, and two collar pieces. The arms should be long enough to extend naturally across the cushion, while the legs should have rounded ends for the feet. Clearly label every template with the piece name, cutting quantity, fabric type, grain direction, and seam allowance before placing it on the fabric.
Sewing the Cushion Base and Gathered Ruffle
Place the ruffle strip under the presser foot and sew two parallel rows of long gathering stitches along the raw edges. Do not backstitch at the beginning or end. Gently pull the bobbin threads to gather the fabric evenly, adjusting the gathers until the ruffle fits around the complete perimeter of the cushion front.
Position the gathered ruffle around the right side of the front cushion panel, keeping the folded edge toward the center and the raw edges aligned with the panel edges. Distribute the gathers evenly, placing a little extra fullness at the corners. Pin or clip the ruffle securely, then baste it in place with a seam slightly narrower than the final seam allowance.
Apply lightweight interfacing to the wrong side of the front cushion panel if the cotton feels thin. Interfacing helps the front support the stuffed bear and reduces distortion around the attachment points. Choose a soft, flexible interfacing rather than a very stiff product, because the finished cushion should remain comfortable and gently padded.
Place the back cushion panel over the prepared front panel with the right sides facing. The ruffle will be enclosed between the two layers. Pin around all four sides, checking that no folded part of the ruffle extends accidentally into the seam. Leave an opening of approximately 12 to 15 cm along the lower edge for turning and stuffing.
Sew around the cushion using a 1 cm seam allowance. Reinforce the stitches at both ends of the opening. Trim excess bulk from the corners without cutting through the stitching, then turn the cushion right side out. Use a blunt turning tool to shape the corners carefully and arrange the ruffle so that it lies evenly around the outside.
Fill the cushion gradually with polyester stuffing. Place the filling into the corners first, then build up the center until the cushion is firm but still soft. Avoid overfilling, as excessive pressure can distort the gathered border. Fold the raw edges of the opening inward and close it with a neat ladder stitch or an invisible hand-sewn slip stitch.
Constructing the Teddy Bear and Checked Outfit
To make the ears, place each pair of plush ear pieces with the right sides together. Sew around the curved edges, leaving the straight bottom edge open. Clip the curves, turn the ears right side out, and add a very small amount of stuffing if you want them to appear more dimensional. Baste the open edges closed.
Position the ears along the upper edge of one head piece, pointing inward toward the center. Place the second head piece over the first with the right sides together, enclosing the ears between the layers. Sew around the head while leaving an opening at the lower edge. Clip the curves, turn the head out, and fill it evenly with soft stuffing.
Create the face using embroidery thread or securely attached safety eyes designed for fabric crafts. Embroidering the eyes is the safest option for an item intended for a young child. Add a small triangular nose, a curved mouth, and delicate whisker lines. Keep the expression balanced by marking the facial features lightly before stitching them permanently.
Sew each arm by placing two matching pieces right sides together. Leave the shoulder end open, clip the curved seam, turn, and stuff lightly. Repeat the method for both legs. Attach contrasting plush sections to the ends before assembling the limbs when you want the paws and feet to match the teddy bear’s face and ears.
Place the two checked body pieces right sides together and sew around the outer edge, leaving openings where the arms, legs, and head will connect. Turn the body to the right side and add a moderate amount of stuffing. The body should be flatter than a traditional stuffed toy so that it rests comfortably against the cushion surface.
Attach the arms and legs to the body with strong hand stitches, hiding the raw edges inside the openings. Sew the head to the top of the body using small ladder stitches. Check the alignment from the front before tightening the thread. Reinforce each connection several times because these areas receive the greatest amount of movement and handling.
Adding the Collar, Buttons, and Final Assembly
Draft the collar as two rounded triangular or curved pieces that meet at the center front. Cut four collar sections from white cotton and two matching pieces from lightweight interfacing. Fuse the interfacing to the wrong side of two sections, then sew each interfaced piece to an un-interfaced piece with the right sides together.
Trim the collar seam allowances, clip the curves, and turn each piece right side out. Press carefully using a temperature suitable for the fabric. Topstitch close to the edge for a crisp, professional finish. Position the two collar pieces around the bear’s neckline and secure them with discreet hand stitches.
Add a narrow folded placket down the center of the checked body to create the appearance of a button-front outfit. You can make the placket from a strip of matching fabric pressed into a double fold. Stitch both long edges neatly, keeping the strip centered from the collar to the lower body.
Sew decorative buttons down the front of the placket. Use flat, lightweight buttons and reinforce them firmly. For a baby-room decoration or a cushion that may be handled by a small child, replace real buttons with embroidered circles or fabric appliqués to reduce the risk associated with detachable small parts.
Position the completed bear in the center of the cushion front. The lower body should rest close to the bottom section, while the head remains fully visible above the collar. Pin the bear temporarily, then check the placement from a distance. Make adjustments until both sides appear balanced and the ruffle frames the bear evenly.
Attach the bear to the cushion with strong hand stitching around the back of the head, body, arms, and legs. Hide the stitches between the plush edges and the cushion fabric. Secure several points rather than stitching only around the body. This method helps the decorative bear remain stable while preserving the soft, three-dimensional appearance of the finished project.
Frequently Asked Questions
What is a Teddy bear cushion sewing tutorial Fabric Pattern?
A Teddy bear cushion sewing tutorial Fabric Pattern is a set of sewing instructions and templates for making a decorative cushion with an attached fabric teddy bear. The project usually combines a padded cushion base, a ruffled border, stuffed bear parts, clothing details, and hand-sewn embellishments.
Is this project suitable for beginners?
The basic cushion is beginner-friendly, while the teddy bear requires careful sewing around curves and small pieces. A patient beginner can complete the project successfully by working slowly, basting the parts before final stitching, and practicing curved seams on scrap fabric.
What fabric is best for the cushion?
Medium-weight cotton is one of the best options because it is easy to cut, press, sew, and decorate. Gingham is especially effective for recreating the cozy country-inspired appearance shown in the reference image. Linen blends and quilting cotton are also suitable.
What material should I use for the teddy bear’s face?
Short-pile plush, fleece, minky, or soft velour can be used for the face. Choose a material that is soft but not excessively stretchy. Very stretchy fabrics may require lightweight stabilizer to prevent the head from losing its intended shape.
How much fabric is needed?
For a medium cushion, approximately one meter of main fabric is generally enough for the cushion, ruffle, body, arms, and legs. You may need less than half a meter of plush fabric for the head and paws, plus a small piece of white cotton for the collar.
Should seam allowance be included in the pattern?
Yes. Adding a consistent 1 cm seam allowance makes assembly easier and reduces confusion. Write “seam allowance included” directly on each template. When using a pattern without allowance, trace the shape first and then draw a second line 1 cm outside it.
Can I make a removable cushion cover?
Yes. Instead of sewing the back as one solid panel, create an envelope closure with two overlapping fabric pieces. You may also install a zipper along the lower edge. In that version, insert a separate cushion form rather than stuffing the cover permanently.
How do I wash the finished cushion?
Hand washing is generally the safest method, especially when the bear contains plush fabric, decorative buttons, or detailed embroidery. Use cool water and mild detergent, avoid twisting the cushion, and allow it to air-dry completely. Test every fabric for colorfastness before sewing.
Can the buttons be replaced with safer decorations?
Yes. Embroidered buttons, felt circles, fabric appliqués, or tightly stitched decorative patches can create the same visual effect. These alternatives are recommended when the cushion will be placed in a nursery or used around babies and toddlers.
How can I enlarge or reduce the Fabric Pattern?
Resize every pattern piece by the same percentage. For example, enlarging all components to 125% maintains the original proportions. Remember that seam allowances may also increase during digital resizing, so check and redraw them to your preferred width after printing.
How can I prevent the ruffle from looking uneven?
Divide both the ruffle and cushion perimeter into four equal sections. Match the quarter marks before distributing the gathers. This technique ensures that approximately the same amount of fabric is gathered along each side and prevents excessive fullness from collecting in one area.
Can I personalize the teddy bear cushion?
You can personalize it with embroidered initials, a child’s name, a small bow, fabric-covered buttons, a pocket, or a different collar shape. You can also make coordinating pink, blue, yellow, or neutral versions while using the same teddy bear cushion sewing tutorial.
Conclusion
The Teddy bear cushion sewing tutorial Fabric Pattern brings together several enjoyable sewing techniques, including pattern drafting, ruffle gathering, cushion construction, plush-toy assembly, embroidery, appliqué, and decorative hand stitching. By preparing accurate templates and completing the project one stage at a time, you can create a polished cushion with a soft teddy bear, checked outfit, elegant collar, and beautifully gathered edge.
EASILY FIND THE PDF FOR THIS PATTERN HERE!
This project is easy to customize through different fabrics, colors, facial expressions, and decorative details. It can become a thoughtful handmade gift, a cozy sewing-room decoration, or an adorable accent for a child’s space when constructed with age-appropriate features. Leave your honest opinion about this tutorial and share your suggestions for colors, fabrics, or details that could make the next teddy bear cushion even more creative.