
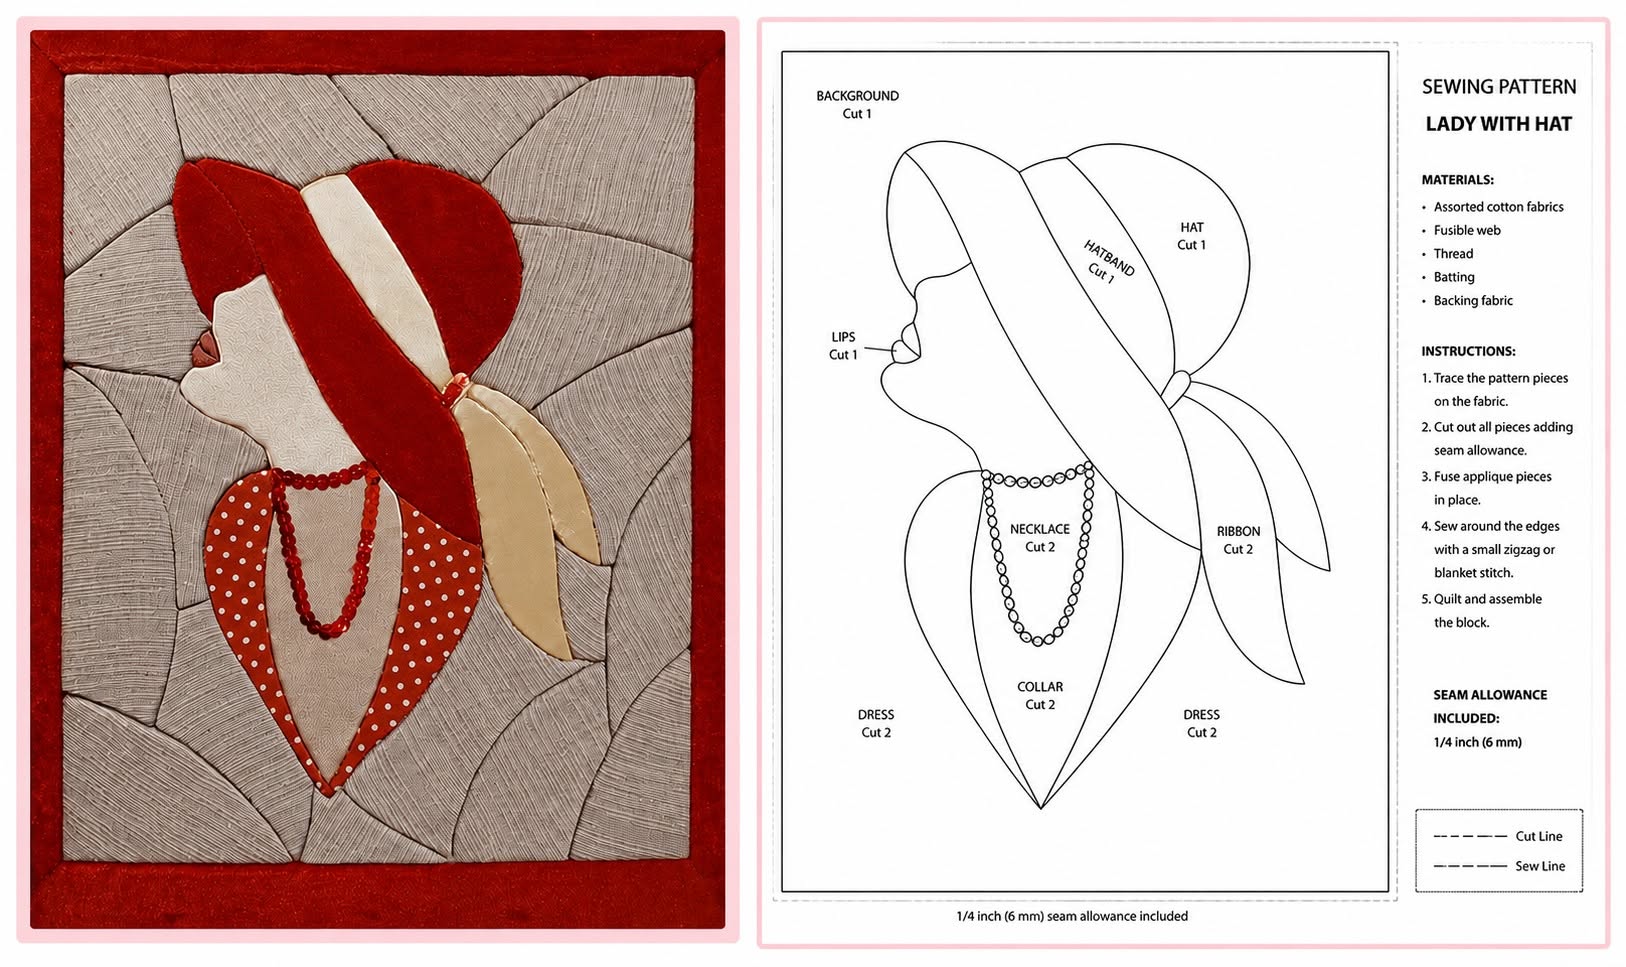
Quilt with Appliqué of a Lady in a Hat Pattern is an elegant textile project that transforms small pieces of fabric into a sophisticated portrait filled with personality, movement, and vintage charm. The design shown in the reference image features a graceful woman viewed in profile, wearing a dramatic red hat, a softly tied scarf, a polka-dot garment, and a decorative necklace. Around the central figure, curved pieces of neutral fabric create a mosaic-like background that makes the warm red details stand out beautifully. This project is suitable for quilters who enjoy artistic appliqué, fabric portraits, dimensional embellishments, and decorative wall quilts. Although the finished piece looks detailed, it can be created step by step with careful planning, simple templates, and patient stitching.
The main term Quilt with Appliqué of a Lady in a Hat Pattern describes a quilted artwork in which the portrait pieces are placed and stitched onto a fabric foundation. Appliqué is a sewing technique that uses separate fabric shapes to build an image, much like creating a picture with colored paper. In this design, the face, neck, hat, scarf, clothing, and jewelry are prepared individually before being assembled into one complete composition. The background is also made from several curved sections, giving the project a stained-glass or fabric-mosaic appearance. Because every shape contributes to the final silhouette, accurate cutting and thoughtful color selection are essential. The result can be displayed as a framed textile panel, a wall hanging, a decorative cushion front, or the centerpiece of a larger quilt.
One of the most appealing qualities of this lady in a hat appliqué quilt is the freedom it gives the maker to personalize the design. Red velvet can create a luxurious hat, while cotton, linen, satin, or felt can produce completely different visual effects. The woman’s skin tone, clothing print, scarf color, necklace style, and background fabrics may all be adapted to match a room, a special occasion, or a favorite vintage fashion theme. Beginners can simplify the pattern by reducing the number of background sections, while experienced quilters can add detailed embroidery, hand quilting, beads, sequins, or trapunto. By combining practical sewing techniques with creative fabric choices, the project becomes both an enjoyable learning experience and a unique work of textile art.
Materials and Preparation for the Appliqué Quilt
Begin your Quilt with Appliqué of a Lady in a Hat Pattern by gathering a firm foundation fabric, lightweight fusible web, tracing paper, fabric scissors, pins, matching thread, an iron, and a sewing machine. You will also need batting and backing fabric if you plan to turn the appliqué panel into a finished quilt. A removable fabric marker, small embroidery scissors, and a pressing cloth will make the construction process easier and more accurate.
DISCOVER MORE FREE PATTERNS HERE!
Choose a selection of fabrics that provides contrast without making the design feel disconnected. A soft cream or beige fabric works well for the face and neck, while rich red fabric creates the hat and clothing details. Neutral gray, taupe, or lightly striped textiles are ideal for the curved background. A small polka-dot print can be used for the shoulders, reproducing the playful vintage appearance visible in the reference project.
The term appliqué quilt pattern refers to the complete collection of shapes needed to build the image. Before cutting fabric, sketch or trace the main silhouette onto paper. Separate the drawing into individual pattern pieces, including the face, neck, hair or hat shadow, hat crown, hat brim, hatband, scarf sections, shoulders, bodice, necklace, and background panels. Number every piece so that the assembly order remains clear.
Add a seam allowance only when using turned-edge appliqué. For raw-edge fusible appliqué, the shapes can usually be cut directly on the traced lines. Remember that fusible-web templates are traced in reverse because they are attached to the back of the fabric. This is especially important for a profile portrait, since reversing the pieces accidentally will make the woman face in the opposite direction.
Prepare the foundation by cutting it slightly larger than the desired finished measurement. The extra fabric provides room for trimming and squaring the panel after the appliqué and quilting are complete. Press the foundation carefully to remove wrinkles, but avoid stretching it. A stable and smooth base helps the facial profile and curved background sections remain correctly positioned.
Before permanently attaching anything, arrange all the paper templates on the foundation. This planning stage helps you evaluate proportions, balance, and spacing. Check that the hat does not sit too close to the upper edge and that the lower clothing section has enough room beneath the necklace. Take a photo of the arrangement so you can refer to it while assembling the final fabric portrait quilt.
Creating the Lady, Hat, Clothing, and Accessories
Start the portrait by tracing each template onto the paper side of the fusible web. Leave a small space between the shapes so they can be cut apart easily. Rough-cut around each template, fuse it to the wrong side of the corresponding fabric, and follow the manufacturer’s pressing instructions. Allow the pieces to cool completely before cutting them precisely along the drawn outlines.
The face is the visual focus of the lady in a hat quilt pattern, so cut this piece slowly and carefully. Preserve the shape of the forehead, nose, lips, chin, and jawline. Small curves can be refined with short-bladed scissors. A tiny contrasting fabric piece may be added to suggest the lips, while a discreet embroidered line can define the closed eye or other facial details.
Construct the hat using several overlapping sections rather than one flat shape. Begin with the section that sits farthest behind the face, followed by the crown, brim, and decorative band. A velvet or velour fabric gives the hat a rich texture, but ordinary quilting cotton is easier for beginners. Position the brim so that it frames the face without covering the nose or mouth.
The scarf adds movement to the composition and visually connects the hat to the lower portrait. Cut two long curved pieces in cream, beige, gold, or another coordinating shade. One section can be placed behind the neck, while the second overlaps it to create the appearance of fabric tied at the back. A few stitched contour lines will make the scarf appear folded rather than completely flat.
Build the clothing with a central bodice piece and two contrasting shoulder shapes. A warm red fabric with small white dots creates a classic retro style, while the central section can use a plain neutral textile. Slightly overlap the shoulder pieces beneath the neck so there are no visible gaps. Make sure the lower point is centered and aligned with the woman’s profile.
Complete the portrait with decorative embellishments. A necklace can be created using embroidery, small beads, sequins, narrow cord, or tiny fabric circles. Secure every bead firmly, especially when the piece will be handled frequently. The embellishments should enhance the appliqué portrait quilt without overpowering the face, hat, and graceful profile that define the design.
Assembling the Curved Background and Stitching the Appliqué
The curved background gives this Quilt with Appliqué of a Lady in a Hat Pattern much of its artistic character. Create a full-size background template by drawing irregular curved lines around the portrait. The sections should resemble softly shaped mosaic pieces rather than perfect geometric blocks. Keep the curves gentle, because extremely tight curves are more difficult to sew and may cause puckering.
Transfer each background section to fabric and label it before cutting. Directional fabrics, such as fine stripes or woven lines, can be rotated to create subtle movement. This change in fabric direction helps each piece remain visible even when all the background fabrics share a similar color. Use several related neutrals instead of one identical fabric for greater depth.
There are two practical methods for assembling the background. The first is to piece the curved sections together using traditional curved seams. The second is to place raw-edge shapes directly on the foundation and secure them with fusible web. Curved piecing creates a clean, professional finish, while fusible construction is usually faster and more approachable for makers with limited quilting experience.
When using curved seams, place two neighboring sections right sides together and align their matching edges. Pin at the beginning, middle, and end before adding more pins between those points. Sew slowly with a narrow seam allowance, stopping when necessary to adjust the fabric. Press the seam toward the darker section without pulling or distorting the curve.
Once the background is complete, position the portrait pieces in layers. Begin with the elements that belong farthest behind, such as the rear scarf and large hat section. Continue with the neck, clothing, face, hat brim, hatband, and upper embellishments. Use the reference photograph or your saved layout image to confirm that every overlap is correct before pressing the pieces permanently.
Stitch around each appliqué shape using a narrow zigzag, blanket stitch, satin stitch, or straight stitch. Matching thread creates a subtle outline, while darker thread gives the project a graphic, illustrated appearance. Test the stitch on scrap fabric first. Sew slowly around the facial profile and other important curves, pivoting frequently with the needle lowered into the fabric.
Quilting, Framing, Finishing, and Creative Variations
After the appliqué is secure, prepare the quilt sandwich by placing the backing fabric wrong side up, the batting in the center, and the appliqué top right side up. Smooth all three layers and baste them with safety pins, temporary spray, or long hand stitches. Proper basting prevents the layers from shifting while you quilt around the detailed portrait.
Quilt the background first using lines that follow the curved mosaic sections. Stitching close to each seam or appliqué edge emphasizes the shapes and gives the panel gentle dimension. Additional parallel lines may be added inside larger areas. Avoid extremely dense quilting around the face, because heavy stitching can distract from the clean profile.
Outline quilting around the hat, scarf, neck, shoulders, and bodice will help the woman stand forward from the background. This technique is sometimes called echo quilting because the stitched lines repeat the contours of the appliqué. Use a walking foot for straight and gently curved lines or a free-motion foot for more expressive quilting.
To recreate the framed appearance of the reference image, add a wide red border around the quilted panel. Velvet creates a soft and luxurious frame, while cotton is easier to cut and stitch accurately. Measure the finished center before cutting the border strips. Attach opposite sides first, press them outward, and then add the remaining strips.
A narrow inner border may also be included between the mosaic background and the wide outer frame. This detail creates visual separation and prevents the central design from blending into the border. After adding the borders, trim the panel square, attach binding, and create a hanging sleeve on the back if the project will be displayed on a wall.
Creative variations can make the Quilt with Appliqué of a Lady in a Hat Pattern completely personal. Try a black hat with gold jewelry for an evening theme, pastel fabrics for a romantic look, or bold African-inspired prints for a vibrant portrait. The background can also be simplified into one solid fabric, allowing the hat and clothing to become the strongest visual elements.
Frequently Asked Questions About the Quilt with Appliqué of a Lady in a Hat Pattern
What is the best fabric for a lady appliqué quilt?
Quilting cotton is the easiest option because it is stable, widely available, and simple to press. Linen blends can add texture, while velvet is especially effective for the hat and outer border. Very slippery fabrics may require lightweight stabilizer before cutting and stitching.
Is this pattern suitable for beginners?
A simplified version is suitable for confident beginners. New quilters should use fusible raw-edge appliqué, a solid background, and a limited number of large shapes. The curved mosaic background and detailed embellishments can be added after the basic portrait has been completed successfully.
How do I prevent the appliqué edges from fraying?
Apply fusible web correctly and stitch around all raw edges using a narrow zigzag, blanket stitch, or satin stitch. A small amount of fabric sealant may be used only when appropriate for the material, but stitching remains the most reliable and attractive solution.
Should I wash the fabrics before beginning?
Prewashing is recommended when using cotton fabrics that may shrink or release excess dye. This is particularly important for strong red fabrics placed beside cream or beige sections. After washing, press the fabrics carefully before tracing and cutting the templates.
Can the portrait be sewn by hand?
Yes. Needle-turn appliqué creates smooth, elegant edges and is ideal for a traditional handmade finish. Use a fine needle, matching thread, and small stitches. Hand embroidery can also be used for facial lines, jewelry, decorative hat details, and clothing accents.
What size should the finished quilt be?
The size depends on its intended use. A small panel can measure approximately 30 by 40 centimeters, while a larger wall hanging may measure 50 by 70 centimeters or more. Enlarge all template pieces at the same percentage to preserve the portrait’s proportions.
How can I make the face look natural?
Focus on the silhouette rather than adding too many details. The forehead, nose, lips, chin, and neck should form one smooth, recognizable line. Use minimal embroidery for the eye and mouth, and avoid heavy stitching that may make the expression appear harsh.
Can I make the project without fusible web?
Yes. You can use needle-turn appliqué, freezer-paper templates, glue-basted appliqué, or traditional turned-edge methods. Fusible web is simply one of the fastest options. The best method depends on your experience and the type of finish you prefer.
How should I choose colors for the design?
Select one dominant color, one supporting color group, and several quiet neutrals. In the reference design, red is dominant, cream supports the portrait, and gray-beige fabrics form the background. This balanced palette keeps the composition sophisticated and easy to understand.
What type of thread is best for appliqué?
A fine cotton or polyester thread works well. Choose thread that closely matches each fabric for an understated finish. For a stronger illustrated outline, use a slightly darker neutral thread throughout the project. Always test tension and stitch width on scraps first.
Can this appliqué pattern be used for other items?
Yes. The portrait can decorate a cushion, tote bag, fabric book cover, table runner, jacket panel, or framed textile artwork. When making an item that will be washed regularly, secure the edges and embellishments more firmly than you would for a decorative wall hanging.
How do I keep the background from becoming too busy?
Use fabrics from the same neutral color family and vary only their texture, stripe direction, or value. Reserve bold prints for the clothing or hat. This approach allows the curved background to remain interesting while keeping attention on the central lady appliqué design.
Conclusion
Creating a Quilt with Appliqué of a Lady in a Hat Pattern is a rewarding way to combine portrait art, quilting, fabric selection, appliqué, embroidery, and decorative embellishment. The process begins with preparing accurate templates and choosing fabrics with clear contrast. The portrait is then constructed in layers, starting with the background elements and continuing through the face, hat, scarf, clothing, and jewelry. Careful stitching around each shape preserves the elegant silhouette and makes the appliqué durable. The curved neutral background adds movement and frames the woman without competing with her dramatic red hat. Quilting along the mosaic sections and around the portrait creates texture, while a wide coordinating border gives the finished panel a polished, framed appearance. Whether you reproduce the traditional red-and-neutral palette or design a completely new color combination, the same techniques can be used to create a beautiful and personal textile portrait.
EASILY FIND THE PDF FOR THIS PATTERN HERE!
This project can be simplified for beginners or enriched with advanced details for experienced quilters. Take time to test fabrics, arrange the pieces before fusing, and enjoy the gradual transformation of individual shapes into a graceful figure. After making your own Quilt with Appliqué of a Lady in a Hat Pattern, please leave your sincere opinion about the project and share suggestions for colors, fabrics, embellishments, or creative variations that could inspire other sewing and quilting enthusiasts.