
The Crochet Cutlery Holder with Flower Tutorial Pattern is a charming way to combine practical table organization with the warmth of handmade décor. Inspired by blooming flowers, green leaves, and garden colors, this crochet project transforms an ordinary place setting into something creative and memorable. Each holder works like a small decorative pocket where you can place a fork, spoon, knife, or napkin. The finished piece is ideal for spring lunches, Easter celebrations, summer gatherings, garden parties, family dinners, and handmade gifts. Although the design looks detailed, it can be created with basic crochet techniques and a little patience.
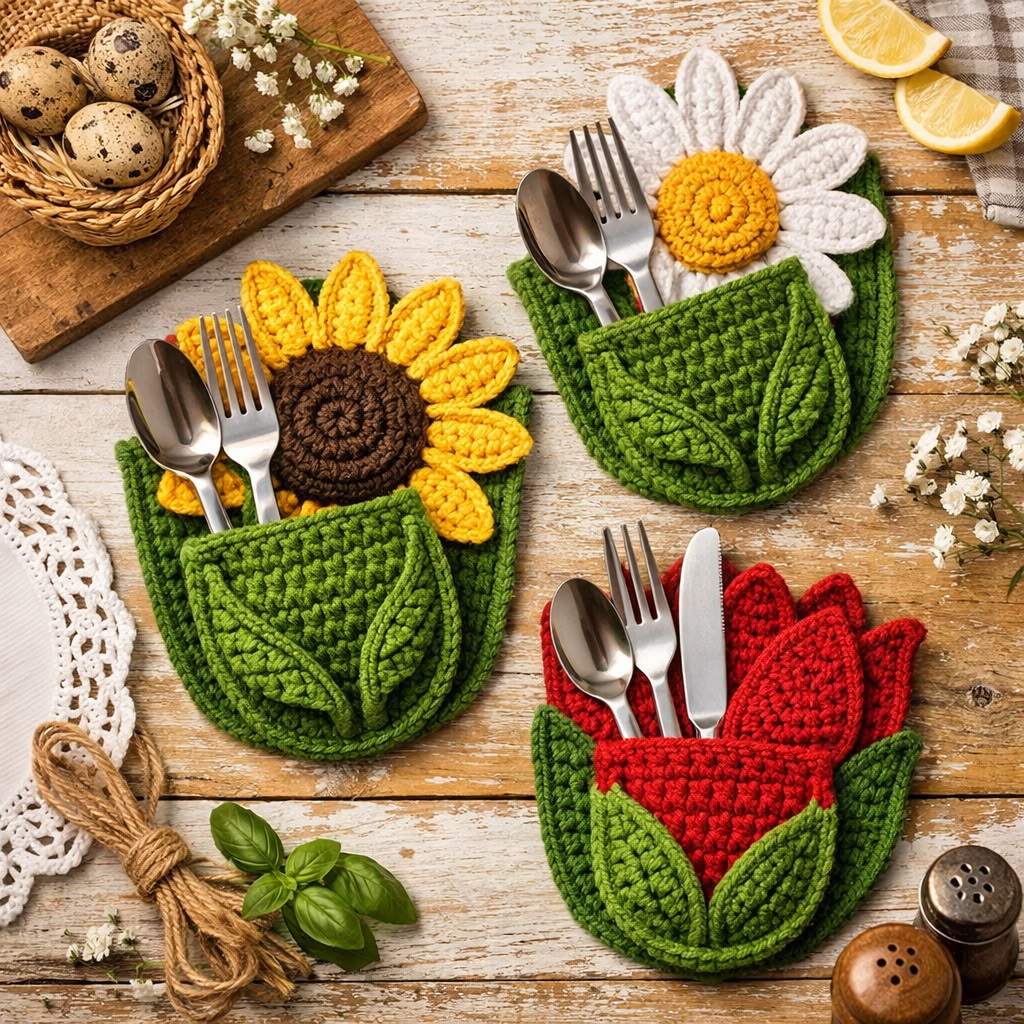
One of the best features of this crochet flower cutlery holder is its versatility. You can make a sunflower with yellow petals and a brown center, a daisy with white petals and a golden center, or a vibrant red flower inspired by tulips or poinsettias. The green pocket represents leaves surrounding the flower, creating a natural and dimensional appearance. The colors can also be customized to match a tablecloth, seasonal decoration, wedding theme, or personal preference. Cotton yarn is especially suitable because it provides structure, durability, and clean stitch definition while remaining easy to wash.
This tutorial explains the project from beginning to end, including the essential materials, crochet abbreviations, pocket construction, flower pieces, leaves, assembly, and finishing details. The instructions are designed to be approachable for confident beginners while still offering enough creative possibilities for experienced crocheters. Before starting the complete Crochet Cutlery Holder with Flower Tutorial Pattern, read through every stage and prepare all materials. Making a small test swatch is also recommended because yarn thickness and individual tension may slightly change the finished measurements.
Materials, Crochet Abbreviations, and Pattern Preparation
For one holder, you will need medium-weight cotton yarn in green and at least two flower colors. A sunflower version requires green, yellow, and brown, while a daisy version uses green, white, and yellow. You will also need a crochet hook that matches your yarn, usually between 3.5 mm and 4.5 mm, scissors, a yarn needle, stitch markers, and a measuring tape. Choose firm cotton yarn so the pocket can support the weight of metal cutlery without stretching excessively.
DISCOVER MORE FREE PATTERNS HERE!
The main term Crochet Cutlery Holder with Flower Tutorial Pattern refers to a complete set of instructions for making both the functional pocket and its decorative flower elements. “Crochet” describes the technique of creating fabric with yarn and a hook. “Cutlery holder” refers to the pocket that stores utensils, while “flower tutorial pattern” describes the guided construction of petals, flower centers, and leaf details. Understanding the full term helps clarify that this is both a decorative and useful crochet project.
Several standard American crochet abbreviations are used throughout the tutorial. CH means chain, SL ST means slip stitch, SC means single crochet, HDC means half double crochet, DC means double crochet, and TR means treble crochet. ST means stitch, STS means stitches, SP means space, SK means skip, and REP means repeat. The abbreviation YO means yarn over, while FO means fasten off.
The finished holder should measure approximately 6 to 7 inches wide and 6 inches tall, depending on the yarn and hook size. This size is generally suitable for a standard spoon, fork, and knife. If you plan to use oversized utensils, add a few stitches to the foundation chain and work extra rows before shaping the pocket. Always place the cutlery on the unfinished crochet panel to check the dimensions before completing the assembly.
A gauge of approximately 16 single crochet stitches and 18 rows in a 4-inch square should create a stable fabric. Exact gauge is not essential for this decorative pattern, but the stitches should be tight enough to prevent the utensils from slipping through large gaps. When the fabric feels too loose, use a smaller crochet hook. When it feels extremely stiff and difficult to work, move up one hook size.
Before beginning, decide which flower design you want to create. The pocket construction remains almost the same for every variation, so you can make several holders with different flowers while maintaining a coordinated set. Prepare the green yarn for the base and leaves, then separate the colors needed for the center and petals. Keeping the yarn organized will make the crochet cutlery pocket pattern easier and more enjoyable to complete.
How to Crochet the Green Cutlery Pocket
Begin the crochet cutlery holder with green yarn. Make a slip knot and CH 27. Starting in the second chain from the hook, work 1 SC in each CH across, giving you 26 stitches. CH 1 and turn. Work one single crochet in every stitch for approximately 22 rows, or until the rectangular panel measures about 6 inches tall. Keep the side edges straight by counting the stitches after every row.
To give the base a softly rounded shape, begin decreasing near the bottom portion. On the next row, CH 1, work one single crochet decrease over the first two stitches, crochet across until two stitches remain, and make another single crochet decrease. You should now have 24 stitches. Repeat this decrease row two more times, reducing the panel to 20 stitches. These gentle decreases create the rounded flowerpot or leaf-basket appearance seen in the finished holder.
Make a second green panel using the same foundation chain, but crochet only 12 to 14 straight rows. This shorter section will become the front pocket. You may keep its upper edge straight or create a shallow center dip. For a dipped edge, work across the row using single crochet, half double crochet near the sides, and slip stitches through the center stitches. This subtle shaping allows the flower to remain visible while making it easier to insert the utensils.
Place the shorter panel over the lower portion of the larger back panel. Make sure the bottom and side edges align evenly. Using green yarn, join the pieces by working single crochet stitches through both layers along the first side, around the bottom, and up the opposite side. Do not crochet across the top because this opening must remain accessible. Work slowly around the bottom curves so the stitches stay smooth rather than becoming crowded.
To create a decorative upper border, attach green yarn to one top corner of the pocket. Work 1 SC, 1 HDC, 1 DC, 1 HDC, and 1 SC across small groups of stitches to form gentle waves. Another option is to work simple reverse single crochet for a corded edge. The border should be attractive but not too bulky, because heavy edging can make it difficult to place the fork, spoon, and knife inside.
Test the finished pocket before adding decorations. Insert the cutlery and check that the opening is wide enough and the base is strong. The utensils should sit securely without pulling the front section downward. When additional support is needed, sew a line of small running stitches along the bottom seam using a yarn needle. This reinforcement is especially helpful when the Crochet Cutlery Holder with Flower Tutorial Pattern will be used frequently.
Crocheting the Flower, Petals, and Decorative Leaves
To create the sunflower center, use brown yarn and make a magic ring. Work 6 SC into the ring and pull it closed. In the next round, make 2 SC in each stitch for a total of 12 stitches. In Round 3, repeat 1 SC in the next stitch, 2 SC in the following stitch around, giving you 18 stitches. Continue increasing evenly until the center measures approximately 2½ to 3 inches across.
For extra texture, work the final round of the sunflower center through the back loops only, or alternate single crochet and small bobble stitches. A simple bobble can be made by working several unfinished double crochet stitches into the same stitch and closing them together. Texture helps imitate the seeds in the center of a sunflower. Fasten off with a long yarn tail, which will later be used to attach the center to the petals and back panel.
To make each sunflower petal, join yellow yarn to any stitch around the center. CH 7, then start in the second chain from the hook. Work 1 SC, 1 HDC, 2 DC, 1 HDC, and 1 SC along the chain. Join the petal to the next available stitch with a slip stitch. Repeat this sequence around the center until the flower looks full. Depending on the center size, you may create between 10 and 14 petals.
For the white daisy variation, use a yellow center and white petals. Make longer petals by chaining 8 and working 1 SC, 1 HDC, 3 DC, 1 HDC, and 1 SC back along the chain. Attach each petal evenly around the center. Keep the tension consistent so all petals have a similar shape. After finishing, gently arrange them with your fingers and block the flower if necessary to help the petals lie evenly.
Create two or three decorative leaves with green yarn. CH 14, then work along one side of the chain as follows: 1 SC, 2 HDC, 4 DC, 3 TR, 2 DC, and 1 SC. Place three single crochet stitches in the last chain to turn around the tip. Continue along the opposite side in reverse order. Slip stitch into the first stitch and fasten off, leaving a long tail for sewing.
Position the flower on the upper section of the large back panel, allowing the petals to rise above the front pocket. Sew the flower center firmly in place, but leave the outer sections of some petals unattached for a natural three-dimensional effect. Place the leaves over the front pocket and angle their tips toward the center. Sew around the lower and side edges of each leaf while leaving the upper tip slightly raised. This layered assembly produces the garden-inspired appearance that makes the Crochet Cutlery Holder with Flower Tutorial Pattern distinctive.
Finishing, Care Instructions, Creative Variations, and FAQ
After all pieces are attached, weave every yarn end securely into the wrong side of the crochet fabric. Move the yarn needle through several stitches in one direction, then turn and weave it back through another group of stitches. Trim only after the yarn tail is fully secured. Loose ends can become visible or cause decorative pieces to detach, so this finishing stage should never be rushed.
Light blocking can improve the shape of the holder. Place the project on a clean blocking mat, gently adjust the flower petals and leaves, and pin them into position. Mist the crochet lightly with water and allow it to dry completely. Avoid stretching the front pocket because it must remain firm. Blocking is particularly helpful when cotton petals curl or when the two green panels do not initially lie flat.
The design can be personalized for different seasons. Use pastel flowers for Easter, red and white flowers for holiday dinners, orange and golden yarn for autumn, or soft neutral shades for rustic weddings. You can also embroider small veins on the leaves with lighter green yarn. A tiny crocheted ladybug, butterfly, button, or wooden tag may be added as a decorative accent, provided it does not interfere with the cutlery opening.
For a coordinated handmade table, crochet one holder for each guest and alternate the flowers. A table setting with sunflowers, daisies, tulips, and other colorful blooms can create a cheerful garden theme. You may also insert a folded napkin behind the utensils. When giving the holders as gifts, combine four or six pieces into a matching set and wrap them with a simple cotton ribbon.
Wash the holders gently by hand in cool or lukewarm water with mild soap. Press out excess water without twisting the flowers, then reshape every piece and lay it flat to dry. Machine washing may be possible when the yarn label allows it, but a mesh laundry bag and gentle cycle are recommended. Do not use high heat because cotton can shrink and synthetic yarn may lose its shape.
The following FAQ addresses common questions about this pattern, including sizing, yarn selection, beginner techniques, and practical use. These answers can help you adjust the instructions while preserving the overall appearance and functionality of the finished project.
Frequently Asked Questions
Is the Crochet Cutlery Holder with Flower Tutorial Pattern suitable for beginners?
Yes. A beginner who understands chains, single crochet, half double crochet, double crochet, slip stitches, and basic increases can complete the project. The holder can also be simplified by making a plain rectangular pocket and attaching an easy flower. More advanced textures, shaped borders, and layered leaves are optional.
What yarn is best for a crochet cutlery holder?
Medium-weight cotton yarn is one of the best choices because it creates a sturdy, washable fabric with clear stitches. Cotton blends may also work well. Very soft or fuzzy yarn is less suitable because it can stretch, hide the flower details, and collect food particles more easily.
Can I change the size of the holder?
Yes. Add chains to the foundation when you need a wider pocket and crochet additional rows when you need more height. Remember that each extra chain usually adds one stitch. Check the holder against your actual cutlery before sewing the panels together.
How many holders can I make from one skein of yarn?
The number depends on the skein size, yarn weight, flower design, and finished dimensions. A standard skein of medium-weight green cotton may produce several base pockets. Smaller amounts of yellow, white, brown, or red yarn are usually enough for multiple flower centers and petals.
Should the flower be sewn to the front pocket or the back panel?
The main flower should normally be attached to the taller back panel. This placement allows it to remain visible after the utensils are inserted. Leaves can be sewn to the front pocket to create depth and conceal part of the flower base.
How can I stop the pocket from stretching?
Use a smaller crochet hook, maintain firm tension, choose cotton yarn, and reinforce the lower seam. You can also work the pocket with single crochet stitches rather than taller stitches. A closely crocheted fabric provides better support for heavier utensils.
Can I use the holder for a cloth napkin?
Yes. A folded cloth napkin can be placed inside the pocket alone or behind the utensils. Make the foundation chain slightly longer when you intend to hold both cutlery and a thick napkin.
How can I make every flower petal the same size?
Count the chains and stitches carefully for every petal. Use stitch markers to identify the first and last petal positions. Consistent yarn tension is also important. Blocking the completed flower can correct minor differences and improve the overall shape.
Can these holders be used for formal celebrations?
They can be adapted for weddings, anniversaries, baby showers, and formal dinners by choosing elegant colors. Cream, white, sage green, dusty rose, gold, and soft beige create a refined look. Keep embellishments subtle and make every holder with consistent measurements.
Are buttons or beads safe to add?
Buttons and beads can be used as decorations when they are sewn securely, but they should be avoided when the holders may be handled by young children. Decorative additions should also be washable and positioned away from the area that touches the utensils.
How long does one crochet cutlery holder take to make?
The time varies according to experience and flower complexity. A simple version may take a few hours, while a highly textured flower with several leaves may require longer. Making all the bases first and then producing the flowers in batches can make a complete set more efficient.
Can leftover yarn be used for this pattern?
Yes. This is an excellent project for using leftover yarn because the petals, centers, and leaves require relatively small amounts. Make sure all selected yarns have similar thickness and compatible washing instructions for a neat and durable result.
Conclusion
The Crochet Cutlery Holder with Flower Tutorial Pattern combines basic crochet construction with colorful floral decoration to create a practical accessory for the dining table. Throughout this tutorial, you learned how to prepare the materials, understand the essential crochet abbreviations, make a sturdy green pocket, crochet a textured flower center, shape individual petals, create decorative leaves, assemble the layers, and finish the project securely.
EASILY FIND THE PDF FOR THIS PATTERN HERE!
This pattern can be adapted into sunflowers, daisies, tulips, poinsettias, or imaginative flowers in any color combination. By changing the foundation chain, row count, petal length, and decorative details, you can create a personalized collection for different occasions. The most important points are maintaining firm tension, checking the pocket size with real utensils, securing the seams, and carefully weaving in every yarn end. A handmade table accessory brings color, personality, and craftsmanship to everyday meals and special celebrations. After completing your holder, please leave your sincere opinion about the pattern and share suggestions for future crochet projects. Your ideas can inspire new flower styles, color combinations, and creative variations for this useful handmade design.