
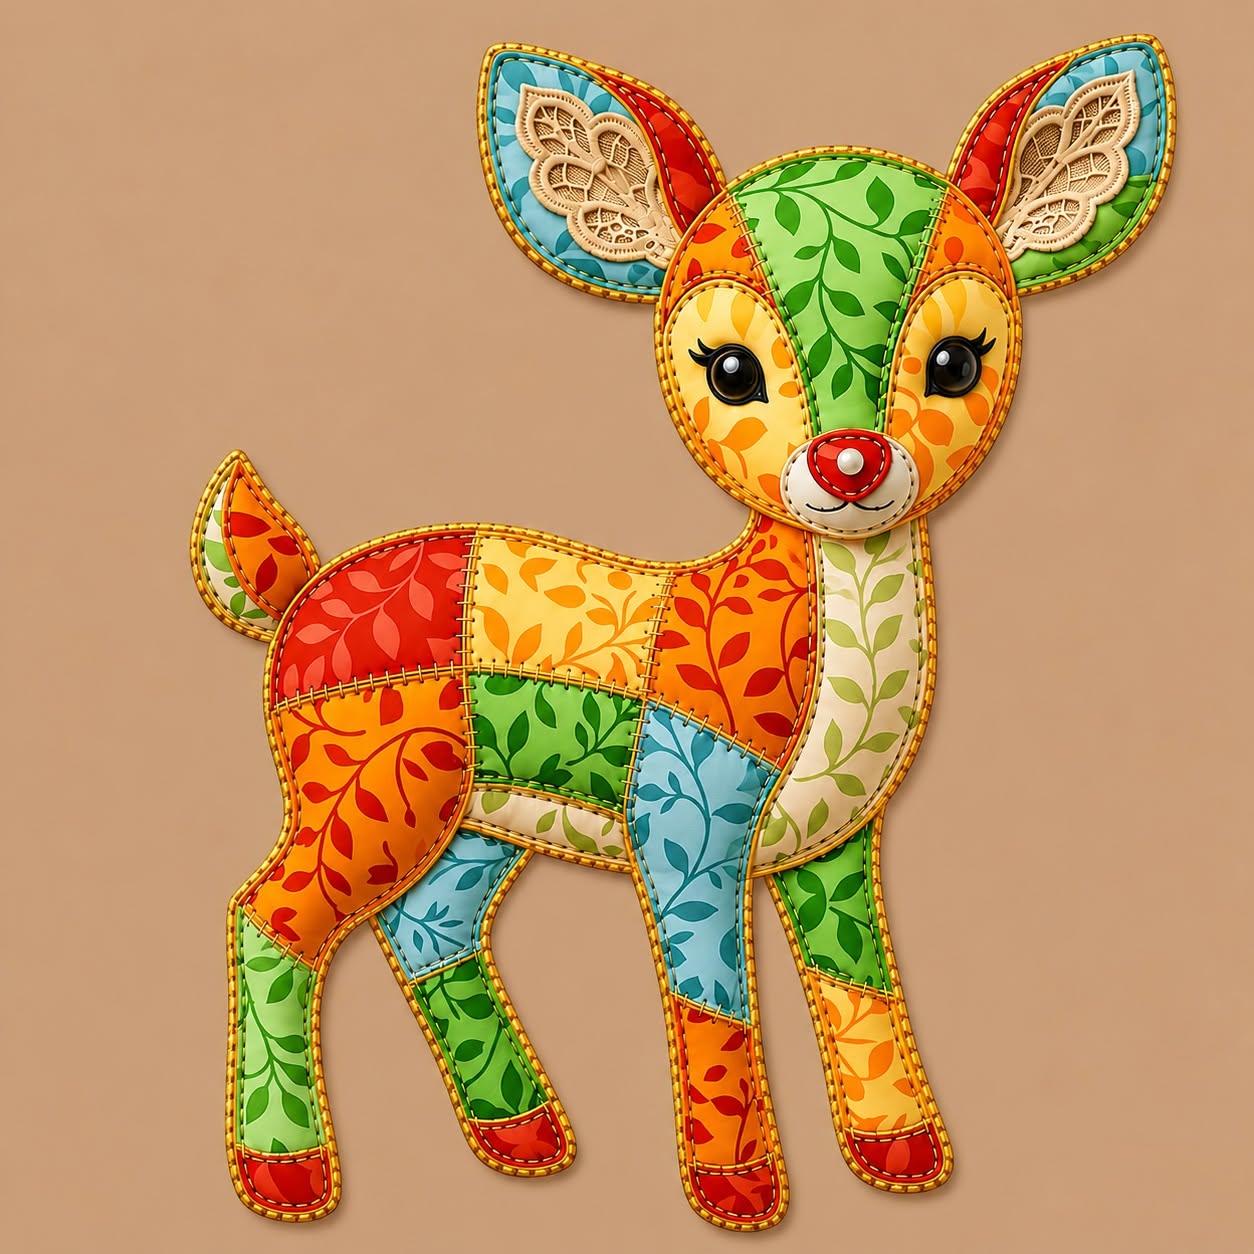
Patchwork Deer Complete Sewing and Quilting Fabric Pattern is a charming fabric-art project that combines traditional patchwork, decorative appliqué, light quilting, and detailed hand or machine stitching. Inspired by the colorful deer shown in the reference image, this project uses small pieces of printed cotton fabric to create a cheerful animal decoration with a dimensional, handcrafted appearance. The finished deer can be used as nursery wall art, a sewing-room decoration, a seasonal ornament, or a thoughtful handmade gift. Because the design is assembled from separate fabric sections, it is also an excellent way to use coordinated scraps left over from previous quilting projects. The combination of warm orange, red, green, yellow, cream, and light-blue fabrics gives the deer a playful personality while keeping the overall composition balanced. Beginners can simplify the embellishments, while experienced makers can add embroidery, lace, beads, pearls, and more advanced quilting details.
The term patchwork deer describes a deer-shaped textile design created by joining several pieces of fabric instead of cutting the entire animal from one material. Each section of the body can feature a different print, allowing the maker to experiment with color, direction, contrast, and scale. The phrase complete sewing pattern refers to all the templates needed to construct the main parts, including the head, muzzle, ears, body, tail, neck, and legs. A quilting fabric pattern also considers the internal layers of the project, such as batting, stabilizer, backing fabric, and decorative topstitching. These layers help the finished deer remain firm and give it the softly padded appearance visible in the image. Although the example includes elegant pearl-like trim and lace accents, these elements are optional and can be replaced with piping, ric-rac, blanket stitching, or a simple turned edge. The most important goal is to create a neat silhouette that clearly resembles a friendly woodland deer.
Before beginning the Patchwork Deer Complete Sewing and Quilting Fabric Pattern, select fabrics that work together without looking too uniform. Medium-scale leaf prints, small floral patterns, dots, and subtle geometric designs are especially suitable because they add visual interest without hiding the shape of the animal. Choose at least five coordinating cotton fabrics, one backing fabric, lightweight batting, and a firm fusible interfacing or stabilizer. You will also need matching thread, contrasting embroidery thread, pins or fabric clips, a fabric marker, sharp scissors, a sewing machine, and a hand-sewing needle. Optional supplies include small beads, faux pearls, lace appliqués, safety eyes, felt, buttons, and fabric-safe glue. Always choose securely attached embellishments when the finished piece will be displayed near children, and avoid loose beads when making an item intended for a baby’s room or play area. Preparing all materials before cutting will make the construction process smoother and reduce the risk of inconsistent results.
Planning the Patchwork Deer Pattern and Choosing Materials
The first step is deciding the final size of your deer. A wall decoration can be approximately 16 to 24 inches tall, while a smaller ornament may be only 8 to 12 inches tall. Draw the complete deer silhouette on paper or print a template at the desired scale. The silhouette should include a rounded body, a long curved neck, a softly shaped head, four narrow legs, two large ears, and a small raised tail. Keep the lines smooth because sharp corners are more difficult to sew and turn neatly.
DISCOVER MORE FREE PATTERNS HERE!
Divide the body into several patchwork sections before creating the individual templates. The body can be separated into six or eight blocks, while the head may be divided into a center forehead panel and two side face panels. The legs can each contain two or three fabric sections, creating the colorful pieced effect seen in the reference project. Mark every piece with a name, number, grainline arrow, and matching point. These markings are essential for reassembling the pattern correctly after the pieces have been cut apart.
Add a seam allowance around every section that will be pieced by machine. A ¼-inch seam allowance works well for small quilting projects, although beginners may prefer a ⅜-inch allowance for easier handling. Add approximately ½ inch around the outside silhouette when using the turned-edge method. When working with raw-edge appliqué, the outer allowance may not be necessary because the edges will be secured with satin stitch, blanket stitch, or decorative trim. Clearly write the chosen allowance on the pattern pieces so it remains consistent.
The expression sewing and quilting fabric pattern means that fabric choice affects both appearance and construction. Quilting cotton is recommended because it is stable, easy to cut, and available in many coordinating prints. Avoid mixing very stretchy fabrics with firm cotton unless they are stabilized first. Thin fabrics can wrinkle when quilted, while heavy upholstery materials may make small curves difficult to manage. Prewashing cotton is optional for decorative wall art but recommended when the project may eventually be washed.
Create a color map before cutting. Use warm colors such as orange, yellow, and red for areas you want to emphasize, including the face, shoulders, hooves, and tail. Place cooler greens and blues in the central body or legs to create contrast. Cream fabric can be used on the neck, muzzle, or belly to give the eye a resting place. Repeating each main color in at least two locations will help the deer look coordinated rather than randomly assembled.
Prepare a test sample with two pieces of fabric, interfacing, batting, and decorative stitching. This sample allows you to check thread tension, stitch length, needle size, and the thickness of the finished layers. It is especially useful when adding pearl trim or lace because decorative materials may require hand sewing. Testing first prevents damage to the completed patchwork surface. It also helps you decide whether the deer should feel soft and flexible or firm enough to hang without a frame.
Cutting and Sewing the Colorful Patchwork Sections
Trace every pattern piece onto the wrong side of the selected fabrics. Pay attention to the direction of leaves, flowers, or other printed motifs. The design will look more polished when the prints follow the natural direction of the deer’s body. For example, vertical vines can emphasize the length of the neck and legs, while curved leaves can follow the shape of the chest. Flip asymmetrical templates when necessary so that the finished pieces face the correct direction.
Cut the fabric accurately with sharp scissors or a rotary cutter. Place each cut section beside its labeled paper pattern to avoid confusion. Small pieces can easily be reversed, especially around the face and ears. Arrange the entire deer on a large table before sewing anything together. This dry layout gives you one final opportunity to adjust colors, move busy prints away from each other, and confirm that every section is present.
Begin piecing the body sections using a straight stitch and the seam allowance selected during the planning stage. Join small groups first, press each seam, and then connect those groups to complete the body panel. Pressing is an important part of patchwork sewing because it keeps the surface flat and makes matching intersections easier. Press the seams to one side when possible, alternating directions so bulky areas can nest together. Use a pressing cloth if the fabric contains metallic details or delicate embellishments.
Assemble the head in the same manner. Sew the two side face sections to the central forehead panel, carefully matching the curves. Clip into the seam allowance without cutting through the stitches so the fabric can spread smoothly when pressed. Construct the muzzle separately using cream or pale fabric and a small contrasting nose section. The muzzle can later be appliquéd onto the face, giving the deer a slightly raised and dimensional expression.
Piece each leg separately and keep the front and back legs clearly labeled. The leg shapes may appear similar, but their angles should follow the body naturally. Add darker red, brown, or orange fabric at the bottom to suggest hooves. Reinforce the narrow leg seams with a shorter stitch length because these areas may experience extra tension during turning and assembly. After stitching, trim bulky seam allowances and press the legs carefully.
Construct the ears and tail last. Each ear can have an outer patchwork layer, a lining, lightweight batting, and an optional lace insert. Sew the layers right sides together, leaving the bottom edge open, then clip the curves and turn the ear right side out. Topstitch close to the edge to sharpen the shape. The tail can be created using the same method, with two or three small fabric sections joined before the front and backing layers are sewn together.
Layering, Quilting, and Assembling the Deer
Place the completed patchwork body over lightweight batting and backing fabric. Baste the layers with safety pins, temporary spray, or long hand stitches. Quilt along the patchwork seam lines to emphasize the individual fabric sections. This technique is sometimes called stitching in the ditch, and it creates gentle definition without covering the printed fabrics. Decorative stitching can also be added slightly inside each patch to create a hand-finished outline.
Repeat the layering process for the head and legs. Use thin batting around the face so the smaller details do not become bulky. If the deer will be mounted on a wall rather than stuffed, firm fusible stabilizer can be added behind the backing. The stabilizer will help the neck and legs maintain their shape. Trim all quilted units carefully, checking that the original silhouette has not changed during stitching.
Attach the legs to the body using the construction method best suited to the finished purpose. For a flat wall appliqué, overlap the upper edges of the legs behind the body and secure them with strong machine stitching. For a lightly dimensional decoration, place the leg pieces right sides together with matching back pieces, sew around them, turn, and insert a small amount of polyester filling. The legs can then be hand sewn to the body using a ladder stitch.
Position the neck and head so the deer has a natural, upright posture. The neck should connect firmly to the front of the body, and the head should sit slightly forward rather than directly above it. Pin the parts in place and view the project from a distance before stitching. Small changes in the head angle can greatly affect the expression. Once satisfied, secure the layers with repeated machine stitches or small, strong hand stitches hidden beneath the decorative edging.
Insert the ears behind the upper head before closing or binding the edge. Angle them outward to create the alert, gentle appearance of a young deer. Attach the tail near the upper back of the body, pointing slightly upward. Make sure all narrow attachments are reinforced. Decorative pieces can become heavier after beads, trim, and lace are added, so the structural seams should be completed before embellishment begins.
Finish the outer silhouette using bias binding, satin stitching, a turned edge, or hand-applied trim. The pearl-like border in the reference image creates an elegant outline around the entire animal. To reproduce that effect, use a continuous strand of faux pearl trim and sew it securely with strong thread, catching the trim at regular intervals. For a washable project, cotton piping or narrow fabric binding is more practical. The border should enhance the silhouette without covering too much of the patchwork.
Creating the Face and Adding Professional Finishing Details
The face is the emotional center of the Patchwork Deer Complete Sewing and Quilting Fabric Pattern, so take time when positioning the eyes. Temporary placement dots can be marked with an erasable fabric pen. Check that the eyes are level and evenly spaced before attaching them. Safety eyes may be used for decorative projects with enclosed backs, while embroidered eyes are the safest choice for items displayed in a child-friendly environment.
To create embroidered eyes, begin with an oval shape in black thread and fill it with closely spaced satin stitches. Add a small white highlight near the upper portion of each eye to create a lively expression. Eyelashes can be made with three or four curved stitches extending from the outer corners. Another option is to use layered felt circles secured with blanket stitch. Avoid relying only on glue, since glued details may loosen over time.
Construct the nose from red fabric, felt, or a covered button. A rounded triangular shape works well and gives the deer a sweet, recognizable appearance. Place the nose at the center of the pale muzzle and outline it with contrasting thread. Add a small pearl, white stitch, or fabric highlight to mimic reflected light. The mouth can be suggested with one short curved line beneath the nose rather than a large embroidered smile.
Add lace appliqués inside the ears for a delicate decorative accent. Trim the lace to follow the inner ear shape and attach it with tiny hand stitches in matching thread. The reference design uses light lace against blue and green fabric, creating contrast without overwhelming the patchwork. Floral cotton appliqués, felt shapes, or simple embroidery can be substituted. Keep both ears visually balanced even when the fabrics are different.
A small cluster of pearls or beads can be attached around the neck to resemble a necklace. For improved durability, stitch each bead individually rather than passing the thread through the entire row only once. Knot the thread securely at intervals so one broken stitch will not release every bead. Fabric rosettes, a tiny bow, a felt flower, or embroidered leaves are good alternatives for projects that need to remain soft and washable.
Complete the project by inspecting all seams, removing visible basting threads, and trimming loose fibers. Add a hanging loop to the back if the deer will be displayed on a wall. A loop made from sturdy ribbon can be stitched behind the head and reinforced with a small fabric patch. Lightly press the finished deer from the back using low heat and a pressing cloth. Do not place a hot iron directly over plastic eyes, faux pearls, beads, or lace.
Frequently Asked Questions About the Patchwork Deer Pattern
What is the best fabric for a patchwork deer?
Quilting cotton is usually the best choice because it is stable, easy to cut, and available in a wide variety of colors and prints. Cotton fabric also accepts interfacing and quilting stitches well. Similar-weight cotton fabrics should be used throughout the project to prevent distortion. Small amounts of felt or lace can be added for facial features and ear details.
Can beginners make this sewing project?
Yes. Beginners can successfully create the Patchwork Deer Complete Sewing and Quilting Fabric Pattern by simplifying the number of patchwork sections. Instead of dividing the body into eight pieces, begin with four larger sections. Use raw-edge appliqué for the muzzle and face details, and choose fabric binding instead of bead trim. Careful labeling and accurate seam allowances are more important than advanced sewing experience.
Does the pattern need batting?
Batting is recommended when you want a padded, quilted appearance. Lightweight cotton or polyester batting gives the fabric gentle dimension and makes the decorative stitching more visible. For a completely flat appliqué, batting can be omitted and replaced with fusible stabilizer. Avoid very thick batting because it can make the narrow legs and small facial curves difficult to sew.
How can the deer be made washable?
Use washable cotton fabric, polyester or cotton batting, colorfast thread, and fabric binding. Replace glued decorations with embroidered details or securely sewn appliqués. Avoid plastic pearls, delicate lace, and decorations that may discolor or detach. Wash the finished piece gently in cold water and allow it to air-dry flat. Always test the fabrics before construction when regular washing is expected.
How do I enlarge or reduce the deer template?
Resize every pattern piece by the same percentage. When enlarging the project, increase both the internal patchwork templates and the complete outer silhouette together. Keep the seam allowance unchanged after resizing rather than enlarging it with the design. Print a small test section and measure a marked reference line to confirm the printer scale before cutting fabric.
Can fabric scraps be used?
Yes. This project is particularly suitable for fabric scraps because many of the sections are small. Select scraps with similar weight and quality, press them before cutting, and stabilize very thin pieces. A controlled color palette will help scraps from different fabric collections look intentional. Repeating a few colors across the face, body, tail, and legs creates visual unity.
What stitch is best for outlining the patchwork?
A regular straight stitch is suitable for quilting along pieced seams. Blanket stitch works well for raw-edge appliqué, while satin stitch produces a more solid outline. Hand quilting with running stitch creates a traditional appearance. The best choice depends on the desired style, but all stitches should be tested on layered fabric before being used on the finished deer.
How can I keep the legs and neck from bending?
Apply firm fusible interfacing to the wrong side of the fabric before quilting. An additional stabilizer layer can be placed between the batting and backing. Keep the batting thin, quilt the layers evenly, and reinforce the connection points between the body, neck, and legs. For a large wall decoration, a hidden felt or canvas backing can provide additional support.
Are beads and safety eyes suitable for children’s items?
Small beads and detachable plastic parts can present a hazard if they become loose. For decorations placed near babies or young children, embroidered eyes, noses, and accents are a safer choice. The finished deer should be treated as decorative textile art unless every component has been designed and tested for use as a toy. Secure stitching and careful supervision remain important.
How long does the project take to complete?
The construction time depends on the size, number of patchwork sections, and amount of hand embellishment. A simplified version may be completed in one day, while a detailed deer with quilting, lace, embroidery, and pearl trim may require several sewing sessions. Working in stages—pattern preparation, patchwork assembly, quilting, construction, and decoration—helps maintain accuracy and makes the process more enjoyable.
Conclusion
The Patchwork Deer Complete Sewing and Quilting Fabric Pattern brings together fabric selection, accurate piecing, appliqué, light quilting, careful assembly, and decorative finishing in one creative project. You learned how to plan the silhouette, divide it into colorful patchwork sections, add seam allowances, choose coordinated quilting cotton, construct the body and facial features, stabilize the narrow areas, and finish the deer with professional details.
EASILY FIND THE PDF FOR THIS PATTERN HERE!
The design can be adapted for different sizes, color palettes, skill levels, and decorative purposes, making it a versatile addition to any sewing collection. Whether you prefer a simple fabric appliqué or an elaborate wall ornament with lace and pearl accents, careful preparation will help you achieve a polished result. Please leave your sincere opinion about this project and share suggestions for other colors, embellishments, or patchwork animals you would enjoy creating.