
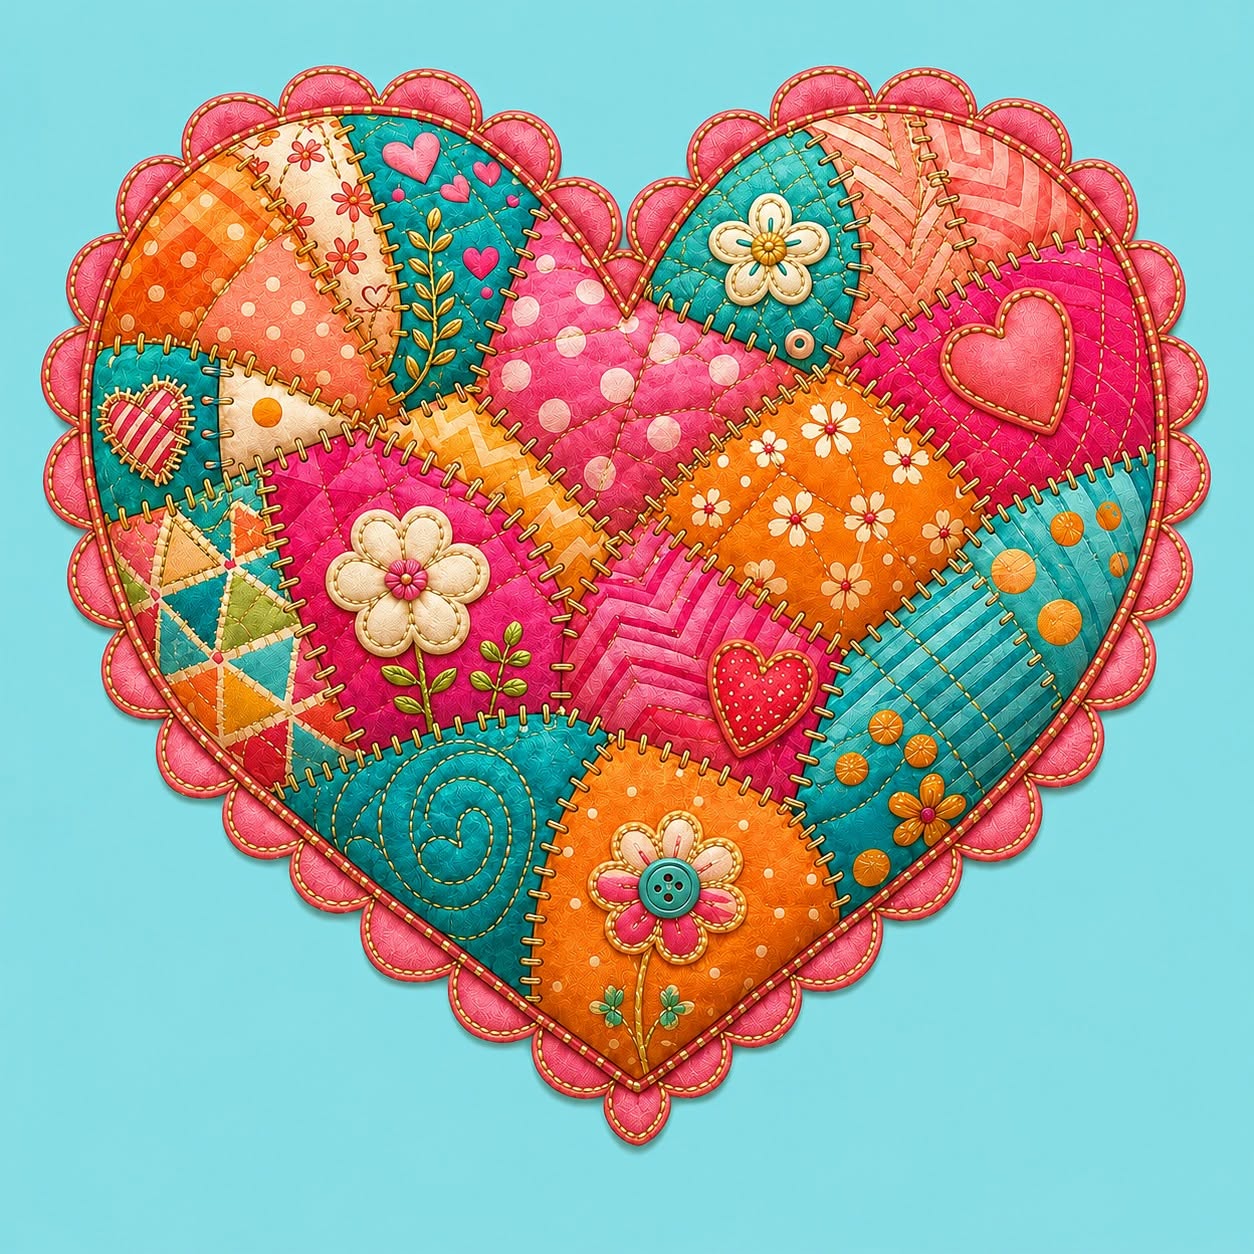
Patchwork Heart Quilt Tutorial Pattern is a cheerful sewing project that combines colorful fabric scraps, decorative stitching, quilting, appliqué, and a charming scalloped border in one memorable design. Inspired by the heart-shaped textile piece shown in the image, this tutorial explains how to transform small pieces of cotton fabric into a decorative quilted heart filled with flowers, smaller hearts, geometric prints, buttons, and embroidered details. The finished project can be displayed as wall art, used as a table decoration, turned into a small pillow, or offered as a handmade gift for someone special. Because the design is assembled from separate fabric sections, it is also an excellent opportunity to reuse treasured scraps left over from previous sewing projects.
The main idea behind the Patchwork Heart Quilt Tutorial Pattern is to create a strong heart-shaped foundation and gradually cover it with irregular fabric patches. Each patch contributes a different color, texture, or print, while visible decorative stitches bring all the sections together. The example uses an energetic combination of pink, turquoise, orange, coral, cream, and yellow, but the color palette can easily be personalized. A romantic version might include red, blush, and ivory fabrics, while a country-style heart could feature gingham, denim, florals, and warm neutral tones. The most important goal is to choose fabrics that create contrast without making the design feel visually disconnected.
This project is suitable for confident beginners as well as experienced quilters who enjoy creative freedom. Precise traditional blocks are not required because the fabric pieces can be arranged organically within the heart silhouette. However, careful cutting, secure stitching, and balanced placement are still essential for achieving a polished result. Throughout this tutorial, the term patchwork refers to the technique of joining different fabric pieces into a larger design, while quilting refers to stitching through the top fabric, batting, and backing layers. The word pattern describes the heart template and the general arrangement used to guide the construction.
Materials, Fabric Selection, and Heart Pattern Preparation
Begin by gathering quilting cotton in several coordinating colors and prints. For a design similar to the photo, select bright pink, turquoise, orange, coral, cream, and golden yellow fabrics. Include a mixture of polka dots, flowers, stripes, geometric shapes, chevrons, and solid or lightly textured materials. Small scraps are ideal for this Patchwork Heart Quilt Tutorial Pattern, although each piece should be large enough to cover part of the heart foundation with a small amount of overlap.
DISCOVER MORE FREE PATTERNS HERE!
You will also need low-loft cotton batting, backing fabric, paper for the template, fabric scissors, paper scissors, pins or temporary fabric adhesive, coordinating thread, embroidery floss, a hand-sewing needle, and a sewing machine. Optional materials include small buttons, felt pieces, fabric flowers, fusible web, fabric markers, and decorative trims. Choose embellishments that are washable and securely attached, especially when the project will be handled frequently.
To create the heart template, fold a large sheet of paper in half and draw one half of a heart along the folded edge. Cut through both layers and unfold the paper to reveal a symmetrical shape. The heart can be any size, but a width of approximately 40 to 50 centimeters produces enough space for several attractive fabric sections. Adjust the curves until both upper lobes appear smooth and the lower point is centered.
Place the paper heart on the batting and trace around it. Cut the batting slightly larger than the template so that the layers can be trimmed accurately after quilting. Repeat the process with the backing fabric, leaving approximately 2 to 3 centimeters of extra material around every edge. The additional fabric provides room for shifting and makes the final trimming stage easier.
Before cutting the patchwork sections, arrange your selected fabrics beside one another and evaluate the overall balance. Avoid placing too many similar prints in the same area. Alternate busy patterns with quieter fabrics, and distribute the strongest colors throughout the heart. In the photographed design, turquoise, orange, and pink are repeated in several locations, which helps the composition feel unified rather than random.
Trace the paper heart onto a lightweight foundation fabric, such as muslin or plain cotton. This foundation will support the individual patches and help preserve the shape during construction. Cut the foundation directly on the traced line. Mark a light vertical guideline through the center and a horizontal guideline near the widest part of the heart. These marks can help you distribute the patches and decorations evenly.
Cutting and Arranging the Colorful Patchwork Sections
Start building the patchwork heart by placing one fabric piece near the center of the foundation. A central pink section works well because it immediately establishes the romantic theme. The piece can have curved, angled, or irregular edges, depending on the style you prefer. Allow it to extend beyond the area it will cover so neighboring patches can overlap it slightly.
Add a second piece beside the first, placing the fabrics with their right sides together along the joining edge. Sew a narrow seam, open the new piece, and press it flat. Continue using this sew-and-flip method to cover the foundation. Some pieces may be triangular, while others can resemble curved wedges or uneven rectangles. The varied shapes give the Patchwork Heart Quilt Tutorial Pattern its handmade personality.
Work gradually from the center toward the outer edges. Each new piece should completely cover the exposed foundation beneath it. When using lightweight fabric, consider applying a small amount of fusible interfacing to prevent stretching. Press after every seam, but avoid pulling the fabric or distorting the heart. A small craft iron can be especially useful when working around narrow sections.
Let several seam lines radiate from the center or move diagonally across the heart. Curved pieces can be added, but gentle curves are easier to manage than sharp ones. For a beginner-friendly method, create mostly straight or slightly angled seams and use decorative stitching later to soften the appearance. The visual interest will come from the combination of prints, colors, and embellishments.
Step back occasionally and examine the design from a distance. Confirm that bright orange, turquoise, and deep pink areas are distributed across the entire heart. If one side looks heavier, add a strong contrasting fabric to the opposite side. Balance does not require perfect symmetry; it simply means that no single area appears noticeably empty, dark, or overcrowded.
Once the foundation is fully covered, turn the work over and use the original heart shape as a cutting guide. Trim away all fabric extending beyond the foundation. Keep the outer curve smooth and preserve the centered bottom point. At this stage, the project should already resemble a complete patchwork heart quilt, although the quilting, surface decorations, and scalloped border will add much more dimension.
Quilting, Decorative Stitches, and Appliqué Embellishments
Place the backing fabric with its wrong side facing upward, position the batting on top, and center the completed patchwork heart over the batting with the right side facing upward. Smooth all three layers carefully. Secure them with curved safety pins, quilting pins, or temporary basting spray. Begin in the center and work outward to remove wrinkles and prevent fabric shifting.
Quilt each fabric section using simple lines that complement its print. Straight lines look attractive on striped and geometric fabrics, while gentle curves work well on floral sections. Polka-dot fabric can be quilted diagonally to create a diamond effect. Maintain an even stitch length and avoid quilting too close to the heart’s outer edge, where the binding or border will later be attached.
Decorative seam stitching is one of the most recognizable features of this Patchwork Heart Quilt Tutorial Pattern. Use a blanket stitch, whipstitch, cross stitch, or another embroidery-inspired stitch along the visible joins. These stitches may be sewn by machine or by hand. Contrasting thread makes the seams stand out, while coordinating thread creates a softer and more refined finish.
Create small appliqué hearts from felt or cotton fabric backed with fusible web. Cut several sizes and position them in open spaces throughout the design. Fuse them according to the product instructions, then stitch around each shape using a blanket stitch. A layered heart can be created by placing a smaller heart over a larger base. Add neat topstitching around both pieces for extra depth.
Fabric flowers are another important decorative element. Cut five rounded petals, arrange them in a circle, and place a small fabric circle or button in the center. Stitch securely through all the layers. Alternatively, draw a simple flower on paper, cut it out, and use it as an appliqué template. Add embroidered stems and leaves to connect the flowers naturally to the patchwork background.
Complete the surface with a few carefully chosen accents. Sew small buttons onto selected flower centers, embroider a spiral in one turquoise patch, or add tiny running stitches around a heart appliqué. Every embellishment should support the design rather than overwhelm it. Leave some areas relatively simple so the viewer’s eye can rest between the more detailed sections.
Creating the Scalloped Border and Finishing the Quilt
The scalloped pink border gives the finished heart a soft, playful outline. To make it, create a paper template shaped like a rounded tab with a straight base. Cut enough matching fabric pieces to surround the heart. Each scallop can be made from two fabric layers sewn right sides together along the curved edge, leaving the straight base open for turning.
Clip the curved seam allowances carefully without cutting the stitches. Turn each scallop right side out and press it flat. Topstitch around the curved edge with white or contrasting thread to imitate the decorative stitched look shown in the image. Prepare several extra scallops so you can test the spacing before attaching them permanently.
Arrange the scallops around the wrong side of the patchwork heart with the rounded portions pointing inward and the raw bases aligned with the heart’s edge. After stitching, the scallops will be turned outward. Pin them closely together, adjusting the overlap around the upper curves and lower point. Baste the pieces in place using a narrow seam allowance.
Prepare a bias binding strip long enough to follow the entire heart outline. Bias-cut fabric is important because it bends smoothly around curved edges. Join shorter strips diagonally, press the seams open, and fold the binding in half lengthwise. Pink fabric with tiny dots, checks, or a subtle print creates a charming transition between the patchwork center and scalloped border.
Sew the binding around the front edge of the heart, catching the scallop bases in the seam. Work slowly around the curves and stop with the needle down whenever you need to reposition the fabric. Fold the binding over the raw edge toward the back and stitch it by hand using small slip stitches. Check that no batting or unfinished fabric remains visible.
Give the completed Patchwork Heart Quilt Tutorial Pattern a final press from the back, protecting dimensional flowers and buttons from direct heat. Add a hanging loop if the piece will be displayed on a wall. For a small pillow, create a second heart-shaped backing, sew it to the decorated front with right sides together, leave an opening, insert stuffing, and close the opening securely by hand.
Frequently Asked Questions
What is the best fabric for a patchwork heart quilt?
Quilting cotton is usually the best choice because it is stable, easy to cut, comfortable to sew, and available in many colors and patterns. Similar-weight cotton fabrics can be combined successfully. Very stretchy, slippery, or heavy fabrics may be more difficult for beginners to control.
Can I make this project entirely by hand?
Yes. The patches can be joined with small backstitches, while quilting and decorative seams can be completed with running stitch, blanket stitch, or whipstitch. Hand sewing takes longer, but it creates a charming artisanal appearance that suits this design beautifully.
How large should each patchwork piece be?
There is no fixed size because the design is intentionally varied. Medium pieces between approximately 6 and 15 centimeters are easy to arrange. Include a few larger pieces to establish the main color areas and smaller pieces to fill narrow spaces near the edges.
Do I need to wash the fabrics before sewing?
Prewashing is recommended when the project may be washed in the future. It removes excess dye and allows the fabric to shrink before construction. When using only high-quality quilting cotton from the same collection, some makers choose not to prewash, but consistent fabric preparation is important.
What type of batting should I use?
Low-loft cotton or cotton-blend batting works well because it gives the heart gentle structure without making it excessively bulky. Fusible fleece can also be used for a firmer wall decoration. Thick polyester batting may make small decorative stitches and curved binding more difficult.
How do I prevent the heart from becoming uneven?
Use a symmetrical paper template, build the patchwork on a stable foundation, and trim the shape only after all patches are attached. Avoid stretching the bias edges while sewing. Frequent pressing and careful basting will also help maintain a smooth, balanced outline.
Can I make the scalloped border without turning individual pieces?
Yes. Felt scallops can be cut as a continuous border and attached directly because felt does not fray easily. Another option is to use purchased scalloped trim. However, individually sewn fabric scallops create a fuller, softer finish that closely matches the project in the image.
Which stitches are most suitable for the visible patchwork seams?
Blanket stitch, feather stitch, herringbone stitch, whipstitch, and cross stitch are all attractive options. A sewing machine with decorative stitch settings can reproduce a similar effect quickly. Test the stitch on scrap fabric first to confirm the tension, width, and thread color.
How can I personalize the Patchwork Heart Quilt Tutorial Pattern?
Add embroidered names, meaningful dates, initials, tiny pockets, lace, ribbons, fabric from special clothing, or colors associated with a particular person. Personal items should be clean, stable, and suitable for sewing. Thoughtful details can turn the heart into a keepsake for weddings, anniversaries, birthdays, or family celebrations.
Can this heart pattern be enlarged to create a full quilt?
Yes. The heart can become the central panel of a larger wall quilt, baby quilt, or bed quilt. Surround it with plain borders, patchwork blocks, or additional appliqué motifs. When enlarging the design, use multiple sheets of paper joined together to create an accurate full-size template.
Conclusion
The Patchwork Heart Quilt Tutorial Pattern combines fabric selection, foundation patchwork, layered quilting, visible decorative stitching, appliqué, embroidery, buttons, curved binding, and a scalloped border in one colorful project. You learned how to prepare a symmetrical heart template, arrange contrasting scraps, secure the quilt layers, embellish the surface, and finish the outer edge neatly.
EASILY FIND THE PDF FOR THIS PATTERN HERE!
Although the design contains many details, it can be completed gradually, one fabric section and one decorative element at a time. Use the colors from the image as inspiration or create a completely personal palette that reflects your home, a special occasion, or the recipient of the finished piece. Please leave your sincere opinion about this tutorial and share suggestions for colors, stitches, embellishments, or future patchwork projects you would enjoy making.