
Mini Crochet Crossbody Bag Pattern is a timeless and practical project that combines style, creativity, and functionality into one beautiful handmade accessory. Whether you are an experienced crocheter or someone looking to improve your skills, this Mini Crochet Crossbody Bag Pattern offers an enjoyable project that results in a fashionable bag perfect for everyday use. The textured stitches, colorful striped design, and compact size make this pattern an excellent choice for gifting, selling at craft fairs, or adding a handmade touch to your wardrobe. Throughout this guide, you will learn every step required to create this charming crochet bag while improving your crochet techniques.
Crocheting a crossbody bag is much more than making an accessory. It is an opportunity to practice stitch consistency, shape construction, color transitions, flap creation, and strap reinforcement. This project uses simple stitches arranged carefully to produce a durable fabric that can easily support daily essentials such as a phone, wallet, keys, and small personal items. The beauty of the Mini Crochet Crossbody Bag Pattern lies in its simplicity, making it approachable while still producing a professional-looking result.
One of the biggest advantages of this project is its versatility. You can customize the colors, choose different yarn fibers, modify the strap length, or even add decorative buttons and embellishments. Although this tutorial is inspired by a rustic striped design, the instructions are adaptable to virtually any color palette. By following the step-by-step crochet instructions below, you’ll gain confidence while creating a handmade bag that is both practical and stylish.
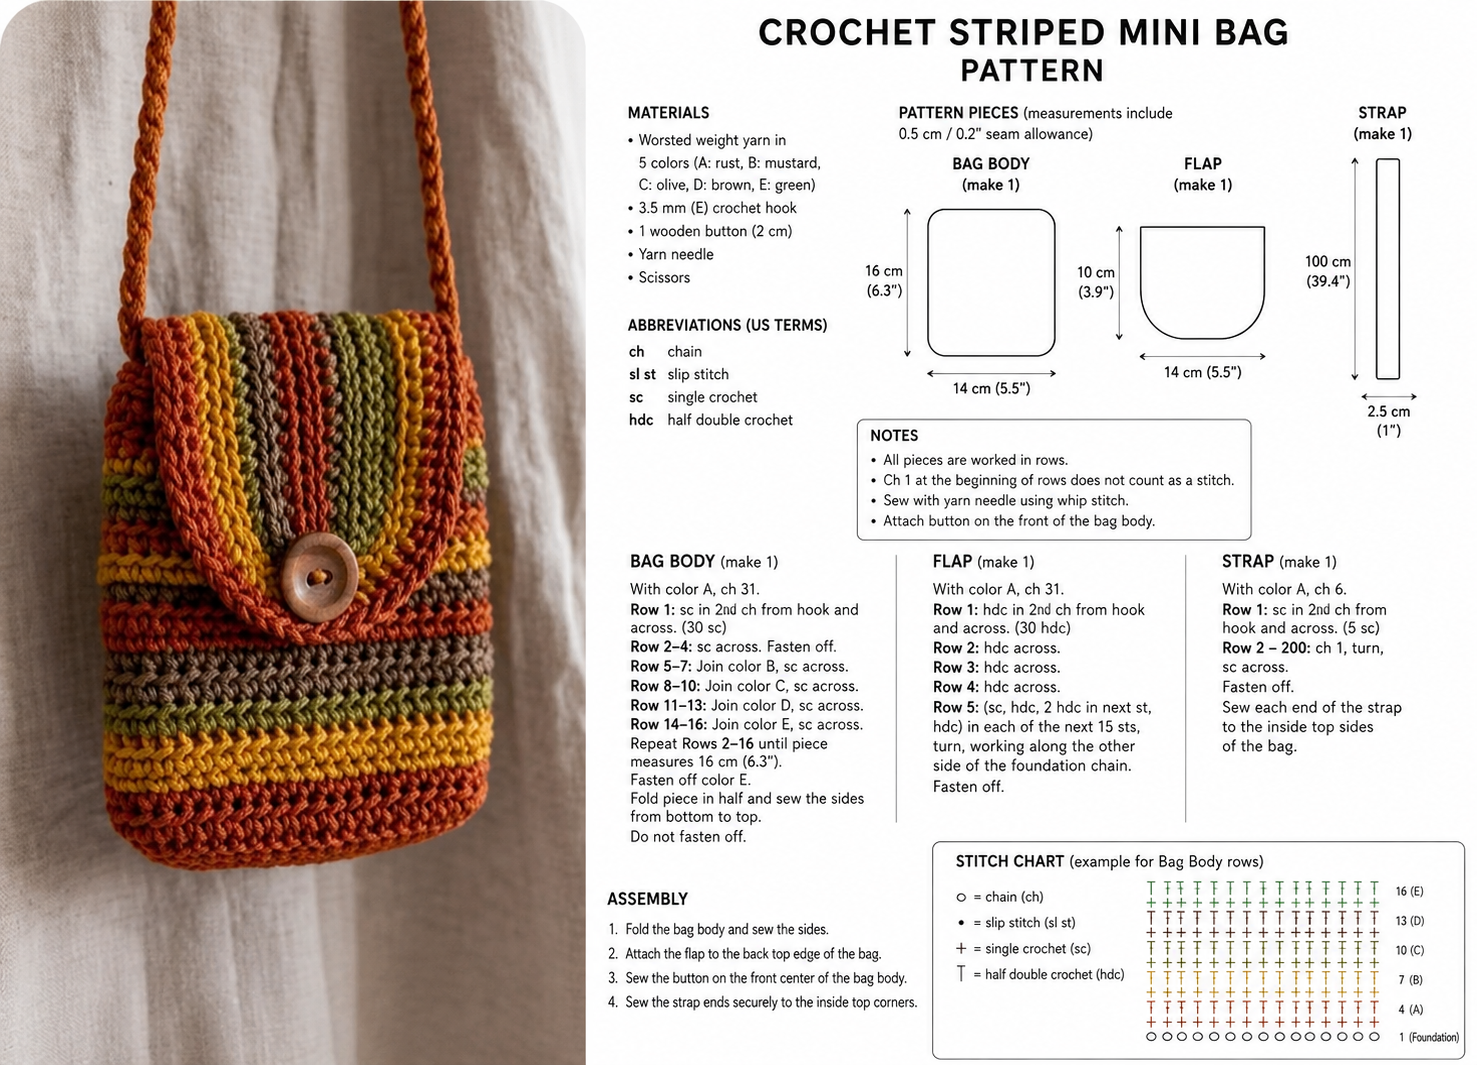
Materials, Crochet Stitches, and Project Preparation
Before beginning your Mini Crochet Crossbody Bag Pattern, gather all necessary materials. Medium-weight cotton yarn is highly recommended because it produces a durable, structured fabric while maintaining beautiful stitch definition. Cotton also stretches less than acrylic, helping the finished bag keep its shape during regular use.
DISCOVER MORE FREE PATTERNS HERE!
You will need approximately 200–250 grams of worsted-weight cotton yarn. Feel free to combine warm autumn shades, earthy neutrals, or bright modern colors to create your own striped design. The sample shown uses alternating rust, mustard, olive green, taupe, and brown shades for a cozy appearance.
Use a 4.0 mm (G) crochet hook for most worsted-weight cotton yarns. Adjust your hook size if necessary to achieve a dense fabric with minimal gaps. A firm fabric prevents small objects from slipping through the stitches.
Additional supplies include a yarn needle for weaving in ends, scissors, one medium decorative button measuring approximately 1 inch (2.5 cm), several stitch markers, and a measuring tape to monitor the project dimensions throughout construction.
The primary crochet stitches used in this Mini Crochet Crossbody Bag Pattern include Chain (ch), Slip Stitch (sl st), Single Crochet (sc), Half Double Crochet (hdc), and Single Crochet Increase (2 sc in one stitch). These basic stitches make the project suitable for confident beginners while creating an attractive textured surface.
Always crochet a small gauge swatch before beginning the project. Although this pattern is forgiving, maintaining consistent tension helps ensure the finished bag measures approximately 7 inches tall and 6 inches wide before adding the strap.
Step-by-Step Crochet Instructions for the Bag Body
Begin by making a foundation chain of 25 chains. This foundation creates the width of your bag. Add one turning chain before working into the second chain from the hook.
Row 1: Work one Single Crochet (sc) into each chain across the row. You should finish with 25 single crochet stitches. Chain one and turn your work.
Rows 2 through 30: Continue working one Single Crochet (sc) into every stitch across each row. Change yarn colors every two or three rows to create beautiful horizontal stripes. Fasten off each color neatly and weave in the ends as you continue.
Once the rectangle reaches approximately 16 inches in length, fold it so the lower portion becomes the front and back of the bag while leaving the remaining section to form the front flap. The flap should measure about one-third of the total rectangle length.
Using matching yarn, join the sides by working Single Crochet (sc) through both front and back layers simultaneously. Continue along each side, creating a strong seam that reinforces the structure of the finished bag. Leave the top edge completely open.
Now crochet one complete round of Single Crochet (sc) around the opening of the bag. This edging smooths the top and prepares the bag for attaching the strap. Finish with one Slip Stitch and fasten off.
Creating the Rounded Flap and Crochet Strap
Locate the flap section that extends beyond the folded bag. Mark the center using a stitch marker. This portion becomes the signature rounded flap that gives the Mini Crochet Crossbody Bag Pattern its elegant appearance.
Row 1 of the flap: Attach yarn to one corner and work Single Crochet (sc) evenly across the width of the flap. Chain one and turn.
Rows 2–6: Continue working one Single Crochet (sc) in every stitch across. At the beginning and end of every second row, crochet two stitches together (sc2tog) to gradually shape gentle curves.
Continue decreasing evenly on both sides until the flap forms a rounded edge. Finish by crocheting one complete edging round using Slip Stitches or Reverse Single Crochet (Crab Stitch) for additional texture and durability.
To make the shoulder strap, create a foundation chain measuring approximately 44–48 inches, depending on your preferred wearing length. Ensure the chain comfortably reaches across the body from shoulder to hip.
Work one Single Crochet (sc) into every chain across the entire length of the strap. Repeat one additional row of Single Crochet to strengthen the strap. Sew each end securely to the inside upper corners of the bag using multiple passes of yarn for maximum durability.
Finishing Details, Assembly, and Personalization
Position the decorative button on the center front of the bag approximately one inch below the flap edge. Sew the button securely using strong matching yarn or sewing thread.
Create the button loop by making a short chain of approximately 8–10 chains attached to the center of the flap. Test the loop around the button before fastening permanently to ensure a comfortable closure.
Carefully inspect every seam and woven yarn end. Secure all loose ends inside the bag using a yarn needle. Proper finishing significantly improves both appearance and long-term durability.
If you prefer additional structure, sew a lightweight cotton fabric lining inside the finished bag. A lining protects the crochet stitches from stretching and prevents smaller items from slipping through the fabric.
Personalize your Mini Crochet Crossbody Bag Pattern by adding wooden buttons, leather labels, tassels, decorative beads, embroidered flowers, or contrasting border colors. Small details allow every finished bag to become completely unique.
After completing your project, gently block the bag using light steam or damp blocking methods suitable for cotton yarn. Blocking evens the stitches, improves shape consistency, and gives the finished accessory a polished handmade appearance.
FAQ
Is this Mini Crochet Crossbody Bag Pattern suitable for beginners?
Yes. The project primarily uses basic crochet stitches such as Chain, Single Crochet, Slip Stitch, and simple decreases, making it ideal for beginners who already understand basic crochet techniques.
What yarn works best for this pattern?
Cotton yarn is the best choice because it provides durability, excellent stitch definition, and minimal stretching, helping the bag maintain its shape over time.
Can I use acrylic yarn instead?
Yes, although acrylic yarn tends to stretch more. If using acrylic, choose a tighter gauge and consider adding a fabric lining for extra support.
How long does it take to complete the project?
Most crocheters can complete the bag in one or two days, depending on their experience level and the amount of uninterrupted crafting time available.
Can I adjust the size of the bag?
Absolutely. Simply increase or decrease the starting foundation chain and add or remove rows while maintaining the same construction method.
How do I make the strap longer?
Increase the foundation chain until you reach your preferred crossbody length before working the rows of Single Crochet.
Should I line the bag?
While optional, adding a fabric lining greatly improves durability, especially if you plan to carry heavier personal items.
How do I clean the finished crochet bag?
Hand wash gently using mild detergent in cool water. Reshape the bag while damp and allow it to air dry flat to preserve its original dimensions.
Can I sell bags made from this pattern?
Yes. Handmade bags created from your own work can typically be sold at craft fairs, local markets, or online, provided you use your own photos and descriptions.
What decorative options work well?
Wooden buttons, faux leather labels, tassels, colorful stripes, embroidered motifs, and contrasting borders all complement the finished Mini Crochet Crossbody Bag Pattern beautifully.
Conclusion
This Mini Crochet Crossbody Bag Pattern demonstrated how to create a stylish and practical handmade accessory using simple crochet stitches and straightforward construction techniques. Throughout this guide, you learned how to choose suitable materials, crochet the main body, shape the rounded flap, create a sturdy shoulder strap, assemble all components, and personalize the finished bag with creative finishing touches. Even though the project uses beginner-friendly stitches, the final result has a polished, professional appearance that is perfect for everyday use or as a thoughtful handmade gift.
EASILY FIND THE PDF FOR THIS PATTERN HERE!
With patience, consistent stitch tension, and careful finishing, you can create a durable crochet bag that reflects your personal style while improving your crochet skills. Every completed project becomes a unique piece of handmade craftsmanship that can be enjoyed for years to come. If you found this tutorial helpful, please leave your honest opinion in the comments and share your suggestions. Your feedback helps improve future crochet patterns and inspires even more creative projects for the crochet community.