
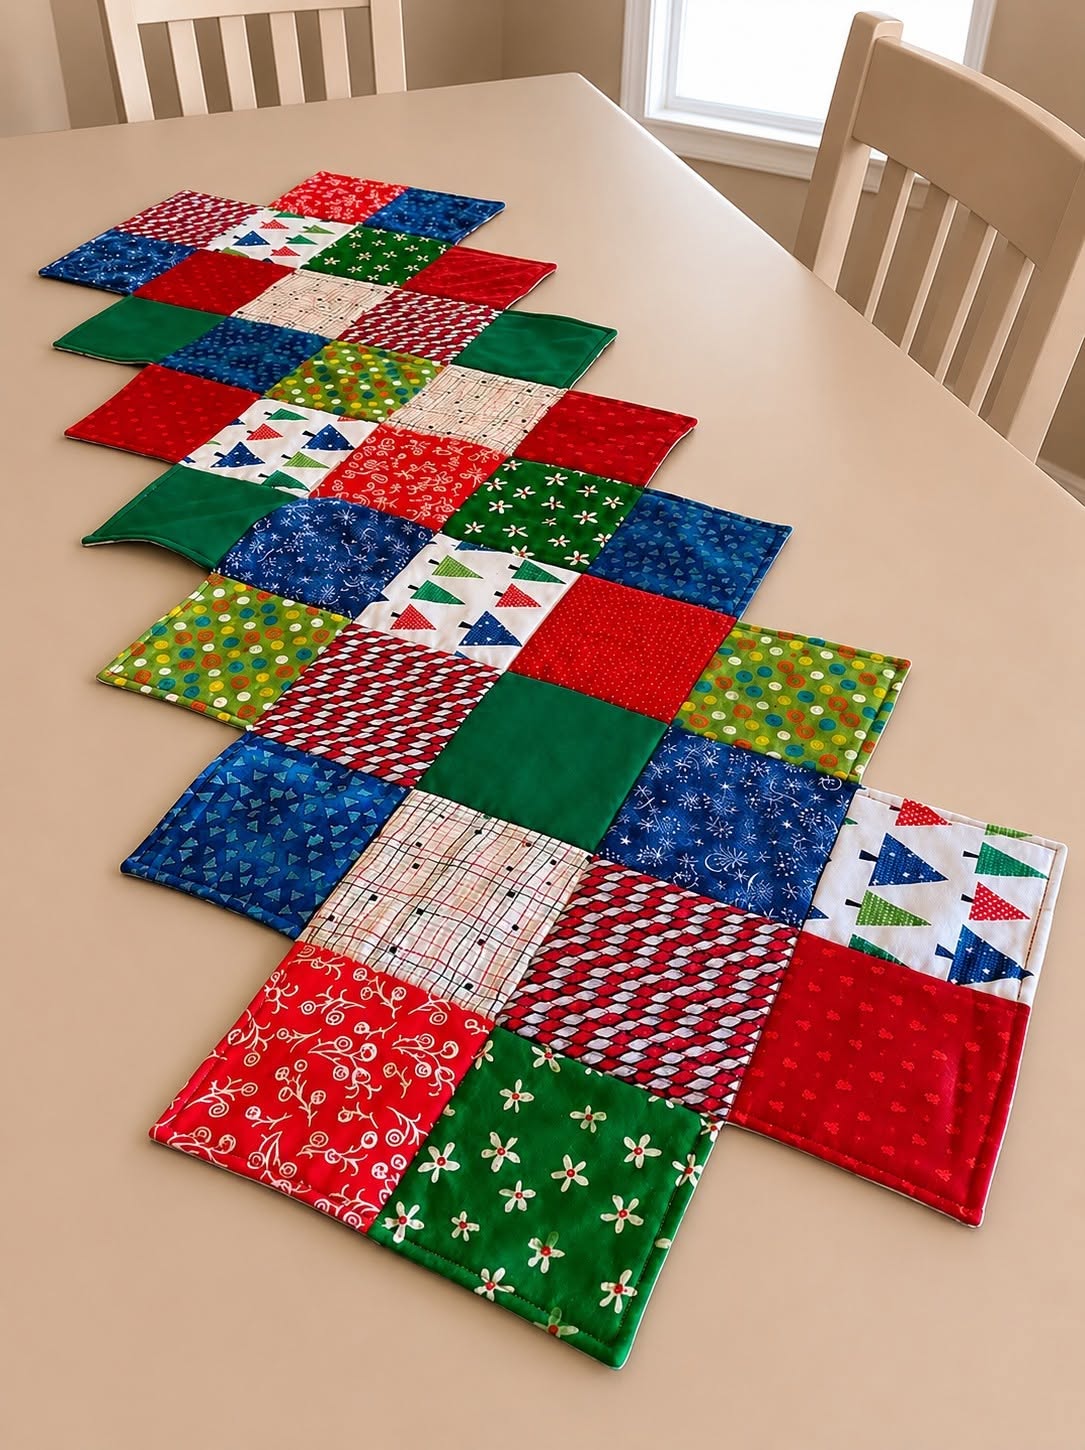
Patchwork table runner tutorial Fabric Pattern is a creative sewing project that transforms small fabric squares into a colorful and practical decoration for the dining room. Inspired by the table runner shown in the photo, this design features a playful arrangement of red, green, blue, white, and patterned fabric blocks. The alternating squares create movement across the table while maintaining the warm, handmade appearance associated with traditional patchwork. This project is especially appealing during the holiday season, although the same construction method can be adapted to different colors and used throughout the year. By selecting coordinating cotton fabrics and carefully assembling each section, you can create a runner that looks decorative, balanced, and professionally finished.
One of the best qualities of this patchwork table runner is its flexible construction. Instead of following a narrow rectangular shape, the blocks are arranged in an offset layout that produces a gentle zigzag effect along the sides. This unusual silhouette makes the project visually interesting without requiring advanced sewing techniques. Beginners can practice accurate cutting, straight seams, pressing, layering, and topstitching while experienced quilters can personalize the runner with decorative quilting. The finished piece can protect a wooden table from minor scratches, highlight a seasonal centerpiece, or simply add color to an everyday dining area. Because the design is made from relatively small pieces, it is also an excellent fabric-scrap project.
Following a reliable Fabric Pattern helps keep the squares aligned and prevents the runner from becoming distorted during construction. The most important factors are choosing one consistent square size, maintaining the same seam allowance, and pressing every seam before joining larger sections. For the version in the photograph, festive prints featuring trees, flowers, dots, geometric designs, and solid colors work beautifully together. However, you can replace them with farmhouse prints, spring florals, autumn tones, or modern neutral fabrics. This complete Patchwork table runner tutorial Fabric Pattern explains the materials, cutting plan, block arrangement, assembly process, quilting, finishing, and common questions so that you can confidently recreate the project from beginning to end.
Materials, Measurements, and Fabric Preparation
Begin by collecting several coordinating quilting cotton fabrics. The photographed runner uses an assortment of approximately eight to twelve prints in red, green, blue, cream, and white. Using multiple designs gives the piece its cheerful scrap-quilt appearance. Choose fabrics with a similar weight so that the finished surface remains smooth and balanced. Avoid combining very thin cotton with heavy upholstery fabric, since different weights can make accurate sewing and pressing more difficult.
DISCOVER MORE FREE PATTERNS HERE!
For a medium-sized runner, cut approximately 30 squares measuring 5 x 5 inches each. With a ¼-inch seam allowance, each finished square will measure about 4½ inches. This produces a table runner that is roughly 22 to 25 inches wide at its widest points and approximately 55 to 65 inches long, depending on the final arrangement. You may add or remove rows to adapt the Fabric Pattern to the dimensions of your table.
You will also need backing fabric and batting. After assembling the patchwork top, measure it and cut the backing and batting approximately 1 to 2 inches larger on every side. Cotton batting is a good choice because it provides gentle structure without making the runner excessively thick. A low-loft polyester batting may also be used when you prefer a slightly fuller appearance.
Additional supplies include cotton sewing thread, a sewing machine, a rotary cutter, a cutting mat, a quilting ruler, straight pins or fabric clips, an iron, and an ironing surface. A walking foot is helpful during the quilting stage because it feeds the top, batting, and backing through the machine evenly. However, the project can still be completed with a standard presser foot when the layers are carefully pinned.
Wash and dry the fabrics before cutting when you expect the table runner to be washed regularly. Prewashing helps reduce the risk of shrinkage and color bleeding later. Press every fabric piece before measuring it because wrinkles can affect the accuracy of the squares. If you prefer the slightly crinkled appearance of a traditional quilt, you may work with unwashed quilting cotton and wash the runner after it is finished.
Accurate cutting is essential in this patchwork table runner tutorial. Place the fabric on the cutting mat, straighten one edge, and use the quilting ruler to cut clean strips. Turn the strips and cut them into equal squares. Measure several pieces before beginning the arrangement. Even a small difference between squares can accumulate across multiple rows and cause the patchwork top to curve or twist.
Arranging and Sewing the Patchwork Squares
Before sewing, place all the fabric squares on a large table or clean floor. Arrange them in offset rows to reproduce the irregular zigzag silhouette shown in the photo. A practical layout can alternate rows containing three squares with rows containing four or five squares. Shift each row slightly to the left or right so the outer edges form decorative steps rather than one straight rectangle.
Distribute colors evenly throughout the patchwork table runner. Try not to place too many red, blue, or green squares directly beside one another. Separate bold prints with calmer designs or solid fabrics. White squares with festive motifs can serve as visual resting points between stronger colors. Step away from the layout occasionally and observe the entire runner rather than focusing on individual pieces.
Taking a photo of the arrangement before sewing is extremely useful. Once the squares are moved to the sewing machine, it is easy to forget their original positions. You may also label each row with a small paper number. Stack the squares from each row in order, keeping every row separate until it has been completely assembled.
Join the squares in each row using a consistent ¼-inch seam allowance. Place two squares with right sides together, align their edges, and sew a straight seam. Add the next square in the same manner until the row is complete. Do not pull the fabric while sewing because stretching can distort the blocks. Allow the feed dogs of the sewing machine to move the pieces naturally.
Press the seams after completing each row. For easier nesting, press the seams of the first row toward the right, the seams of the second row toward the left, and continue alternating directions. When two rows are placed together, the seam allowances will lock against one another. This technique helps the corners of the squares meet more accurately and reduces bulky intersections.
Join the completed rows according to your photographed layout. Place two rows with right sides together, match the block intersections, and secure them with pins or clips. Sew slowly across the row, checking that the offset sections remain correctly positioned. Continue adding rows until the entire Patchwork table runner tutorial Fabric Pattern top is assembled. Press the final seams carefully without stretching the outer edges.
Layering, Quilting, and Finishing the Runner
Place the backing fabric on a clean surface with its wrong side facing upward. Smooth it completely and secure the corners temporarily with tape when necessary. Position the batting over the backing, followed by the patchwork top with its right side facing upward. This three-layer combination is commonly called a quilt sandwich.
Smooth the layers from the center toward the edges to remove wrinkles and trapped air. Pin or baste the layers every 3 to 4 inches. Pay special attention to the stepped outer edges because they can shift more easily than the center. The backing and batting should extend beyond the patchwork top on all sides during the quilting process.
For simple quilting, sew approximately ⅛ to ¼ inch away from each seam line. This method is often called stitching in the ditch or echo quilting, depending on the exact placement of the stitches. Following the patchwork grid emphasizes the individual squares and complements the geometric style. Begin near the center and gradually work outward to distribute the fabric evenly.
Another option is to quilt diagonal lines across the squares. Use a removable fabric marker and ruler to draw the guidelines before sewing. Diagonal quilting adds movement and helps secure the larger blocks. Decorative free-motion quilting can also be used, but simple straight lines are usually more appropriate for beginners completing their first Fabric Pattern project.
After quilting, trim the excess batting and backing so they follow the stepped shape of the patchwork top. Work slowly around every corner and indentation. A rotary cutter offers clean results on straight sections, while sharp fabric scissors may be easier around smaller areas. Check that the top remains flat before beginning the edge finish.
Finish the runner with binding or with a turned-edge method. Binding gives the strongest and most traditional quilt finish. Cut 2½-inch fabric strips, join them end to end, press the long strip in half, and sew it around the outer edge. Because this design has several corners, stop at each turn and form a neat miter. Fold the binding to the back and secure it by machine or with small hand stitches.
Frequently Asked Questions About a Patchwork Table Runner
What is the best fabric for a patchwork table runner? Quilting cotton is usually the best option because it is stable, easy to cut, and available in many coordinating prints. It also presses well and can withstand regular washing. For consistent results, use fabrics with similar fiber content and weight throughout the project.
How many fabric squares are needed for this Fabric Pattern? A medium runner similar to the photographed design generally requires between 25 and 35 squares. The exact number depends on the selected square size, the length of the table, and the number of offset rows. Arrange paper squares first when you want to test the dimensions without wasting fabric.
Can beginners complete this Patchwork table runner tutorial Fabric Pattern? Yes. The project is suitable for confident beginners because it mainly uses straight cutting and straight seams. The stepped arrangement may look complicated, but it is created simply by changing the position and number of squares in each row. Accurate measuring and consistent seam allowances are more important than advanced sewing experience.
Should a table runner contain batting? Batting is recommended because it gives the runner shape, protects the table, and improves the appearance of the quilting. Low-loft cotton batting creates a flat, elegant finish. For a very lightweight runner, fusible fleece or a layer of heavy interfacing may be substituted, although the finished texture will be different.
How can I prevent the patchwork squares from becoming uneven? Cut every square with the same ruler, maintain a ¼-inch seam allowance, and press the seams after each construction stage. Alternating the direction of the pressed seams makes the intersections easier to match. Avoid aggressively ironing back and forth; instead, lift and lower the iron to prevent stretching.
Can this pattern be adapted for other seasons? Absolutely. Use pastel florals for spring, yellow and blue prints for summer, orange and brown fabrics for autumn, or neutral linen-inspired colors for everyday décor. The construction of the patchwork table runner remains the same, so the entire appearance can be changed simply by selecting a new fabric collection.
Conclusion
This Patchwork table runner tutorial Fabric Pattern demonstrates how equal fabric squares can be transformed into an eye-catching decoration through thoughtful color placement and an offset arrangement. The main steps include selecting coordinating quilting cotton, cutting accurate squares, planning the complete layout, sewing individual rows, matching the intersections, and pressing each seam carefully. Once the patchwork top is assembled, backing, batting, quilting, trimming, and binding provide structure and create a durable finished piece.
EASILY FIND THE PDF FOR THIS PATTERN HERE!
The project is both practical and customizable, making it a rewarding choice for using fabric scraps or creating seasonal home décor. You can adjust the square dimensions, change the number of rows, experiment with new color combinations, or add decorative quilting to make the design entirely your own. After completing your runner, please leave your sincere opinion about the tutorial and share suggestions for future patchwork projects or improvements you would like to see.