
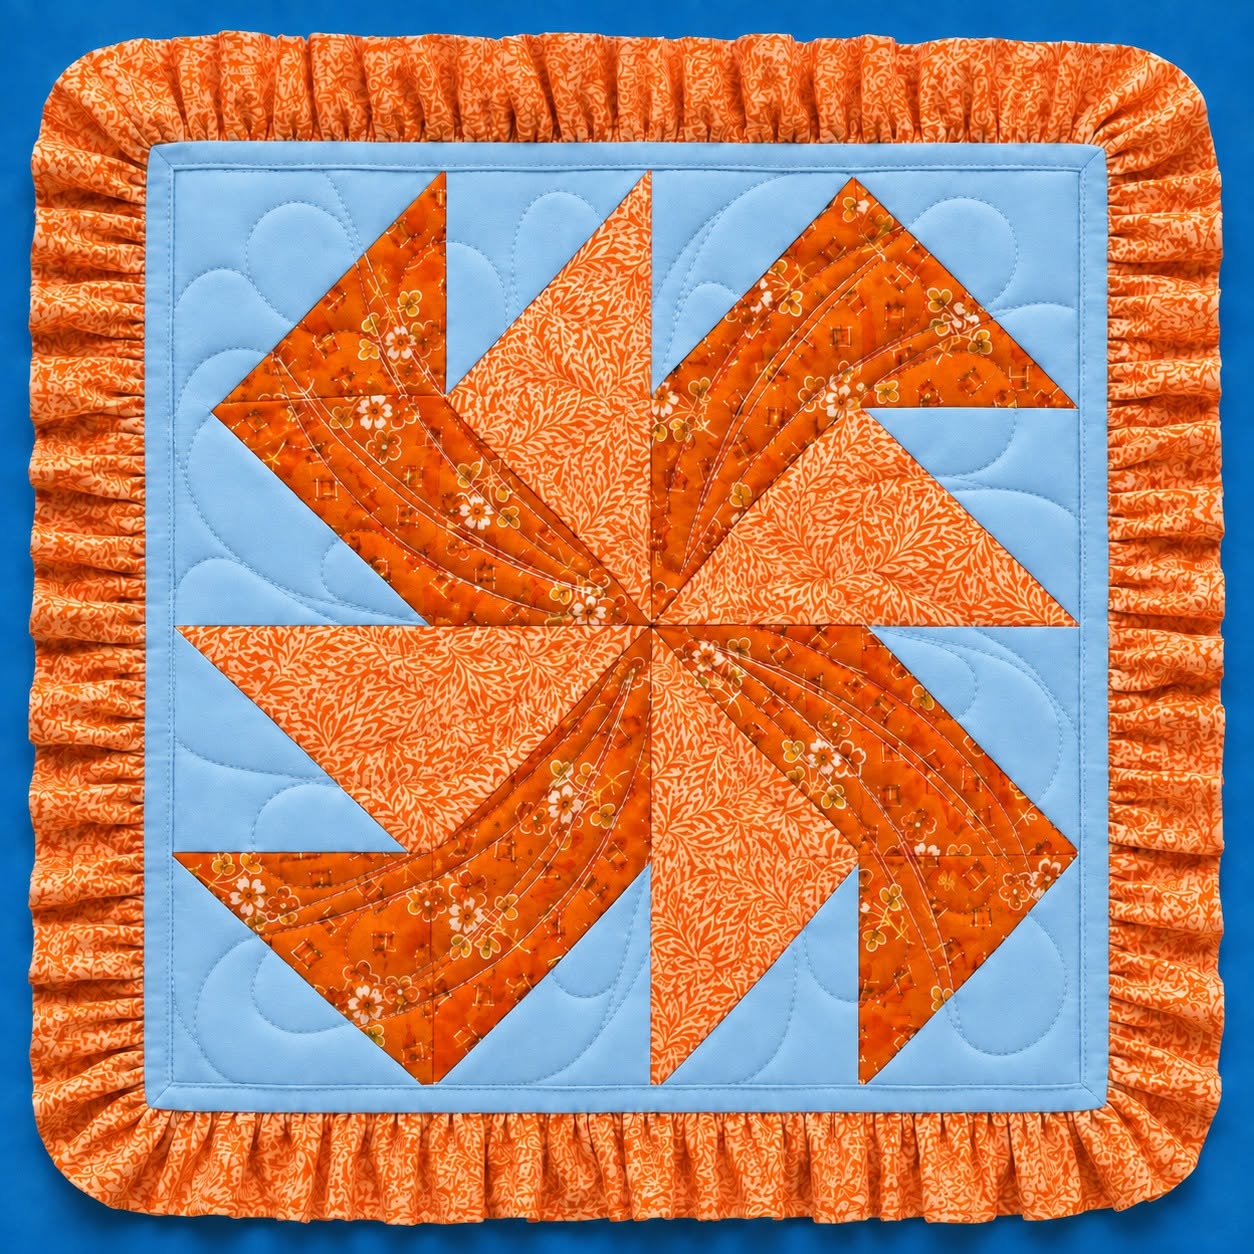
The Orange Pinwheel Mini Quilt Tutorial Pattern is a cheerful sewing project that combines traditional patchwork, curved decorative quilting, and a gathered fabric ruffle. Inspired by the photographed piece, this design features four rotating pinwheel sections made with two coordinating orange prints and a soft cream background. The combination creates movement without making the finished mini quilt look overly complicated. Although the arrangement appears detailed, it can be constructed from familiar geometric units, including triangles, rectangles, and folded fabric sections. With careful cutting and accurate seams, even a confident beginner can recreate the project successfully.
This orange pinwheel mini quilt can be used as a decorative table topper, sewing-room wall hanging, dresser mat, or handmade seasonal accent. Its warm color palette works beautifully for summer, autumn, Thanksgiving décor, or any room that needs an energetic handmade detail. The gathered ruffle surrounding the central quilt adds softness and dimension, creating a charming finish that resembles a framed textile artwork. You can follow the suggested measurements or adjust them to make a larger quilt, pillow cover, or placemat. The most important part is maintaining the four-part rotation that gives the pinwheel its recognizable shape.
Throughout this Orange Pinwheel Mini Quilt Tutorial Pattern, you will learn how to select coordinating fabrics, prepare the patchwork pieces, assemble the rotating blocks, create a quilt sandwich, add decorative stitching, and attach the gathered border. Every stage contributes to the polished appearance of the final design. Accurate pressing is just as important as accurate sewing because flat seams help all four sections meet neatly in the center. Take your time, check the direction of each unit before stitching, and enjoy watching a collection of simple fabric shapes turn into a vibrant quilted project.
Materials, Fabric Selection, and Project Preparation
For the central design, choose two orange quilting cottons that are different enough to remain visible beside one another. The photographed project uses one brighter print with a light leafy texture and one darker orange print featuring small floral details. This contrast is essential because it defines the rotating sections of the Orange Pinwheel Mini Quilt Tutorial Pattern. You will also need a cream or light beige fabric for the background, narrow binding, and a coordinating orange print for the gathered ruffle.
DISCOVER MORE FREE PATTERNS HERE!
A practical finished size for the central quilted square is approximately 16 by 16 inches, not including the ruffle. The completed ruffle may add about 2½ to 3½ inches around every side, depending on its cut width and fullness. These measurements can be changed, but all four quadrants must remain equal. Before cutting, wash and dry the fabric using the same method you expect to use for the finished quilt. Prewashing helps prevent unexpected shrinkage and removes excess manufacturing finishes.
Prepare approximately half a yard of each orange print, one yard of cream background fabric, and about one yard of fabric for the ruffle. You may need extra material if you prefer a particularly full gathered edge. For the backing, cut a square several inches larger than the patchwork top. You will also need low-loft cotton batting, neutral sewing thread, orange quilting thread if desired, a rotary cutter, an acrylic ruler, a cutting mat, pins or clips, and a sewing machine.
The term pinwheel quilt pattern describes a design in which geometric fabric units appear to rotate around a central point. Traditional pinwheels are often constructed from half-square triangles, but this project uses longer pointed shapes and layered directional sections to create a more dramatic spinning effect. The visual movement depends on color placement. Before sewing, arrange all the pieces on a table so that the darker and lighter orange sections consistently turn in the same direction.
Use a sharp rotary blade to obtain straight, clean edges. Inaccurate cutting can cause the points to shift and prevent the sections from meeting correctly. A quarter-inch presser foot is useful because the entire patchwork top should be assembled with a consistent ¼-inch seam allowance. If your machine does not have this foot, mark the correct seam position with removable tape. Test the seam on scrap fabric and measure the sewn unit before beginning the main project.
Label the four main quadrants as A, B, C, and D. You can also label the individual pieces with small paper notes placed on the wrong side of the fabric. This simple organizational step prevents accidental rotation during assembly. Take a quick reference photo of your layout before carrying the pieces to the sewing machine. The photograph will help you restore the intended arrangement whenever the units become mixed or turned in the wrong direction.
Cutting and Constructing the Four Pinwheel Sections
Begin by dividing the central design into four equal quadrants. For a 16-inch finished center, each quadrant should finish at approximately 8 inches square. Because seam allowances are required, construct each quadrant slightly larger and trim it to the exact unfinished measurement afterward. Each quadrant contains cream background sections, a bold darker orange pointed section, and a lighter orange triangular section. Templates made from paper or lightweight cardboard can simplify the cutting process and improve consistency.
To draft the darker orange shape, study the design as a long folded or angled point that begins near the outside corner and narrows toward the center. Draw the shape on paper first, then add a ¼-inch seam allowance around every edge. Cut four identical pieces from the darker orange floral fabric. Flip the template whenever necessary so the shapes rotate rather than all pointing in the same direction. Mark the center-facing end of every piece with a small removable dot.
Create the lighter orange pieces as broad triangles that occupy the neighboring space in each quadrant. Their widest edges should align with the outer portions of the block, while their tips approach the central intersection. Add the same ¼-inch seam allowance before cutting four pieces from the lighter print. Depending on your preferred piecing method, these sections may be constructed from one large triangle or from two smaller pieces joined together. Keep the printed design facing consistently upward while arranging them.
Cut the cream background pieces to fill the remaining areas of each quadrant. Some sections can be cut as rectangles and trimmed after assembly, while others may require triangles. Cutting the background slightly oversized is helpful because the angled seams can introduce minor distortion. The cream fabric creates negative space and allows the orange pieces to stand out clearly. It also provides a calm surface for the decorative curved quilting that appears behind the pinwheel points.
Sew each quadrant from the smallest internal sections outward. Place two pieces right sides together, align the raw edges, pin carefully, and stitch with a ¼-inch seam allowance. Press the seam before adding the next piece. Pressing toward the darker fabric usually prevents the seam allowance from showing through the cream background. When several seams meet, press some allowances open to reduce bulk. Avoid stretching the bias edges of the triangular pieces while handling or pressing them.
After all the parts of one quadrant are joined, place it on the cutting mat and trim it square. Repeat the same process for the remaining three quadrants, checking their orientation after every major seam. When placed side by side, the four orange points should appear to rotate around the center. This repeating construction is the foundation of the Orange Pinwheel Mini Quilt Tutorial Pattern, so pause and correct any reversed unit before joining the quadrants permanently.
Joining, Quilting, and Defining the Pinwheel Design
Arrange the four completed quadrants in two rows. Rotate them until the darker orange shapes sweep around the center in a continuous circular direction. The lighter orange triangles should alternate with the darker sections and create a balanced secondary pattern. Examine the center carefully because all major points will meet there. A slight variation is normal in handmade patchwork, but accurate pinning can keep the intersection neat and prevent the design from looking uneven.
Sew the two upper quadrants together and then join the two lower quadrants. Press the center seams in opposite directions so they will nest when the rows are connected. Place the two rows right sides together, match the central seam, and insert a pin directly through the intersection. Add more pins along the remaining edge and sew slowly. Open the quilt top and check the center before pressing. Restitch the area immediately when the match needs improvement.
Trim the joined top into a precise square while preserving at least ¼ inch beyond the outer tips of the orange shapes. This space protects the points when the border is attached. Add a narrow cream frame around the patchwork if you would like to match the finished appearance in the photograph. Cut four strips approximately 1½ inches wide, sew the side strips first, and then add the top and bottom strips. Press the new seams away from the central design.
Cut the backing and batting about two inches larger than the quilt top on every side. Place the backing wrong side up, center the batting on it, and position the patchwork top right side up. Smooth each layer from the center toward the edges. Baste the sandwich with curved safety pins, temporary basting spray, or long hand stitches. Secure basting is particularly helpful when quilting curved lines because it prevents the layers from shifting or developing puckers.
Quilt several graceful curved lines inside the darker orange sections to emphasize their movement. Start near the central point and guide each line outward, following the long shape of the fabric. Additional soft loops or cloud-like curves can be stitched in the cream background. These lines do not need to be identical. Their purpose is to add texture and support the spinning visual effect of the orange pinwheel quilt pattern while holding all three quilt layers securely together.
Once the decorative quilting is complete, stitch around the outside edge of the patchwork top approximately ⅛ inch from the raw edge. This stabilizing seam keeps the layers together during border construction. Trim the excess backing and batting so they are even with the quilt top. Check the square from every direction and correct any uneven edges. A clean, stable central panel will make the gathered ruffle easier to attach and produce a more professional final result.
Creating the Gathered Ruffle and Finishing the Mini Quilt
To make the ruffle, cut several fabric strips across the width of the coordinating orange print. Strips between 4 and 5 inches wide create a generous finished ruffle when folded in half. Join the strips with diagonal seams to reduce bulky connections. You will need a continuous length measuring approximately two to three times the perimeter of the quilted center. A longer strip creates deeper gathers, while a shorter strip gives the border a softer, less dramatic fullness.
Press the long joined strip in half lengthwise with the wrong sides together. The folded edge will become the finished outer edge of the ruffle, so no separate hem is necessary. Sew two parallel rows of long basting stitches along the raw edges. Leave long thread tails at the beginning and end, and do not backstitch. Gently pull the bobbin threads to form even gathers, distributing the fullness gradually rather than pulling from only one end.
For rounded corners like those in the photographed project, concentrate a little extra fullness near each corner. Pin or clip the gathered strip around the quilted panel with the raw edges aligned. The ruffle should face inward over the front of the quilt while it is being sewn. Adjust the gathers until they look balanced on all four sides. Join the beginning and end of the strip neatly, hiding the connection in one of the less noticeable areas.
Stitch the ruffle to the quilt using a ¼-inch seam allowance. Sew slowly through the gathered layers and remove pins before they reach the presser foot. Check frequently to make sure the folded portion of the ruffle is not accidentally caught under the stitching. After sewing, gently press the ruffle away from the quilt center. Use only the tip of the iron near the gathers so their fullness and texture are not flattened.
Cover the attachment seam with narrow binding or a fabric facing. For a visible framed effect, make double-fold binding from the cream fabric and stitch it around the edge of the central quilt. Mitered corners produce a traditional square frame, while softly rounded corners complement the gathered border. Sew the binding to the front by machine, fold it over the seam, and finish it on the back with hand stitches or a narrow machine seam.
Complete the Orange Pinwheel Mini Quilt Tutorial Pattern by trimming loose threads and gently shaping the ruffle with your hands. Add a hanging sleeve to the back when the project will be displayed on a wall. For table use, make sure the backing lies flat and that no pins remain inside the quilt. A light press from the back can smooth the central panel without crushing the gathered border. Your finished project should feel bright, dimensional, and full of handcrafted personality.
Frequently Asked Questions
What skill level is needed for the Orange Pinwheel Mini Quilt Tutorial Pattern?
This project is suitable for an adventurous beginner or intermediate quilter. Basic experience with rotary cutting, ¼-inch seams, pressing, and simple machine quilting will be helpful. Beginners can practice the pointed units with scrap fabric before cutting their chosen prints. The gathered ruffle requires patience, but it does not require advanced sewing techniques.
Can I make the pinwheel using only half-square triangles?
Yes. A simplified variation can be constructed from half-square triangle units arranged in four rotating quadrants. The result will look more traditional and may not include the long sweeping orange sections visible in the original project. Half-square triangles are an excellent alternative for anyone who prefers standard rotary-cut shapes instead of handmade templates.
How can I make the central points meet accurately?
Accurate cutting, consistent seam allowances, and careful pressing are the three most important factors. Sew the quadrants into pairs, press the adjoining seams in opposite directions, and nest them before joining the rows. Insert a pin directly through the central intersections. You can also shorten the machine stitch length near the center to strengthen the seam and improve control.
Why are my quilt blocks becoming distorted?
Many triangular pieces have bias edges, which can stretch easily. Avoid pulling them while sewing, pressing, or moving them between work areas. Use an up-and-down pressing motion rather than sliding the iron across the fabric. Cutting the quadrants slightly oversized and trimming them after assembly can also correct small distortions.
How much fabric is needed for the gathered ruffle?
The exact quantity depends on the size of the center and the fullness you prefer. Measure the perimeter of the quilt and multiply it by two for moderate gathers or by three for very full gathers. Add several extra inches for joining the ends. Cutting the strips across the fabric width is usually the easiest and most economical method.
Can the ruffle be removed from the design?
Absolutely. The patchwork center can be finished with ordinary quilt binding for a cleaner and more modern appearance. You can also replace the ruffle with a flat border, prairie points, scalloped binding, or a wider cream frame. Removing the ruffle may make the mini quilt more practical as a placemat or small table topper.
What type of batting works best for this mini quilt?
Low-loft cotton or an 80/20 cotton-polyester blend works well because it provides structure without making the piece excessively thick. Thin batting also keeps the central seams manageable and allows the decorative quilting to remain visible. Very high-loft batting may create too much volume beside the full gathered border.
Should I quilt before or after attaching the ruffle?
Quilt the central panel before adding the ruffle. This order allows you to move the quilt freely under the sewing machine without the gathered fabric getting in the way. After quilting, trim and stabilize the panel, attach the ruffle, and cover the raw attachment seam with binding or facing.
Can I wash the finished mini quilt?
Yes, provided all the fabrics and batting are washable. Use a gentle cycle with cold water and a mild detergent. Place the project inside a laundry bag to protect the ruffle, or hand wash it carefully. Reshape the border while damp and allow the quilt to air-dry flat. Avoid aggressive wringing, which could distort the gathered edge.
How can I adapt this pattern to other colors or seasons?
Replace orange with any combination that offers clear contrast. Red and green can create a Christmas project, blue and white can produce a fresh coastal design, and gold, brown, and burgundy can emphasize an autumn theme. The cream background can also be exchanged for pale gray, white, or another quiet neutral that allows the pinwheel to remain the focal point.
Conclusion
The Orange Pinwheel Mini Quilt Tutorial Pattern combines precise patchwork with playful finishing details. In this tutorial, you learned how to select contrasting orange fabrics, draft and cut the rotating shapes, construct four matching quadrants, join the central intersection, create a stable quilt sandwich, add curved decorative quilting, and finish the project with a full gathered ruffle. Each stage builds upon the previous one, turning basic cotton fabrics into a textured and colorful handmade decoration.
EASILY FIND THE PDF FOR THIS PATTERN HERE!
Remember that successful quilting does not depend on absolute perfection. Consistent seams, careful pressing, and thoughtful color placement are more important than making every point mathematically exact. Use the suggested construction as a foundation, then personalize the measurements, quilting lines, fabric prints, and border style. After completing your own Orange Pinwheel Mini Quilt Tutorial Pattern, please leave an honest opinion about the tutorial and share your suggestions for future quilt patterns and sewing projects.